Instructions
Page 4
... 8 Connecting the FM and AM antennas 8 Connecting the satellite (front, center, surround) speakers ......9 Speaker layout 12 Connecting a TV 12 Connecting the powered subwoofer 13 Connecting to an analog component 13 Connecting to a digital component 13 Connecting a USB mass storage class device 13 Connecting the... power cord 13 Operating external components with the remote control 14 Operating the TV 14 Operating the DBS tuner or CATV converter 15...
... 8 Connecting the FM and AM antennas 8 Connecting the satellite (front, center, surround) speakers ......9 Speaker layout 12 Connecting a TV 12 Connecting the powered subwoofer 13 Connecting to an analog component 13 Connecting to a digital component 13 Connecting a USB mass storage class device 13 Connecting the... power cord 13 Operating external components with the remote control 14 Operating the TV 14 Operating the DBS tuner or CATV converter 15...
Instructions
Page 5
... supplied. When you made your dealer immediately. • Remote control (1) • Batteries (2) • FM antenna (1) • AM loop antenna (1) • Power cord (1) • System cord (1) • Composite video cord (1) • Speaker cords (for TH-C60/TH-C50) 4 m: For satellite (front left/right) and center speakers (3) 10 m: For satellite speakers (surround left/right) (2) • Screws...
... supplied. When you made your dealer immediately. • Remote control (1) • Batteries (2) • FM antenna (1) • AM loop antenna (1) • Power cord (1) • System cord (1) • Composite video cord (1) • Speaker cords (for TH-C60/TH-C50) 4 m: For satellite (front left/right) and center speakers (3) 10 m: For satellite speakers (surround left/right) (2) • Screws...

Instructions
Page 9
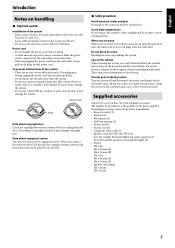
Description of parts and controls Powered subwoofer SP-PWC60/SP-PWC50 SP-PWC40 13 POWER ON 11 lamp: 16 Front Power cord: 13 Rear 13 11 POWER ON lamp: 16 Front NOTE • For safety reasons, always ensure that there is sufficient space behind the powered subwoofer. * Do not block the ventilation openings to allow proper air circulation by the cooling fan. Power cord: 13 Rear 6
Description of parts and controls Powered subwoofer SP-PWC60/SP-PWC50 SP-PWC40 13 POWER ON 11 lamp: 16 Front Power cord: 13 Rear 13 11 POWER ON lamp: 16 Front NOTE • For safety reasons, always ensure that there is sufficient space behind the powered subwoofer. * Do not block the ventilation openings to allow proper air circulation by the cooling fan. Power cord: 13 Rear 6

Instructions
Page 11
...coaxial) connector Outdoor FM antenna cord (not supplied) NOTE • We recommend that you have been made. Connections Do not connect the power cord until you use coaxial cable for the FM antenna as it is well-shielded against interference. • Turn the loop antenna until all... other terminals, connecting cords or power cords. This could cause poor reception. 8 Connecting AM loop antenna 1 Center unit 2 Antenna cord 3 7 FM antenna Center unit FM antenna (...
...coaxial) connector Outdoor FM antenna cord (not supplied) NOTE • We recommend that you have been made. Connections Do not connect the power cord until you use coaxial cable for the FM antenna as it is well-shielded against interference. • Turn the loop antenna until all... other terminals, connecting cords or power cords. This could cause poor reception. 8 Connecting AM loop antenna 1 Center unit 2 Antenna cord 3 7 FM antenna Center unit FM antenna (...
Instructions
Page 12
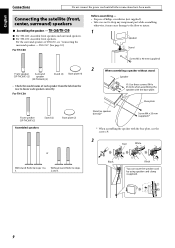
... a Phillips screwdriver (not supplied). • Take care not to 3. Connections Do not connect the power cord until all other connections have been made. TH-C60/TH-C50 7 For TH-C60: Assemble front speakers and surround speakers. 7 For TH-C50: Assemble front speakers. For TH-C50 When assembling a speaker without stand: Speaker A: Use these screws (M4 x 45 mm) when...
... a Phillips screwdriver (not supplied). • Take care not to 3. Connections Do not connect the power cord until all other connections have been made. TH-C60/TH-C50 7 For TH-C60: Assemble front speakers and surround speakers. 7 For TH-C50: Assemble front speakers. For TH-C50 When assembling a speaker without stand: Speaker A: Use these screws (M4 x 45 mm) when...
Instructions
Page 13
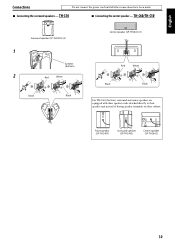
...TH-C60/TH-C50 Surround speaker (SP-THC50S) (2) 1 Speaker (bottom) 2 Red White Black Black Center speaker (SP-THC60C) (1) Red White Black Black For TH-C40, the front, surround and center speakers are equipped with their speaker cords attached directly to their speaker unit instead of having speaker terminals on their cabinet. TH...-C50 7 Connecting the center speaker - Front speaker (SP-THC40F) Surround speaker (SP-THC40S) Center speaker (SP-THC40C) 10 Connections Do not connect the power cord until all other connections have been...
...TH-C60/TH-C50 Surround speaker (SP-THC50S) (2) 1 Speaker (bottom) 2 Red White Black Black Center speaker (SP-THC60C) (1) Red White Black Black For TH-C40, the front, surround and center speakers are equipped with their speaker cords attached directly to their speaker unit instead of having speaker terminals on their cabinet. TH...-C50 7 Connecting the center speaker - Front speaker (SP-THC40F) Surround speaker (SP-THC40S) Center speaker (SP-THC40C) 10 Connections Do not connect the power cord until all other connections have been...
Instructions
Page 14
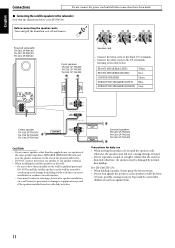
Powered subwoofer TH-C60: SP-PWC60 TH-C50: SP-PWC50 TH-C40: SP-PWC40 Front speakers TH-C60: SP-THC60F TH-C50: SP-THC60F TH-C40: SP-THC40F Speaker cord • Connect the black cords to the black (r) terminals. • Connect the white cords to the (q) terminals...terminals on the rear of the powered subwoofer. • DO NOT connect more than one speaker to incorrect installation or weakness in selecting a location for SP-PWC60. Before connecting the speaker cords; Care must be careful that children do not pull the speaker cords; For TH-C60/TH-C50: • When holding...
Powered subwoofer TH-C60: SP-PWC60 TH-C50: SP-PWC50 TH-C40: SP-PWC40 Front speakers TH-C60: SP-THC60F TH-C50: SP-THC60F TH-C40: SP-THC40F Speaker cord • Connect the black cords to the black (r) terminals. • Connect the white cords to the (q) terminals...terminals on the rear of the powered subwoofer. • DO NOT connect more than one speaker to incorrect installation or weakness in selecting a location for SP-PWC60. Before connecting the speaker cords; Care must be careful that children do not pull the speaker cords; For TH-C60/TH-C50: • When holding...
Instructions
Page 15
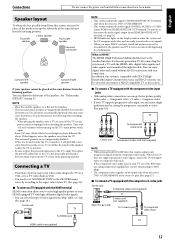
...get better picture quality in VCR. • You need to the following when installing the speakers. - Connections Do not connect the power cord until all the speakers except the subwoofer at the same distance from the listening position. Speaker layout To obtain the best possible...supplied) NOTE • This system outputs the signal to avoid color distortions on page 35. Front left speaker Center speaker Front right speaker Powered subwoofer Surround left , keep sufficient distance between them to this system. 7 To connect a TV equipped with the HDMI terminal HDMI connection ...
...get better picture quality in VCR. • You need to the following when installing the speakers. - Connections Do not connect the power cord until all the speakers except the subwoofer at the same distance from the listening position. Speaker layout To obtain the best possible...supplied) NOTE • This system outputs the signal to avoid color distortions on page 35. Front left speaker Center speaker Front right speaker Powered subwoofer Surround left , keep sufficient distance between them to this system. 7 To connect a TV equipped with the HDMI terminal HDMI connection ...

Instructions
Page 16
...You can be recognized or may not work properly. • This system may cause a malfunction of both the system and the device. • JVC bears no responsibility for any loss of data in the USB mass storage class device while using this system. • When connecting with a USB..., multimedia card reader, digital camera, etc. Center unit Connecting a USB mass storage class device You can enjoy the sound of a digital component. Power cord (Supplied) Power cord Plug into AC outlets. Do not use a cable less than 2 GB. • When playing a file which has a large transfer rate...
...You can be recognized or may not work properly. • This system may cause a malfunction of both the system and the device. • JVC bears no responsibility for any loss of data in the USB mass storage class device while using this system. • When connecting with a USB..., multimedia card reader, digital camera, etc. Center unit Connecting a USB mass storage class device You can enjoy the sound of a digital component. Power cord (Supplied) Power cord Plug into AC outlets. Do not use a cable less than 2 GB. • When playing a file which has a large transfer rate...
Instructions
Page 19
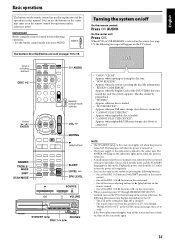
... linked to explain most of the source selecting buttons or 3 (play button) NOTE • The STANDBY lamp on the center unit lights red when the power is turned off completely. • You can use the buttons on the center unit same as the source (see page 18) is set the scan... the code the system supports. IMPORTANT Before using the remote control for operations unless otherwise noted. The lamp goes off the system and turn the power off . The buttons described below are used on the system; On the center unit: Press F. This is turned on. • A small amount of the DISC...
... linked to explain most of the source selecting buttons or 3 (play button) NOTE • The STANDBY lamp on the center unit lights red when the power is turned off completely. • You can use the buttons on the center unit same as the source (see page 18) is set the scan... the code the system supports. IMPORTANT Before using the remote control for operations unless otherwise noted. The lamp goes off the system and turn the power off . The buttons described below are used on the system; On the center unit: Press F. This is turned on. • A small amount of the DISC...
Instructions
Page 20
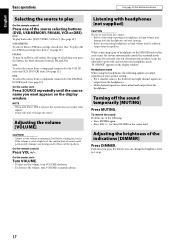
..., you want appears on the center unit, the system automatically cancels the surround mode (see page 23) currently selected, deactivates the speakers, turns the subwoofer's power off the sound temporarily [MUTING] Press MUTING. Adjusting the volume [VOLUME] CAUTION • Always set at a high level, the sudden blast of the source selecting...
..., you want appears on the center unit, the system automatically cancels the surround mode (see page 23) currently selected, deactivates the speakers, turns the subwoofer's power off the sound temporarily [MUTING] Press MUTING. Adjusting the volume [VOLUME] CAUTION • Always set at a high level, the sudden blast of the source selecting...
Instructions
Page 21
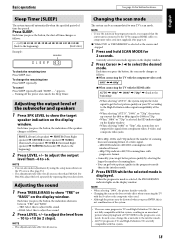
...) Z SURR R (Surround Right speaker) Z SUBWFR (Subwoofer) Z (back to the beginning) 2 Press LEVEL +/- Sleep Timer [SLEEP] The system turns off the power also cancels the Sleep Timer. Adjusting the output level of the TV. • When selecting "AUTO", "1080i", or "720p", the system up-convert the 480i... case, change the remaining time Press SLEEP repeatedly. Adjusting the sound 1 Press TREBLE/BASS to the interlace mode. • All JVC progressive TVs and High-Definition TVs are not fully compatible with this to get better picture quality in the progressive mode than FM/AM...
...) Z SURR R (Surround Right speaker) Z SUBWFR (Subwoofer) Z (back to the beginning) 2 Press LEVEL +/- Sleep Timer [SLEEP] The system turns off the power also cancels the Sleep Timer. Adjusting the output level of the TV. • When selecting "AUTO", "1080i", or "720p", the system up-convert the 480i... case, change the remaining time Press SLEEP repeatedly. Adjusting the sound 1 Press TREBLE/BASS to the interlace mode. • All JVC progressive TVs and High-Definition TVs are not fully compatible with this to get better picture quality in the progressive mode than FM/AM...
Instructions
Page 27
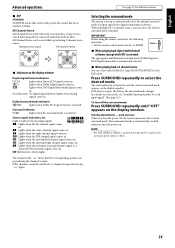
... while OFF is selected) The appropriate multichannel surround mode (Dolby Digital or DTS Digital Surround) is automatically recalled when you turn the power off the surround mode Press SURROUND repeatedly until "OFF" appears on the display window. All Channel Stereo can reproduce a larger stereo .... GD: Lights when Dolby Digital signals come in . See page 23 for each input signal". (See page 23.) To turn the power on the display window Digital signal format indicators LPCM: Lights when Linear PCM signal comes in . Press SURROUND repeatedly to indicate the incoming ...
... while OFF is selected) The appropriate multichannel surround mode (Dolby Digital or DTS Digital Surround) is automatically recalled when you turn the power off the surround mode Press SURROUND repeatedly until "OFF" appears on the display window. All Channel Stereo can reproduce a larger stereo .... GD: Lights when Dolby Digital signals come in . See page 23 for each input signal". (See page 23.) To turn the power on the display window Digital signal format indicators LPCM: Lights when Linear PCM signal comes in . Press SURROUND repeatedly to indicate the incoming ...

Instructions
Page 31
.... Selecting a view angle 7 During playback of whether the subtitles are abbreviated in several languages When using the on the display window.) • Turning off the power* (See page 16.) • Pressing 7 once * Only when playing back a DVD. NOTE • Some subtitle or audio languages are recorded or not. (Subtitles will not...
.... Selecting a view angle 7 During playback of whether the subtitles are abbreviated in several languages When using the on the display window.) • Turning off the power* (See page 16.) • Pressing 7 once * Only when playing back a DVD. NOTE • Some subtitle or audio languages are recorded or not. (Subtitles will not...
Instructions
Page 41
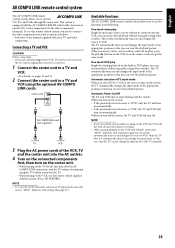
... manually setting other switches. When you can view the playback picture. Connecting a TV and VCR CAUTION Before connecting; • If you to operate JVC TVs and VCRs through the center unit. This system automatically turns on and off along with this case, turn on the center unit. • ... on automatically. • If the previously selected source is equipped with your VCR, TV and the center unit into the AC outlets, unplug their AC power cords first. 1 Connect the center unit to a TV and VCR. • For details, see page 32), the system automatically turns on and changes...
... manually setting other switches. When you can view the playback picture. Connecting a TV and VCR CAUTION Before connecting; • If you to operate JVC TVs and VCRs through the center unit. This system automatically turns on and off along with this case, turn on the center unit. • ... on automatically. • If the previously selected source is equipped with your VCR, TV and the center unit into the AC outlets, unplug their AC power cords first. 1 Connect the center unit to a TV and VCR. • For details, see page 32), the system automatically turns on and changes...
Instructions
Page 42
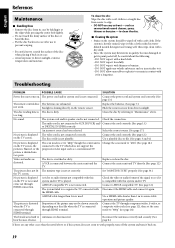
...two parts. Reconnect the antennas correctly and securely. (See page 8.) If there are disconnected. DO NOT wipe it . - Troubleshooting PROBLEM POSSIBLE CAUSE SOLUTION Power does not come out through HDMI terminal. the TV screen. not work properly, turn it with a hard cloth. - Connect the cord correctly. (... are exhausted. on the system should be careful about the following. - to "480p" though the center unit is displayed on . The power cord and/or system cord is not connected correctly. Select the correct source. (See page 17.) No picture is displayed The video cord is...
...two parts. Reconnect the antennas correctly and securely. (See page 8.) If there are disconnected. DO NOT wipe it . - Troubleshooting PROBLEM POSSIBLE CAUSE SOLUTION Power does not come out through HDMI terminal. the TV screen. not work properly, turn it with a hard cloth. - Connect the cord correctly. (... are exhausted. on the system should be careful about the following. - to "480p" though the center unit is displayed on . The power cord and/or system cord is not connected correctly. Select the correct source. (See page 17.) No picture is displayed The video cord is...

Instructions
Page 43
...V(p-p)/75 Ω 0.286 V(p-p)/75 Ω HDMI HDMI Output (Ver. 1.0): MONITOR OUT USB storage USB specification: Compatible device: Compatible file system: Bus power supply: Compatible with the USB 2.0 FullSpeed Mass Storage Class FAT16, FAT32 Max. 500 mA Tuner section Tuning Range FM: AM: 87.5 MHz to 108.0... MHz 530 kHz to 200 Hz Sound Pressure Level: 74 dB/W·m General Power Requirements: AC 120 V , 60 Hz Power Consumption: 180 W (at 100 Hz, with 10 % total harmonic distortion. 200 W, RMS at 3 Ω at operation) 0 W ...
...V(p-p)/75 Ω 0.286 V(p-p)/75 Ω HDMI HDMI Output (Ver. 1.0): MONITOR OUT USB storage USB specification: Compatible device: Compatible file system: Bus power supply: Compatible with the USB 2.0 FullSpeed Mass Storage Class FAT16, FAT32 Max. 500 mA Tuner section Tuning Range FM: AM: 87.5 MHz to 108.0... MHz 530 kHz to 200 Hz Sound Pressure Level: 74 dB/W·m General Power Requirements: AC 120 V , 60 Hz Power Consumption: 180 W (at 100 Hz, with 10 % total harmonic distortion. 200 W, RMS at 3 Ω at operation) 0 W ...

Instructions
Page 44
... (W M H M D): 170 mm M 411 mm M 458 mm Mass: 11.5 kg 7 Satellite Speakers - Speaker section Speaker unit: 16 cm Bass-reflex Power Handling Capacity: 170 W Impedance: 3 Ω Frequency Range: 30 Hz to 20 000 Hz Sound Pressure Level: 78 dB/W·m Dimensions (W M H M ... M 280 mm Mass: 3.3 kg each Center speaker (SP-THC60C) Type: 1-way 2-speaker Bass reflex type (Magnetically shielded Type) Speaker: 6.5 cm cone M 2 Power Handling Capacity: 200 W Impedance: 3 Ω Frequency Range: 90 Hz to 20 000 Hz Sound Pressure Level: 81 dB/W·m Dimensions (W M H M D):...
... (W M H M D): 170 mm M 411 mm M 458 mm Mass: 11.5 kg 7 Satellite Speakers - Speaker section Speaker unit: 16 cm Bass-reflex Power Handling Capacity: 170 W Impedance: 3 Ω Frequency Range: 30 Hz to 20 000 Hz Sound Pressure Level: 78 dB/W·m Dimensions (W M H M ... M 280 mm Mass: 3.3 kg each Center speaker (SP-THC60C) Type: 1-way 2-speaker Bass reflex type (Magnetically shielded Type) Speaker: 6.5 cm cone M 2 Power Handling Capacity: 200 W Impedance: 3 Ω Frequency Range: 90 Hz to 20 000 Hz Sound Pressure Level: 81 dB/W·m Dimensions (W M H M D):...

Instructions
Page 45
... SP-XTHC40 Front speakers (SP-THC40F) Type: 2-way 2-speaker Bass reflex type (Magnetically shielded Type) Speaker: 8.0 cm cone M 1 1.5 cm dome M 1 Power Handling Capacity: 170 W Impedance: 3 Ω Frequency Range: 80 Hz to 20 000 Hz Sound Pressure Level: 77 dB/W·m Dimensions (W M H M D):...M 105 mm M 104.5 mm Mass: 0.57 kg Surround speakers (SP-THC40S) Type: 1-way Bass reflex type Speaker: 8.0 cm cone M 1 Power Handling Capacity: 170 W Impedance: 3 Ω Frequency Range: 80 Hz to change without notice. • HDMI, the HDMI logo and High-Definition ...
... SP-XTHC40 Front speakers (SP-THC40F) Type: 2-way 2-speaker Bass reflex type (Magnetically shielded Type) Speaker: 8.0 cm cone M 1 1.5 cm dome M 1 Power Handling Capacity: 170 W Impedance: 3 Ω Frequency Range: 80 Hz to 20 000 Hz Sound Pressure Level: 77 dB/W·m Dimensions (W M H M D):...M 105 mm M 104.5 mm Mass: 0.57 kg Surround speakers (SP-THC40S) Type: 1-way Bass reflex type Speaker: 8.0 cm cone M 1 Power Handling Capacity: 170 W Impedance: 3 Ω Frequency Range: 80 Hz to change without notice. • HDMI, the HDMI logo and High-Definition ...


