
Instruction Manual
Page 2
.... . ...in an environment prone to the VCR, Remote or video cassette. 1. For your product dealer or local power company. Do not defeat the safety purpose of Conformity Model Number: SR-V101US Trade Name: JVC Responsible Party: JVC Americas Corp. Overloading Do not overload wall outlets, extension... the equipment. Wall or Ceiling Mounting The product should be equipped with Part 15 of Gemstar Development Corporation. However, S-VHS recordings are registered trademarks of FCC Rules. In conditions where condensation may be routed so that is subject to vibration. 2....
.... . ...in an environment prone to the VCR, Remote or video cassette. 1. For your product dealer or local power company. Do not defeat the safety purpose of Conformity Model Number: SR-V101US Trade Name: JVC Responsible Party: JVC Americas Corp. Overloading Do not overload wall outlets, extension... the equipment. Wall or Ceiling Mounting The product should be equipped with Part 15 of Gemstar Development Corporation. However, S-VHS recordings are registered trademarks of FCC Rules. In conditions where condensation may be routed so that is subject to vibration. 2....
Instruction Manual
Page 3
.... ● in a wet basement, or near a swimming pool and the like any kind into the product. Simply place the recorded cassette into the Remote with this product, ask the service technician to perform safety checks to its normal operation. Accessories To avoid personal injury: ● ...operating condition. The Remote can be moved with "ON SCREEN (PLAY)" set to "ON" (੬ pg. 18)). While only VHS signals can be recorded on regular VHS cassettes*, both VHS and Super VHS signals can operate most of any full-sized VHS cassette. ● This VCR can record on this product from...
.... ● in a wet basement, or near a swimming pool and the like any kind into the product. Simply place the recorded cassette into the Remote with this product, ask the service technician to perform safety checks to its normal operation. Accessories To avoid personal injury: ● ...operating condition. The Remote can be moved with "ON SCREEN (PLAY)" set to "ON" (੬ pg. 18)). While only VHS signals can be recorded on regular VHS cassettes*, both VHS and Super VHS signals can operate most of any full-sized VHS cassette. ● This VCR can record on this product from...
Instruction Manual
Page 4
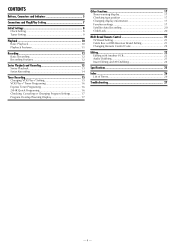
... 8 Clock Setting 8 Tuner Setting 9 Playback 10 Basic Playback 10 Playback Features 11 Recording 12 Basic Recording 12 Recording Features 12 Series Playback and Recording 13 Series Playback 13 Series Recording 14 Timer Recording 15 Changing VCR Plus+® Setting 15 VCR Plus+® Timer Programing 16 Express ... 17 Changing display information 17 Function settings 17 Satellite Auto Recording 20 Child Lock 20 Multi-Brand Remote Control 21 TV Brand Setting 21 Cable Box or DBS Receiver Brand Setting 21 Changing Remote Control Code 22 Editing 22 Editing with Another VCR 22...
... 8 Clock Setting 8 Tuner Setting 9 Playback 10 Basic Playback 10 Playback Features 11 Recording 12 Basic Recording 12 Recording Features 12 Series Playback and Recording 13 Series Playback 13 Series Recording 14 Timer Recording 15 Changing VCR Plus+® Setting 15 VCR Plus+® Timer Programing 16 Express ... 17 Changing display information 17 Function settings 17 Satellite Auto Recording 20 Child Lock 20 Multi-Brand Remote Control 21 TV Brand Setting 21 Cable Box or DBS Receiver Brand Setting 21 Changing Remote Control Code 22 Editing 22 Editing with Another VCR 22...

Instruction Manual
Page 5
Buttons, Connectors and Indicators Front Panel S-VIDEO Cassette loading slot Advanced JOG dial POWER REW FF 24HR QUICK REC LINK PROGRAM INSERT A.DUB S-VIDEO VIDEO/AUDIO input input connectors connector Remote sensor Display panel Start Time/Mode Lock indicator Stop Time/Mode Lock indicator VCR mode indicator S-VHS indicator TBC indicator Timer mode indicator Play indicator Record indicator REC LINK indicator Counter/Remain display Channel and auxiliary input/ Clock time Rear Panel AC power cord REMOTE OUT -5- REMOTE IN CONTINUED ON NEXT PAGE
Buttons, Connectors and Indicators Front Panel S-VIDEO Cassette loading slot Advanced JOG dial POWER REW FF 24HR QUICK REC LINK PROGRAM INSERT A.DUB S-VIDEO VIDEO/AUDIO input input connectors connector Remote sensor Display panel Start Time/Mode Lock indicator Stop Time/Mode Lock indicator VCR mode indicator S-VHS indicator TBC indicator Timer mode indicator Play indicator Record indicator REC LINK indicator Counter/Remain display Channel and auxiliary input/ Clock time Rear Panel AC power cord REMOTE OUT -5- REMOTE IN CONTINUED ON NEXT PAGE

Instruction Manual
Page 6
... on the left side of SP/EP on the illustration above are helpful when using the Remote in the recording mode. B Press OSD (OK) again to clear the display. ● The RECORD/PAUSE indication remains on the TV screen. Remote Number keys On-screen display If you press OSD (OK) on the... down TV on the TV screen. The glow-in-the-dark buttons shown in white on the Remote. After that, the counter information and RECORD/PAUSE (if in the Record Pause mode), remain on the Remote. -6- SEP function is available eventhough there is in darkened rooms. Buttons with this VCR. Channel ...
... on the left side of SP/EP on the illustration above are helpful when using the Remote in the recording mode. B Press OSD (OK) again to clear the display. ● The RECORD/PAUSE indication remains on the TV screen. Remote Number keys On-screen display If you press OSD (OK) on the... down TV on the TV screen. The glow-in-the-dark buttons shown in white on the Remote. After that, the counter information and RECORD/PAUSE (if in the Record Pause mode), remain on the Remote. -6- SEP function is available eventhough there is in darkened rooms. Buttons with this VCR. Channel ...
Instruction Manual
Page 7
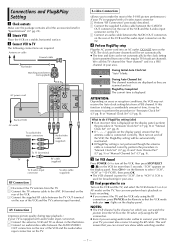
.... This will ensure that the antenna cable is taking a considerable amount of the S-VHS picture performance.) If your TV, you connect the TV and the VCR only using the RF connection, press TV/VCR on the Remote so that the VCR mode indicator ( ) lights on the VCR for more than ... "Manual Clock Set" (੬ pg. 8). Then turn off the VCR; the Plug&Play setting will be set automatically. ● The time and date can record one of the VCR and the TV's antenna input terminal. Plug&Play Completed The current time is a PBS channel in "Manual Clock Set" (੬ pg...
.... This will ensure that the antenna cable is taking a considerable amount of the S-VHS picture performance.) If your TV, you connect the TV and the VCR only using the RF connection, press TV/VCR on the Remote so that the VCR mode indicator ( ) lights on the VCR for more than ... "Manual Clock Set" (੬ pg. 8). Then turn off the VCR; the Plug&Play setting will be set automatically. ● The time and date can record one of the VCR and the TV's antenna input terminal. Plug&Play Completed The current time is a PBS channel in "Manual Clock Set" (੬ pg...
Instruction Manual
Page 8
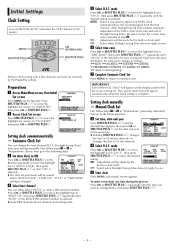
...SHUTTLE PLUS e on the VCR and TV, and select the VCR channel (or AV mode). E Select D.S.T. ON: Adjustment will appear on the Remote. OFF: Select when Daylight Saving Time does not apply to change the host channel/D.S.T. (Daylight Saving Time)/ time zone setting manually. To make ...minute intervals, or changes the date in "Preparations" previously described, then go to select the desired setting. Initial Settings Clock Setting Turn on the Remote repeatedly to move the highlight bar to "INITIAL SET", then press OK or SHUTTLE PLUS e. First follow steps 1 to 2 in 15-day ...
...SHUTTLE PLUS e on the VCR and TV, and select the VCR channel (or AV mode). E Select D.S.T. ON: Adjustment will appear on the Remote. OFF: Select when Daylight Saving Time does not apply to change the host channel/D.S.T. (Daylight Saving Time)/ time zone setting manually. To make ...minute intervals, or changes the date in "Preparations" previously described, then go to select the desired setting. Initial Settings Clock Setting Turn on the Remote repeatedly to move the highlight bar to "INITIAL SET", then press OK or SHUTTLE PLUS e. First follow steps 1 to 2 in 15-day ...

Instruction Manual
Page 9
...● When Auto Channel Set is complete, "SCAN COMPLETED" appears on screen. ● If the scan was unsuccessful, "SCAN COMPLETED-NO SIGNAL-" appears on the Remote. B Press OK or SHUTTLE PLUS e to set to "AUTO CHANNEL SET", then press OK or SHUTTLE PLUS e. B Press OK or SHUTTLE PLUS e to set... bar (arrow) to add. Number keys Setting channels manually - C Add or skip desired channels To add channels A Press the Number keys on the Remote to input a channel number you want manually. Auto Channel Set Perform Auto Channel Set only if channels have not been set correctly by the Plug...
...● When Auto Channel Set is complete, "SCAN COMPLETED" appears on screen. ● If the scan was unsuccessful, "SCAN COMPLETED-NO SIGNAL-" appears on the Remote. B Press OK or SHUTTLE PLUS e to set to "AUTO CHANNEL SET", then press OK or SHUTTLE PLUS e. B Press OK or SHUTTLE PLUS e to set... bar (arrow) to add. Number keys Setting channels manually - C Add or skip desired channels To add channels A Press the Number keys on the Remote to input a channel number you want manually. Auto Channel Set Perform Auto Channel Set only if channels have not been set correctly by the Plug...

Instruction Manual
Page 10
...(3 steps) Reverse Fso(5erwastarecprdhs) Reverse Forward Reverse search Reverse play Reverse slow motion Slow motion Normal play back a tape recorded in S-VHS mode or in the opposite direction. ● During still picture, press and hold OK on the screen, and this...EP -21 -11 -5 -1 -1/6 1/6 1/2 1 1.5 2 5 11 21 SEP -21 -11 -7 - - - - 1 - - 7 11 21 ● You can also eject the cassette when the VCR is up on the Remote for more than 2 seconds also starts forward slow motion playback. A Load a cassette Make sure the window side is turned off the VCR Press POWER 1.
...(3 steps) Reverse Fso(5erwastarecprdhs) Reverse Forward Reverse search Reverse play Reverse slow motion Slow motion Normal play back a tape recorded in S-VHS mode or in the opposite direction. ● During still picture, press and hold OK on the screen, and this...EP -21 -11 -5 -1 -1/6 1/6 1/2 1 1.5 2 5 11 21 SEP -21 -11 -7 - - - - 1 - - 7 11 21 ● You can also eject the cassette when the VCR is up on the Remote for more than 2 seconds also starts forward slow motion playback. A Load a cassette Make sure the window side is turned off the VCR Press POWER 1.
Instruction Manual
Page 11
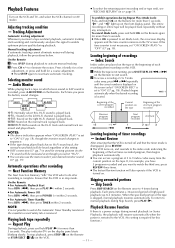
... STOP/EJECT (0) on the tape. Hi-Fi sound is removed. NORM HI-FI: Both sounds on the Remote to 2 minutes). Repeat Play Locating beginning of recordings - Skip Search Press SKIP SEARCH on . Playback Resume Function If there is a power outage during normal playback (or Series Playback), ...Play (Mode Lock) Press and hold for example, you have 5 programs recorded and you press the button, sound changes. ● To select the returning point (recording end or tape end), see "REC END RETURN" on the Remote for more than 5 seconds. When the specified portion of this setting. &#...
... STOP/EJECT (0) on the tape. Hi-Fi sound is removed. NORM HI-FI: Both sounds on the Remote to 2 minutes). Repeat Play Locating beginning of recordings - Skip Search Press SKIP SEARCH on . Playback Resume Function If there is a power outage during normal playback (or Series Playback), ...Play (Mode Lock) Press and hold for example, you have 5 programs recorded and you press the button, sound changes. ● To select the returning point (recording end or tape end), see "REC END RETURN" on the Remote for more than 5 seconds. When the specified portion of this setting. &#...
Instruction Manual
Page 12
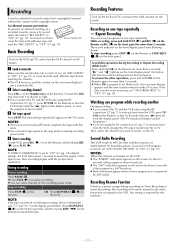
...pictures from the VCR, change the TV's input mode from the VCR, press TV/ VCR on the Remote, while holding REC (7), press PLAY (4). Watching one program while recording another During recording... ● If you want to watch, on the front panel for more than 5 seconds. ●...panel starts blinking slowly. Recording Resume Function If there is a power outage during recording, the recording stops and "⅜" and " $" on the Remote for this deck. ● You can select tape speed in the recording pause mode. Recording It may be unlawful to record or play back copyrighted ...
...pictures from the VCR, change the TV's input mode from the VCR, press TV/ VCR on the Remote, while holding REC (7), press PLAY (4). Watching one program while recording another During recording... ● If you want to watch, on the front panel for more than 5 seconds. ●...panel starts blinking slowly. Recording Resume Function If there is a power outage during recording, the recording stops and "⅜" and " $" on the Remote for this deck. ● You can select tape speed in the recording pause mode. Recording It may be unlawful to record or play back copyrighted ...
Instruction Manual
Page 13
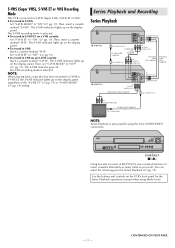
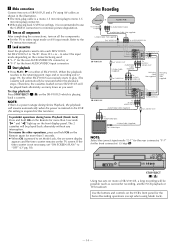
... marked "S-VHS". The S-VHS recording mode is selected. ● To record in S-VHS ET on a VHS cassette: Set "S-VHS ET" to "OFF" (੬ pg. 19). ● To record in VHS on the VCR's front panel for Series Playback (੬ pg. 19). The S-VHS indicator lights up on the display panel. Series Playback and Recording Series Playback SR-V101US-1 To REMOTE OUT To REMOTE IN To...
... marked "S-VHS". The S-VHS recording mode is selected. ● To record in S-VHS ET on a VHS cassette: Set "S-VHS ET" to "OFF" (੬ pg. 19). ● To record in VHS on the VCR's front panel for Series Playback (੬ pg. 19). The S-VHS indicator lights up on the display panel. Series Playback and Recording Series Playback SR-V101US-1 To REMOTE OUT To REMOTE IN To...
Instruction Manual
Page 14
...SR-V101US. C Load cassettes Insert the playback cassette into each SR-V101US. D Start playback ● Press PLAY ( 4) on either of SR-V101US and a TV using Mode Lock). - 14 - The 2 cassettes will be rewound when the playback stops.) Therefore, the cassettes loaded on the Remote again for more than 5 seconds. Series Recording...The mini-plug cable is a mono 3.5 mm mini-plug to mono 3.5 mm mini-plug connector. ● When playing back S-VHS recordings, it is required for the front connector). (੬step 3) S-VIDEO POWER REW FF 24HR QUICK REC LINK PROGRAM INSERT A.DUB Using...
...SR-V101US. C Load cassettes Insert the playback cassette into each SR-V101US. D Start playback ● Press PLAY ( 4) on either of SR-V101US and a TV using Mode Lock). - 14 - The 2 cassettes will be rewound when the playback stops.) Therefore, the cassettes loaded on the Remote again for more than 5 seconds. Series Recording...The mini-plug cable is a mono 3.5 mm mini-plug to mono 3.5 mm mini-plug connector. ● When playing back S-VHS recordings, it is required for the front connector). (੬step 3) S-VIDEO POWER REW FF 24HR QUICK REC LINK PROGRAM INSERT A.DUB Using...
Instruction Manual
Page 15
...for the rear AUDIO/VIDEO IN connector, or ● "F-1" for recording Insert the recording cassette into each station. To stop recording Press STOP/EJECT (0) on the Remote to rewind the tape. To resume the other SR-V101US successively starts to the TV channels and the cable channels. Press TIMER...on the front display panel. To prohibit operations during recording, set the correct guide channel number. " " and " " light up on the Remote for each SR-V101US, and prepare the playback source. If the time counter is recording. Turn on -screen display appears and the time ...
...for the rear AUDIO/VIDEO IN connector, or ● "F-1" for recording Insert the recording cassette into each station. To stop recording Press STOP/EJECT (0) on the Remote to rewind the tape. To resume the other SR-V101US successively starts to the TV channels and the cable channels. Press TIMER...on the front display panel. To prohibit operations during recording, set the correct guide channel number. " " and " " light up on the Remote for each SR-V101US, and prepare the playback source. If the time counter is recording. Turn on -screen display appears and the time ...

Instruction Manual
Page 16
...a mistake, press CANCEL to input the PlusCode number, then press OK or SHUTTLE PLUS e. screen reappears. Express Timer Programing Load a cassette with the record safety tab intact. A Press PROG. repeatedly to enter the start time indicator ( ) starts blinking on the display panel. or STOP+/- 9=WEEKLY),...is accurate on , and the counter is displayed for the tape speed appears on the Remote to set Start time the start time. ● One click stop time, press STOP+/-. ● To timer-record daily (Sunday-Saturday) or weekly serials, press DAILY (Number key "8") or WEEKLY (...
...a mistake, press CANCEL to input the PlusCode number, then press OK or SHUTTLE PLUS e. screen reappears. Express Timer Programing Load a cassette with the record safety tab intact. A Press PROG. repeatedly to enter the start time indicator ( ) starts blinking on the display panel. or STOP+/- 9=WEEKLY),...is accurate on , and the counter is displayed for the tape speed appears on the Remote to set Start time the start time. ● One click stop time, press STOP+/-. ● To timer-record daily (Sunday-Saturday) or weekly serials, press DAILY (Number key "8") or WEEKLY (...

Instruction Manual
Page 17
...AUTO OFF ON ON SELECT WITH ( , ) AND (OK) PRESS (MENU) TO END PREVIOUS PAGE AUTO SP EP TIMER DIGITAL R3 VIDEO STABILIZER 2ND AUDIO RECORD AUDIO MONITOR S-VHS MODE NEXT PAGE OFF ON OFF OFF HI-FI ON SELECT WITH ( , ) AND (OK) PRESS (MENU) TO END PREVIOUS PAGE FRONT AUX INPUT ...COMPLETED PROGRAM OVERLAP" appears, you have another program overlapping the program you have just made ) and Program 4 overlap each other useful function settings on the Remote. Repeat the above steps again. Press TIMER to make changes is shown, then press OK or SHUTTLE PLUS e. ● If the overlap is not...
...AUTO OFF ON ON SELECT WITH ( , ) AND (OK) PRESS (MENU) TO END PREVIOUS PAGE AUTO SP EP TIMER DIGITAL R3 VIDEO STABILIZER 2ND AUDIO RECORD AUDIO MONITOR S-VHS MODE NEXT PAGE OFF ON OFF OFF HI-FI ON SELECT WITH ( , ) AND (OK) PRESS (MENU) TO END PREVIOUS PAGE FRONT AUX INPUT ...COMPLETED PROGRAM OVERLAP" appears, you have another program overlapping the program you have just made ) and Program 4 overlap each other useful function settings on the Remote. Repeat the above steps again. Press TIMER to make changes is shown, then press OK or SHUTTLE PLUS e. ● If the overlap is not...

Instruction Manual
Page 19
... select "AUTO REW", the VCR rewinds tape each time after timer recording. If you may fail in recording (editing) on the Remote to make high quality video recordings with horizontal resolution of 400 lines, comparing with S-VHS tape. ● To keep the highest quality recording and playback pictures over a long period of high grade tapes are...
... select "AUTO REW", the VCR rewinds tape each time after timer recording. If you may fail in recording (editing) on the Remote to make high quality video recordings with horizontal resolution of 400 lines, comparing with S-VHS tape. ● To keep the highest quality recording and playback pictures over a long period of high grade tapes are...

Instruction Manual
Page 20
...signals come into the VCR, the VCR stops recording ("⅜" goes off , "CL" appears for more than 2 seconds. Satellite Auto Recording You can automatically record a satellite program which one to use , keep the Remote out of satellite receiver, Satellite Auto Recording may not be performed even if the child ...When the child lock function is in use . (੬ See pg. 19, "REAR AUX INPUT".) B Set timer program on the Remote. ● Timer recording programs will appear on the display panel, then the clock time appears again. Child Lock You can disable the VCR operations. NOTES: ...
...signals come into the VCR, the VCR stops recording ("⅜" goes off , "CL" appears for more than 2 seconds. Satellite Auto Recording You can automatically record a satellite program which one to use , keep the Remote out of satellite receiver, Satellite Auto Recording may not be performed even if the child ...When the child lock function is in use . (੬ See pg. 19, "REAR AUX INPUT".) B Set timer program on the Remote. ● Timer recording programs will appear on the display panel, then the clock time appears again. Child Lock You can disable the VCR operations. NOTES: ...

Instruction Manual
Page 21
... cable box or DBS receiver using the Power button on the unit or its Remote. B Press MBR SET. Multi-Brand Remote Control This Remote can control a JVC TV. B Press MBR SET. NOTES: ● Some unit's brands have to set Remote to JVC 51: CABLE/ DBS MBR SET A/B 5 1 ENTER/OSD 3 OK Release TV Brand... Setting A Turn on TV Turn on the TV using the Power button on the TV or its Remote. If the unit does not function with a remote sensor. ● It is not ...
... cable box or DBS receiver using the Power button on the unit or its Remote. B Press MBR SET. Multi-Brand Remote Control This Remote can control a JVC TV. B Press MBR SET. NOTES: ● Some unit's brands have to set Remote to JVC 51: CABLE/ DBS MBR SET A/B 5 1 ENTER/OSD 3 OK Release TV Brand... Setting A Turn on TV Turn on the TV using the Power button on the TV or its Remote. If the unit does not function with a remote sensor. ● It is not ...

Instruction Manual
Page 22
...signals. ● To set appears on another VCR. Audio/Video cable (supplied) When using this VCR as the playback or recording VCR. The code currently set the Remote and the VCR back to different codes, so that you can use a camcorder as the playback VCR and your VCR as... another VCR is monaural, connect this VCR as the recording VCR. one set Remote to B code control signals. You can control two JVC VCRs by switching the remote control code for connection and its operations. Editing Editing with the same Remote You can easily modify your VCR is initially set to...
...signals. ● To set appears on another VCR. Audio/Video cable (supplied) When using this VCR as the playback or recording VCR. The code currently set the Remote and the VCR back to different codes, so that you can use a camcorder as the playback VCR and your VCR as... another VCR is monaural, connect this VCR as the recording VCR. one set Remote to B code control signals. You can control two JVC VCRs by switching the remote control code for connection and its operations. Editing Editing with the same Remote You can easily modify your VCR is initially set to...
