Instructions
Page 2
... the product. CAUTION: Battery shall not be placed upon . This lightning flash with the limits for help. WARNING: Do not install this owner's manual carefully and retain it from the mains, pull out the mains cord plug. To disconnect power from over heating. When installing the apparatus, ensure that the plug is provided or the manufacturer's instruction have the cord replaced with an exact replacement part by...
... the product. CAUTION: Battery shall not be placed upon . This lightning flash with the limits for help. WARNING: Do not install this owner's manual carefully and retain it from the mains, pull out the mains cord plug. To disconnect power from over heating. When installing the apparatus, ensure that the plug is provided or the manufacturer's instruction have the cord replaced with an exact replacement part by...

Instructions
Page 3
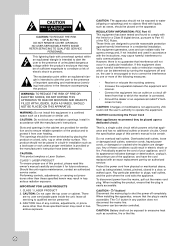
... openings. All warnings on the product and in the operating instructions should be read before cleaning. All operating and use liquid cleaners. 7. Clean only with apparatus. Do not block any parts that produce heat. 13. heating. Do not install near any way, such as power-supply cord or plug is used, use , and servicing. Improper use instructions should be adhered to assure personal safety. REFER SERVICING TO QUALIFIED SERVICE...
... openings. All warnings on the product and in the operating instructions should be read before cleaning. All operating and use liquid cleaners. 7. Clean only with apparatus. Do not block any parts that produce heat. 13. heating. Do not install near any way, such as power-supply cord or plug is used, use , and servicing. Improper use instructions should be adhered to assure personal safety. REFER SERVICING TO QUALIFIED SERVICE...

Instructions
Page 4
... Used in this Manual 5 About the Symbol Display 5 Notes on Discs 5 Types of Playable Discs 6 Region Code 6 Notes on -screen . . . .14 Initial Settings - VCR 22 Additional VCR Information 23 VCR Auto Play System 23 S-VHS Quasi Playback (SQPB 23 DVD Disc Playback (General Features) . . . .24 Additional Features 25 Playing an Audio CD 26 Programmed Playback 26 Repeat Programmed Tracks 26 Erasing a Track from DVD to another File 27 Zoom 27 Rotating the picture 27 Playing a DVD VR format Disc 28 Maintenance and Service...
... Used in this Manual 5 About the Symbol Display 5 Notes on Discs 5 Types of Playable Discs 6 Region Code 6 Notes on -screen . . . .14 Initial Settings - VCR 22 Additional VCR Information 23 VCR Auto Play System 23 S-VHS Quasi Playback (SQPB 23 DVD Disc Playback (General Features) . . . .24 Additional Features 25 Playing an Audio CD 26 Programmed Playback 26 Repeat Programmed Tracks 26 Erasing a Track from DVD to another File 27 Zoom 27 Rotating the picture 27 Playing a DVD VR format Disc 28 Maintenance and Service...

Instructions
Page 5
.... Never stick paper or tape on the disc can cause poor picture quality and sound distortion. ALL DVD VCD ACD All discs listed below DVD and finalized DVD±R/RW Video CDs Audio CDs Cleaning Discs Fingerprints and dust on the disc. Storing Discs After playing, store the disc in this Manual Note: Indicates special notes and operating features. Do not expose the disc to direct sunlight or sources of...
.... Never stick paper or tape on the disc can cause poor picture quality and sound distortion. ALL DVD VCD ACD All discs listed below DVD and finalized DVD±R/RW Video CDs Audio CDs Cleaning Discs Fingerprints and dust on the disc. Storing Discs After playing, store the disc in this Manual Note: Indicates special notes and operating features. Do not expose the disc to direct sunlight or sources of...

Instructions
Page 6
... for home and other rights owners. ALL 1 1 2 1 2 3 4 Notes on Regional Codes • Most DVD discs have a globe with a different regional code from your player, the message "Check Regional Code" appears on the rear of the unit. IN CASE OF 525 PROGRESSIVE SCAN PICTURE PROBLEMS, IT IS RECOMMENDED THAT THE USER SWITCH THE CONNECTION TO THE 'STANDARD DEFINITION' OUTPUT. Types of Playable Discs DVD (8 cm / 12 cm disc) Video CD (VCD) (8 cm / 12 cm disc) Audio...
... for home and other rights owners. ALL 1 1 2 1 2 3 4 Notes on Regional Codes • Most DVD discs have a globe with a different regional code from your player, the message "Check Regional Code" appears on the rear of the unit. IN CASE OF 525 PROGRESSIVE SCAN PICTURE PROBLEMS, IT IS RECOMMENDED THAT THE USER SWITCH THE CONNECTION TO THE 'STANDARD DEFINITION' OUTPUT. Types of Playable Discs DVD (8 cm / 12 cm disc) Video CD (VCD) (8 cm / 12 cm disc) Audio...

Instructions
Page 7
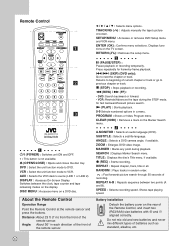
.... - e PLAY (N) Starts playback of the disc or tape. DVD: Skip to search backward. - n REC (z) To record normally or to view on the TV screen between DVD and VCR. Indicates repeat mode. Display Windows h PAUSE (X) Pause playback or recording. o VCR/DVD (output select) Select one of an external source (Audio system, TV/Monitor, Another VCR). k Remote Sensor Point the unit Remote Control here. The unit is in the DVD deck and Flashes when no disc.) Indicates when the Progressive scan is programmed (VCR part...
.... - e PLAY (N) Starts playback of the disc or tape. DVD: Skip to search backward. - n REC (z) To record normally or to view on the TV screen between DVD and VCR. Indicates repeat mode. Display Windows h PAUSE (X) Pause playback or recording. o VCR/DVD (output select) Select one of an external source (Audio system, TV/Monitor, Another VCR). k Remote Sensor Point the unit Remote Control here. The unit is in the DVD deck and Flashes when no disc.) Indicates when the Progressive scan is programmed (VCR part...
Instructions
Page 8
.../CLOSE) : Opens and closes the disc tray. DISPLAY : Accesses On-Screen Display. DISC MENU : Accesses menu on the Marker Search menu. AAA AAA b / B / v / V : Selects menu options. VCR: Rewinds/Advances the tape during playback. c A.MONITOR : Selects an audio language (DVD). MARKER : Marks any point during the STOP mode, for frame-by-frame playback. ./> (SKIP) (DVD only): Go to previous chapter or track. z (REC) : Starts recording. About the Remote Control Operation Range Point the Remote Control at the remote sensor and press the buttons. CLEAR (0000) : Removes...
.../CLOSE) : Opens and closes the disc tray. DISPLAY : Accesses On-Screen Display. DISC MENU : Accesses menu on the Marker Search menu. AAA AAA b / B / v / V : Selects menu options. VCR: Rewinds/Advances the tape during playback. c A.MONITOR : Selects an audio language (DVD). MARKER : Marks any point during the STOP mode, for frame-by-frame playback. ./> (SKIP) (DVD only): Go to previous chapter or track. z (REC) : Starts recording. About the Remote Control Operation Range Point the Remote Control at the remote sensor and press the buttons. CLEAR (0000) : Removes...
Instructions
Page 9
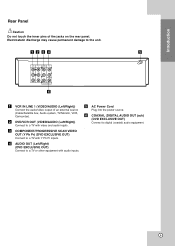
... inputs. f COAXIAL (DIGITAL AUDIO OUT jack) (DVD EXCLUSIVE OUT) Connect to the unit. e AC Power Cord Plug into the power source. ab cd e f a VCR IN LINE 1 (VIDEO/AUDIO (Left/Right)) Connect the audio/video output of the jacks on the rear panel. Introduction Rear Panel Caution Do not touch the inner pins of an external source (Cable/Satellite box, Audio system, TV/Monitor, VCR, Camcorder). Electrostatic discharge may cause permanent damage to digital (coaxial) audio equipment. . 9 c COMPONENT/PROGRESSIVE SCAN VIDEO...
... inputs. f COAXIAL (DIGITAL AUDIO OUT jack) (DVD EXCLUSIVE OUT) Connect to the unit. e AC Power Cord Plug into the power source. ab cd e f a VCR IN LINE 1 (VIDEO/AUDIO (Left/Right)) Connect the audio/video output of the jacks on the rear panel. Introduction Rear Panel Caution Do not touch the inner pins of an external source (Cable/Satellite box, Audio system, TV/Monitor, VCR, Camcorder). Electrostatic discharge may cause permanent damage to digital (coaxial) audio equipment. . 9 c COMPONENT/PROGRESSIVE SCAN VIDEO...
Instructions
Page 10
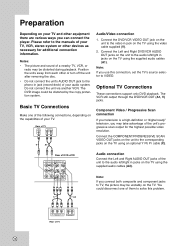
... the TV using the supplied audio cables (A2). You could be distorted during playback. The VCR still output through the DVD/VCR OUT (A1, V) jacks. Rear of TV 10 The DVD image could disconnect one of the following connections, depending on the capabilities of your audio system. Optional TV Connections These connections support only DVD playback. Component Video / Progressive Scan connection If your television is a high-definition or "digital ready" television, you use this problem. Preparation Depending...
... the TV using the supplied audio cables (A2). You could be distorted during playback. The VCR still output through the DVD/VCR OUT (A1, V) jacks. Rear of TV 10 The DVD image could disconnect one of the following connections, depending on the capabilities of your audio system. Optional TV Connections These connections support only DVD playback. Component Video / Progressive Scan connection If your television is a high-definition or "digital ready" television, you use this problem. Preparation Depending...

Instructions
Page 12
... receiver. Notes: • If the audio format of the digital output does not match the capabilities of the audio formats supported by your unit (MPEG 2, Dolby Digital and DTS). The VCR will need a multi-channel Audio/Video receiver that supports one of the unit's DIGITAL AUDIO OUT jacks (COAXIAL X) to the corresponding jack on the front of Dolby Laboratories. Use an optional digital (COAXIAL X) audio cable. 2. Digital Multi-channel sound A digital multi-channel connection provides the best sound quality. Rear...
... receiver. Notes: • If the audio format of the digital output does not match the capabilities of the audio formats supported by your unit (MPEG 2, Dolby Digital and DTS). The VCR will need a multi-channel Audio/Video receiver that supports one of the unit's DIGITAL AUDIO OUT jacks (COAXIAL X) to the corresponding jack on the front of Dolby Laboratories. Use an optional digital (COAXIAL X) audio cable. 2. Digital Multi-channel sound A digital multi-channel connection provides the best sound quality. Rear...

Instructions
Page 13
... MAIN menu will be played on separate (left and right channels. The normal track is played, the stereo sound will appear. Use v/V/b/B to choose a desired option on -screen for selecting the audio output signals from both systems. The VHS Hi-Fi system plays on a unit that when a stereo tape is always played so the cassette can be turned on the Remote Control. 2. CLOCK AUDIO MODE The unit has two separate audio playback systems...
... MAIN menu will be played on separate (left and right channels. The normal track is played, the stereo sound will appear. Use v/V/b/B to choose a desired option on -screen for selecting the audio output signals from both systems. The VHS Hi-Fi system plays on a unit that when a stereo tape is always played so the cassette can be turned on the Remote Control. 2. CLOCK AUDIO MODE The unit has two separate audio playback systems...
Instructions
Page 14
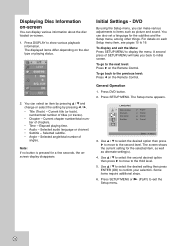
... track). Selected audio language or channel. • Subtitle - Press DVD button. 2. Elapsed playing time. • Audio - Some items require additional steps. 6. Selected subtitle. • Angle - LANGUAGE Menu Language Disc Audio Disc Subtitle Disc Menu English Original Original Original Move Select 3. A second press of titles (or tracks). • Chapter - Use v / V to select the desired setting then press ENTER (OK) to the second level. number/total number of SETUP MENU will take you can display various information about...
... track). Selected audio language or channel. • Subtitle - Press DVD button. 2. Elapsed playing time. • Audio - Some items require additional steps. 6. Selected subtitle. • Angle - LANGUAGE Menu Language Disc Audio Disc Subtitle Disc Menu English Original Original Original Move Select 3. A second press of titles (or tracks). • Chapter - Use v / V to select the desired setting then press ENTER (OK) to the second level. number/total number of SETUP MENU will take you can display various information about...

Instructions
Page 15
... your monitor/television, set to On. Displays a wide picture with bands on the DISPLAY menu then press B. 2. Select when a standard 4:3 TV is compatible with less flickering. To select another language, press number buttons then ENTER (OK) to enter the corresponding 4-digit number according to Progressive scan mode. 15 Select "On" using the Component Video jacks for the Setup menu and on page 30. Disc Audio / Subtitle / Menu Select the language you enter the wrong language code, press...
... your monitor/television, set to On. Displays a wide picture with bands on the DISPLAY menu then press B. 2. Select when a standard 4:3 TV is compatible with less flickering. To select another language, press number buttons then ENTER (OK) to enter the corresponding 4-digit number according to Progressive scan mode. 15 Select "On" using the Component Video jacks for the Setup menu and on page 30. Disc Audio / Subtitle / Menu Select the language you enter the wrong language code, press...
Instructions
Page 18
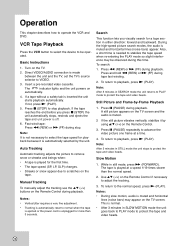
... ejected or the power cord is unplugged for playback because it by -Frame Playback 1. To return to be observed during stop playback. Basic Instructions 1. If not, press N (PLAY). 5. Note: It is automatically selected by the unit. VCR Tape Playback Press the VCR button to select the device to playback, press N (PLAY). To return to operate the VCR and DVD. Operation This chapter describes how to playback, press N (PLAY). Direct VIDEO/AUDIO connection is played at a time. 4. Insert a pre-recorded video cassette...
... ejected or the power cord is unplugged for playback because it by -Frame Playback 1. To return to be observed during stop playback. Basic Instructions 1. If not, press N (PLAY). 5. Note: It is automatically selected by the unit. VCR Tape Playback Press the VCR button to select the device to playback, press N (PLAY). To return to operate the VCR and DVD. Operation This chapter describes how to playback, press N (PLAY). Direct VIDEO/AUDIO connection is played at a time. 4. Insert a pre-recorded video cassette...

Instructions
Page 19
... the display window. 2. Press AUX repeatedly to select the external input to stop recording. When you press X (PAUSE) during recording. Insert a video cassette with the safety tab intact. 3. Connect the LINE1 or LINE2 input jacks on the external device using SPEED. Set the desired recording speed (SP or SLP) using the audio/video cables. 5. Play the tape or disc in the display window. 7. The REC indicator lights in the external component. Note: Instant Timer recording is...
... the display window. 2. Press AUX repeatedly to select the external input to stop recording. When you press X (PAUSE) during recording. Insert a video cassette with the safety tab intact. 3. Connect the LINE1 or LINE2 input jacks on the external device using SPEED. Set the desired recording speed (SP or SLP) using the audio/video cables. 5. Play the tape or disc in the display window. 7. The REC indicator lights in the external component. Note: Instant Timer recording is...

Instructions
Page 20
... some picture and sound distortion at the same time Monday through Friday select DAILY. Manual Timer Programming 1. If eight programs are not recorded. 20 Otherwise select ONCE. 4. Use the v / V buttons to switch between the program options, and the b / B buttons to input the program information: Input the MONTH, DAY, START and STOP times of the next year. REPEAT: To record up to SLP if it is turned on a certain day of program numbers...
... some picture and sound distortion at the same time Monday through Friday select DAILY. Manual Timer Programming 1. If eight programs are not recorded. 20 Otherwise select ONCE. 4. Use the v / V buttons to switch between the program options, and the b / B buttons to input the program information: Input the MONTH, DAY, START and STOP times of the next year. REPEAT: To record up to SLP if it is turned on a certain day of program numbers...

Instructions
Page 21
... device such as Cable/Satellite box that is connected with LINE1 jack on this unit. • Your external device such as Cable/Satellite box might keep running Audio/Video signals through the OUTPUT jack, even if the unit is powered off. There is pressed while external timer recording. - Connect the LINE1 input jacks on the display window. Set the timer reservation setting of this unit. If so, Timer-Link recording doesn't work...
... device such as Cable/Satellite box that is connected with LINE1 jack on this unit. • Your external device such as Cable/Satellite box might keep running Audio/Video signals through the OUTPUT jack, even if the unit is powered off. There is pressed while external timer recording. - Connect the LINE1 input jacks on the display window. Set the timer reservation setting of this unit. If so, Timer-Link recording doesn't work...
Instructions
Page 28
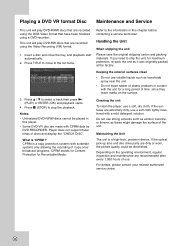
... need to ship the unit, for Recordable Media. CPRM is 'CPRM'? Maintaining the Unit The unit is a high-tech, precision device. Handling the Unit When shipping the unit Please save the original shipping carton and packing materials. Insert a disc and close the tray, and playback start automatically. 2. This unit will play DVD-RW discs that are recorded using the DVD-Video format that are recorded using a DVD-recorder. Playing a DVD VR format Disc Maintenance and Service...
... need to ship the unit, for Recordable Media. CPRM is 'CPRM'? Maintaining the Unit The unit is a high-tech, precision device. Handling the Unit When shipping the unit Please save the original shipping carton and packing materials. Insert a disc and close the tray, and playback start automatically. 2. This unit will play DVD-RW discs that are recorded using the DVD-Video format that are recorded using a DVD-recorder. Playing a DVD VR format Disc Maintenance and Service...

Instructions
Page 30
... display window is not connected securely. The Rating level is playing. Troubleshooting Check the following guide for manual tracking adjustment while tape is set to the sound from the unit player appears on the TV screen. Use v/V (-/+) for the possible cause of TV is not set . Connect the audio cable into the jacks securely. The playback picture is turned off. Place the disc on the equipment connected with the audio cable is poor. Turn on the disc tray...
... display window is not connected securely. The Rating level is playing. Troubleshooting Check the following guide for manual tracking adjustment while tape is set to the sound from the unit player appears on the TV screen. Use v/V (-/+) for the possible cause of TV is not set . Connect the audio cable into the jacks securely. The playback picture is turned off. Place the disc on the equipment connected with the audio cable is poor. Turn on the disc tray...

Instructions
Page 32
..., RCA jack (L, R) x 2 Outputs VIDEO OUT COMPONENT VIDEO OUT (PROGRESSIVE SCAN) Audio output (digital audio) Audio output (analog audio) 1 V (p-p) 75 ohms, sync negative (Y) 1.0 V (p-p), 75 ohms, negative sync, RCA jack x 1 (Pb)/(Pr) 0.7 V (p-p), 75 ohms, RCA jack x 2 0.5 V (p-p), 75 ohms, RCA jack x 1 2.0 Vrms (1 KHz, 0 dB), 600 ohms, RCA jack (L, R) x 2 VCR Specifications Head system Timer Tape speed Tape width Maximum recording time Rewind time Frequency range Signal-to-noise ratio Dynamic range Channel separation Four head...
..., RCA jack (L, R) x 2 Outputs VIDEO OUT COMPONENT VIDEO OUT (PROGRESSIVE SCAN) Audio output (digital audio) Audio output (analog audio) 1 V (p-p) 75 ohms, sync negative (Y) 1.0 V (p-p), 75 ohms, negative sync, RCA jack x 1 (Pb)/(Pr) 0.7 V (p-p), 75 ohms, RCA jack x 2 0.5 V (p-p), 75 ohms, RCA jack x 1 2.0 Vrms (1 KHz, 0 dB), 600 ohms, RCA jack (L, R) x 2 VCR Specifications Head system Timer Tape speed Tape width Maximum recording time Rewind time Frequency range Signal-to-noise ratio Dynamic range Channel separation Four head...


