User Manual
Page 1
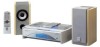
... the rear, bottom or side of CA-FSSD990 and SP-FSSD990 REMOTE CONTROL DIMMER SLEEP POWER AUTO DISPLAY PRESET FM MODE PROGRAM RANDOM REPEAT DOOR AHB PRO SLIDE CD BASS TREBLE CANCEL UP SET FADE MUTING DOWN CD MD/AUX FM / AM VOLUME FS-SD550 REMOTE CONTROL DIMMER SLEEP POWER AUTO DISPLAY PRESET FM MODE PROGRAM RANDOM REPEAT DOOR AHB PRO SLIDE CD BASS TREBLE CANCEL UP SET FADE MUTING DOWN CD MD/AUX FM / AM VOLUME FS-SD770, FS-SD990 INSTRUCTIONS For Customer Use...
... the rear, bottom or side of CA-FSSD990 and SP-FSSD990 REMOTE CONTROL DIMMER SLEEP POWER AUTO DISPLAY PRESET FM MODE PROGRAM RANDOM REPEAT DOOR AHB PRO SLIDE CD BASS TREBLE CANCEL UP SET FADE MUTING DOWN CD MD/AUX FM / AM VOLUME FS-SD550 REMOTE CONTROL DIMMER SLEEP POWER AUTO DISPLAY PRESET FM MODE PROGRAM RANDOM REPEAT DOOR AHB PRO SLIDE CD BASS TREBLE CANCEL UP SET FADE MUTING DOWN CD MD/AUX FM / AM VOLUME FS-SD770, FS-SD990 INSTRUCTIONS For Customer Use...
User Manual
Page 2
... DO NOT REMOVE COVER (OR BACK) NO USER SERVICEABLE PARTS INSIDE REFER SERVICING TO QUALIFIED SERVICE PERSONNEL. These limits are no guarantee that to allow for help. If this appliance to radio communications. IMPORTANT FOR LASER PRODUCTS REPRODUCTION OF LABELS 1. DANGER: Invisible laser radiation when open the top cover. CAUTION To reduce the risk of important operating and maintenance (servicing) instructions in the...
... DO NOT REMOVE COVER (OR BACK) NO USER SERVICEABLE PARTS INSIDE REFER SERVICING TO QUALIFIED SERVICE PERSONNEL. These limits are no guarantee that to allow for help. If this appliance to radio communications. IMPORTANT FOR LASER PRODUCTS REPRODUCTION OF LABELS 1. DANGER: Invisible laser radiation when open the top cover. CAUTION To reduce the risk of important operating and maintenance (servicing) instructions in the...
User Manual
Page 3
... the power cord with an initial capital letter only: e.g. SERIOUS INJURY MAY OCCUR IF THE SYSTEM IS OPERATED WITHOUT THE TOP COVER. s The controls and operations have a query that include repeat, random and program play. s A 45-station preset capability (30 FM and 15 AM) in addition to faithfully reproduce low frequency sounds. setting the volume - Use the table of buttons/controls and display messages are no user serviceable parts inside. s CD...
... the power cord with an initial capital letter only: e.g. SERIOUS INJURY MAY OCCUR IF THE SYSTEM IS OPERATED WITHOUT THE TOP COVER. s The controls and operations have a query that include repeat, random and program play. s A 45-station preset capability (30 FM and 15 AM) in addition to faithfully reproduce low frequency sounds. setting the volume - Use the table of buttons/controls and display messages are no user serviceable parts inside. s CD...
User Manual
Page 4
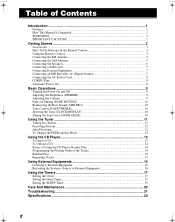
... (Digital Output 7 Connecting the AC Power Cord 8 COMPU Play...8 Automatic Power On...8 Basic Operations 9 Turning the Power On and Off 9 Adjusting the Brightness (DIMMER 9 Adjusting the Volume ...9 Fade-out Muting (FADE MUTING 10 Reinforcing the Bass Sound (AHB PRO 10 Tone Control (BASS/TREBLE 10 Showing the Time (CLOCK/DISPLAY 10 Sliding the Top Cover (DOOR SLIDE 10 Using the Tuner 11 Tuning In a Station...11 Presetting Stations ...12 Auto Presetting...12 To Change the FM Reception Mode 12 Using the CD Player...
... (Digital Output 7 Connecting the AC Power Cord 8 COMPU Play...8 Automatic Power On...8 Basic Operations 9 Turning the Power On and Off 9 Adjusting the Brightness (DIMMER 9 Adjusting the Volume ...9 Fade-out Muting (FADE MUTING 10 Reinforcing the Bass Sound (AHB PRO 10 Tone Control (BASS/TREBLE 10 Showing the Time (CLOCK/DISPLAY 10 Sliding the Top Cover (DOOR SLIDE 10 Using the Tuner 11 Tuning In a Station...11 Presetting Stations ...12 Auto Presetting...12 To Change the FM Reception Mode 12 Using the CD Player...

User Manual
Page 6
..., connect the outdoor antenna. Connecting the FM Antenna Rear Panel of the Unit SUB WOOFER CD DIGITAL OUT OUT IN ANTENNA MD / AUX AM EXT AM LOOP FM(75 ) COAXIAL SPEAKERS IMPEDANCE 4 16 R L AC IN Using the Supplied Wire Antenna FM wire antenna (supplied) • Before attaching a 75 ohm coaxial lead (the kind with coaxial type connector should be connected to an outdoor antenna), disconnect the supplied FM Wire Antenna. Using the Coaxial Type Connector (Not Supplied) A 75...
..., connect the outdoor antenna. Connecting the FM Antenna Rear Panel of the Unit SUB WOOFER CD DIGITAL OUT OUT IN ANTENNA MD / AUX AM EXT AM LOOP FM(75 ) COAXIAL SPEAKERS IMPEDANCE 4 16 R L AC IN Using the Supplied Wire Antenna FM wire antenna (supplied) • Before attaching a 75 ohm coaxial lead (the kind with coaxial type connector should be connected to an outdoor antenna), disconnect the supplied FM Wire Antenna. Using the Coaxial Type Connector (Not Supplied) A 75...

User Manual
Page 9
... connect an optical digital cord (not supplied) between the System's MD/AUX-OUT/IN terminals and the output/input terminals of an external subwoofer. FM(75 11mm Max/ ) * COAXIAL * Use the plug whose diameter is 11mm or less. Signal cord (not supplied) 11mm Max. * SUB WOOFER CD DIGITAL OUT OUT IN ANTENNA MD / AUX AM EXT AM LOOP FM(75 ) COAXIAL Stereo mini-plug Pin-plug x 2 Signal cord (not supplied) 11mm Max. * MD recorder or tape...
... connect an optical digital cord (not supplied) between the System's MD/AUX-OUT/IN terminals and the output/input terminals of an external subwoofer. FM(75 11mm Max/ ) * COAXIAL * Use the plug whose diameter is 11mm or less. Signal cord (not supplied) 11mm Max. * SUB WOOFER CD DIGITAL OUT OUT IN ANTENNA MD / AUX AM EXT AM LOOP FM(75 ) COAXIAL Stereo mini-plug Pin-plug x 2 Signal cord (not supplied) 11mm Max. * MD recorder or tape...
User Manual
Page 10
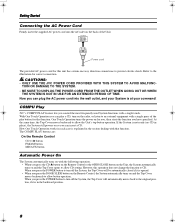
... is opened. • When you can insert a CD. With One Touch Operation you press the DOOR SLIDE button on the Remote Control, the System automatically turns on for correct connection. If the System is not ready (no CD in the backward position. 8 When you press the POWER button to CD. At the same time, the Top Cover moves backward to allow CD setting. CAUTIONS: • ONLY USE THE JVC POWER CORD...
... is opened. • When you can insert a CD. With One Touch Operation you press the DOOR SLIDE button on the Remote Control, the System automatically turns on for correct connection. If the System is not ready (no CD in the backward position. 8 When you press the POWER button to CD. At the same time, the Top Cover moves backward to allow CD setting. CAUTIONS: • ONLY USE THE JVC POWER CORD...

User Manual
Page 11
... 20 minutes. button to . No sound comes out of headphones to turn on the Remote Control, the brightness of sound could damage your hearing, speakers and/or headphones. For private listening Connect a pair of the speakers. Be sure to the PHONES jack. s To switch off (called Standby Mode). When you press the DIMMER button on the System and/or start playing any source without first setting the VOLUME control to minimum, as...
... 20 minutes. button to . No sound comes out of headphones to turn on the Remote Control, the brightness of sound could damage your hearing, speakers and/or headphones. For private listening Connect a pair of the speakers. Be sure to the PHONES jack. s To switch off (called Standby Mode). When you press the DIMMER button on the System and/or start playing any source without first setting the VOLUME control to minimum, as...
User Manual
Page 13
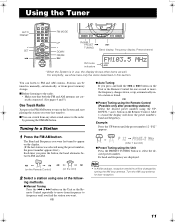
... described in this section. Using the Tuner AUTO PRESET < SET 4 REMOTE CONTROL DIMMER SLEEP POWER AUTO DISPLAY PRESET FM MODE PROGRAM RANDOM REPEAT DOOR AHB PRO SLIDE CD BASS TREBLE CANCEL UP SET FADE MUTING DOWN CD MD/AUX FM / AM FM MODE UP > DOWN FM/AM ¢ MD/AUX FM/AM PRESET TUNING AHB PRO CD DOWN UP MULTI CONTROL CLOCK TIMER VOLUME FM/AM PRESET 4 ¢ TUNING Band display, Frequency display, Preset channel VOLUME FM mode STEREO indicators MONO * When the System is found. s Before...
... described in this section. Using the Tuner AUTO PRESET < SET 4 REMOTE CONTROL DIMMER SLEEP POWER AUTO DISPLAY PRESET FM MODE PROGRAM RANDOM REPEAT DOOR AHB PRO SLIDE CD BASS TREBLE CANCEL UP SET FADE MUTING DOWN CD MD/AUX FM / AM FM MODE UP > DOWN FM/AM ¢ MD/AUX FM/AM PRESET TUNING AHB PRO CD DOWN UP MULTI CONTROL CLOCK TIMER VOLUME FM/AM PRESET 4 ¢ TUNING Band display, Frequency display, Preset channel VOLUME FM mode STEREO indicators MONO * When the System is found. s Before...
User Manual
Page 14
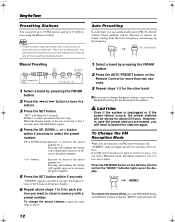
... preset number. FM MODE MONO To restore the stereo effect, press the FM MODE button on the Remote Control so that the "MONO" indicator lights up to 15 AM stations using the Remote Control. • Preset numbers may have been set in case the preset stations are tuned into memory by following one set to factory test frequencies prior to shipment. CAUTION: • Even if the system is unplugged or if the power...
... preset number. FM MODE MONO To restore the stereo effect, press the FM MODE button on the Remote Control so that the "MONO" indicator lights up to 15 AM stations using the Remote Control. • Preset numbers may have been set in case the preset stations are tuned into memory by following one set to factory test frequencies prior to shipment. CAUTION: • Even if the system is unplugged or if the power...

User Manual
Page 15
... Remote Control). s You can insert a CD while listening to read correctly (because it . Using the CD Player PROGRAM RANDOM SET < CD #/8 4 REMOTE CONTROL DIMMER SLEEP POWER AUTO DISPLAY PRESET FM MODE PROGRAM RANDOM REPEAT DOOR AHB PRO SLIDE CD BASS TREBLE CANCEL UP SET FADE MUTING DOWN CD MD/AUX FM / AM VOLUME REPEAT CD 0 CANCEL UP > DOWN ¢ 7 MD/AUX FM/AM PRESET TUNING AHB PRO CD DOWN UP MULTI CONTROL CLOCK TIMER ¢ 4 7 CD #¥8 VOLUME POWER STANDBY/ON Top Cover OPEN/CLOSE PHONES Track number, Playing time, Preset number OPEN...
... Remote Control). s You can insert a CD while listening to read correctly (because it . Using the CD Player PROGRAM RANDOM SET < CD #/8 4 REMOTE CONTROL DIMMER SLEEP POWER AUTO DISPLAY PRESET FM MODE PROGRAM RANDOM REPEAT DOOR AHB PRO SLIDE CD BASS TREBLE CANCEL UP SET FADE MUTING DOWN CD MD/AUX FM / AM VOLUME REPEAT CD 0 CANCEL UP > DOWN ¢ 7 MD/AUX FM/AM PRESET TUNING AHB PRO CD DOWN UP MULTI CONTROL CLOCK TIMER ¢ 4 7 CD #¥8 VOLUME POWER STANDBY/ON Top Cover OPEN/CLOSE PHONES Track number, Playing time, Preset number OPEN...

User Manual
Page 16
... > button: Increases the track number by 1. • When the > or < button is displayed. Total track number Total playback time To stop playing and remove the CD, press the OPEN/ CLOSE button on the Unit or CD 0 button on the display. Programming the Playing Order of the tracks using the Remote Control. To pause, press the CD #¥8 button. Using the CD Player To Unload a CD Take out the CD as shown below. Basics of the CD begins playing.
... > button: Increases the track number by 1. • When the > or < button is displayed. Total track number Total playback time To stop playing and remove the CD, press the OPEN/ CLOSE button on the Unit or CD 0 button on the display. Programming the Playing Order of the tracks using the Remote Control. To pause, press the CD #¥8 button. Using the CD Player To Unload a CD Take out the CD as shown below. Basics of the CD begins playing.

User Manual
Page 17
...; button; In Random Play mode, repeats all the tracks in the program. Program order number UP SET DOWN (After 2 seconds) Total playback time of the programmed tracks 7 Repeat steps 5 and 6 to the beginning) : Repeats one track. To Modify the Program Modify the contents of the program while the CD Player is stopped, each press of programmed tracks on the Remote Control. The "RANDOM" indicator lights up the program...
...; button; In Random Play mode, repeats all the tracks in the program. Program order number UP SET DOWN (After 2 seconds) Total playback time of the programmed tracks 7 Repeat steps 5 and 6 to the beginning) : Repeats one track. To Modify the Program Modify the contents of the program while the CD Player is stopped, each press of programmed tracks on the Remote Control. The "RANDOM" indicator lights up the program...
User Manual
Page 18
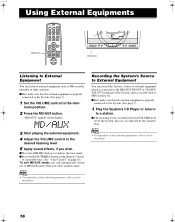
... Instructions. 16 s First make sure that the external equipment is properly connected to the System. (See page 7). 1 Set the VOLUME control to the mini- mum position. 2 Press the MD/AUX button. Using External Equipments MD/AUX REMOTE CONTROL DIMMER SLEEP POWER AUTO DISPLAY PRESET FM MODE PROGRAM RANDOM REPEAT DOOR AHB PRO SLIDE CD BASS TREBLE CANCEL UP SET FADE MUTING DOWN CD MD/AUX FM / AM VOLUME MD/AUX FM/AM PRESET TUNING AHB PRO CD DOWN UP MULTI CONTROL CLOCK TIMER VOLUME...
... Instructions. 16 s First make sure that the external equipment is properly connected to the System. (See page 7). 1 Set the VOLUME control to the mini- mum position. 2 Press the MD/AUX button. Using External Equipments MD/AUX REMOTE CONTROL DIMMER SLEEP POWER AUTO DISPLAY PRESET FM MODE PROGRAM RANDOM REPEAT DOOR AHB PRO SLIDE CD BASS TREBLE CANCEL UP SET FADE MUTING DOWN CD MD/AUX FM / AM VOLUME MD/AUX FM/AM PRESET TUNING AHB PRO CD DOWN UP MULTI CONTROL CLOCK TIMER VOLUME...
User Manual
Page 19
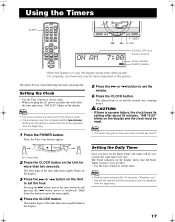
.... Setting the Clock • Use the Unit's button to set the minute. 6 Press the CLOCK button. Using the Timers SLEEP REMOTE CONTROL DIMMER SLEEP POWER AUTO DISPLAY PRESET FM MODE PROGRAM RANDOM REPEAT DOOR AHB PRO SLIDE CD BASS TREBLE CANCEL UP SET FADE MUTING DOWN CD MD/AUX FM / AM VOLUME MD/AUX FM/AM PRESET TUNING AHB PRO CD DOWN UP MULTI CONTROL CLOCK TIMER VOLUME TIMER 4 ¢ CLOCK ON time, OFF time, Source, Volume Timer indicator SLEEP SLEEP indicator * When the System is a power failure, the clock loses...
.... Setting the Clock • Use the Unit's button to set the minute. 6 Press the CLOCK button. Using the Timers SLEEP REMOTE CONTROL DIMMER SLEEP POWER AUTO DISPLAY PRESET FM MODE PROGRAM RANDOM REPEAT DOOR AHB PRO SLIDE CD BASS TREBLE CANCEL UP SET FADE MUTING DOWN CD MD/AUX FM / AM VOLUME MD/AUX FM/AM PRESET TUNING AHB PRO CD DOWN UP MULTI CONTROL CLOCK TIMER VOLUME TIMER 4 ¢ CLOCK ON time, OFF time, Source, Volume Timer indicator SLEEP SLEEP indicator * When the System is a power failure, the clock loses...

User Manual
Page 20
... display. Set the minute you want the Unit to set , "CLOCK" and "ADJUST" appear alternately on . Press the ¢ or 4 button to the desired station. To change the timer setting, repeat the setting procedure from the first track at Timer on , using the ¢ and 4 buttons. 3 Selecting the music source. 1. Using the Timers 1 Setting the ON time (Example: AM 10:15). 1. The Timer indicator lights up and the hour digit of the ON time blink...
... display. Set the minute you want the Unit to set , "CLOCK" and "ADJUST" appear alternately on . Press the ¢ or 4 button to the desired station. To change the timer setting, repeat the setting procedure from the first track at Timer on , using the ¢ and 4 buttons. 3 Selecting the music source. 1. Using the Timers 1 Setting the ON time (Example: AM 10:15). 1. The Timer indicator lights up and the hour digit of the ON time blink...

User Manual
Page 21
... the clock is playing. 1 Play a CD or tune in this sequence: 10 = 20 = 30 = 60 = 90 = 120 = Cancelled = (back to the beginning) The selected number of time you can only set the Sleep Timer when the System is on and a source is not set, "CLOCK" and "ADJUST" appear alternately on at first. 3 Set the length of minutes for the Sleep Timer will be turned on the display. Using the Timers...
... the clock is playing. 1 Play a CD or tune in this sequence: 10 = 20 = 30 = 60 = 90 = 120 = Cancelled = (back to the beginning) The selected number of time you can only set the Sleep Timer when the System is on and a source is not set, "CLOCK" and "ADJUST" appear alternately on at first. 3 Set the length of minutes for the Sleep Timer will be turned on the display. Using the Timers...
User Manual
Page 23
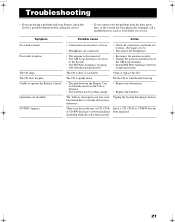
... to the best reception position. NO DISC appears. • Connections are incorrect, or loose. • Headphones are disabled. The built-in . functioned due to the System. • The FM Wire Antenna is blocked. • The batteries have lost their charge. • Remove the obstruction. • Replace the batteries. The CD does not play. There is heard. Operations are connected. • Check all connections and make corrections...
... to the best reception position. NO DISC appears. • Connections are incorrect, or loose. • Headphones are disabled. The built-in . functioned due to the System. • The FM Wire Antenna is blocked. • The batteries have lost their charge. • Remove the obstruction. • Replace the batteries. The CD does not play. There is heard. Operations are connected. • Check all connections and make corrections...
User Manual
Page 24
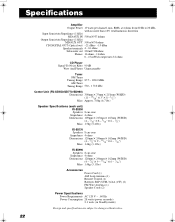
... Output Sensitivity/Impedance (1 kHz) MD/AUX OUT 500 mV/5 kohms CD DIGITAL OUT (Optical out) -21 dBm - -15 dBm Speaker terminals 4 - 16 ohms Subwoofer out 230mV/19kohms Phones 16 ohms - 1 kohm 0 - 15 mW/ch output into 32 ohms CD Player Signal-To-Noise Ratio 90 dB Wow And Flutter Unmeasurable Tuner FM Tuner Tuning Range 87.5 - 108.0 MHz AM Tuner Tuning Range 530 - 1 710 kHz Center Unit (FS-SD550...
... Output Sensitivity/Impedance (1 kHz) MD/AUX OUT 500 mV/5 kohms CD DIGITAL OUT (Optical out) -21 dBm - -15 dBm Speaker terminals 4 - 16 ohms Subwoofer out 230mV/19kohms Phones 16 ohms - 1 kohm 0 - 15 mW/ch output into 32 ohms CD Player Signal-To-Noise Ratio 90 dB Wow And Flutter Unmeasurable Tuner FM Tuner Tuning Range 87.5 - 108.0 MHz AM Tuner Tuning Range 530 - 1 710 kHz Center Unit (FS-SD550...
User Manual
Page 26
... of sale. Model No.: Serial No.: Purchase date: Name of original retail purchase for the period as listed above which will be defective, JVC will repair or replace defective parts at JVC authorized service centers. All products and parts thereof may also have other than a service facility authorized by JVC during normal business hours at no express warranties except as shown below the Model No. Operational adjustments covered...
... of sale. Model No.: Serial No.: Purchase date: Name of original retail purchase for the period as listed above which will be defective, JVC will repair or replace defective parts at JVC authorized service centers. All products and parts thereof may also have other than a service facility authorized by JVC during normal business hours at no express warranties except as shown below the Model No. Operational adjustments covered...


