
Instructions
Page 7
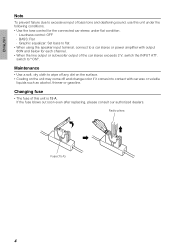
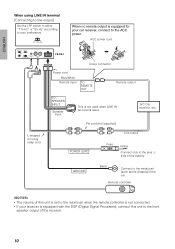
..., set this to the line output or subwoofer output of the car stereo. which gives you better sound. LINE IN terminal Use this to the position (a/b) Switches the cutoff frequency. PHASE switch LPF (Low Pass Filter) switch POWER/SPEAKER INPUT terminal Switch to AONB when using... Use L/MONO terminal when the subwoofer output is on and off the subwoofer output. Connects the power cord. REMOTE CONTROL terminal Connect the remote control. When it is monaural. Main Unit INPUT ATT. ON: Blue, OFF: Green Volume ⅐ Adjust the subwoofer output level. ⅐ Adjust ...
..., set this to the line output or subwoofer output of the car stereo. which gives you better sound. LINE IN terminal Use this to the position (a/b) Switches the cutoff frequency. PHASE switch LPF (Low Pass Filter) switch POWER/SPEAKER INPUT terminal Switch to AONB when using... Use L/MONO terminal when the subwoofer output is on and off the subwoofer output. Connects the power cord. REMOTE CONTROL terminal Connect the remote control. When it is monaural. Main Unit INPUT ATT. ON: Blue, OFF: Green Volume ⅐ Adjust the subwoofer output level. ⅐ Adjust ...
Instructions
Page 8
... contact with output 60W and below for each channel. • When the line output or subwoofer output of this unit under the following conditions. • Use the tone control for the connected car stereo under flat condition. ⅐ Loudness control: OFF ⅐ BASS: Flat ⅐ ...Graphic equalizer: Set bass to flat • When using the speaker input terminal, connect to a car stereo or power amplifier with car...
... contact with output 60W and below for each channel. • When the line output or subwoofer output of this unit under the following conditions. • Use the tone control for the connected car stereo under flat condition. ⅐ Loudness control: OFF ⅐ BASS: Flat ⅐ ...Graphic equalizer: Set bass to flat • When using the speaker input terminal, connect to a car stereo or power amplifier with car...
Instructions
Page 9
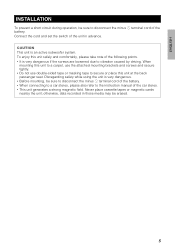
... Before mounting, be sure to disconnect the minus - Disregarding safety while using the unit is an active subwoofer system. Never place cassette tapes or magnetic cards nearby the unit; When mounting this unit to a carpet, use the attached mounting brackets and screws and secure tightly. &#...loosened due to the instruction manual of the battery. • When connecting to a car stereo, please also refer to vibration caused by driving. terminal cord of the car stereo. • This unit generates a strong magnetic field. ENGLISH INSTALLATION To prevent a short circuit during operation, ...
... Before mounting, be sure to disconnect the minus - Disregarding safety while using the unit is an active subwoofer system. Never place cassette tapes or magnetic cards nearby the unit; When mounting this unit to a carpet, use the attached mounting brackets and screws and secure tightly. &#...loosened due to the instruction manual of the battery. • When connecting to a car stereo, please also refer to vibration caused by driving. terminal cord of the car stereo. • This unit generates a strong magnetic field. ENGLISH INSTALLATION To prevent a short circuit during operation, ...

Instructions
Page 10
...) Use a cutter to make 4 holes. • Use the paper pattern to the mounting bracket C, you will hear a scrapping sound when the unit comes into contact with the car body as the car moves and vibrates. 6 CAUTION If the cushion is at the bottom. Mounting screw (Dia. 7/32 inch c 1 inch / M 5 mm c 25 mm) c 2 Cushion...
...) Use a cutter to make 4 holes. • Use the paper pattern to the mounting bracket C, you will hear a scrapping sound when the unit comes into contact with the car body as the car moves and vibrates. 6 CAUTION If the cushion is at the bottom. Mounting screw (Dia. 7/32 inch c 1 inch / M 5 mm c 25 mm) c 2 Cushion...

Instructions
Page 11
Treat the machined areas with the car. Mounting bracket A Mount such that the letter ABB is at the bottom. ENGLISH Procedures for vertical installation 1 Mount mounting brackets A and B at the bottom of the unit comes into contact with anti-rust and waterproof measures. • If... • Use the paper pattern to determine the position and mount the unit in the car. 1(218-193m/3m2 )inch Mounting bracket C (c2) assembled in the car to determine the positions. • Attach the cushion when the back of the unit Mounting bracket B Mounting screw (Dia. 7/32 inch c 11/32 inch...
Treat the machined areas with the car. Mounting bracket A Mount such that the letter ABB is at the bottom. ENGLISH Procedures for vertical installation 1 Mount mounting brackets A and B at the bottom of the unit comes into contact with anti-rust and waterproof measures. • If... • Use the paper pattern to determine the position and mount the unit in the car. 1(218-193m/3m2 )inch Mounting bracket C (c2) assembled in the car to determine the positions. • Attach the cushion when the back of the unit Mounting bracket B Mounting screw (Dia. 7/32 inch c 11/32 inch...
Instructions
Page 13
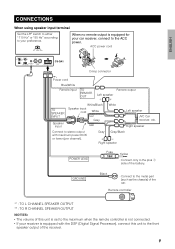
... Left speaker JVC Car receiver, etc. GROUND Black ⅐ Connect to the plus + side of the car. CONNECTIONS When using speaker input terminal Set the LPF switch to either A110 HzB or A85 HzB according to your car receiver, connect to the ACC power. Gray Gray/Black Right speaker POWER LEAD Fuse ...(Digital Signal Processor), connect this unit is set to the front speaker output of this unit to the maximum when the remote controller is not connected. • If your receiver is equipped for your preference. When no remote output is equipped with maximum power 60 W or lower (per ...
... Left speaker JVC Car receiver, etc. GROUND Black ⅐ Connect to the plus + side of the car. CONNECTIONS When using speaker input terminal Set the LPF switch to either A110 HzB or A85 HzB according to your car receiver, connect to the ACC power. Gray Gray/Black Right speaker POWER LEAD Fuse ...(Digital Signal Processor), connect this unit is set to the front speaker output of this unit to the maximum when the remote controller is not connected. • If your receiver is equipped for your preference. When no remote output is equipped with maximum power 60 W or lower (per ...
Instructions
Page 14
...Processor), connect this unit is set to the maximum when the remote controller is not connected. • If your preference. Pin cord (not supplied) Line output POWER LEAD GROUND Fuse 15A Yellow ⅐ Connect only to the plus + side of the receiver. 10 JVC Car receiver, etc.... When no remote output is equipped for your car receiver, connect to your receiver is used. Remote controller NOTES...
...Processor), connect this unit is set to the maximum when the remote controller is not connected. • If your preference. Pin cord (not supplied) Line output POWER LEAD GROUND Fuse 15A Yellow ⅐ Connect only to the plus + side of the receiver. 10 JVC Car receiver, etc.... When no remote output is equipped for your car receiver, connect to your receiver is used. Remote controller NOTES...

Instructions
Page 15
... terminal is equipped for your car receiver, connect to adjust the volume of the unit. (However, when the sound of the unit becomes distorted, lower the subwoofer output level of the battery. When no remote output is used. JVC Car receiver, etc. ACC power cord L-shaped pin plug relay... cord CS-DA1 Crimp connector Power cord Blue/White Remote ...
... terminal is equipped for your car receiver, connect to adjust the volume of the unit. (However, when the sound of the unit becomes distorted, lower the subwoofer output level of the battery. When no remote output is used. JVC Car receiver, etc. ACC power cord L-shaped pin plug relay... cord CS-DA1 Crimp connector Power cord Blue/White Remote ...

Instructions
Page 16
... LINE IN terminal is 1 channel, connect to adjust the volume of the unit. (However, when the sound of the unit becomes distorted, lower the subwoofer output level at the 5.1ch decoder.) • When the subwoofer output is used with vinyl tapes. 12 GROUND Black ⅐ Connect to AOFFB... to 5.1ch subwoofer output] Set the LPF switch to the metal part (such as the chassis) of the car. When no remote output is equipped for your car receiver, connect to the plus + side of the battery. JVC Car receiver, etc. Pin cord (not supplied) 5.1ch subwoofer output POWER LEAD Fuse 15A...
... LINE IN terminal is 1 channel, connect to adjust the volume of the unit. (However, when the sound of the unit becomes distorted, lower the subwoofer output level at the 5.1ch decoder.) • When the subwoofer output is used with vinyl tapes. 12 GROUND Black ⅐ Connect to AOFFB... to 5.1ch subwoofer output] Set the LPF switch to the metal part (such as the chassis) of the car. When no remote output is equipped for your car receiver, connect to the plus + side of the battery. JVC Car receiver, etc. Pin cord (not supplied) 5.1ch subwoofer output POWER LEAD Fuse 15A...
Instructions
Page 17
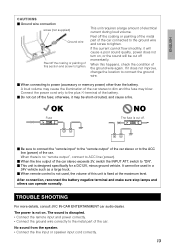
... to connect the ground wire. Ⅵ When connecting to tighten. If it will cause a poor sound quality, power does not turn on . TROUBLE SHOOTING For more details, consult JVC IN-CAR ENTERTAINMENT car audio dealer. No sound from the speaker. • Connect the line input or speaker input cord correctly. 13 ... of the ground wire again. The sound is disrupted. • Connect the remote input and power correctly. • Connect the ground wire correctly to the metal part of the car stereo to "ON". Ⅵ This unit is cut off . 15A Ⅵ Be sure to connect the "remote input" to the ...
... to connect the ground wire. Ⅵ When connecting to tighten. If it will cause a poor sound quality, power does not turn on . TROUBLE SHOOTING For more details, consult JVC IN-CAR ENTERTAINMENT car audio dealer. No sound from the speaker. • Connect the line input or speaker input cord correctly. 13 ... of the ground wire again. The sound is disrupted. • Connect the remote input and power correctly. • Connect the ground wire correctly to the metal part of the car stereo to "ON". Ⅵ This unit is cut off . 15A Ⅵ Be sure to connect the "remote input" to the ...