Owners Manual
Page 3
... 11 TRANSPORTING 52 Transporting the Scooter...52 12 MAINTENANCE 54 Suggested Maintenance Procedures ...54 13 TROUBLESHOOTING 55 General Troubleshooting...55 Service Indicator Error Codes...57 Part No. 1163141 3 Invacare® Leo™ Scooter CONTENTS 8 TILLER ADJUSTMENT 41 Adjusting the Tiller Angle ...41 9 WHEELS AND CASTERS 42 Removing/Installing the Drive Wheels...42 Removing/Installing the Front...
... 11 TRANSPORTING 52 Transporting the Scooter...52 12 MAINTENANCE 54 Suggested Maintenance Procedures ...54 13 TROUBLESHOOTING 55 General Troubleshooting...55 Service Indicator Error Codes...57 Part No. 1163141 3 Invacare® Leo™ Scooter CONTENTS 8 TILLER ADJUSTMENT 41 Adjusting the Tiller Angle ...41 9 WHEELS AND CASTERS 42 Removing/Installing the Drive Wheels...42 Removing/Installing the Front...

Owners Manual
Page 17
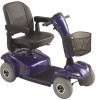
DO NOT operate the scooter unless the tiller is in the same locations for the three wheel model. DO NOT lift scooter up by the front or rear shroud. The labels are in the locked position. DO NOT lean against or pull forward on the tiller while mounting or dismounting the scooter. Otherwise, injury may occur. 1118373 Rev A Part No. 1163141 17 Serial Number Label Invacare® Leo™ Scooter Otherwise injury or damage to the scooter may occur. 3 Product Labeling 3 PRODUCT LABELING Four wheel model shown.
DO NOT operate the scooter unless the tiller is in the same locations for the three wheel model. DO NOT lift scooter up by the front or rear shroud. The labels are in the locked position. DO NOT lean against or pull forward on the tiller while mounting or dismounting the scooter. Otherwise, injury may occur. 1118373 Rev A Part No. 1163141 17 Serial Number Label Invacare® Leo™ Scooter Otherwise injury or damage to the scooter may occur. 3 Product Labeling 3 PRODUCT LABELING Four wheel model shown.

Owners Manual
Page 19
4 Technical Data 4.1 Typical Product Parameters Overall Dimensions Overall Length: Drive Unit Width: Overall Width: Overall Height: Seat Dimensions Width: Depth: Seat Height: Arm Dimensions Armrest Height: Part No. 1163141 4 TECHNICAL DATA 3 WHEEL 4 WHEEL 47.2 in 23.2 in 23 to 29 in (armrest adjustment range) 39 in 3 WHEEL 19 in 16 in 16.5 to 19.5 in 4 WHEEL 3 WHEEL 4 WHEEL 8 in 19 Invacare® Leo™ Scooter
4 Technical Data 4.1 Typical Product Parameters Overall Dimensions Overall Length: Drive Unit Width: Overall Width: Overall Height: Seat Dimensions Width: Depth: Seat Height: Arm Dimensions Armrest Height: Part No. 1163141 4 TECHNICAL DATA 3 WHEEL 4 WHEEL 47.2 in 23.2 in 23 to 29 in (armrest adjustment range) 39 in 3 WHEEL 19 in 16 in 16.5 to 19.5 in 4 WHEEL 3 WHEEL 4 WHEEL 8 in 19 Invacare® Leo™ Scooter

Owners Manual
Page 20
...Invacare® Leo™ Scooter 20 Part No. 1163141 Weight limitation is 325 lbs. Example: If weight limitation of the scooter is 350 lbs and additional items equal 25 lbs, subtract 25 lbs from 350 lbs this means the maximum weight limitation of Product: Maximum Weight Limitation: 3 WHEEL 173.7 lbs 350 lbs 4 WHEEL...; .50 inches unless otherwise indicated. 4 TECHNICAL DATA Driving Speed: Maximum Incline Capability: Turning Radius: 3 WHEEL 6° Grade 47.2 in 5 mph 4 WHEEL 8° Grade 52 in Weight Weight of the user is total weight (user weight plus any additional items...
...Invacare® Leo™ Scooter 20 Part No. 1163141 Weight limitation is 325 lbs. Example: If weight limitation of the scooter is 350 lbs and additional items equal 25 lbs, subtract 25 lbs from 350 lbs this means the maximum weight limitation of Product: Maximum Weight Limitation: 3 WHEEL 173.7 lbs 350 lbs 4 WHEEL...; .50 inches unless otherwise indicated. 4 TECHNICAL DATA Driving Speed: Maximum Incline Capability: Turning Radius: 3 WHEEL 6° Grade 47.2 in 5 mph 4 WHEEL 8° Grade 52 in Weight Weight of the user is total weight (user weight plus any additional items...

Owners Manual
Page 21
Thereafter follow these maintenance procedures: Part No. 1163141 21 Invacare® Leo™ Scooter To operate properly and safely, your personal body structure needs and preference. Initial adjustments should be replaced. CAUTION As with any vehicle, the wheels and tires should be checked periodically for cracks and wear, and should be cared for a thorough inspection...
Thereafter follow these maintenance procedures: Part No. 1163141 21 Invacare® Leo™ Scooter To operate properly and safely, your personal body structure needs and preference. Initial adjustments should be replaced. CAUTION As with any vehicle, the wheels and tires should be checked periodically for cracks and wear, and should be cared for a thorough inspection...
Owners Manual
Page 22
... engages and disengages properly and securely. ❑ Ensure that all labels are raised or turned. ❑ Inspect front wheel/fork assembly for flat spots and wear. Invacare® Leo™ Scooter 22 Part No. 1163141 The front wheel should come to a gradual stop. ❑ Check the front fork for damage or corrosion. ❑ Tighten locknut...
... engages and disengages properly and securely. ❑ Ensure that all labels are raised or turned. ❑ Inspect front wheel/fork assembly for flat spots and wear. Invacare® Leo™ Scooter 22 Part No. 1163141 The front wheel should come to a gradual stop. ❑ Check the front fork for damage or corrosion. ❑ Tighten locknut...
Owners Manual
Page 23
Ensure buckle latches. Replace if worn or damaged. Part No. 1163141 23 Invacare® Leo™ Scooter Verify that the hardware that the bolts and fasteners on the caster assemblies are present and legible. ❑ Inspect electrical components for signs of ...frame is easy to engage/disengage. ❑ Inspect for no excessive side movement or binding when the drive wheels are raised or turned. ❑ Check front fork for damage or corrosion. ❑ Ensure wheel bearings are clean and free of moisture. ❑ Clean upholstery and armrests. ❑ Inspect the seat ...
Ensure buckle latches. Replace if worn or damaged. Part No. 1163141 23 Invacare® Leo™ Scooter Verify that the hardware that the bolts and fasteners on the caster assemblies are present and legible. ❑ Inspect electrical components for signs of ...frame is easy to engage/disengage. ❑ Inspect for no excessive side movement or binding when the drive wheels are raised or turned. ❑ Check front fork for damage or corrosion. ❑ Ensure wheel bearings are clean and free of moisture. ❑ Clean upholstery and armrests. ❑ Inspect the seat ...

Owners Manual
Page 42
... 9.1 on page 33. 3. Remove the large washer from the threaded end of the four wheel and three wheel models. Set aside. 8. 9 WHEELS AND CASTERS 9 Wheels and Casters ƽ WARNING After any maintenance, adjustment or service, turn power Off and remove...wheel puller if necessary to remove other drive wheel. Remove the seat. Remove the cap, locknut and small washer from the drive shaft. 7. Keystock Drive Wheel Drive Shaft Threaded End Large Washer Small Washer Locknut Cap FIGURE 9.1 Removing/Installing the Drive Wheels Invacare® Leo™ Scooter...
... 9.1 on page 33. 3. Remove the large washer from the threaded end of the four wheel and three wheel models. Set aside. 8. 9 WHEELS AND CASTERS 9 Wheels and Casters ƽ WARNING After any maintenance, adjustment or service, turn power Off and remove...wheel puller if necessary to remove other drive wheel. Remove the seat. Remove the cap, locknut and small washer from the drive shaft. 7. Keystock Drive Wheel Drive Shaft Threaded End Large Washer Small Washer Locknut Cap FIGURE 9.1 Removing/Installing the Drive Wheels Invacare® Leo™ Scooter...

Owners Manual
Page 43
...of the drive shaft. Place the front of the powered scooter up on the drive shaft. 2. Align the front wheel with the cutout in the wheel hub. Part No. 1163141 43 Invacare® Leo™ Scooter Secure wheel to drive shaft by installing the small washer and locknut... onto the threaded end of wheel and mounting hardware before removing. Removing 1. Installing ...
...of the drive shaft. Place the front of the powered scooter up on the drive shaft. 2. Align the front wheel with the cutout in the wheel hub. Part No. 1163141 43 Invacare® Leo™ Scooter Secure wheel to drive shaft by installing the small washer and locknut... onto the threaded end of wheel and mounting hardware before removing. Removing 1. Installing ...

Owners Manual
Page 44
... power off the ground. 3. Installing 1. Remove the bolt, axle, washer, nut and two spacers that the front wheels are off and remove the key from the fork. Invacare® Leo™ Scooter 44 Part No. 1163141 Four Wheel Models 9.3 Removing/Installing the Front Wheels - Use the bolt, axle, washer, nut and two spacers to secure the...
... power off the ground. 3. Installing 1. Remove the bolt, axle, washer, nut and two spacers that the front wheels are off and remove the key from the fork. Invacare® Leo™ Scooter 44 Part No. 1163141 Four Wheel Models 9.3 Removing/Installing the Front Wheels - Use the bolt, axle, washer, nut and two spacers to secure the...
Owners Manual
Page 45
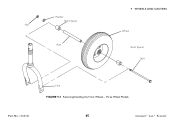
Washer Short Spacer Nut Axle 9 WHEELS AND CASTERS Wheel Short Spacer Bolt Part No. 1163141 Fork FIGURE 9.3 Removing/Installing the Front Wheels - Three Wheel Models 45 Invacare® Leo™ Scooter
Washer Short Spacer Nut Axle 9 WHEELS AND CASTERS Wheel Short Spacer Bolt Part No. 1163141 Fork FIGURE 9.3 Removing/Installing the Front Wheels - Three Wheel Models 45 Invacare® Leo™ Scooter

Owners Manual
Page 54
... or scouring liquids. 12.1 Suggested Maintenance Procedures 1. The wheels and tires should be checked periodically for prolonged periods of the front wheel checked to Charging the Batteries on page 48. Invacare® Leo™ Scooter 54 Part No. 1163141 12 MAINTENANCE 12 Maintenance ƽ... performing any parts for proper adjustment. 2. Use care in the front and drive wheels. DO NOT overtighten hardware attaching to contact the exposed terminals. Before using the powered scooter, make sure that batteries are tight. Check any maintenance, adjustment or service, turn...
... or scouring liquids. 12.1 Suggested Maintenance Procedures 1. The wheels and tires should be checked periodically for prolonged periods of the front wheel checked to Charging the Batteries on page 48. Invacare® Leo™ Scooter 54 Part No. 1163141 12 MAINTENANCE 12 Maintenance ƽ... performing any parts for proper adjustment. 2. Use care in the front and drive wheels. DO NOT overtighten hardware attaching to contact the exposed terminals. Before using the powered scooter, make sure that batteries are tight. Check any maintenance, adjustment or service, turn...
