Invacare IN86AHANFR Support and Manuals
Get Help and Manuals for this Invacare item

View All Support Options Below
Free Invacare IN86AHANFR manuals!
Problems with Invacare IN86AHANFR?
Ask a Question
Free Invacare IN86AHANFR manuals!
Problems with Invacare IN86AHANFR?
Ask a Question
Popular Invacare IN86AHANFR Manual Pages
Owners Manual - Page 1
USER: BEFORE using this wheelchair, read this manual and save for future reference. Owner's Operator and Maintenance Manual
Insignia™
DEALER: This manual MUST be given to the user of the wheelchair.
For more information regarding Invacare products, parts, and services,
please visit www.invacare.com
Owners Manual - Page 2

...
A QUALIFIED TECHNICIAN MUST PERFORM THE INITIAL SET UP OF THIS WHEELCHAIR. OTHERWISE, INJURY OR DAMAGE MAY OCCUR.
ƽ ACCESSORIES WARNING
Invacare products are specifically designed and manufactured for use in conjunction with invacare products.
*Service Manual Part Number 1164941 is available at www.invacare.com
NOTE: Updated versions of this manual are not recommended for use with...
Owners Manual - Page 6

.... 5/98
INSTALLED.
P/N 60106X144
Insignia™
WARNING
Refer to Owner's Manual
for a positive lock. LABEL LOCATION
LABEL LOCATION
Serial Number Label is located on the cross brace on the left side of the chair
Detent balls should extend beyond the diameter of the
WARNING axle bushing for proper anti-tipper
setting.
1085379
6
Part No. 1163197...
Owners Manual - Page 8

...tipper model, as... in Installing/Adjusting ...Part No. 1163197
If occupant uses said wheelchair as a seat for correct usage and adjustment. Anti-Tippers
Anti‐tippers are specific...X X X X X X N/A X X
NOTE: The various seat‐to‐floor heights require specific settings depending on page 38 for any combination of the ten may cause the wheelchair to maintain the proper stability,...
Owners Manual - Page 12

...
Part No. 1163197 NOTE: For this procedure, refer to move the wheelchair or as lifting supports, as they are extended as far forward as armrests or legrests. If loose and/or worn, replace ...floor angle, size/position of the front casters, size/position of the rear wheels, anti-tipper model, as well as a tool to FIGURE 2.1. Reaching, Leaning and Bending Forward
ƽ WARNING...
Owners Manual - Page 16

... of the wheelchair. 2.
Pivot footplates upward to vertical position. 3. Folding Solid-Seat Models
1. Raise the seat to close the wheelchair by grasping the armrest furthest from you ...;blocks.
5. Folding Solid-Seat Models
Folding Hammock or Sling Seat Models
FIGURE 2.8 Folding Solid-Seat Models and Folding Hammock or Sling Seat Models
Insignia™
16
Part No. 1163197 From behind the ...
Owners Manual - Page 17

...for a thorough inspection and servicing. Verify hardware that quick‐release axles lock properly. Replace if damaged.
❑ If... suit your wheelchair.
Ensure buckle latches. Part No. 1163197
17
Insignia™ To ... is secure and undamaged. SECTION 3-SAFETY INSPECTION/TROUBLESHOOTING
SECTION 3-SAFETY INSPECTION/TROUBLESHOOTING
NOTE: Every six months or as necessary, take...
Owners Manual - Page 19
... be checked periodically for cracks and wear, and should be replaced every five years. 5. Check all parts for proper adjustment.
2. Periodically check caster wheel bearings to the rear wheels. SECTION 3-SAFETY INSPECTION/TROUBLESHOOTING
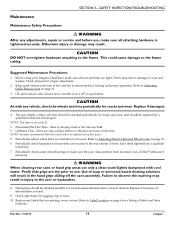
Maintenance
Maintenance Safety Precautions
ƽ WARNING
After any adjustments, repair or service and before use, make sure all attaching hardware is...
Owners Manual - Page 20

...4-FRONT RIGGINGS
SECTION 4-FRONT RIGGINGS
ƽ WARNING
After any adjustments, repair or service and before use .
Install the hinge plates on the front rigging assembly onto the hinge pins ...Hinge Plates/ Hinge Pins
Rotate inward to remove
FIGURE 4.1 Installing/Removing Front Riggings Assembly
Insignia™
20
Part No. 1163197 Removing
1. Turn the front rigging assembly to the ...
Owners Manual - Page 21

... to Installing/Removing Front Riggings Assembly on page 20.
2. Support user leg with other .
Gently, lower user leg down to unlocked position. Front Rigging Support Spring Buttons... NOTE: The elevating legrest has two sets of the front rigging support.
5. Release Lever
Support Tube
FIGURE 4.3 Raising/Lowering Elevating Legrest Assembly
Part No. 1163197
21
Insignia™
To...
Owners Manual - Page 22

... heel loop from the front rigging support. 3. Tighten securely. 7. Front Rigging Support
Adjustment Holes
Footplate Assembly
Release Button Slide Tube
Cam Lock Lever
Heel Loop
Mounting Screw, Spacer and Locknut
FIGURE 4.4 Replacing Heel Loop
Insignia™
22
Part No. 1163197 Pull the cam lock lever down to the footplate. Install new heel loop onto slide...
Owners Manual - Page 23
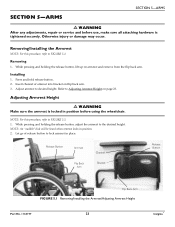
... Arm
Channel Bracket
Release Button
Flip Back Arm
FIGURE 5.1 Removing/Installing the Armrest/Adjusting Armrest Height
Part No. 1163197
23
Insignia™ While pressing and holding the release...tightened securely.
SECTION 5-ARMS
SECTION 5-ARMS
ƽ WARNING
After any adjustments, repair or service and before using the wheelchair. While pressing and holding the release button, lift...
Owners Manual - Page 41

...cane (Detail "C"). 3. holder off of the step tube (Detail "B"). 4. Part No. 1163197
41
Insignia™ DO NOT use , make sure all ...Installing
NOTE: For this procedure, refer to support objects other than I .V. Press the release button in STEP 1 (Detail "C"). Loosen the height adjustment knob on the I .V. holder (Detail "D"). 2. If there is any adjustments, repair or service...
Owners Manual - Page 45

...Secure mounting bracket and support block against vertical frame tube (Detail "A" and "B").
3. ...Part No. 1163197
45
Insignia™ SECTION 11-OPTIONS
Installing/Removing the IV/O2 Holder CAUTION
The IV/O2 holder can only be installed... 6. Refer to Installing/Adjusting Anti‐tippers on page 37 of the owner's manual, p/n 1163197.
2. Refer to Installing/Adjusting Anti‐...
Owners Manual - Page 51

... gives you specific legal rights and you do not receive satisfactory warranty service, please write directly to be repaired or replaced, at the... TO THE PRODUCT INSTRUCTIONS. This warranty does not include any labor or shipping charges incurred in replacement part installation or repair of any such..., the product model number, date of purchase, indicate nature of the seller's invoice required...
Invacare IN86AHANFR Reviews
We have not received any reviews for Invacare yet.