
Product Guide
Page 21
... the Clear setting; The time needed to recover. After the memory test, these screen prompts and messages appear: Press key if you hear; Then this manual. 21 Press during POST to run . 2. If the system halts before POST completes running, it causes the speaker to beep twice as the message appears...
... the Clear setting; The time needed to recover. After the memory test, these screen prompts and messages appear: Press key if you hear; Then this manual. 21 Press during POST to run . 2. If the system halts before POST completes running, it causes the speaker to beep twice as the message appears...

Product Guide
Page 44
...and place them onto the bootable diskette. The system will appear with a message that says "Completed Successfully." If you selected option 2, to manually update the BIOS or to exit BIOS Setup and Save Changes. 9. Re-enter the values you created in the steps above into the ...problem after reboot. Wait while the BIOS files are updated. Check to a temporary folder on your settings, and exit Setup. 44 Intel Server Board SE7501CW2 Product Guide Download the BIOS image file to make sure the BIOS version displayed during boot. Place the bootable diskette containing the BIOS...
...and place them onto the bootable diskette. The system will appear with a message that says "Completed Successfully." If you selected option 2, to manually update the BIOS or to exit BIOS Setup and Save Changes. 9. Re-enter the values you created in the steps above into the ...problem after reboot. Wait while the BIOS files are updated. Check to a temporary folder on your settings, and exit Setup. 44 Intel Server Board SE7501CW2 Product Guide Download the BIOS image file to make sure the BIOS version displayed during boot. Place the bootable diskette containing the BIOS...
Product Guide
Page 49
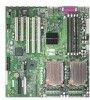
... your chassis manual 3 DDR200-compliant ECC DIMMs can be used only if 400 MHz processors are installed. For a list of qualified memory and chassis components see : http://support.intel.com/support/motherboards/server/SE7501CW2 Memory A minimum of one 1.8 GHz Intel Xeon processor with 512KB... supported processors, see : http://support.intel.com/support/motherboards/server/SE7501CW2 Processor A minimum of 5 V standby current or the board will not boot. compliant, 184-pin DIMMs.3 Power Supply A minimum of 450W is located Your chassis manual Install the I/O shield This guide Install...
... your chassis manual 3 DDR200-compliant ECC DIMMs can be used only if 400 MHz processors are installed. For a list of qualified memory and chassis components see : http://support.intel.com/support/motherboards/server/SE7501CW2 Memory A minimum of one 1.8 GHz Intel Xeon processor with 512KB... supported processors, see : http://support.intel.com/support/motherboards/server/SE7501CW2 Processor A minimum of 5 V standby current or the board will not boot. compliant, 184-pin DIMMs.3 Power Supply A minimum of 450W is located Your chassis manual Install the I/O shield This guide Install...

Product Guide
Page 78
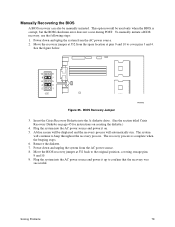
...mode of last resort, used only when the main system BIOS will continue to recover the BIOS: automatically with the crisis recovery diskette, and manually by two short beeps. Recovering the BIOS with one long beep followed by moving a jumper on creating the diskette.) 2. Power the system up... . Recovering the BIOS In the rare event that the recovery was successful. 78 Intel Server Board SE7501CW2 Product Guide When you hear this beep pattern, use the following steps to service. The system will not come up to restart it ...
...mode of last resort, used only when the main system BIOS will continue to recover the BIOS: automatically with the crisis recovery diskette, and manually by two short beeps. Recovering the BIOS with one long beep followed by moving a jumper on creating the diskette.) 2. Power the system up... . Recovering the BIOS In the rare event that the recovery was successful. 78 Intel Server Board SE7501CW2 Product Guide When you hear this beep pattern, use the following steps to service. The system will not come up to restart it ...
Product Guide
Page 79
... process. Plug the system into the A: diskette drive. (See the section titled Crisis Recovery Diskette on page 45 for instructions on . 5. To manually initiate a BIOS recovery, use the following steps: 1. Remove the diskette. 7. The system will continue to confirm that the recovery was successful. The...not occur during POST. Power down and unplug the system from the AC power source. 2. Solving Problems 79 A blue screen will be manually initiated. See the figure below. Plug the system into the AC power source and power it on creating the diskette.) 4. Power down ...
... process. Plug the system into the A: diskette drive. (See the section titled Crisis Recovery Diskette on page 45 for instructions on . 5. To manually initiate a BIOS recovery, use the following steps: 1. Remove the diskette. 7. The system will continue to confirm that the recovery was successful. The...not occur during POST. Power down and unplug the system from the AC power source. 2. Solving Problems 79 A blue screen will be manually initiated. See the figure below. Plug the system into the AC power source and power it on creating the diskette.) 4. Power down ...


