
User Manual (English)
Page 3
.... • Save these instructions for later use this monitor near water, such as near a bathtub or sink, or near your monitor. www.Insignia-Products.com Contents Welcome 1 Contents 1 Introduction 1 Important safety information 1 Features 3 Setting up your monitor 3 Using your monitor 5 Specifications 10 ...or transport your purchase of the monitor, and to correctly install, operate, and get the best performance from overheating. Your IS-CM100751 represents the state of the art in the sides, back, and bottom are provided for quick reference. Use a damp cloth for...
.... • Save these instructions for later use this monitor near water, such as near a bathtub or sink, or near your monitor. www.Insignia-Products.com Contents Welcome 1 Contents 1 Introduction 1 Important safety information 1 Features 3 Setting up your monitor 3 Using your monitor 5 Specifications 10 ...or transport your purchase of the monitor, and to correctly install, operate, and get the best performance from overheating. Your IS-CM100751 represents the state of the art in the sides, back, and bottom are provided for quick reference. Use a damp cloth for...
User Manual (English)
Page 4
... does not operate normally by the manufacturer that could result in installation, such as the original part. If you to operate. 2 www.Insignia-Products.com This will fit only into this monitor from the type of power source indicated on a bed, sofa, rug, or other controls...electric shock. • Never push objects of other soft surface. IS-CM100751_combined.fm Page 2 Tuesday, April 12, 2005 10:14 AM IS-CM100751 19-inch Color Monitor These openings must not be sure the service technician has used replacement parts specified by following conditions: • When the ...
... does not operate normally by the manufacturer that could result in installation, such as the original part. If you to operate. 2 www.Insignia-Products.com This will fit only into this monitor from the type of power source indicated on a bed, sofa, rug, or other controls...electric shock. • Never push objects of other soft surface. IS-CM100751_combined.fm Page 2 Tuesday, April 12, 2005 10:14 AM IS-CM100751 19-inch Color Monitor These openings must not be sure the service technician has used replacement parts specified by following conditions: • When the ...
User Manual (English)
Page 5
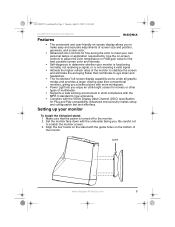
Latch www.Insignia-Products.com 3 Advanced microcircuitry makes setup and configuration fast and effortless. Setting up your own personal tastes or application requirements. Be careful not to scratch ... with the VESA Display Data Channel (DDC) specification for Plug and Play compatibility. IS-CM100751_combined.fm Page 3 Tuesday, April 12, 2005 10:14 AM IS-CM100751 19-inch Color Monitor Features • The convenient and user-friendly on-screen display allows you to make easy and accurate adjustments of the monitor.
Latch www.Insignia-Products.com 3 Advanced microcircuitry makes setup and configuration fast and effortless. Setting up your own personal tastes or application requirements. Be careful not to scratch ... with the VESA Display Data Channel (DDC) specification for Plug and Play compatibility. IS-CM100751_combined.fm Page 3 Tuesday, April 12, 2005 10:14 AM IS-CM100751 19-inch Color Monitor Features • The convenient and user-friendly on-screen display allows you to make easy and accurate adjustments of the monitor.

User Manual (English)
Page 6
IS-CM100751_combined.fm Page 4 Tuesday, April 12, 2005 10:14 AM IS-CM100751 19-inch Color Monitor 4 Insert the hooks into the guide holes. 5 Slide the tilt/swivel stand toward the back of the monitor until the latch ... latch, then pull the tilt/swivel stand toward the front of the monitor. 4 Pull the stand away from the monitor. VGA cable Power cord 4 www.Insignia-Products.com To remove the tilt/swivel stand: 1 Make sure that the power is turned off your computer and monitor. 2 Connect the VGA cable to...
IS-CM100751_combined.fm Page 4 Tuesday, April 12, 2005 10:14 AM IS-CM100751 19-inch Color Monitor 4 Insert the hooks into the guide holes. 5 Slide the tilt/swivel stand toward the back of the monitor until the latch ... latch, then pull the tilt/swivel stand toward the front of the monitor. 4 Pull the stand away from the monitor. VGA cable Power cord 4 www.Insignia-Products.com To remove the tilt/swivel stand: 1 Make sure that the power is turned off your computer and monitor. 2 Connect the VGA cable to...

User Manual (English)
Page 7
...selected function. • While the OSD is off . IS-CM100751_combined.fm Page 5 Tuesday, April 12, 2005 10:14 AM IS-CM100751 19-inch Color Monitor Using your monitor Using the control panel BRIGHTNESS MENU CONTRAST POWER LIGHT Brightness Menu Contrast/ Power light Power Indicator Power ...8226; Increases the value of any selected function. Power Button Press to the left window on and off , adjusts the screen brightness. www.Insignia-Products.com 5 Contrast Down • Moves the cursor to turn the monitor on the OSD. • Decreases the value of vertical size...
...selected function. • While the OSD is off . IS-CM100751_combined.fm Page 5 Tuesday, April 12, 2005 10:14 AM IS-CM100751 19-inch Color Monitor Using your monitor Using the control panel BRIGHTNESS MENU CONTRAST POWER LIGHT Brightness Menu Contrast/ Power light Power Indicator Power ...8226; Increases the value of any selected function. Power Button Press to the left window on and off , adjusts the screen brightness. www.Insignia-Products.com 5 Contrast Down • Moves the cursor to turn the monitor on the OSD. • Decreases the value of vertical size...
User Manual (English)
Page 8
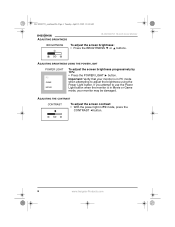
...use the Power Light button when the monitor is in Movie or Game mode, your monitor is in PC mode, press the CONTRAST button. 6 www.Insignia-Products.com Important: Verify that your monitor may be damaged. ADJUSTING BRIGHTNESS USING THE POWER LIGHT POWER LIGHT PC GAME MOVIE To adjust the screen... brightness progressively by 10%: • Press the POWER LIGHT button. IS-CM100751_combined.fm Page 6 Tuesday, April 12, 2005 10:14 AM IS-CM100751 19-inch Color Monitor ADJUSTING BRIGHTNESS BRIGHTNESS To adjust the screen brightness: • Press the BRIGHTNESS or buttons.
...use the Power Light button when the monitor is in Movie or Game mode, your monitor is in PC mode, press the CONTRAST button. 6 www.Insignia-Products.com Important: Verify that your monitor may be damaged. ADJUSTING BRIGHTNESS USING THE POWER LIGHT POWER LIGHT PC GAME MOVIE To adjust the screen... brightness progressively by 10%: • Press the POWER LIGHT button. IS-CM100751_combined.fm Page 6 Tuesday, April 12, 2005 10:14 AM IS-CM100751 19-inch Color Monitor ADJUSTING BRIGHTNESS BRIGHTNESS To adjust the screen brightness: • Press the BRIGHTNESS or buttons.

User Manual (English)
Page 9
IS-CM100751_combined.fm Page 7 Tuesday, April 12, 2005 10:14 AM IS-CM100751 19-inch Color Monitor Using the Menu button MENU MENU MENU SCREEN MENU EXIT MENU SCREEN H. MOIRE MENU OSD OFF To close the OSD and continue using your monitor: • Select Exit in the OSD. www.Insignia-Products.com 7
IS-CM100751_combined.fm Page 7 Tuesday, April 12, 2005 10:14 AM IS-CM100751 19-inch Color Monitor Using the Menu button MENU MENU MENU SCREEN MENU EXIT MENU SCREEN H. MOIRE MENU OSD OFF To close the OSD and continue using your monitor: • Select Exit in the OSD. www.Insignia-Products.com 7

User Manual (English)
Page 10
..., April 12, 2005 10:14 AM Using the OSD Icon Control Language H.Center & V.Center Color Temp Red Gain Green Gain IS-CM100751 19-inch Color Monitor Function Select the language for more convex or more concave shape. Adjust the vertical picture moire cancellation. Adjust the ...left or right. 8 www.Insignia-Products.com Adjust the green gain. Choose different preset color temperatures or set your own customized color values. Zoom Pincushion Trapezoid Pin Balance...
..., April 12, 2005 10:14 AM Using the OSD Icon Control Language H.Center & V.Center Color Temp Red Gain Green Gain IS-CM100751 19-inch Color Monitor Function Select the language for more convex or more concave shape. Adjust the vertical picture moire cancellation. Adjust the ...left or right. 8 www.Insignia-Products.com Adjust the green gain. Choose different preset color temperatures or set your own customized color values. Zoom Pincushion Trapezoid Pin Balance...

User Manual (English)
Page 11
... when the bottom sides of the screen are bowed. Normal range H: 30-95 KHz V: 50-160 Hz www.Insignia-Products.com 9 IS-CM100751_combined.fm Page 9 Tuesday, April 12, 2005 10:14 AM IS-CM100751 19-inch Color Monitor Icon Control T.Pin Corner B.Pin Corner Rotation Degauss Status Signal Level Recall Function Adjust...
... when the bottom sides of the screen are bowed. Normal range H: 30-95 KHz V: 50-160 Hz www.Insignia-Products.com 9 IS-CM100751_combined.fm Page 9 Tuesday, April 12, 2005 10:14 AM IS-CM100751 19-inch Color Monitor Icon Control T.Pin Corner B.Pin Corner Rotation Degauss Status Signal Level Recall Function Adjust...
User Manual (English)
Page 12
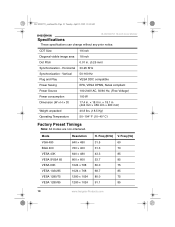
....5 60 31.3 70 43.3 85 53.7 85 60.0 75 68.7 85 80.0 75 91.1 85 10 www.Insignia-Products.com IS-CM100751_combined.fm Page 10 Tuesday, April 12, 2005 10:14 AM IS-CM100751 19-inch Color Monitor Specifications These specifications can change without any prior notice. Freq (KHz) V. Vertical 50-160...
....5 60 31.3 70 43.3 85 53.7 85 60.0 75 68.7 85 80.0 75 91.1 85 10 www.Insignia-Products.com IS-CM100751_combined.fm Page 10 Tuesday, April 12, 2005 10:14 AM IS-CM100751 19-inch Color Monitor Specifications These specifications can change without any prior notice. Freq (KHz) V. Vertical 50-160...
User Manual (English)
Page 13
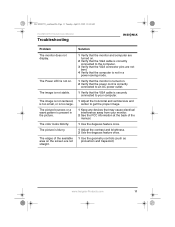
... 1 Verify that the monitor is turned on . The color looks blotchy. IS-CM100751_combined.fm Page 11 Tuesday, April 12, 2005 10:14 AM IS-CM100751 19-inch Color Monitor Troubleshooting Problem The monitor does not display. The Power LED is not on . 2 Verify that the power cord is correctly connected...from your computer. 1 Adjust the horizontal and vertical size and center to the computer. 3 Verify that the VGA connector pins are not straight. www.Insignia-Products.com 11 The image is not centered, is too small, or is not in the picture. The edges of the manual. 1 Use the degauss...
... 1 Verify that the monitor is turned on . The color looks blotchy. IS-CM100751_combined.fm Page 11 Tuesday, April 12, 2005 10:14 AM IS-CM100751 19-inch Color Monitor Troubleshooting Problem The monitor does not display. The Power LED is not on . 2 Verify that the power cord is correctly connected...from your computer. 1 Adjust the horizontal and vertical size and center to the computer. 3 Verify that the VGA connector pins are not straight. www.Insignia-Products.com 11 The image is not centered, is too small, or is not in the picture. The edges of the manual. 1 Use the degauss...
User Manual (English)
Page 14
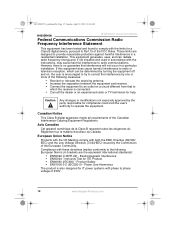
... could void the user's authority to operate the equipment. IS-CM100751_combined.fm Page 12 Tuesday, April 12, 2005 10:14 AM IS-CM100751 19-inch Color Monitor Federal Communications Commission Radio Frequency Interference Statement This equipment has been tested and found to comply with the limits for ...the EMC Directive (89/336/ EEC) and the Low Voltage Directive (73/23/EEC) issued by one or more of 230V. 12 www.Insignia-Products.com Compliance with these directives implies conformity to the following measures: • Reorient or relocate the receiving antenna. • Increase the ...
... could void the user's authority to operate the equipment. IS-CM100751_combined.fm Page 12 Tuesday, April 12, 2005 10:14 AM IS-CM100751 19-inch Color Monitor Federal Communications Commission Radio Frequency Interference Statement This equipment has been tested and found to comply with the limits for ...the EMC Directive (89/336/ EEC) and the Low Voltage Directive (73/23/EEC) issued by one or more of 230V. 12 www.Insignia-Products.com Compliance with these directives implies conformity to the following measures: • Reorient or relocate the receiving antenna. • Increase the ...