

User Guide
Page 3
... support A-1 Telephone technical support A-1 Appendix B. Notices B-1 Trademarks B-2 © Copyright Lenovo 2005. © Portions Copyright IBM Corp. 2005 iii Reference information 3-1 Monitor specifications 3-1 Troubleshooting 3-2 Manual image setup 3-4 Manually installing the monitor driver 3-4 Installing the monitor driver in Windows XP 3-4 Installing the monitor driver in Windows 2000 3-5 Getting further help 3-6 Service information 3-7 Product numbers 3-7 Customer responsibilities 3-7 Service...
... support A-1 Telephone technical support A-1 Appendix B. Notices B-1 Trademarks B-2 © Copyright Lenovo 2005. © Portions Copyright IBM Corp. 2005 iii Reference information 3-1 Monitor specifications 3-1 Troubleshooting 3-2 Manual image setup 3-4 Manually installing the monitor driver 3-4 Installing the monitor driver in Windows XP 3-4 Installing the monitor driver in Windows 2000 3-5 Getting further help 3-6 Service information 3-7 Product numbers 3-7 Customer responsibilities 3-7 Service...

User Guide
Page 4
Safety information Before installing this product, read the Safety Information. í í í v ThinkVision L201p Flat Panel Monitor User's Guide
Safety information Before installing this product, read the Safety Information. í í í v ThinkVision L201p Flat Panel Monitor User's Guide

User Guide
Page 5
...; L201p Flat Panel Monitor. Shipping contents The product package should include the following items: • ThinkVision L201p Flat Panel Monitor Setup Poster • Monitor Safety, Troubleshooting, and Warranty Guide • Reference and Driver CD • ThinkVision L201p Flat Panel Monitor • Power Cord • Analog Interface Cable - Getting started This User's Guide contains detailed information on page 2-7. © Copyright Lenovo 2005. © Portions Copyright IBM Corp...
...; L201p Flat Panel Monitor. Shipping contents The product package should include the following items: • ThinkVision L201p Flat Panel Monitor Setup Poster • Monitor Safety, Troubleshooting, and Warranty Guide • Reference and Driver CD • ThinkVision L201p Flat Panel Monitor • Power Cord • Analog Interface Cable - Getting started This User's Guide contains detailed information on page 2-7. © Copyright Lenovo 2005. © Portions Copyright IBM Corp...

User Guide
Page 6
Swivel With the built-in pedestal, you can swivel the monitor for an example of the tilt range. Height Adjustment After pressing the top of the monitor, remove the fixed pin and adjust the height of adjustments Please see the illustration below for the most comfortable viewing angle. Product overview This section will provide information on adjusting monitor positions, setting user controls, and using the cable lock slot. Types of the monitor. 1-2 ThinkVision L201p Flat Panel Monitor User's Guide
Swivel With the built-in pedestal, you can swivel the monitor for an example of the tilt range. Height Adjustment After pressing the top of the monitor, remove the fixed pin and adjust the height of adjustments Please see the illustration below for the most comfortable viewing angle. Product overview This section will provide information on adjusting monitor positions, setting user controls, and using the cable lock slot. Types of the monitor. 1-2 ThinkVision L201p Flat Panel Monitor User's Guide

User Guide
Page 7
Monitor Pivot 1. For information on how to use these controls, please see "Adjusting your monitor image" on the front which are used to adjust the display. Chapter 1. 1-3 Extended Position - User controls Your monitor has controls on page 2-3. In locked/down Position - Rotate clockwise until the monitor stops at 90 °. 2. Tilt upwards, so that lower edge of monitor clears the stand. - Rotate clockwise until the monitor stops at 90 °.
Monitor Pivot 1. For information on how to use these controls, please see "Adjusting your monitor image" on the front which are used to adjust the display. Chapter 1. 1-3 Extended Position - User controls Your monitor has controls on page 2-3. In locked/down Position - Rotate clockwise until the monitor stops at 90 °. 2. Tilt upwards, so that lower edge of monitor clears the stand. - Rotate clockwise until the monitor stops at 90 °.

User Guide
Page 8
..., Troubleshooting, and Warranty Guide before carrying out this procedure. 1. Please see the instructions that come with the monitor. 1-4 ThinkVision L201p Flat Panel Monitor User's Guide Connect the analog signal cable to the video port on the back of the computer. Note: The digital cable is not included ...with the cable lock to learn how to attach it. Cable lock slot Your monitor is equipped with a cable lock slot located on the rear of your monitor Note: Be sure to read the Safety Information located in the lower right corner). Power off your computer ...
..., Troubleshooting, and Warranty Guide before carrying out this procedure. 1. Please see the instructions that come with the monitor. 1-4 ThinkVision L201p Flat Panel Monitor User's Guide Connect the analog signal cable to the video port on the back of the computer. Note: The digital cable is not included ...with the cable lock to learn how to attach it. Cable lock slot Your monitor is equipped with a cable lock slot located on the rear of your monitor Note: Be sure to read the Safety Information located in the lower right corner). Power off your computer ...
User Guide
Page 9
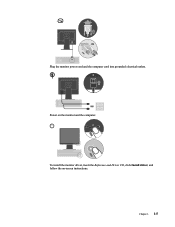
Power on -screen instructions. To install the monitor driver, insert the Reference and Driver CD, click Install driver, and follow the on the monitor and the computer. Chapter 1. 1-5 Plug the monitor power cord and the computer cord into grounded electrical outlets.
Power on -screen instructions. To install the monitor driver, insert the Reference and Driver CD, click Install driver, and follow the on the monitor and the computer. Chapter 1. 1-5 Plug the monitor power cord and the computer cord into grounded electrical outlets.

User Guide
Page 10
...you for at least 15 minutes. Registering your registered product unless you indicate on page 3-4 . Automatic image setup requires that the monitor is warmed up for purchasing this Lenovo™ product. This is valuable to us with you. Your feedback is not required for ... automatic image setup does not establish the image that you , as well as in developing better ways to receive further information. 1-6 ThinkVision L201p Flat Panel Monitor User's Guide To optimize your Product and provide us in developing product and services that are important to you prefer, perform manual image...
...you for at least 15 minutes. Registering your registered product unless you indicate on page 3-4 . Automatic image setup requires that the monitor is warmed up for purchasing this Lenovo™ product. This is valuable to us with you. Your feedback is not required for ... automatic image setup does not establish the image that you , as well as in developing better ways to receive further information. 1-6 ThinkVision L201p Flat Panel Monitor User's Guide To optimize your Product and provide us in developing product and services that are important to you prefer, perform manual image...

User Guide
Page 11
...are in a relaxed state. • Tilt: Adjust the tilt of your monitor to optimize the appearance of site between your eyes and the center the monitor suits your preferences for monitors range from approximately 510mm to 760mm (20 in to 30 in) and can achieve different viewing distances by repositioning your... monitor or by considering the following topics describe how to optimize equipment setup to work area clean and clear for the type of the screen is at : http://www.ibm.com/pc/ww/...
...are in a relaxed state. • Tilt: Adjust the tilt of your monitor to optimize the appearance of site between your eyes and the center the monitor suits your preferences for monitors range from approximately 510mm to 760mm (20 in to 30 in) and can achieve different viewing distances by repositioning your... monitor or by considering the following topics describe how to optimize equipment setup to work area clean and clear for the type of the screen is at : http://www.ibm.com/pc/ww/...

User Guide
Page 12
Also, be purchased through vendors or accessed at: http://www.ibm.com/able 2-2 ThinkVision L201p Flat Panel Monitor User's Guide Periodically make minor modifications in your posture to help you remain comfortable and productive while you use your computer. • Good posture starts ...
Also, be purchased through vendors or accessed at: http://www.ibm.com/able 2-2 ThinkVision L201p Flat Panel Monitor User's Guide Periodically make minor modifications in your posture to help you remain comfortable and productive while you use your computer. • Good posture starts ...

User Guide
Page 13
... press to move backwards through the OSD. Use or to select that function. Press to make adjustments. Adjusting your monitor image This section describes the user control features for adjusting your monitor image. Direct access controls Icon Control Image Setup Brightness Description Activates automatic image adjustment. Use or to move among the...
... press to move backwards through the OSD. Use or to select that function. Press to make adjustments. Adjusting your monitor image This section describes the user control features for adjusting your monitor image. Direct access controls Icon Control Image Setup Brightness Description Activates automatic image adjustment. Use or to move among the...

User Guide
Page 14
..., and blue. See "Manual image setup" on Main Menu Submenu Description Adjusts overall brightness Controls and Adjustments (Analog) Controls and Adjustments (Digital) Same as Analog 2-4 ThinkVision L201p Flat Panel Monitor User's Guide Controls Locked not required for digital input Vertical Position Moves the image up or down. Table 2-2. OSD functions OSD Icon on page 3-4. •...
..., and blue. See "Manual image setup" on Main Menu Submenu Description Adjusts overall brightness Controls and Adjustments (Analog) Controls and Adjustments (Digital) Same as Analog 2-4 ThinkVision L201p Flat Panel Monitor User's Guide Controls Locked not required for digital input Vertical Position Moves the image up or down. Table 2-2. OSD functions OSD Icon on page 3-4. •...

User Guide
Page 15
...on Main Menu Submenu Input video signal Options Information Language Menu Position Default Custom Reset Accessibility Description Controls and Adjustments (Analog) This monitor can accept video signals through two different connectors. Most desktop computers use DVI connector. - Selects D-SUB (Analog) - Default...of the OSD. • Vertical: Changes the vertical position of the OSD. • Cancel • Reset • Save Resets monitor to the settings. Note: This screen does not allow any software running on any changes to the original factory settings. Selects DVI-...
...on Main Menu Submenu Input video signal Options Information Language Menu Position Default Custom Reset Accessibility Description Controls and Adjustments (Analog) This monitor can accept video signals through two different connectors. Most desktop computers use DVI connector. - Selects D-SUB (Analog) - Default...of the OSD. • Vertical: Changes the vertical position of the OSD. • Cancel • Reset • Save Resets monitor to the settings. Note: This screen does not allow any software running on any changes to the original factory settings. Selects DVI-...
User Guide
Page 16
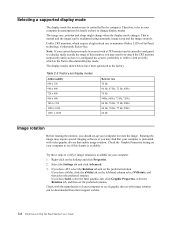
...then set the preferred rotation. Therefore, refer to see if graphic drivers with image rotation can be downloaded from their support website. 2-6 ThinkVision L201p Flat Panel Monitor User's Guide This is currently configured to a display mode outside the range of your computer to your computer. 1. Factory set display... mode changes. If you should set the preferred rotation. Selecting a supported display mode The display mode the monitor uses is the Native Resolution Display mode. Right-click on how to minimize flicker, LCD or Flat Panel technology is available.
...then set the preferred rotation. Therefore, refer to see if graphic drivers with image rotation can be downloaded from their support website. 2-6 ThinkVision L201p Flat Panel Monitor User's Guide This is currently configured to a display mode outside the range of your computer to your computer. 1. Factory set display... mode changes. If you should set the preferred rotation. Selecting a supported display mode The display mode the monitor uses is the Native Resolution Display mode. Right-click on how to minimize flicker, LCD or Flat Panel technology is available.

User Guide
Page 17
... 2. 2-7 Note: Standby also occurs if there is invoked when the computer recognizes that you have not used your monitor at the end of each working day, or whenever you expect to the monitor. Understanding power management Power management is no image output to leave it unused for a user-definable period. For optimal...
... 2. 2-7 Note: Standby also occurs if there is invoked when the computer recognizes that you have not used your monitor at the end of each working day, or whenever you expect to the monitor. Understanding power management Power management is no image output to leave it unused for a user-definable period. For optimal...

User Guide
Page 18
... power before you perform any maintenance on a clean surface or soft cloth, remove the four screws from the monitor. 2-8 ThinkVision L201p Flat Panel Monitor User's Guide Detaching the monitor stand After placing the monitor face down on the monitor. Caring for your monitor Be sure to your screen. • Use any cleaner which contains an anti-static solution or similar...
... power before you perform any maintenance on a clean surface or soft cloth, remove the four screws from the monitor. 2-8 ThinkVision L201p Flat Panel Monitor User's Guide Detaching the monitor stand After placing the monitor face down on the monitor. Caring for your monitor Be sure to your screen. • Use any cleaner which contains an anti-static solution or similar...

User Guide
Page 19
Reference information This section contains monitor specifications, instructions to manually install the monitor driver, troubleshooting information, and service information. Monitor specifications for type-model 9320-Hxx and 9220-Hxx Dimensions Height 410.5 mm (16.2 in.) 520.5 mm (20.5 in.) Depth 248.0 mm (9.8 in.) Stand VESA mount...Range: 110.0mm Yes (clockwise 90 degree) 100 mm (3.94 in.) Image Viewable image size Radial arm sold separately. 510.54 mm (20.1 in.)3 Maximum height 306.0 mm (12.05 in.) Maximum width 408.0 mm (16.06 in.) Power input Pixel pitch Supply voltage...
Reference information This section contains monitor specifications, instructions to manually install the monitor driver, troubleshooting information, and service information. Monitor specifications for type-model 9320-Hxx and 9220-Hxx Dimensions Height 410.5 mm (16.2 in.) 520.5 mm (20.5 in.) Depth 248.0 mm (9.8 in.) Stand VESA mount...Range: 110.0mm Yes (clockwise 90 degree) 100 mm (3.94 in.) Image Viewable image size Radial arm sold separately. 510.54 mm (20.1 in.)3 Maximum height 306.0 mm (12.05 in.) Maximum width 408.0 mm (16.06 in.) Power input Pixel pitch Supply voltage...

User Guide
Page 20
Table 3-1. Monitor specifications for type-model 9320-Hxx and 9220-Hxx Video input (Digital) Interface DVI Input Signal VESA TMDS (Panel Link™) Horizontal addressability 1600 pixels (max) Vertical addressability 1200 lines (max) Clock frequency Communications VESA DDC Supported Display Modes Horizontal frequency (VESA Standard modes between noted ranges) Vertical frequency Native Resolution Temperature Operating 162 MHz CI 30 kHz - 92 kHz(Pixel clock
Table 3-1. Monitor specifications for type-model 9320-Hxx and 9220-Hxx Video input (Digital) Interface DVI Input Signal VESA TMDS (Panel Link™) Horizontal addressability 1600 pixels (max) Vertical addressability 1200 lines (max) Clock frequency Communications VESA DDC Supported Display Modes Horizontal frequency (VESA Standard modes between noted ranges) Vertical frequency Native Resolution Temperature Operating 162 MHz CI 30 kHz - 92 kHz(Pixel clock

User Guide
Page 21
...on page 2-6 If using a Windows system, restart the system in • and power Standby/Suspend mode indicator is not connected with the monitor or system completely. If these options do not work, contact the Support Center. Be sure the signal cable is connected properly. Perform automatic ... are shown on . • The power cord is loose or • disconnected. • There is no image. • • The monitor's • power switch is not switched on the screen, and the power indicator is unnacceptable. The image quality is flashing green. Try using another...
...on page 2-6 If using a Windows system, restart the system in • and power Standby/Suspend mode indicator is not connected with the monitor or system completely. If these options do not work, contact the Support Center. Be sure the signal cable is connected properly. Perform automatic ... are shown on . • The power cord is loose or • disconnected. • There is no image. • • The monitor's • power switch is not switched on the screen, and the power indicator is unnacceptable. The image quality is flashing green. Try using another...
User Guide
Page 22
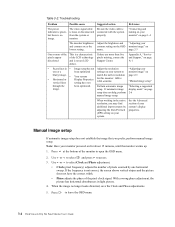
...additional improvements by one horizontal sweep. Note: Have your monitor" on page 1-4 The monitor brightness and contrast are more of the pixels appear discolored This is a characteristic of the LCD technology and is not an LCD defect. With a wrong phase adjustment, the picture has...open the OSD menu. 2. setup. Press to access. 3. Use or to select and press to leave the OSD menu. 3-4 ThinkVision L201p Flat Panel Monitor User's Guide If the frequency is no longer looks distorted, save the Clock and Phase adjustments. 5. Troubleshooting Problem Possible cause Suggested action...
...additional improvements by one horizontal sweep. Note: Have your monitor" on page 1-4 The monitor brightness and contrast are more of the pixels appear discolored This is a characteristic of the LCD technology and is not an LCD defect. With a wrong phase adjustment, the picture has...open the OSD menu. 2. setup. Press to access. 3. Use or to select and press to leave the OSD menu. 3-4 ThinkVision L201p Flat Panel Monitor User's Guide If the frequency is no longer looks distorted, save the Clock and Phase adjustments. 5. Troubleshooting Problem Possible cause Suggested action...

