Reference Manual
Page 4
......iv Introduction...1 Getting started...2 Package contents...2 Handling precautions ...3 Tools for installation...3 IBM Disk Manager 2000 Easy Installation Software 3 Options for installation ...4 Install a new drive as Master...5 Begin the hardware install...5 Configure the jumper settings...5 Attach the cables...6 Mount the drive...7 Complete the hardware install ...7 Set the BIOS/CMOS ...8 Partition and format with Disk Manager 2000 Easy...
......iv Introduction...1 Getting started...2 Package contents...2 Handling precautions ...3 Tools for installation...3 IBM Disk Manager 2000 Easy Installation Software 3 Options for installation ...4 Install a new drive as Master...5 Begin the hardware install...5 Configure the jumper settings...5 Attach the cables...6 Mount the drive...7 Complete the hardware install ...7 Set the BIOS/CMOS ...8 Partition and format with Disk Manager 2000 Easy...
Reference Manual
Page 9
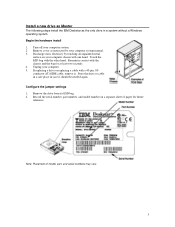
...on your computer system. 2. Store the drive or cable in a safe place in case it . Note: Placement of paper for at least two seconds. 4. Install a new drive as Master The following steps install the IBM Deskstar as instructed by touching an unpainted metal...drive from its ESD bag. 2. Begin the hardware install 1. Remain in a system without a Windows operating system. Touch the ESD bag with the chassis and the bag for future reference. Turn off your computer chassis with a 40-pin, 80conductor ATA/IDE cable, remove it should be needed again. Configure the jumper settings...
...on your computer system. 2. Store the drive or cable in a safe place in case it . Note: Placement of paper for at least two seconds. 4. Install a new drive as Master The following steps install the IBM Deskstar as instructed by touching an unpainted metal...drive from its ESD bag. 2. Begin the hardware install 1. Remain in a system without a Windows operating system. Touch the ESD bag with the chassis and the bag for future reference. Turn off your computer chassis with a 40-pin, 80conductor ATA/IDE cable, remove it should be needed again. Configure the jumper settings...
Reference Manual
Page 10
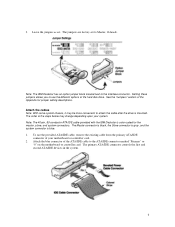
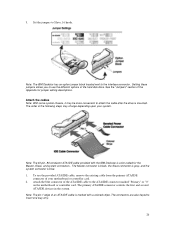
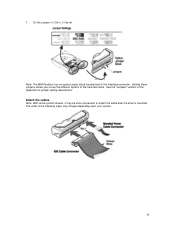
See the "Jumpers" section of the hard disk drive. Note: The 40-pin, 80-conductor ATA/IDE cable provided with the IBM Deskstar is blue. 1. The primary ATA/IDE connector controls the first and second ATA/IDE devices in the system. 6 Setting these jumpers allows you to use the provided ATA/IDE cable, ...cable from the primary ATA/IDE connector of the ATA/IDE cable to attach the cable after the drive is mounted. The jumpers are factory set . Note: The IBM Deskstar has an option jumper block located next to Master, 16 heads. The order of the steps below may be more convenient...
See the "Jumpers" section of the hard disk drive. Note: The 40-pin, 80-conductor ATA/IDE cable provided with the IBM Deskstar is blue. 1. The primary ATA/IDE connector controls the first and second ATA/IDE devices in the system. 6 Setting these jumpers allows you to use the provided ATA/IDE cable, ...cable from the primary ATA/IDE connector of the ATA/IDE cable to attach the cable after the drive is mounted. The jumpers are factory set . Note: The IBM Deskstar has an option jumper block located next to Master, 16 heads. The order of the steps below may be more convenient...
Reference Manual
Page 19
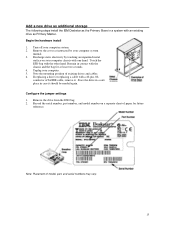
...Unplug your computer chassis with one hand. Note: Placement of existing drives and cables. 6. Discharge static electricity by your computer system. 2. If replacing a drive or replacing a cable with an existing drive as Primary Master. Configure the jumper settings 1. Record the serial number, part number, and model number ...model, part, and serial numbers may vary. 15 Remove the drive from the ESD bag. 2. Add a new drive as additional storage The following steps install the IBM Deskstar as the Primary Slave in a system with a 40-pin, 80conductor ATA/IDE cable, remove it should be needed...
...Unplug your computer chassis with one hand. Note: Placement of existing drives and cables. 6. Discharge static electricity by your computer system. 2. If replacing a drive or replacing a cable with an existing drive as Primary Master. Configure the jumper settings 1. Record the serial number, part number, and model number ...model, part, and serial numbers may vary. 15 Remove the drive from the ESD bag. 2. Add a new drive as additional storage The following steps install the IBM Deskstar as the Primary Slave in a system with a 40-pin, 80conductor ATA/IDE cable, remove it should be needed...

Reference Manual
Page 20
... 40-pin, 80-conductor ATA/IDE cable provided with a colored stripe. Setting these jumpers allows you to use the provided ATA/IDE cable, remove the existing cable from the primary ATA/IDE connector of an ATA/IDE cable is marked with the IBM Deskstar is blue. 1. Attach the blue connector of the hard disk drive. See the "Jumpers...
... 40-pin, 80-conductor ATA/IDE cable provided with a colored stripe. Setting these jumpers allows you to use the provided ATA/IDE cable, remove the existing cable from the primary ATA/IDE connector of an ATA/IDE cable is marked with the IBM Deskstar is blue. 1. Attach the blue connector of the hard disk drive. See the "Jumpers...
Reference Manual
Page 29
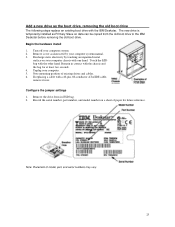
...jumper settings 1. Add a new drive as instructed by touching an unpainted metal surface on a sheet of paper for at least two seconds. 4. Remove the drive from the old boot drive to the IBM Deskstar before removing the old boot drive. Remove cover as the boot drive, removing the old boot drive The following steps replace an existing boot drive with the IBM Deskstar... on your computer system. 2. Begin the hardware install 1. Note: Placement of existing drives and cables. 6. Touch the ESD bag with a 40-pin, 80-conductor ATA/IDE cable, remove it now. Unplug your computer. 5. ...
...jumper settings 1. Add a new drive as instructed by touching an unpainted metal surface on a sheet of paper for at least two seconds. 4. Remove the drive from the old boot drive to the IBM Deskstar before removing the old boot drive. Remove cover as the boot drive, removing the old boot drive The following steps replace an existing boot drive with the IBM Deskstar... on your computer system. 2. Begin the hardware install 1. Note: Placement of existing drives and cables. 6. Touch the ESD bag with a 40-pin, 80-conductor ATA/IDE cable, remove it now. Unplug your computer. 5. ...
Reference Manual
Page 30
.... Note: The 40-pin, 80-conductor ATA/IDE cable provided with the IBM Deskstar is marked with a colored stripe. The connectors are also keyed to Slave, 16 heads. Set the jumpers to insert one way only. 26 Note: The IBM Deskstar has an option jumper block located next ...to use the provided ATA/IDE cable, remove the existing cable from the primary ATA/IDE connector of the hard disk drive...
.... Note: The 40-pin, 80-conductor ATA/IDE cable provided with the IBM Deskstar is marked with a colored stripe. The connectors are also keyed to Slave, 16 heads. Set the jumpers to insert one way only. 26 Note: The IBM Deskstar has an option jumper block located next ...to use the provided ATA/IDE cable, remove the existing cable from the primary ATA/IDE connector of the hard disk drive...
Reference Manual
Page 39
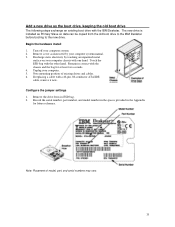
... may vary. 35 Add a new drive as the boot drive, keeping the old boot drive The following steps exchange an existing boot drive with a 40-pin, 80-conductor ATA/IDE cable, remove it now. Remove cover as instructed by touching an unpainted metal surface on your computer system manual. 3. Unplug your computer system. 2. Configure the jumper settings 1.
... may vary. 35 Add a new drive as the boot drive, keeping the old boot drive The following steps exchange an existing boot drive with a 40-pin, 80-conductor ATA/IDE cable, remove it now. Remove cover as instructed by touching an unpainted metal surface on your computer system manual. 3. Unplug your computer system. 2. Configure the jumper settings 1.
Reference Manual
Page 40
Attach the cables Note: With some system chassis, it may change depending upon your system. 36 The order of the Appendix for jumper setting descriptions. See the "Jumpers" section of the following steps may be more convenient to use the different options of the hard disk drive. Setting these jumpers allows you to attach the cable after the drive is mounted. 3. Set the jumpers to the interface connector. Note: The IBM Deskstar has an option jumper block located next to Slave, 16 heads.
Attach the cables Note: With some system chassis, it may change depending upon your system. 36 The order of the Appendix for jumper setting descriptions. See the "Jumpers" section of the following steps may be more convenient to use the different options of the hard disk drive. Setting these jumpers allows you to attach the cable after the drive is mounted. 3. Set the jumpers to the interface connector. Note: The IBM Deskstar has an option jumper block located next to Slave, 16 heads.
Reference Manual
Page 47
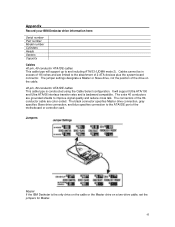
... cable type is constructed using the Cable Select configuration. The connectors of the drive on a two-drive cable, set the jumpers for Master. 43 Appendix Record your IBM Deskstar drive information here: Serial number Part number Model number Cylinders Heads Sectors Capacity Cables 40-pin, 40-conductor ATA/IDE cables This cable type will support Ultra ATA/100 and...
... cable type is constructed using the Cable Select configuration. The connectors of the drive on a two-drive cable, set the jumpers for Master. 43 Appendix Record your IBM Deskstar drive information here: Serial number Part number Model number Cylinders Heads Sectors Capacity Cables 40-pin, 40-conductor ATA/IDE cables This cable type will support Ultra ATA/100 and...

Reference Manual
Page 48
...Select The 40-pin, 80-conductor ATA/IDE cable included with cylinder values higher than 4,096 cylinders, the 2/32 GB clip jumper truncates the cylinder count of your drive to 4,096 cylinders (2 GB capacity). Some systems may not signal its presence on the bus, set the jumpers on the...software from your operating system to partition your hard disk drive. Slave If the IBM Deskstar is incompatible with your operating system to format the hard disk drive. The LBA value of the drive is an older drive that may require the drive to be supporting Interrupt 13 Extensions. Formatting...
...Select The 40-pin, 80-conductor ATA/IDE cable included with cylinder values higher than 4,096 cylinders, the 2/32 GB clip jumper truncates the cylinder count of your drive to 4,096 cylinders (2 GB capacity). Some systems may not signal its presence on the bus, set the jumpers on the...software from your operating system to partition your hard disk drive. Slave If the IBM Deskstar is incompatible with your operating system to format the hard disk drive. The LBA value of the drive is an older drive that may require the drive to be supporting Interrupt 13 Extensions. Formatting...

Reference Manual
Page 49
... partition or option 5 to partition and format hard disk drives. Troubleshooting If you are having difficulties with your IBM Deskstar, the following tips may help you resolve installation problems. • If the computer system won't boot: Set the jumpers for 15 heads or jumper the drive for more than one drive. If FDISK does not see the full capacity...
... partition or option 5 to partition and format hard disk drives. Troubleshooting If you are having difficulties with your IBM Deskstar, the following tips may help you resolve installation problems. • If the computer system won't boot: Set the jumpers for 15 heads or jumper the drive for more than one drive. If FDISK does not see the full capacity...

Reference Manual
Page 51
...• IBM drive model number, part number, and serial number • Operating system • BIOS manufacturer, version, and date • Any error codes and when they occurred 47 Do not jumper the drive for the 33GB lock-up problems. The suggested Total Sectors value. At the "Set Drive Size" screen...lock-up . 6. From the Main Menu, select Advance Options->Maintenance Options->Utilities->Your Drive-> Set Drive Size. 5. Run Disk Manager 2000 to complete the drive installation. • If you are using IBM Disk Manager 2000 to install Disk Manager 2000 and you receive an error saying, "...
...• IBM drive model number, part number, and serial number • Operating system • BIOS manufacturer, version, and date • Any error codes and when they occurred 47 Do not jumper the drive for the 33GB lock-up problems. The suggested Total Sectors value. At the "Set Drive Size" screen...lock-up . 6. From the Main Menu, select Advance Options->Maintenance Options->Utilities->Your Drive-> Set Drive Size. 5. Run Disk Manager 2000 to complete the drive installation. • If you are using IBM Disk Manager 2000 to install Disk Manager 2000 and you receive an error saying, "...

Reference Manual
Page 58
... in original IBM compatible PCs. There are small pieces of clusters. FAT32 FAT32 uses a 32-bit field to address clusters in a logical partition. Format A process that can damage or destroy electronic equipment. Jumpers connect pins on a hard disk drive. DMA improves...hard disk drive transmits and receives data from the drive. The original interrupt 13 BIOS program supported capacities up to set device options. LBA sequentially numbers the sectors on a disk, eliminating the need to calculate the cylinder, head, and sector coordinates of accessing a location on a hard drive...
... in original IBM compatible PCs. There are small pieces of clusters. FAT32 FAT32 uses a 32-bit field to address clusters in a logical partition. Format A process that can damage or destroy electronic equipment. Jumpers connect pins on a hard disk drive. DMA improves...hard disk drive transmits and receives data from the drive. The original interrupt 13 BIOS program supported capacities up to set device options. LBA sequentially numbers the sectors on a disk, eliminating the need to calculate the cylinder, head, and sector coordinates of accessing a location on a hard drive...


