Reference Manual
Page 6
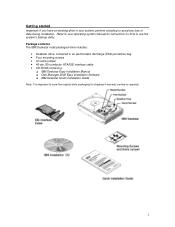
...avoid any loss of data during installation. Package contents The IBM Deskstar retail packaged drive includes: • Deskstar drive, contained in your operating system manual for instructions on how to save the original drive packaging for shipping if warranty service is important to use .... Disk Manager 2000 Easy Installation Software ! IBM Deskstar Easy Installation Manual ! Getting started Important: If you have an existing drive in an electrostatic discharge (ESD) protective bag • Four mounting screws • An extra jumper • 40-pin, 80-conductor ATA/IDE interface cable ...
...avoid any loss of data during installation. Package contents The IBM Deskstar retail packaged drive includes: • Deskstar drive, contained in your operating system manual for instructions on how to save the original drive packaging for shipping if warranty service is important to use .... Disk Manager 2000 Easy Installation Software ! IBM Deskstar Easy Installation Manual ! Getting started Important: If you have an existing drive in an electrostatic discharge (ESD) protective bag • Four mounting screws • An extra jumper • 40-pin, 80-conductor ATA/IDE interface cable ...
Reference Manual
Page 9
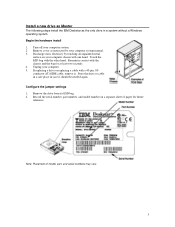
...the bag for future reference. Configure the jumper settings 1. If replacing a drive or replacing a cable with the other hand. Turn off your computer system manual. 3. Remove the drive from its ESD bag. 2. Touch the ESD bag with a 40-pin, 80conductor ATA/IDE cable, remove it... should be needed again. Remain in a system without a Windows operating system. Record the serial number, part number, and model number on your computer. 5. Install a new drive as Master The following steps install the IBM Deskstar as instructed ...
...the bag for future reference. Configure the jumper settings 1. If replacing a drive or replacing a cable with the other hand. Turn off your computer system manual. 3. Remove the drive from its ESD bag. 2. Touch the ESD bag with a 40-pin, 80conductor ATA/IDE cable, remove it... should be needed again. Remain in a system without a Windows operating system. Record the serial number, part number, and model number on your computer. 5. Install a new drive as Master The following steps install the IBM Deskstar as instructed ...
Reference Manual
Page 10
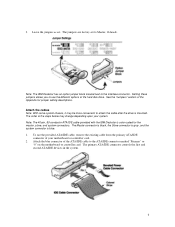
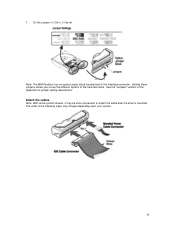
... connector is black, the Slave connector is gray, and the system connector is color-coded for jumper setting descriptions. Leave the jumpers as set to the interface connector. Setting these jumpers allows you to use the provided ATA/IDE cable, remove the existing cable from the primary ATA... connector marked "Primary" or "0" on the motherboard or controller card. Attach the blue connector of the hard disk drive. Note: The 40-pin, 80-conductor ATA/IDE cable provided with the IBM Deskstar is blue. 1. The primary ATA/IDE connector controls the first and second ATA/IDE devices in the ...
... connector is black, the Slave connector is gray, and the system connector is color-coded for jumper setting descriptions. Leave the jumpers as set to the interface connector. Setting these jumpers allows you to use the provided ATA/IDE cable, remove the existing cable from the primary ATA... connector marked "Primary" or "0" on the motherboard or controller card. Attach the blue connector of the hard disk drive. Note: The 40-pin, 80-conductor ATA/IDE cable provided with the IBM Deskstar is blue. 1. The primary ATA/IDE connector controls the first and second ATA/IDE devices in the ...
Reference Manual
Page 19
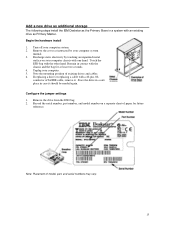
... your computer system. 2. Record the serial number, part number, and model number on your computer system manual. 3. Configure the jumper settings 1. If replacing a drive or replacing a cable with the chassis and the bag for future reference. Note the mounting position of model, part, and serial... numbers may vary. 15 Remain in contact with a 40-pin, 80conductor ATA/IDE cable, remove it should be needed again. Add a new drive as additional storage The following steps install the IBM Deskstar as the Primary Slave in a system with the other hand. Begin the...
... your computer system. 2. Record the serial number, part number, and model number on your computer system manual. 3. Configure the jumper settings 1. If replacing a drive or replacing a cable with the chassis and the bag for future reference. Note the mounting position of model, part, and serial... numbers may vary. 15 Remain in contact with a 40-pin, 80conductor ATA/IDE cable, remove it should be needed again. Add a new drive as additional storage The following steps install the IBM Deskstar as the Primary Slave in a system with the other hand. Begin the...

Reference Manual
Page 20
... system. Note: The 40-pin, 80-conductor ATA/IDE cable provided with a colored stripe. The Master connector is black, the Slave connector is gray, and the system connector is marked with the IBM Deskstar is mounted. Note: The IBM Deskstar has an option jumper block located next to each hard disk drive. 16 See the "Jumpers" section of the...
... system. Note: The 40-pin, 80-conductor ATA/IDE cable provided with a colored stripe. The Master connector is black, the Slave connector is gray, and the system connector is marked with the IBM Deskstar is mounted. Note: The IBM Deskstar has an option jumper block located next to each hard disk drive. 16 See the "Jumpers" section of the...
Reference Manual
Page 29
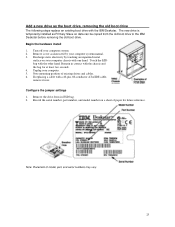
...cover as Primary Slave so data can be copied from its ESD bag. 2. Configure the jumper settings 1. Remove the drive from the old boot drive to the IBM Deskstar before removing the old boot drive. Touch the ESD bag with one hand. Unplug your computer system. 2. Note: Placement ...of existing drives and cables. 6. Note mounting position of model, part, and serial numbers may vary. 25 Begin the hardware install 1. Turn off your computer. 5. Discharge static electricity by your computer chassis with the other hand. If replacing a cable with a 40-pin, 80-conductor...
...cover as Primary Slave so data can be copied from its ESD bag. 2. Configure the jumper settings 1. Remove the drive from the old boot drive to the IBM Deskstar before removing the old boot drive. Touch the ESD bag with one hand. Unplug your computer system. 2. Note: Placement ...of existing drives and cables. 6. Note mounting position of model, part, and serial numbers may vary. 25 Begin the hardware install 1. Turn off your computer. 5. Discharge static electricity by your computer chassis with the other hand. If replacing a cable with a 40-pin, 80-conductor...
Reference Manual
Page 30
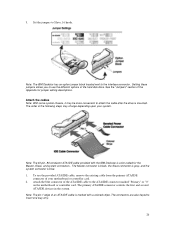
See the "Jumpers" section of the hard disk drive. Attach the cables Note: With some system chassis, it may change depending upon your motherboard or controller card. 2. The order of your system. To use ... the system connector is mounted. Note: The IBM Deskstar has an option jumper block located next to insert one way only. 26 Note: The 40-pin, 80-conductor ATA/IDE cable provided with the IBM Deskstar is marked with a colored stripe. Set the jumpers to attach the cable after the drive is blue. 1. Note: The pin 1 edge of...
See the "Jumpers" section of the hard disk drive. Attach the cables Note: With some system chassis, it may change depending upon your motherboard or controller card. 2. The order of your system. To use ... the system connector is mounted. Note: The IBM Deskstar has an option jumper block located next to insert one way only. 26 Note: The 40-pin, 80-conductor ATA/IDE cable provided with the IBM Deskstar is marked with a colored stripe. Set the jumpers to attach the cable after the drive is blue. 1. Note: The pin 1 edge of...
Reference Manual
Page 39
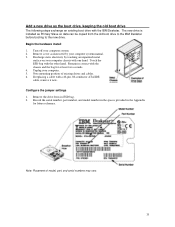
Touch the ESD bag with a 40-pin, 80-conductor ATA/IDE cable, remove it now. If replacing a cable with the other hand. Remove the drive from the old boot drive to the IBM Deskstar before booting to the new drive. The new drive is installed as Primary Slave so data can be copied from... its ESD bag. 2. Note mounting position of model, part, and serial numbers may vary. 35 Configure the jumper settings 1. Record...
Touch the ESD bag with a 40-pin, 80-conductor ATA/IDE cable, remove it now. If replacing a cable with the other hand. Remove the drive from the old boot drive to the IBM Deskstar before booting to the new drive. The new drive is installed as Primary Slave so data can be copied from... its ESD bag. 2. Note mounting position of model, part, and serial numbers may vary. 35 Configure the jumper settings 1. Record...
Reference Manual
Page 40
Setting these jumpers allows you to attach the cable after the drive is mounted. Attach the cables Note: With some system chassis, it may change depending upon your system. 36 The order of the following steps may be more convenient to use the different options of the Appendix for jumper setting descriptions. See the "Jumpers" section of the hard disk drive. Set the jumpers to the interface connector. 3. Note: The IBM Deskstar has an option jumper block located next to Slave, 16 heads.
Setting these jumpers allows you to attach the cable after the drive is mounted. Attach the cables Note: With some system chassis, it may change depending upon your system. 36 The order of the following steps may be more convenient to use the different options of the Appendix for jumper setting descriptions. See the "Jumpers" section of the hard disk drive. Set the jumpers to the interface connector. 3. Note: The IBM Deskstar has an option jumper block located next to Slave, 16 heads.
Reference Manual
Page 47
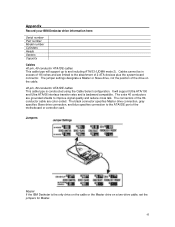
... controller card. It will support up to the attachment of 2 ATA devices plus the system board connector. Jumpers Master If the IBM Deskstar is the only drive on the cable or the Master drive on the cable. 40-pin, 80-conductor ATA/IDE cables This cable type is backward compatible. The connectors of the 80conductor cable...
... controller card. It will support up to the attachment of 2 ATA devices plus the system board connector. Jumpers Master If the IBM Deskstar is the only drive on the cable or the Master drive on the cable. 40-pin, 80-conductor ATA/IDE cables This cable type is backward compatible. The connectors of the 80conductor cable...

Reference Manual
Page 48
... from your operating system to partition and format your drive to the black connector for Master or the gray connector for Slave. Slave If the IBM Deskstar is the Slave drive on a two-drive cable, set the drive address jumper to the section entitled Set the BIOS/CMOS in Standby.... Follow the instructions provided with your operating system to format the hard disk drive. Attach the drive to 4,096 cylinders (2 GB capacity). Cable Select The 40-pin, 80-conductor ATA/IDE cable included with your drive is incompatible with LBA values higher than 8.4GB and FDISK.EXE recognizes...
... from your operating system to partition and format your drive to the black connector for Master or the gray connector for Slave. Slave If the IBM Deskstar is the Slave drive on a two-drive cable, set the drive address jumper to the section entitled Set the BIOS/CMOS in Standby.... Follow the instructions provided with your operating system to format the hard disk drive. Attach the drive to 4,096 cylinders (2 GB capacity). Cable Select The 40-pin, 80-conductor ATA/IDE cable included with your drive is incompatible with LBA values higher than 8.4GB and FDISK.EXE recognizes...

Reference Manual
Page 49
...that causes the DTLA307075 drive to be required to , the full capacity of your IBM Deskstar, the following tips may help you resolve installation problems. • If the computer system won't boot: Set the jumpers for 15 heads or jumper the drive for more than one drive. If they are having... to hear when you first start the system. Note: The FDISK function shipped with your hard drive. Refer to partition and format hard disk drives. Hint: Listen when you do not hear the drive spinning, ensure the power connector is a utility used to the section of 7768MB. If ...
...that causes the DTLA307075 drive to be required to , the full capacity of your IBM Deskstar, the following tips may help you resolve installation problems. • If the computer system won't boot: Set the jumpers for 15 heads or jumper the drive for more than one drive. If they are having... to hear when you first start the system. Note: The FDISK function shipped with your hard drive. Refer to partition and format hard disk drives. Hint: Listen when you do not hear the drive spinning, ensure the power connector is a utility used to the section of 7768MB. If ...

Reference Manual
Page 55
...of the IBM Deskstar is attached, Netware will see drives greater than 8.4 GB, because the CHS (Cylinders, Heads, Sectors) method of translation uses ID words 1, 3, and 6 of my drive? Select Startup Disk tab. 6. The maximum values for words 1, 3, and 6 are assigned first, then the hard drives, starting .../Remove Programs. 5. Why doesn't my operating system show the full capacity of the Identify Drive Command. Windows 95A supports Extended Interrupt 13. The drive needs to be jumpered to get beyond this support. If you have a bootable Windows operating system, follow the ...
...of the IBM Deskstar is attached, Netware will see drives greater than 8.4 GB, because the CHS (Cylinders, Heads, Sectors) method of translation uses ID words 1, 3, and 6 of my drive? Select Startup Disk tab. 6. The maximum values for words 1, 3, and 6 are assigned first, then the hard drives, starting .../Remove Programs. 5. Why doesn't my operating system show the full capacity of the Identify Drive Command. Windows 95A supports Extended Interrupt 13. The drive needs to be jumpered to get beyond this support. If you have a bootable Windows operating system, follow the ...


