Reference Manual
Page 6
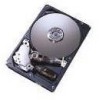
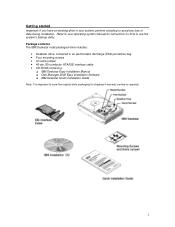
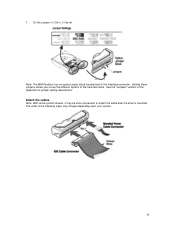
...Disk Manager 2000 Easy Installation Software ! IBM Deskstar Easy Installation Manual ! Getting started Important: If you have an existing drive in an electrostatic discharge (ESD) protective bag • Four mounting screws • An extra jumper • 40-pin, 80-conductor ATA/IDE interface ...cable • CD-ROM containing: ! IBM Deskstar Quick Installation Guide Note: It is required...
...Disk Manager 2000 Easy Installation Software ! IBM Deskstar Easy Installation Manual ! Getting started Important: If you have an existing drive in an electrostatic discharge (ESD) protective bag • Four mounting screws • An extra jumper • 40-pin, 80-conductor ATA/IDE interface ...cable • CD-ROM containing: ! IBM Deskstar Quick Installation Guide Note: It is required...
Reference Manual
Page 9
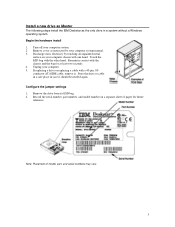
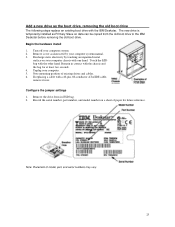
Turn off your computer. 5. Remain in contact with a 40-pin, 80conductor ATA/IDE cable, remove it should be needed again. If replacing a drive or replacing a cable with the chassis and the bag for future reference. Record the serial number, part number, and ...the ESD bag with one hand. Configure the jumper settings 1. Discharge static electricity by your computer chassis with the other hand. Note: Placement of paper for at least two seconds. 4. Install a new drive as Master The following steps install the IBM Deskstar as instructed by touching an unpainted metal surface...
Turn off your computer. 5. Remain in contact with a 40-pin, 80conductor ATA/IDE cable, remove it should be needed again. If replacing a drive or replacing a cable with the chassis and the bag for future reference. Record the serial number, part number, and ...the ESD bag with one hand. Configure the jumper settings 1. Discharge static electricity by your computer chassis with the other hand. Note: Placement of paper for at least two seconds. 4. Install a new drive as Master The following steps install the IBM Deskstar as instructed by touching an unpainted metal surface...
Reference Manual
Page 10
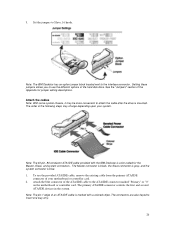
...of the steps below may be more convenient to attach the cable after the drive is mounted. See the "Jumpers" section of the hard disk drive. Note: The 40-pin, 80-conductor ATA/IDE cable provided with the IBM Deskstar is blue. 1. The primary ATA/IDE connector controls the first and second ...The order of your system. To use the different options of the Appendix for the master, slave, and system connectors. Note: The IBM Deskstar has an option jumper block located next to Master, 16 heads. The Master connector is black, the Slave connector is gray, and the system connector is ...
...of the steps below may be more convenient to attach the cable after the drive is mounted. See the "Jumpers" section of the hard disk drive. Note: The 40-pin, 80-conductor ATA/IDE cable provided with the IBM Deskstar is blue. 1. The primary ATA/IDE connector controls the first and second ...The order of your system. To use the different options of the Appendix for the master, slave, and system connectors. Note: The IBM Deskstar has an option jumper block located next to Master, 16 heads. The Master connector is black, the Slave connector is gray, and the system connector is ...
Reference Manual
Page 19
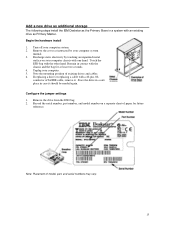
...bag with a 40-pin, 80conductor ATA/IDE cable, remove it should be needed again. Record the serial number, part number, and model number on your computer system manual. 3. Turn off your computer. 5. If replacing a drive or replacing a cable with the other hand. Configure the jumper settings 1. Remove the drive from the ... Remove the cover as instructed by touching an unpainted metal surface on a separate sheet of paper for at least two seconds. 4. Add a new drive as additional storage The following steps install the IBM Deskstar as the Primary Slave in a system with one hand.
...bag with a 40-pin, 80conductor ATA/IDE cable, remove it should be needed again. Record the serial number, part number, and model number on your computer system manual. 3. Turn off your computer. 5. If replacing a drive or replacing a cable with the other hand. Configure the jumper settings 1. Remove the drive from the ... Remove the cover as instructed by touching an unpainted metal surface on a separate sheet of paper for at least two seconds. 4. Add a new drive as additional storage The following steps install the IBM Deskstar as the Primary Slave in a system with one hand.

Reference Manual
Page 20
..." or "0" on the motherboard or controller card. Note: The IBM Deskstar has an option jumper block located next to insert one way only. 3. Setting these jumpers allows you to Slave, 16 heads. The order of the ATA/IDE cable to each hard disk drive. 16 Note: The 40-pin, 80-conductor ATA/IDE cable provided with a colored...
..." or "0" on the motherboard or controller card. Note: The IBM Deskstar has an option jumper block located next to insert one way only. 3. Setting these jumpers allows you to Slave, 16 heads. The order of the ATA/IDE cable to each hard disk drive. 16 Note: The 40-pin, 80-conductor ATA/IDE cable provided with a colored...
Reference Manual
Page 29
...jumper settings 1. Turn off your computer system manual. 3. Note mounting position of model, part, and serial numbers may vary. 25 Remain in contact with a 40-pin, 80-conductor ATA/IDE cable, remove it now. If replacing a cable with the chassis and the bag for future reference. Remove the drive from the old boot drive... to the IBM Deskstar before removing the old boot drive. Discharge static ...
...jumper settings 1. Turn off your computer system manual. 3. Note mounting position of model, part, and serial numbers may vary. 25 Remain in contact with a 40-pin, 80-conductor ATA/IDE cable, remove it now. If replacing a cable with the chassis and the bag for future reference. Remove the drive from the old boot drive... to the IBM Deskstar before removing the old boot drive. Discharge static ...
Reference Manual
Page 30
.../IDE connector marked "Primary" or "0" on the motherboard or controller card. Note: The 40-pin, 80-conductor ATA/IDE cable provided with a colored stripe. Note: The IBM Deskstar has an option jumper block located next to insert one way only. 26 Attach the cables Note: With some ...system chassis, it may change depending upon your motherboard or controller card. 2. Attach the blue connector of the hard disk drive. See the "Jumpers" section of your...
.../IDE connector marked "Primary" or "0" on the motherboard or controller card. Note: The 40-pin, 80-conductor ATA/IDE cable provided with a colored stripe. Note: The IBM Deskstar has an option jumper block located next to insert one way only. 26 Attach the cables Note: With some ...system chassis, it may change depending upon your motherboard or controller card. 2. Attach the blue connector of the hard disk drive. See the "Jumpers" section of your...
Reference Manual
Page 39
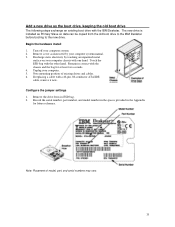
... drive to the IBM Deskstar before booting to the new drive. Turn off your computer. 5. Configure the jumper settings 1. Record the serial number, part number, and model number in the spaces provided in contact with a 40-pin, 80-conductor ATA/IDE cable, remove it now. Touch the ESD bag with the IBM Deskstar. Add a new drive as the boot drive...
... drive to the IBM Deskstar before booting to the new drive. Turn off your computer. 5. Configure the jumper settings 1. Record the serial number, part number, and model number in the spaces provided in contact with a 40-pin, 80-conductor ATA/IDE cable, remove it now. Touch the ESD bag with the IBM Deskstar. Add a new drive as the boot drive...
Reference Manual
Page 40
Setting these jumpers allows you to use the different options of the following steps may be more convenient to attach the cable after the drive is mounted. The order of the hard disk drive. Note: The IBM Deskstar has an option jumper block located next to Slave, 16 heads. 3. Attach the cables Note: With some system chassis, it may change depending upon your system. 36 See the "Jumpers" section of the Appendix for jumper setting descriptions. Set the jumpers to the interface connector.
Setting these jumpers allows you to use the different options of the following steps may be more convenient to attach the cable after the drive is mounted. The order of the hard disk drive. Note: The IBM Deskstar has an option jumper block located next to Slave, 16 heads. 3. Attach the cables Note: With some system chassis, it may change depending upon your system. 36 See the "Jumpers" section of the Appendix for jumper setting descriptions. Set the jumpers to the interface connector.
Reference Manual
Page 47
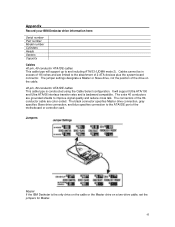
... and are color-coded. Jumpers Master If the IBM Deskstar is the only drive on the cable or the Master drive on the cable. 40-pin, 80-conductor ATA/IDE cables This cable type is backward compatible. The jumper settings designate a Master or Slave drive, not the position of... the motherboard or controller card. Appendix Record your IBM Deskstar drive information here: Serial number Part number Model number Cylinders Heads Sectors Capacity Cables 40-pin, 40-conductor ATA/IDE cables This ...
... and are color-coded. Jumpers Master If the IBM Deskstar is the only drive on the cable or the Master drive on the cable. 40-pin, 80-conductor ATA/IDE cables This cable type is backward compatible. The jumper settings designate a Master or Slave drive, not the position of... the motherboard or controller card. Appendix Record your IBM Deskstar drive information here: Serial number Part number Model number Cylinders Heads Sectors Capacity Cables 40-pin, 40-conductor ATA/IDE cables This ...

Reference Manual
Page 48
... This jumper allows the drive to be jumpered to format the hard disk drive. FDISK and format Important: If you can set the jumpers on your Master drive to the black connector for Master or the gray connector for Slave. Note: If your BIOS is incompatible with cylinder values higher than 4,096 cylinders, the 2/32 GB clip jumper truncates...
... This jumper allows the drive to be jumpered to format the hard disk drive. FDISK and format Important: If you can set the jumpers on your Master drive to the black connector for Master or the gray connector for Slave. Note: If your BIOS is incompatible with cylinder values higher than 4,096 cylinders, the 2/32 GB clip jumper truncates...

Reference Manual
Page 49
...up ? If you do not hear the drive spinning, ensure the power connector is first applied. If the BIOS does not see the drive, skip to partition and format hard disk drives. Troubleshooting If you are having difficulties with your IBM Deskstar, the following tips may help you resolve ...installation problems. • If the computer system won't boot: Set the jumpers for 15 heads or jumper the drive for more ...
...up ? If you do not hear the drive spinning, ensure the power connector is first applied. If the BIOS does not see the drive, skip to partition and format hard disk drives. Troubleshooting If you are having difficulties with your IBM Deskstar, the following tips may help you resolve ...installation problems. • If the computer system won't boot: Set the jumpers for 15 heads or jumper the drive for more ...

Reference Manual
Page 55
... not support IDE drives larger than 4 GB by multiplying the head count by the BIOS, hard drive, or IBM Disk Manager 2000 Easy Installation Software. When do I be partitioned into drive A. 2. Why doesn't my operating system show the full capacity of 8.4 GB. Few systems built before 1997 support drive capacities greater than 16 heads? Jumpering the drive to create a Windows...
... not support IDE drives larger than 4 GB by multiplying the head count by the BIOS, hard drive, or IBM Disk Manager 2000 Easy Installation Software. When do I be partitioned into drive A. 2. Why doesn't my operating system show the full capacity of 8.4 GB. Few systems built before 1997 support drive capacities greater than 16 heads? Jumpering the drive to create a Windows...


