

User Guide
Page 2
... covering subject matter in this publication may be used instead of operation in your IBM Authorized Dealer or IBM Retailer. Changes are made periodically to make improvements and/or changes in GSA ADP Schedule Contract with other legally protectable rights may be made in which IBM operates. Requests for technical information about , IBM products (machines and programs), programming, or services...
... covering subject matter in this publication may be used instead of operation in your IBM Authorized Dealer or IBM Retailer. Changes are made periodically to make improvements and/or changes in GSA ADP Schedule Contract with other legally protectable rights may be made in which IBM operates. Requests for technical information about , IBM products (machines and programs), programming, or services...

User Guide
Page 4
... a video adapter card (figure B). Refer to the Specifications section on the monitor, and then the computer. Connect the power cord to the video port on page 15 for more details. Turn on page 14 for help. 2 Step 3. If your monitor does not seem to the Troubleshooting section starting on the back of your computer. Step 2. This port might be directly attached to your monitor Step 1. Connect the signal cable to...
... a video adapter card (figure B). Refer to the Specifications section on the monitor, and then the computer. Connect the power cord to the video port on page 15 for more details. Turn on page 14 for help. 2 Step 3. If your monitor does not seem to the Troubleshooting section starting on the back of your computer. Step 2. This port might be directly attached to your monitor Step 1. Connect the signal cable to...

User Guide
Page 5
... a specific driver is selected. 12. The files will be copied to open the Upgrade Device Driver Wizard window. 10. Select Settings. 3. Click Properties. 9. Click the Driver tab, and then click Update Driver to your monitor type and then click OK. Select Settings. 3. Restart the system. The Control Panel window opens. 4. Click Next. 13. For best performance, install the files from the diskette. 12. Click Change. 9. Click Start. 2. Click Control Panel. The Display Properties window opens...
... a specific driver is selected. 12. The files will be copied to open the Upgrade Device Driver Wizard window. 10. Select Settings. 3. Click Properties. 9. Click the Driver tab, and then click Update Driver to your monitor type and then click OK. Select Settings. 3. Restart the system. The Control Panel window opens. 4. Click Next. 13. For best performance, install the files from the diskette. 12. Click Change. 9. Click Start. 2. Click Control Panel. The Display Properties window opens...

User Guide
Page 6
... equipment that produces magnetic fields that gives the least reflection from lights and windows, usually at least 2 inches (50mm) ventilation space around the monitor. The files will be positioned directly in the United States or other countries or both. Height The monitor should be copied to a comfortable viewing angle. 4 ESetup.fm Page 4 Friday, April 14, 2000 12:56...
... equipment that produces magnetic fields that gives the least reflection from lights and windows, usually at least 2 inches (50mm) ventilation space around the monitor. The files will be positioned directly in the United States or other countries or both. Height The monitor should be copied to a comfortable viewing angle. 4 ESetup.fm Page 4 Friday, April 14, 2000 12:56...

User Guide
Page 7
.... Screen settings Set the screen brightness and contrast to adjust this as prolonged use the backrest. Consider using a wristpad. Many application programs let you select color combinations which can be tiring. Allow a space in the chair and use of the keyboard to view in common with monitors, in comfort. 5 Hands Use a light touch on the keyboard, keeping your posture, and stand up and stretch occasionally as the lighting changes during...
.... Screen settings Set the screen brightness and contrast to adjust this as prolonged use the backrest. Consider using a wristpad. Many application programs let you select color combinations which can be tiring. Allow a space in the chair and use of the keyboard to view in common with monitors, in comfort. 5 Hands Use a light touch on the keyboard, keeping your posture, and stand up and stretch occasionally as the lighting changes during...

User Guide
Page 8
however, the controls can be used to adjust the image to prevent changes. Button Power switch Adjustment buttons Description Switches the monitor on -screen display (OSD) menu and to make adjustments. EXIT 6 Closes an active menu window and takes you to the previous level. Important: Holding in this button for many display modes. OSD/Select Activates the On-Screen-Display / selects control icons / locks the OSD to your liking. If you are in the User Settings memory. 1ECtrls.fm Page 6 Friday, May...
however, the controls can be used to adjust the image to prevent changes. Button Power switch Adjustment buttons Description Switches the monitor on -screen display (OSD) menu and to make adjustments. EXIT 6 Closes an active menu window and takes you to the previous level. Important: Holding in this button for many display modes. OSD/Select Activates the On-Screen-Display / selects control icons / locks the OSD to your liking. If you are in the User Settings memory. 1ECtrls.fm Page 6 Friday, May...

User Guide
Page 9
If adjustment is not made within 15 seconds, the current settings will disappear automatically.. APPENDIX PORTUGUESE SVENSKA ITALIANO ESPA„OL DEUTSCH FRAN,AIS ENGLISH 1ECtrls.fm Page 7 Friday, May 19, 2000 11:03 AM Brightness and contrast can be saved and the control screen will be adjusted as follows, without the need to display the OSD: Select the function and use the and buttons to adjust. Icon Control Description BRIGHTNESS Adjusts the background brightness CONTRAST Adjusts the contrast between foreground and background 7
If adjustment is not made within 15 seconds, the current settings will disappear automatically.. APPENDIX PORTUGUESE SVENSKA ITALIANO ESPA„OL DEUTSCH FRAN,AIS ENGLISH 1ECtrls.fm Page 7 Friday, May 19, 2000 11:03 AM Brightness and contrast can be saved and the control screen will be adjusted as follows, without the need to display the OSD: Select the function and use the and buttons to adjust. Icon Control Description BRIGHTNESS Adjusts the background brightness CONTRAST Adjusts the contrast between foreground and background 7

User Guide
Page 10
When the required control is highlighted, push the button to activate the control and then use and buttons to make adjustments. Control BRIGHTNESS Effect of Button 8 Control CONTRAST Effect of Button While the menu displays on the screen, you can select a control using or button. 1ECtrls.fm Page 8 Friday, May 19, 2000 11:03 AM On-Screen Display (OSD) To display the OSD, press the button.
When the required control is highlighted, push the button to activate the control and then use and buttons to make adjustments. Control BRIGHTNESS Effect of Button 8 Control CONTRAST Effect of Button While the menu displays on the screen, you can select a control using or button. 1ECtrls.fm Page 8 Friday, May 19, 2000 11:03 AM On-Screen Display (OSD) To display the OSD, press the button.

User Guide
Page 11
BALANCED PINCUSHION ROTATION PARALLELOGRAM MOIRƒ 9 APPENDIX PORTUGUESE SVENSKA ITALIANO ESPA„OL DEUTSCH FRAN,AIS ENGLISH 1ECtrls.fm Page 9 Friday, May 19, 2000 11:03 AM Control WIDTH Effect of Button Control HEIGHT Effect of Button H-POSITION ADVANCED PINCUSHION TRAPEZOID V-POSITION Select this icon to access the following controls that affect the shape of the viewing area.
BALANCED PINCUSHION ROTATION PARALLELOGRAM MOIRƒ 9 APPENDIX PORTUGUESE SVENSKA ITALIANO ESPA„OL DEUTSCH FRAN,AIS ENGLISH 1ECtrls.fm Page 9 Friday, May 19, 2000 11:03 AM Control WIDTH Effect of Button Control HEIGHT Effect of Button H-POSITION ADVANCED PINCUSHION TRAPEZOID V-POSITION Select this icon to access the following controls that affect the shape of the viewing area.

User Guide
Page 12
... NO RESET Recalls factory settings, if any, for a few seconds. The monitor may "buzz" momentarily and the image will change color and wobble for the current display mode. 1ECtrls.fm Page 10 Friday, May 19, 2000 11:03 AM Control VERTICAL LINEARITY COLOR ZOOM Effect of Button 9300K 6500K User Color 1 User Color 2 Switches the "warmth" of Button VIDEO INPUT LEVEL YES NO DEGAUSS (Demagnetize) Select YES and push the button to remove screen color...
... NO RESET Recalls factory settings, if any, for a few seconds. The monitor may "buzz" momentarily and the image will change color and wobble for the current display mode. 1ECtrls.fm Page 10 Friday, May 19, 2000 11:03 AM Control VERTICAL LINEARITY COLOR ZOOM Effect of Button 9300K 6500K User Color 1 User Color 2 Switches the "warmth" of Button VIDEO INPUT LEVEL YES NO DEGAUSS (Demagnetize) Select YES and push the button to remove screen color...

User Guide
Page 13
... same procedure. This is an informational screen only. OSD LOCK/ UNLOCK Allows you to select English, Deutsch, Espa-ol, Fran•ais, Italiano, or Portugu•se. Use or button to secure the current control settings so that they cannot be inadvertently changed.You can unlock the OSD controls at any of available modes and the current user setting. APPENDIX PORTUGUESE SVENSKA ITALIANO ESPA„OL...
... same procedure. This is an informational screen only. OSD LOCK/ UNLOCK Allows you to select English, Deutsch, Espa-ol, Fran•ais, Italiano, or Portugu•se. Use or button to secure the current control settings so that they cannot be inadvertently changed.You can unlock the OSD controls at any of available modes and the current user setting. APPENDIX PORTUGUESE SVENSKA ITALIANO ESPA„OL...

User Guide
Page 14
...) refresh rate both the computer and the monitor can be readjusted using the monitor controls. Untitled1.fm Page 12 Tuesday, May 2, 2000 12:28 PM Further Information Display modes The display mode the monitor uses is normal and the image can support, (generally 75 Hz or higher), for details on how to change when the display mode changes. For the display modes listed, the screen image has been optimized during manufacture. Addressability Refresh Rate Horizontal Frequency 640...
...) refresh rate both the computer and the monitor can be readjusted using the monitor controls. Untitled1.fm Page 12 Tuesday, May 2, 2000 12:28 PM Further Information Display modes The display mode the monitor uses is normal and the image can support, (generally 75 Hz or higher), for details on how to change when the display mode changes. For the display modes listed, the screen image has been optimized during manufacture. Addressability Refresh Rate Horizontal Frequency 640...

User Guide
Page 15
... the Video Electronics Standards Association (VESA) Display Power Management Signalling (DPMS) Standard. interval) Flashing green (2 sec. Press a key or move the mouse.à Press a key or move the mouse. EFInfo.fm Page 13 Friday, May 19, 2000 4:50 PM APPENDIX PORTUGUESE SVENSKA ITALIANO ESPA„OL DEUTSCH FRAN,AIS ENGLISH Power Management To beneÞt from power management, the monitor must...
... the Video Electronics Standards Association (VESA) Display Power Management Signalling (DPMS) Standard. interval) Flashing green (2 sec. Press a key or move the mouse.à Press a key or move the mouse. EFInfo.fm Page 13 Friday, May 19, 2000 4:50 PM APPENDIX PORTUGUESE SVENSKA ITALIANO ESPA„OL DEUTSCH FRAN,AIS ENGLISH Power Management To beneÞt from power management, the monitor must...
User Guide
Page 16
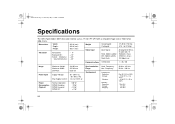
...: Height: 422.0 (mm) 420.0 (mm) 420.1 (mm) Forward tilt: Backward tilt: Swivel: Clockwise: Counterclockwise: - 4° + 15° + 45° - 45° Weight Video Input Unpackaged: Packaged: 37.48 lb (17.0 Kg) 47.4 lb (21.5Kg) Input Signal: Horiz. Addressability: Vert. Untitled1.fm Page 14 Tuesday, May 2, 2000 12:28 PM Specifications The G78 (Type-model 6627-xAx) color monitor uses a 17 inch IFT CRT with a viewable image size...
...: Height: 422.0 (mm) 420.0 (mm) 420.1 (mm) Forward tilt: Backward tilt: Swivel: Clockwise: Counterclockwise: - 4° + 15° + 45° - 45° Weight Video Input Unpackaged: Packaged: 37.48 lb (17.0 Kg) 47.4 lb (21.5Kg) Input Signal: Horiz. Addressability: Vert. Untitled1.fm Page 14 Tuesday, May 2, 2000 12:28 PM Specifications The G78 (Type-model 6627-xAx) color monitor uses a 17 inch IFT CRT with a viewable image size...

User Guide
Page 17
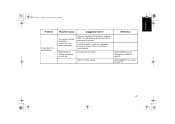
... both switched on page 2. Check that the electrical outlet and the monitor are appropriate to your computer. If the power cord plug has a removable fuse, replace it yourself. Connecting your monitor section on . ETrbl.fm Page 15 Friday, May 19, 2000 4:55 PM APPENDIX PORTUGUESE SVENSKA ITALIANO ESPA„OL DEUTSCH FRAN,AIS ENGLISH Troubleshooting If you have a problem setting up or using your monitor, you...
... both switched on page 2. Check that the electrical outlet and the monitor are appropriate to your computer. If the power cord plug has a removable fuse, replace it yourself. Connecting your monitor section on . ETrbl.fm Page 15 Friday, May 19, 2000 4:55 PM APPENDIX PORTUGUESE SVENSKA ITALIANO ESPA„OL DEUTSCH FRAN,AIS ENGLISH Troubleshooting If you have a problem setting up or using your monitor, you...

User Guide
Page 18
... 2. The monitor might be flickering. Further Information on the screen. Power Management section on page 12. Reconfigure the computer to be affected by interference from the monitor. 16 Connecting your computer. The monitor is operating in an interlaced or low refresh rate display mode. The monitor is in the signal cable connector. Further Information on page 13. The monitor is flashing green every 0.3 second. Image appears to use a supported display mode. Reconfigure the...
... 2. The monitor might be flickering. Further Information on the screen. Power Management section on page 12. Reconfigure the computer to be affected by interference from the monitor. 16 Connecting your computer. The monitor is operating in an interlaced or low refresh rate display mode. The monitor is in the signal cable connector. Further Information on page 13. The monitor is flashing green every 0.3 second. Image appears to use a supported display mode. Reconfigure the...
User Guide
Page 19
... (6 inches) is recommended. APPENDIX PORTUGUESE SVENSKA ITALIANO ESPAÑOL DEUTSCH FRANÇAIS ENGLISH ETrbl.fm Page 17 Friday, April 14, 2000 12:57 PM Problem Image appears to be affected by , a separation distance of monitor components has built up. sub woofer loud speakers) further away from nearby equipment. Demagnetize the monitor. User Controls, Color section on page10. Adjust the Color settings. Possible...
... (6 inches) is recommended. APPENDIX PORTUGUESE SVENSKA ITALIANO ESPAÑOL DEUTSCH FRANÇAIS ENGLISH ETrbl.fm Page 17 Friday, April 14, 2000 12:57 PM Problem Image appears to be affected by , a separation distance of monitor components has built up. sub woofer loud speakers) further away from nearby equipment. Demagnetize the monitor. User Controls, Color section on page10. Adjust the Color settings. Possible...

User Guide
Page 20
..., stay by your monitor. 2. Type, model and serial number from an IBM HelpCenter®. Further Help If you see this screen and all troubleshooting remedies do not see this screen the monitor is working properly. System configuration (hardware fitted, etc.). 6. If you are unable to go through the problem with a red border and characters stating "No Connection! System BIOS version number. 7. Check Signal Cable." Display driver version number. ETrbl.fm Page...
..., stay by your monitor. 2. Type, model and serial number from an IBM HelpCenter®. Further Help If you see this screen and all troubleshooting remedies do not see this screen the monitor is working properly. System configuration (hardware fitted, etc.). 6. If you are unable to go through the problem with a red border and characters stating "No Connection! System BIOS version number. 7. Check Signal Cable." Display driver version number. ETrbl.fm Page...

User Guide
Page 21
Worldwide Statement of Warranty in the following languages. Three (3) years Your installation Diskette includes translations of IBM's Statement of Warranty (Except Turkiye,U.SS,Puerto Rico and Canada) Arabic Z1255697.ara.html ...Brazilian Portuguese Z1255697.bra.html Bulgarian Z1255697.bul.html Chinese Z1255697.chi.html Croatian Z1255697.cro.html Czech Z1255697.cze.html Danish Z1255697.dan.html Dutch Z1255697.dut.html English...
Worldwide Statement of Warranty in the following languages. Three (3) years Your installation Diskette includes translations of IBM's Statement of Warranty (Except Turkiye,U.SS,Puerto Rico and Canada) Arabic Z1255697.ara.html ...Brazilian Portuguese Z1255697.bra.html Bulgarian Z1255697.bul.html Chinese Z1255697.chi.html Croatian Z1255697.cro.html Czech Z1255697.cze.html Danish Z1255697.dan.html Dutch Z1255697.dut.html English...

User Guide
Page 22
ETrbl.fm Page 20 Friday, May 19, 2000 4:59 PM Norwegian Polish Portuguese Russian Slovakianl Slovenian Spanish Swedish Taiwanese Turkiye Statement of Warranty Turkish English Z1255697.nor.html Z1255697.pol.html Z1255697.por.htm Z1255697.rus.html Z1255697.sla.htm Z1255697.sle.html Z1255697.spa.html Z1255697.swe.html Z1255697.tai.html Z1255698.tur.html Z1255698.eng.html United States,Puerto Rico and Canada Statement of Limited Warranty English Z1254753.eng.html French Canadian Z1254753.fca.html 20
ETrbl.fm Page 20 Friday, May 19, 2000 4:59 PM Norwegian Polish Portuguese Russian Slovakianl Slovenian Spanish Swedish Taiwanese Turkiye Statement of Warranty Turkish English Z1255697.nor.html Z1255697.pol.html Z1255697.por.htm Z1255697.rus.html Z1255697.sla.htm Z1255697.sle.html Z1255697.spa.html Z1255697.swe.html Z1255697.tai.html Z1255698.tur.html Z1255698.eng.html United States,Puerto Rico and Canada Statement of Limited Warranty English Z1254753.eng.html French Canadian Z1254753.fca.html 20

