
Parts Manual
Page 11
... 83 85-01 1 574 51 40-01 1 590 63 21-01 1 Description Panel, Control Left Gry Panel, Control Right Gry Meter, Service Switch, Ignition Switch, Blade Key, Ignition Light.
... 83 85-01 1 574 51 40-01 1 590 63 21-01 1 Description Panel, Control Left Gry Panel, Control Right Gry Meter, Service Switch, Ignition Switch, Blade Key, Ignition Light.

Parts Manual
Page 23
...10 539 11 28-99 6 521 99 11-01 3 539 10 65-04 2 539 10 96-00 9 Description Deck w/ Safety Decals Belt, Deck Blade 21" Arm, Idler Pulley, Deck Pulley, Idler Shield, Belt Left Shield, Belt Right Shield, Deflector Shield, Dust Roller, Gauge Tube, Roller 3-3/8" Baffle ... 3/8-16 x 3-1/2 Round Hd Square Neck Bolt 1/4-20 x 3/4 Round Hd Square Neck Bolt 3/8-16 x 1-1/4 Round Hd Square Neck Bolt 1/2-13 x 4-3/4 Round Hd Square Neck Bolt/Washer, Blade Eyebolt 3/8 x 4 Bolt 3/8-16 x 2-3/4 Hex Flange Hd Bolt 1/2-13 x 1 Hex Flange Hd Bolt 3/8-16 x 1 Hex Flange Hd Bolt 3/8-16 x 4 Hex Flange Hd Bolt 3/8 ...
...10 539 11 28-99 6 521 99 11-01 3 539 10 65-04 2 539 10 96-00 9 Description Deck w/ Safety Decals Belt, Deck Blade 21" Arm, Idler Pulley, Deck Pulley, Idler Shield, Belt Left Shield, Belt Right Shield, Deflector Shield, Dust Roller, Gauge Tube, Roller 3-3/8" Baffle ... 3/8-16 x 3-1/2 Round Hd Square Neck Bolt 1/4-20 x 3/4 Round Hd Square Neck Bolt 3/8-16 x 1-1/4 Round Hd Square Neck Bolt 1/2-13 x 4-3/4 Round Hd Square Neck Bolt/Washer, Blade Eyebolt 3/8 x 4 Bolt 3/8-16 x 2-3/4 Hex Flange Hd Bolt 1/2-13 x 1 Hex Flange Hd Bolt 3/8-16 x 1 Hex Flange Hd Bolt 3/8-16 x 4 Hex Flange Hd Bolt 3/8 ...
Owner Manual
Page 7
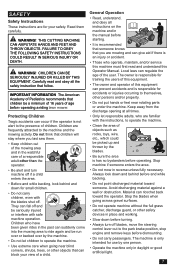
...Slow down before dismounting. • Do not carry passengers. Always look behind and down and behind before operating a riding lawn mower. Stop the blades when going near blind corners, shrubs, trees, or other persons and/or property. • Do not put hands or feet near rotating parts or...8226; Do not operate machine without the full grass catcher, discharge guard, or other than the operator. • Be alert and turn off blades, move the steering control lever out to the machine and the mowing activity. SAFETY Safety Instructions These instructions are for your view of a child...
...Slow down before dismounting. • Do not carry passengers. Always look behind and down and behind before operating a riding lawn mower. Stop the blades when going near blind corners, shrubs, trees, or other persons and/or property. • Do not put hands or feet near rotating parts or...8226; Do not operate machine without the full grass catcher, discharge guard, or other than the operator. • Be alert and turn off blades, move the steering control lever out to the machine and the mowing activity. SAFETY Safety Instructions These instructions are for your view of a child...
Owner Manual
Page 8
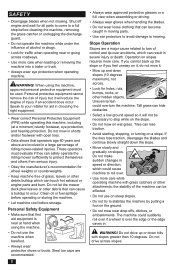
...of riding mower-related injuries. Steel toe caps are involved in severe injury or death. If the tires lose traction, disengage the blades and continue slowly straight down hills with grass catchers or other debris buildup which can safely operate the riding mower sufficiently to hearing. ...are recommended. 8 • Always wear approved protective glasses or a full visor when assembling or driving. • Always wear gloves when handling the blades. • Do not wear loose clothing that can lose traction. • Avoid starting, stopping, or turning on it, do not mow it ...
...of riding mower-related injuries. Steel toe caps are involved in severe injury or death. If the tires lose traction, disengage the blades and continue slowly straight down hills with grass catchers or other debris buildup which can safely operate the riding mower sufficiently to hearing. ...are recommended. 8 • Always wear approved protective glasses or a full visor when assembling or driving. • Always wear gloves when handling the blades. • Do not wear loose clothing that can lose traction. • Avoid starting, stopping, or turning on it, do not mow it ...
Owner Manual
Page 9
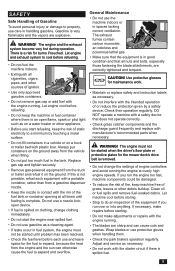
...electricity to a minimum by a safety device. CAUTION! DO NOT operate a machine with the engine running. • The blades are correctly tightened and torqued. Wrap blades or use care in contact with plastic liner. The exhaust fumes contain carbon monoxide, an odorless and poisonous lethal gas. •...high engine speeds. If necessary, make adjustments or repairs with a safety device that all nuts and bolts, especially those fastening the blade attachments, are sharp and can otherwise cause the fuel to expand and overflow. Always put containers on the ground. Gasoline is not ...
...electricity to a minimum by a safety device. CAUTION! DO NOT operate a machine with the engine running. • The blades are correctly tightened and torqued. Wrap blades or use care in contact with plastic liner. The exhaust fumes contain carbon monoxide, an odorless and poisonous lethal gas. •...high engine speeds. If necessary, make adjustments or repairs with a safety device that all nuts and bolts, especially those fastening the blade attachments, are sharp and can otherwise cause the fuel to expand and overflow. Always put containers on the ground. Gasoline is not ...
Owner Manual
Page 10
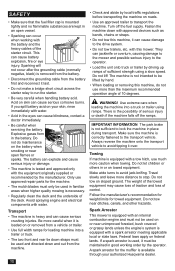
... injury or damage. • The machine is the possibility of sufficient strength using ramps. A spark arrestor for the machine. • The mulch blades must be used on your authorized Husqvarna dealer. 10 Only use more careful when it last. • Do not make a bridge short circuit across the starter relay to the...
... injury or damage. • The machine is the possibility of sufficient strength using ramps. A spark arrestor for the machine. • The mulch blades must be used on your authorized Husqvarna dealer. 10 Only use more careful when it last. • Do not make a bridge short circuit across the starter relay to the...
Owner Manual
Page 12
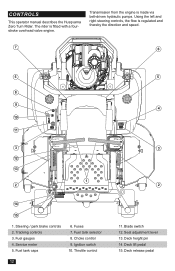
.... Blade switch 12. Seat adjustment lever 13. Using the left and right steering controls, the flow is fitted with a fourstroke overhead valve engine. Fuel tank caps 6. Deck height pin 14. Choke control 9. Deck release pedal Fuel tank selector 8. Throttle control 12 5 4 3 2 11. Service meter 5. CONTROLS This operator manual describes the Husqvarna Zero...
.... Blade switch 12. Seat adjustment lever 13. Using the left and right steering controls, the flow is fitted with a fourstroke overhead valve engine. Fuel tank caps 6. Deck height pin 14. Choke control 9. Deck release pedal Fuel tank selector 8. Throttle control 12 5 4 3 2 11. Service meter 5. CONTROLS This operator manual describes the Husqvarna Zero...

Owner Manual
Page 13
... same time. Use more care when using the two steering controls. Do not operate the unit without the two levers being inwards out of the blades, assuming the blade switch is moved forward or back respectively.
... same time. Use more care when using the two steering controls. Do not operate the unit without the two levers being inwards out of the blades, assuming the blade switch is moved forward or back respectively.
Owner Manual
Page 14
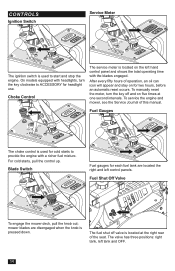
... an automatic reset occurs. To manually reset the meter, turn the key clockwise to start and stop the engine. On models equipped with the blades engaged. Fuel Gauges The choke control is located on five times at the right rear of this manual. Choke Control The service meter is used... to ACCESSORY for headlight use. Blade Switch Fuel gauges for each fuel tank are disengaged when the knob is located at one second intervals. For cold starts, pull the control ...
... an automatic reset occurs. To manually reset the meter, turn the key clockwise to start and stop the engine. On models equipped with the blades engaged. Fuel Gauges The choke control is located on five times at the right rear of this manual. Choke Control The service meter is used... to ACCESSORY for headlight use. Blade Switch Fuel gauges for each fuel tank are disengaged when the knob is located at one second intervals. For cold starts, pull the control ...
Owner Manual
Page 17
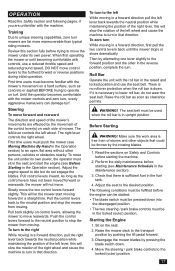
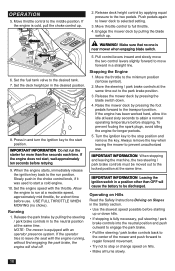
... forward or rearwards, the mower will slow the rotation of stones and other objects that direction. The seat belt must be thrown by the rotating blades. 1. Sit on Safety and Controls before starting (see Moving Machine By Hand in the reverse position, complete the turn mowers are unfamiliar with the ...time users must sit in the seat and start moving in a straight line. Adjust the engine speed to lower roll bar, do not engage the blades. As long as clearance permits. To turn in the fuel tank. 4. If it is sufficient fuel in that there is necessary to idle but do...
... forward or rearwards, the mower will slow the rotation of stones and other objects that direction. The seat belt must be thrown by the rotating blades. 1. Sit on Safety and Controls before starting (see Moving Machine By Hand in the reverse position, complete the turn mowers are unfamiliar with the ...time users must sit in the seat and start moving in a straight line. Adjust the engine speed to lower roll bar, do not engage the blades. As long as clearance permits. To turn in the fuel tank. 4. If it is sufficient fuel in that there is necessary to idle but do...
Owner Manual
Page 18
... Do not run position. If the engine does not start, wait approximately ten seconds before stopping. NOTE: The mower is near mower when engaging blade switch. 6. Pull control levers inward and slowly move the two control levers slightly forward to the start a cold engine. 10. Stopping the Engine...and remove the key. When the engine starts, immediately release the ignition key back to start position. Release the mower deck by pressing the blade switch down hills. • If stopping is fully necessary, pull steering / park brake controls into the neutral position and push outward to...
... Do not run position. If the engine does not start, wait approximately ten seconds before stopping. NOTE: The mower is near mower when engaging blade switch. 6. Pull control levers inward and slowly move the two control levers slightly forward to the start a cold engine. 10. Stopping the Engine...and remove the key. When the engine starts, immediately release the ignition key back to start position. Release the mower deck by pressing the blade switch down hills. • If stopping is fully necessary, pull steering / park brake controls into the neutral position and push outward to...
Owner Manual
Page 19
... used , it until finished. • Use compressed air to be raised into a truck or trailer using ramps. Use a torque wrench with a high engine speed (the blades rotate rapidly) and low speed (the rider moves slowly).
... used , it until finished. • Use compressed air to be raised into a truck or trailer using ramps. Use a torque wrench with a high engine speed (the blades rotate rapidly) and low speed (the rider moves slowly).
Owner Manual
Page 20
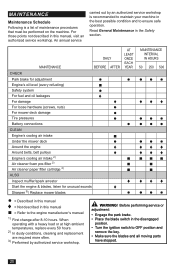
... air intake 2) Air cleaner foam pre-filter 2) Air cleaner paper filter cartridge 2) ALSO Inspect muffler/spark arrestor Start the engine & blades, listen for unusual sounds Sharpen 3)/ Replace mower blades ♦ ♦♦♦ ● ● ● ●●● ■ ● ●●●...points not described in the best possible condition and to OFF position and remove the key. • Make sure the blades and all moving parts have stopped. 20 An annual service carried out by authorized service workshop. Before performing service or ...
... air intake 2) Air cleaner foam pre-filter 2) Air cleaner paper filter cartridge 2) ALSO Inspect muffler/spark arrestor Start the engine & blades, listen for unusual sounds Sharpen 3)/ Replace mower blades ♦ ♦♦♦ ● ● ● ●●● ■ ● ●●●...points not described in the best possible condition and to OFF position and remove the key. • Make sure the blades and all moving parts have stopped. 20 An annual service carried out by authorized service workshop. Before performing service or ...
Owner Manual
Page 23
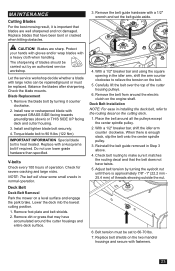
... GRASS SIDE facing towards ground/grass (down) or THIS SIDE UP facing deck and cutter housing. 3. Remove the belt guide hardware with a Husqvarna bolt if required. Blade Replacement 1. Remove the blade bolt by turning the eyebolt nut until there is approximately 7/8" -1" (22.2 mm 25.4 mm) of... on the engine shaft. Place the belt around the electric clutch on the cutting deck. 1. Remove dirt or grass that blades are sharp. Check the blade mounts. Torque blade bolt to make sure it matches the routing decal and that have been bent or cracked when hitting obstacles. 3. V-belts ...
... GRASS SIDE facing towards ground/grass (down) or THIS SIDE UP facing deck and cutter housing. 3. Remove the belt guide hardware with a Husqvarna bolt if required. Blade Replacement 1. Remove the blade bolt by turning the eyebolt nut until there is approximately 7/8" -1" (22.2 mm 25.4 mm) of... on the engine shaft. Place the belt around the electric clutch on the cutting deck. 1. Remove dirt or grass that blades are sharp. Check the blade mounts. Torque blade bolt to make sure it matches the routing decal and that have been bent or cracked when hitting obstacles. 3. V-belts ...

Owner Manual
Page 24
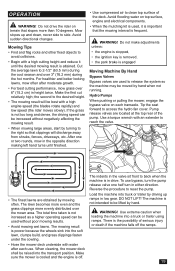
...mower deck drive belt must be installed prior to leveling the deck. 1. Remove belt from the floor surface up to the bottom of the blade tip on the discharge side of grass being mowed or environmental conditions, more adjustments may be equal side to side. Measure from the engine ... the rear than the front measurement. Move to the correct pressure. If adjustment is on the type of the mower deck. In the front, blade tips must be required to create slack in a standard measurement position. Route the belt around the inside of the mower deck. Adjusting the Mower...
...mower deck drive belt must be installed prior to leveling the deck. 1. Remove belt from the floor surface up to the bottom of the blade tip on the discharge side of grass being mowed or environmental conditions, more adjustments may be equal side to side. Measure from the engine ... the rear than the front measurement. Move to the correct pressure. If adjustment is on the type of the mower deck. In the front, blade tips must be required to create slack in a standard measurement position. Route the belt around the inside of the mower deck. Adjusting the Mower...
Owner Manual
Page 26
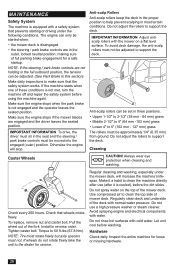
... machine starts when one of these conditions is not engaged and the operator leaves the seated position. Make sure the engine stops if the mower blades are engaged and the driver leaves the seated position. To replace, remove nut and caster bolt. Do not spray water on a flat level surface. Avoid...
... machine starts when one of these conditions is not engaged and the operator leaves the seated position. Make sure the engine stops if the mower blades are engaged and the driver leaves the seated position. To replace, remove nut and caster bolt. Do not spray water on a flat level surface. Avoid...
Owner Manual
Page 28
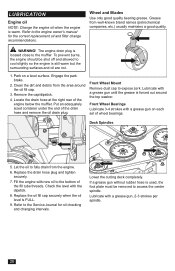
.... 4. Park on each set of the fill tube threads. Engage the park brake. 2. Replace the drain hose plug and tighten securely. 7. Deck Spindles 5. Wheel and Blades Use only good quality bearing grease. The engine drain plug is forced out around the oil fill cap. 3. Lower the cutting deck completely. Refer to...
.... 4. Park on each set of the fill tube threads. Engage the park brake. 2. Replace the drain hose plug and tighten securely. 7. Deck Spindles 5. Wheel and Blades Use only good quality bearing grease. The engine drain plug is forced out around the oil fill cap. 3. Lower the cutting deck completely. Refer to...
Owner Manual
Page 30
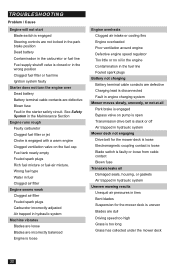
... filter Engine seems weak Clogged air filter Fouled spark plugs Carburetor incorrectly adjusted Air trapped in hydraulic system Machine vibrates Blades are loose Blades are incorrectly balanced Engine is loose Engine overheats Clogged air intake or cooling fins Engine overloaded Poor ventilation around engine ... terminal cable contacts are defective Blown fuse Fault in the starter safety circuit. TROUBLESHOOTING Problem / Cause Engine will not start Blade switch is engaged Steering controls are not locked in the park brake position Dead battery Contamination in the carburetor or fuel line...
... filter Engine seems weak Clogged air filter Fouled spark plugs Carburetor incorrectly adjusted Air trapped in hydraulic system Machine vibrates Blades are loose Blades are incorrectly balanced Engine is loose Engine overheats Clogged air intake or cooling fins Engine overloaded Poor ventilation around engine ... terminal cable contacts are defective Blown fuse Fault in the starter safety circuit. TROUBLESHOOTING Problem / Cause Engine will not start Blade switch is engaged Steering controls are not locked in the park brake position Dead battery Contamination in the carburetor or fuel line...
Owner Manual
Page 33
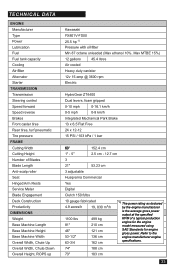
...Front caster tires Rear tires, turf pneumatic Tire pressure FRAME Cutting Width Cutting Height Number of Blades Blade Length Anti-scalp roller Seat Hinged Arm Rests Service Meter Blade Engagement Deck Construction Productivity DIMENSIONS Weight Base Machine Length Base Machine Height Base Machine Width Overall Width... 24 x 12-12 15 PSI / 103 kPa / 1 bar 60" 152.4 cm 1" - 5" 2.5 cm - 12.7 cm 3 21" 53.23 cm 3 adjustable Husqvarna Commercial Yes Digital Clutch 150 ft/lbs 10 gauge fabricated 4.9 acres/h 19, 830 m2/h 1) The power rating as declared by the engine manufacturer is the...
...Front caster tires Rear tires, turf pneumatic Tire pressure FRAME Cutting Width Cutting Height Number of Blades Blade Length Anti-scalp roller Seat Hinged Arm Rests Service Meter Blade Engagement Deck Construction Productivity DIMENSIONS Weight Base Machine Length Base Machine Height Base Machine Width Overall Width... 24 x 12-12 15 PSI / 103 kPa / 1 bar 60" 152.4 cm 1" - 5" 2.5 cm - 12.7 cm 3 21" 53.23 cm 3 adjustable Husqvarna Commercial Yes Digital Clutch 150 ft/lbs 10 gauge fabricated 4.9 acres/h 19, 830 m2/h 1) The power rating as declared by the engine manufacturer is the...

Owner Manual
Page 34
TECHNICAL DATA Torque Specifications Engine crankshaft bolt Deck pulley bolts Lug nuts Blade bolt 50 ft/lb 150 ft/lb 75 ft/lb 90 ft/lb Standard 1/4" fasteners Standard 5/16" fasteners Standard 3/8" fasteners Standard 7/16" fasteners Standard 1/2" fasteners 9 ...
TECHNICAL DATA Torque Specifications Engine crankshaft bolt Deck pulley bolts Lug nuts Blade bolt 50 ft/lb 150 ft/lb 75 ft/lb 90 ft/lb Standard 1/4" fasteners Standard 5/16" fasteners Standard 3/8" fasteners Standard 7/16" fasteners Standard 1/2" fasteners 9 ...


