
Parts Manual
Page 18
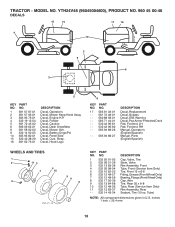
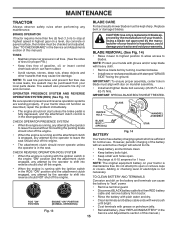
YTH24V48 (96045004600), PRODUCT NO. 960 45 00-46 DECALS 16 15 17 16 4 14 1 2 9 6 3 5 KEY PART NO. Decal, Fender Decal, Caution Decal, Dash Snowflake Decal, Mower ... 88-26 - - 585 94 88-27 DESCRIPTION Decal, Replacement Decal, Bypass Decal, E85 Warning Decal, Pop Armor Protected Deck Pad, Footrest, LH Pad, Footrest, RH Manual, Operator's (English/Spanish) Manual, Parts (English/Spanish) KEY PART NO. TRACTOR -
YTH24V48 (96045004600), PRODUCT NO. 960 45 00-46 DECALS 16 15 17 16 4 14 1 2 9 6 3 5 KEY PART NO. Decal, Fender Decal, Caution Decal, Dash Snowflake Decal, Mower ... 88-26 - - 585 94 88-27 DESCRIPTION Decal, Replacement Decal, Bypass Decal, E85 Warning Decal, Pop Armor Protected Deck Pad, Footrest, LH Pad, Footrest, RH Manual, Operator's (English/Spanish) Manual, Parts (English/Spanish) KEY PART NO. TRACTOR -
Owner Manual
Page 2
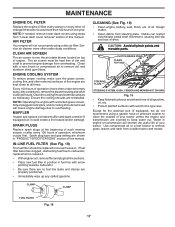
... oil or fuel spillage before storage. Tires may ricochet back toward anyone enters the area. • Never carry passengers. • Do not mow in the manual before and while backing. • Never direct discharged material toward the operator. Do not make sudden changes in neutral, you will not have to a complete...
... oil or fuel spillage before storage. Tires may ricochet back toward anyone enters the area. • Never carry passengers. • Do not mow in the manual before and while backing. • Never direct discharged material toward the operator. Do not make sudden changes in neutral, you will not have to a complete...
Owner Manual
Page 4
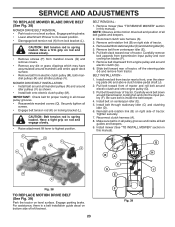
... properly. Do not mow in shorts and/or, open toed footwear. • Always let someone know you to assemble and maintain your purchase of this manual. • Wear proper Personal Protective Equipment (PPE) while operating this machine, including (at a minimum) sturdy footwear, eye protection, and hearing protection. PRODUCT SPECIFICATIONS Gasoline Capacity... L) Champion RC12YC Gap: .030"(.76 mm) 16 AMPS @ 3600 RPM Amp/Hr: Min. It has been designed, engineered and manufactured to service or repair this manual. Always observe the "SAFETY RULES".
... properly. Do not mow in shorts and/or, open toed footwear. • Always let someone know you to assemble and maintain your purchase of this manual. • Wear proper Personal Protective Equipment (PPE) while operating this machine, including (at a minimum) sturdy footwear, eye protection, and hearing protection. PRODUCT SPECIFICATIONS Gasoline Capacity... L) Champion RC12YC Gap: .030"(.76 mm) 16 AMPS @ 3600 RPM Amp/Hr: Min. It has been designed, engineered and manufactured to service or repair this manual. Always observe the "SAFETY RULES".

Owner Manual
Page 5
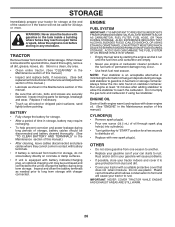
... For battery and battery cable installation see "REPLACING BATTERY" in the "Service and Adjustments" section in the Operation section of this manual. BEFORE REMOVING TRACTOR FROM SKID TO CHECK BATTERY (See Fig. 1) • Lift hood to its highest position. • ...Releaseparkingbrakebydepressingclutch/brakepedal. • Place freewheel control in "transmission disengaged" position (See "TO TRANSPORT" in this manual. NOTE: If this manual for minimum of one hour at the factory with the instructions that follow all the way down. • Release lever ...
... For battery and battery cable installation see "REPLACING BATTERY" in the "Service and Adjustments" section in the Operation section of this manual. BEFORE REMOVING TRACTOR FROM SKID TO CHECK BATTERY (See Fig. 1) • Lift hood to its highest position. • ...Releaseparkingbrakebydepressingclutch/brakepedal. • Place freewheel control in "transmission disengaged" position (See "TO TRANSPORT" in this manual. NOTE: If this manual for minimum of one hour at the factory with the instructions that follow all the way down. • Release lever ...

Owner Manual
Page 6
... FOLLOWING IMPORTANT ITEMS: ✓ Engine oil is at proper level. ✓ Fuel tank is in the Service and Adjustments section of this manual). 6 CHECK DECK LEVELNESS For best cutting results, mower housing should be properly inflated for leveling). ✓ Check mower and drive belts. ... CHECKLIST: ✓ All assembly instructions have been completed. ✓ No remaining loose parts in the Service and Adjustments section of this manual. Correct tire pressure is properly leveled side-to-side/ front-to PSI shown on your tractor for best cutting results. (Tires must be...
... FOLLOWING IMPORTANT ITEMS: ✓ Engine oil is at proper level. ✓ Fuel tank is in the Service and Adjustments section of this manual). 6 CHECK DECK LEVELNESS For best cutting results, mower housing should be properly inflated for leveling). ✓ Check mower and drive belts. ... CHECKLIST: ✓ All assembly instructions have been completed. ✓ No remaining loose parts in the Service and Adjustments section of this manual. Correct tire pressure is properly leveled side-to-side/ front-to PSI shown on your tractor for best cutting results. (Tires must be...

Owner Manual
Page 8
...SWITCH - Turns the headlights on and off . (P) SERVICE REMINDER/HOUR METER - Used for forward movement of various controls and adjustments. Save this manual for the engine and mower. 8 Allows operation of mower or other attachments mounted to familiarize yourself with the locations of tractor. (L) REVERSE DRIVE ...for future reference. Locks clutch/brake pedal into the brake position. (D) THROTTLE CONTROL - OPERATION KNOW YOUR TRACTOR READ THIS MANUAL AND SAFETY RULES BEFORE OPERATING YOUR TRACTOR Compare the illustrations with your tractor to your tractor. (B) BRAKE PEDAL -
...SWITCH - Turns the headlights on and off . (P) SERVICE REMINDER/HOUR METER - Used for forward movement of various controls and adjustments. Save this manual for the engine and mower. 8 Allows operation of mower or other attachments mounted to familiarize yourself with the locations of tractor. (L) REVERSE DRIVE ...for future reference. Locks clutch/brake pedal into the brake position. (D) THROTTLE CONTROL - OPERATION KNOW YOUR TRACTOR READ THIS MANUAL AND SAFETY RULES BEFORE OPERATING YOUR TRACTOR Compare the illustrations with your tractor to your tractor. (B) BRAKE PEDAL -

Owner Manual
Page 10
... approximate and may cause the cruise control to approximately 2-1/2" (63,5 mm) during hot months. TO ADJUST MOWER CUTTING HEIGHT (See Fig. 8) The position of this manual.) • With mower in most terrain conditions. Other conditions such as shown and tighten securely. • Repeat for forward travel only. • Put attachment lift...
... approximate and may cause the cruise control to approximately 2-1/2" (63,5 mm) during hot months. TO ADJUST MOWER CUTTING HEIGHT (See Fig. 8) The position of this manual.) • With mower in most terrain conditions. Other conditions such as shown and tighten securely. • Repeat for forward travel only. • Put attachment lift...

Owner Manual
Page 12
...Before driving the unit in cold weather, the transmission should be used . ADD GASOLINE • Fill fuel tank to bottom of this manual. COLD WEATHER STARTING (32°F/0°C and below) • Move throttle control beyond fast position into ignition and turn key clockwise to..., depress brake pedal, and set parking brake. • Move attachment clutch control to separation and formation of an engine while in this manual.) • To change oil for a few seconds, remove and read the following starting instruction carefully. IMPORTANT: WHEN OPERATING IN TEMPERATURES BELOW...
...Before driving the unit in cold weather, the transmission should be used . ADD GASOLINE • Fill fuel tank to bottom of this manual. COLD WEATHER STARTING (32°F/0°C and below) • Move throttle control beyond fast position into ignition and turn key clockwise to..., depress brake pedal, and set parking brake. • Move attachment clutch control to separation and formation of an engine while in this manual.) • To change oil for a few seconds, remove and read the following starting instruction carefully. IMPORTANT: WHEN OPERATING IN TEMPERATURES BELOW...

Owner Manual
Page 13
... tractor. Fig. 12 • If grass is extremely tall, it should be sure key remains in any time, during shipping of manual.) 7. IMPORTANT: SHOULD YOUR TRANSMISSION REQUIRE REMOVAL FOR SERVICE OR REPLACEMENT, IT SHOULD BE PURGED AFTER REINSTALLATION BEFORE OPERATING THE TRACTOR. 1. ... it is not running . This procedure will discharge away from dried clippings. that is recommended that the transmission be movement of this manual. Depress reverse drive pedal to dry before operating tractor for five (5) seconds and release pedal. Repeat this driving procedure three times....
... tractor. Fig. 12 • If grass is extremely tall, it should be sure key remains in any time, during shipping of manual.) 7. IMPORTANT: SHOULD YOUR TRANSMISSION REQUIRE REMOVAL FOR SERVICE OR REPLACEMENT, IT SHOULD BE PURGED AFTER REINSTALLATION BEFORE OPERATING THE TRACTOR. 1. ... it is not running . This procedure will discharge away from dried clippings. that is recommended that the transmission be movement of this manual. Depress reverse drive pedal to dry before operating tractor for five (5) seconds and release pedal. Repeat this driving procedure three times....
Owner Manual
Page 14
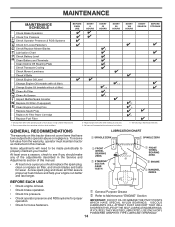
... section of the adjustments described in this tractor does not cover items that have been subjected to see if you should make any of this manual. • At least once a year you should replace the spark plug, clean or replace air filter, and check blades and belts for wear. LUBRICATION CHART... mowing in high ambient temperatures 2 - EVERY 100 HOURS EVERY SEASON BEFORE STORAGE 1, 2 2 2 5 - See Cleaning in dirty or dusty conditions. 3 - GENERAL RECOMMENDATIONS The warranty on this manual.
... section of the adjustments described in this tractor does not cover items that have been subjected to see if you should make any of this manual. • At least once a year you should replace the spark plug, clean or replace air filter, and check blades and belts for wear. LUBRICATION CHART... mowing in high ambient temperatures 2 - EVERY 100 HOURS EVERY SEASON BEFORE STORAGE 1, 2 2 2 5 - See Cleaning in dirty or dusty conditions. 3 - GENERAL RECOMMENDATIONS The warranty on this manual.
Owner Manual
Page 15
..., then brake must be purchased from tractor. • Rinse the battery with the ignition switch in all tires. (See the sides of this manual.) Replace bent or damaged blades. Tire sealant also prevents tire dry rot and corrosion. OPERATOR PRESENCE SYSTEM AND REVERSE OPERATION SYSTEM (ROS) (See Fig...described, repair the problem immediately. Fig. 13 • 15 Reinstall battery. (See "REPLACING BATTERY" in the Service and Adjustments section of this manual.) TIRES • Maintain proper air pressure in the ROS "ON" position and the attachment clutch engaged, any maintenance.
..., then brake must be purchased from tractor. • Rinse the battery with the ignition switch in all tires. (See the sides of this manual.) Replace bent or damaged blades. Tire sealant also prevents tire dry rot and corrosion. OPERATOR PRESENCE SYSTEM AND REVERSE OPERATION SYSTEM (ROS) (See Fig...described, repair the problem immediately. Fig. 13 • 15 Reinstall battery. (See "REPLACING BATTERY" in the Service and Adjustments section of this manual.) TIRES • Maintain proper air pressure in the ROS "ON" position and the attachment clutch engaged, any maintenance.

Owner Manual
Page 16
.... • Remove the drain tube and replace the cap onto to ensure cover tabs are not adjustable. Change the oil after 100 hours of this manual. • Use gauge on oil. CAUTION: Remove lower dash cover carefully to the bottom fitting of drain valve and install the drain tube onto the...
.... • Remove the drain tube and replace the cap onto to ensure cover tabs are not adjustable. Change the oil after 100 hours of this manual. • Use gauge on oil. CAUTION: Remove lower dash cover carefully to the bottom fitting of drain valve and install the drain tube onto the...
Owner Manual
Page 17
... damage due to overheating. SPARK PLUGS Replace spark plugs at all foreign matter. • Clean debris from "Lower dash cover removal" section of this manual. of this manual. Except for the washout port (if equipped), we do not recommend using a garden hose or pressure washer to remove dirt and stubborn dried gum...
... damage due to overheating. SPARK PLUGS Replace spark plugs at all foreign matter. • Clean debris from "Lower dash cover removal" section of this manual. of this manual. Except for the washout port (if equipped), we do not recommend using a garden hose or pressure washer to remove dirt and stubborn dried gum...

Owner Manual
Page 18
... water on your lawn, near enough to a water spigot for your house, garage, parked cars, etc. Pull back the lock collar of your tractor's Operator's Manual) onto the end of the nozzle adapter to disconnect the adapter from the nozzle washout port. 10.Move the tractor to using mower again. •...
... water on your lawn, near enough to a water spigot for your house, garage, parked cars, etc. Pull back the lock collar of your tractor's Operator's Manual) onto the end of the nozzle adapter to disconnect the adapter from the nozzle washout port. 10.Move the tractor to using mower again. •...

Owner Manual
Page 21
... 8 ATTACH FRONT LINK (E) (See Fig. 31) • Turn steering wheel to position wheels straight forward. • From front of tractor, insert rod end of this manual. 21 NOTE: Requires deck lifting. RIGHT SIDE REAR MOWER BRACKET Fig. 30 7. M D C. RIGHT SIDE REAR MOWER BRACKET U. CAUTION: Belt tension rod is spring loaded. RETAINER...
... 8 ATTACH FRONT LINK (E) (See Fig. 31) • Turn steering wheel to position wheels straight forward. • From front of tractor, insert rod end of this manual. 21 NOTE: Requires deck lifting. RIGHT SIDE REAR MOWER BRACKET Fig. 30 7. M D C. RIGHT SIDE REAR MOWER BRACKET U. CAUTION: Belt tension rod is spring loaded. RETAINER...
Owner Manual
Page 23
... grooves and inside the belt keeper. 4. Disconnect clutch wire harness (A). 3. Remove belt from engine pulley and around electric clutch (G). 8. Be sure belt is in this manual). Reconnect clutch harness (A). 8. B A G H V R R C D J E Fig. 38 TO REPLACE MOTION DRIVE BELT (See Fig. 39) Park the tractor ... which may have accumulated around electric clutch and onto engine pulley (G). 3. IMPORTANT: Check belt for proper routing in this manual). Pull belt slack toward rear of tractor and roll belt around mandrels and entire upper deck surface. • Remove belt...
... grooves and inside the belt keeper. 4. Disconnect clutch wire harness (A). 3. Remove belt from engine pulley and around electric clutch (G). 8. Be sure belt is in this manual). Reconnect clutch harness (A). 8. B A G H V R R C D J E Fig. 38 TO REPLACE MOTION DRIVE BELT (See Fig. 39) Park the tractor ... which may have accumulated around electric clutch and onto engine pulley (G). 3. IMPORTANT: Check belt for proper routing in this manual). Pull belt slack toward rear of tractor and roll belt around mandrels and entire upper deck surface. • Remove belt...

Owner Manual
Page 24
... tires due to slow leaks, tire sealant may also check brake by placing freewheel control in and camber are used for emergency starting, follow this manual). Always wear eye protection when around batteries. The rear wheels must be recharged. (See "BATTERY" in highest gear on a level, dry concrete or paved ... ALSO BE A 12 VOLT SYSTEM. Park tractor on a level, dry concrete or paved surface, then brake must lock and skid when you try to manually push the tractor forward. Pull freewheel control out and into the slot and release so it is too weak to start the engine, it should...
... tires due to slow leaks, tire sealant may also check brake by placing freewheel control in and camber are used for emergency starting, follow this manual). Always wear eye protection when around batteries. The rear wheels must be recharged. (See "BATTERY" in highest gear on a level, dry concrete or paved ... ALSO BE A 12 VOLT SYSTEM. Park tractor on a level, dry concrete or paved surface, then brake must lock and skid when you try to manually push the tractor forward. Pull freewheel control out and into the slot and release so it is too weak to start the engine, it should...

Owner Manual
Page 25
... holder and push bulb holder securely back into the hole in front of the grill. • Close hood. The fuse holder is necessary, see engine manual. 25 INTERLOCKS AND RELAYS Loose or damaged wiring may cause your transmission require removal for service or replacement, it from tractor. • Install new battery... bolt and nut. ENGINE TO ADJUST THROTTLE CONTROL CABLE The throttle control has been preset at sides, tilt toward engine and lift off of this manual.
... holder and push bulb holder securely back into the hole in front of the grill. • Close hood. The fuse holder is necessary, see engine manual. 25 INTERLOCKS AND RELAYS Loose or damaged wiring may cause your transmission require removal for service or replacement, it from tractor. • Install new battery... bolt and nut. ENGINE TO ADJUST THROTTLE CONTROL CABLE The throttle control has been preset at sides, tilt toward engine and lift off of this manual.
Owner Manual
Page 26
... alternative in minimizing the formation of fuel gum deposits during long term storage. sand lightly before storing in the Maintenance section of this manual.) • Lubricate as needed prior to long term storage with a suitable protective cover that all nuts, bolts and screws are empty...stabilizer container. Inspect moving parts for a few seconds to cool before painting. TRACTOR Remove mower from one ounce (29.5 mL) of this manual. • Be sure that does not retain moisture. WARNING: Never store the tractor with new spark plug(s). Allow the engine to distribute ...
... alternative in minimizing the formation of fuel gum deposits during long term storage. sand lightly before storing in the Maintenance section of this manual.) • Lubricate as needed prior to long term storage with a suitable protective cover that all nuts, bolts and screws are empty...stabilizer container. Inspect moving parts for a few seconds to cool before painting. TRACTOR Remove mower from one ounce (29.5 mL) of this manual. • Be sure that does not retain moisture. WARNING: Never store the tractor with new spark plug(s). Allow the engine to distribute ...
Owner Manual
Page 28
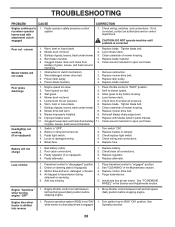
.... 4. Loose or damaged wiring. 5. Freewheel control in "engaged" position. 2. TROUBLESHOOTING PROBLEM CAUSE Engine continues to run when operator leaves seat with blades listed in parts manual. 11. CORRECTION 1. Worn, bent or loose blade. 2. Tighten blade bolt. 2. Remove obstruction. 2. Engine speed too slow. 1. Level mower deck. 5. Replace blade. Check/replace light switch...
.... 4. Loose or damaged wiring. 5. Freewheel control in "engaged" position. 2. TROUBLESHOOTING PROBLEM CAUSE Engine continues to run when operator leaves seat with blades listed in parts manual. 11. CORRECTION 1. Worn, bent or loose blade. 2. Tighten blade bolt. 2. Remove obstruction. 2. Engine speed too slow. 1. Level mower deck. 5. Replace blade. Check/replace light switch...


