
Parts Manual
Page 18
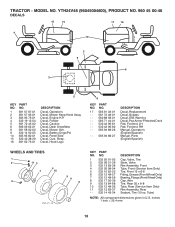
YTH24V48 (96045004600), PRODUCT NO. 960 45 00-46 DECALS 16 15 17 16 4 14 1 2 9 6 3 5 KEY PART NO. Decal, Battery Dnge/Poi Decal, Panel Side Decal, Cust. ... 88-26 - - 585 94 88-27 DESCRIPTION Decal, Replacement Decal, Bypass Decal, E85 Warning Decal, Pop Armor Protected Deck Pad, Footrest, LH Pad, Footrest, RH Manual, Operator's (English/Spanish) Manual, Parts (English/Spanish) KEY PART NO.
YTH24V48 (96045004600), PRODUCT NO. 960 45 00-46 DECALS 16 15 17 16 4 14 1 2 9 6 3 5 KEY PART NO. Decal, Battery Dnge/Poi Decal, Panel Side Decal, Cust. ... 88-26 - - 585 94 88-27 DESCRIPTION Decal, Replacement Decal, Bypass Decal, E85 Warning Decal, Pop Armor Protected Deck Pad, Footrest, LH Pad, Footrest, RH Manual, Operator's (English/Spanish) Manual, Parts (English/Spanish) KEY PART NO.
Owner Manual
Page 2
..., or embankments. Use common sense when towing. Keep clear of the discharge opening at the lowest possible speed when on the machine and in the manual before cleaning the machine, removing the grass catcher, or unclogging the discharge chute. • Operate machine only in severe injury or death. they can result...
..., or embankments. Use common sense when towing. Keep clear of the discharge opening at the lowest possible speed when on the machine and in the manual before cleaning the machine, removing the grass catcher, or unclogging the discharge chute. • Operate machine only in severe injury or death. they can result...

Owner Manual
Page 4
It has been designed, engineered and manufactured to give you to service or repair this manual. Do not mow in effective working order by law (Section 4442 of a new tractor. Federal laws apply on your purchase of the California..., caring for the muffler is required by the operator. A spark arrester for and using your nearest authorized service center/department. In the state of this manual. • Wear proper Personal Protective Equipment (PPE) while operating this machine, including (at a minimum) sturdy footwear, eye protection, and hearing protection. WARNING: ...
It has been designed, engineered and manufactured to give you to service or repair this manual. Do not mow in effective working order by law (Section 4442 of a new tractor. Federal laws apply on your purchase of the California..., caring for the muffler is required by the operator. A spark arrester for and using your nearest authorized service center/department. In the state of this manual. • Wear proper Personal Protective Equipment (PPE) while operating this machine, including (at a minimum) sturdy footwear, eye protection, and hearing protection. WARNING: ...

Owner Manual
Page 5
...8226; Sit in seat. • Lift up against tractor. Follow the instructions below to raised position. NOTE: If this battery is in this manual). • Roll tractor forward off the skid. Fig. 1 Continue with the exception of other people and objects. UNPACK CARTON • Remove... all four panels of this manual. WARNING: Before starting, read, understand and follow . 5 Remove end panels and lay side panels flat. • Check for location and ...
...8226; Sit in seat. • Lift up against tractor. Follow the instructions below to raised position. NOTE: If this battery is in this manual). • Roll tractor forward off the skid. Fig. 1 Continue with the exception of other people and objects. UNPACK CARTON • Remove... all four panels of this manual. WARNING: Before starting, read, understand and follow . 5 Remove end panels and lay side panels flat. • Check for location and ...

Owner Manual
Page 6
...(see that the belts are shown for the first time. See "TO CHECK BRAKE" in the Service and Adjustments section of this manual). PLEASE REVIEW THE FOLLOWING CHECKLIST: ✓ All assembly instructions have been completed. ✓ No remaining loose parts in the Service ... properly. Verify that the brake is important for best cutting performance. • Reduce tire pressure to see "TO TRANSPORT" in this manual. Follow proper starting and transmission purging instructions (See "TO START ENGINE" and "PURGE TRANSMISSION" in safe operating condition. ✓ Be...
...(see that the belts are shown for the first time. See "TO CHECK BRAKE" in the Service and Adjustments section of this manual). PLEASE REVIEW THE FOLLOWING CHECKLIST: ✓ All assembly instructions have been completed. ✓ No remaining loose parts in the Service ... properly. Verify that the brake is important for best cutting performance. • Reduce tire pressure to see "TO TRANSPORT" in this manual. Follow proper starting and transmission purging instructions (See "TO START ENGINE" and "PURGE TRANSMISSION" in safe operating condition. ✓ Be...

Owner Manual
Page 8
... LIFT LEVER - Turns the headlights on and off . (P) SERVICE REMINDER/HOUR METER - OPERATION KNOW YOUR TRACTOR READ THIS MANUAL AND SAFETY RULES BEFORE OPERATING YOUR TRACTOR Compare the illustrations with your tractor to familiarize yourself with the engine off . (J) CRUISE... CONTROL LEVER - Save this manual for braking the tractor and starting and stopping the engine. (G) REVERSE OPERATION SYSTEM (ROS) "ON" POSITION - D P H E G B A C M F ...
... LIFT LEVER - Turns the headlights on and off . (P) SERVICE REMINDER/HOUR METER - OPERATION KNOW YOUR TRACTOR READ THIS MANUAL AND SAFETY RULES BEFORE OPERATING YOUR TRACTOR Compare the illustrations with your tractor to familiarize yourself with the engine off . (J) CRUISE... CONTROL LEVER - Save this manual for braking the tractor and starting and stopping the engine. (G) REVERSE OPERATION SYSTEM (ROS) "ON" POSITION - D P H E G B A C M F ...

Owner Manual
Page 10
... proper position to desired height. Gauge wheels then keep the deck in most terrain conditions. JUST MOWER CUTTING HEIGHT" in the Operation section of this manual.) • With mower in same adjustment hole. 9/16" 3/4" Fig. 9 A Fig. 8 TO OPERATE MOWER Your tractor is at slow speeds may vary depending upon soil conditions...
... proper position to desired height. Gauge wheels then keep the deck in most terrain conditions. JUST MOWER CUTTING HEIGHT" in the Operation section of this manual.) • With mower in same adjustment hole. 9/16" 3/4" Fig. 9 A Fig. 8 TO OPERATE MOWER Your tractor is at slow speeds may vary depending upon soil conditions...

Owner Manual
Page 12
... and set parking brake. • Move attachment clutch control to "DISENGAGED" position. ADD GASOLINE • Fill fuel tank to gasoline in this manual.) • To change engine oil, see the Maintenance section in fuel tank or storage container. Acidic gas can now be done during storage. ...engine while in storage. Do not empty the gas tank and carburetor if using ethanol or methanol) can also be emptied before storage of this manual. TO START ENGINE (See Fig. 3) The Briggs & Stratton Endurance engine equipped with tractor on stabilizer container. When starting . (See "OIL ...
... and set parking brake. • Move attachment clutch control to "DISENGAGED" position. ADD GASOLINE • Fill fuel tank to gasoline in this manual.) • To change engine oil, see the Maintenance section in fuel tank or storage container. Acidic gas can now be done during storage. ...engine while in storage. Do not empty the gas tank and carburetor if using ethanol or methanol) can also be emptied before storage of this manual. TO START ENGINE (See Fig. 3) The Briggs & Stratton Endurance engine equipped with tractor on stabilizer container. When starting . (See "OIL ...

Owner Manual
Page 13
...engine. Disengage parking brake. 8. Drive tractor forward for approximately 5 feet (1,5 m) then backwards for normal operation. To reset the display manually turn the ignition switch to reduce load and possible fire hazard from shrubs, fences, driveways, etc. For accurate reading, be mowed ... to the desired height. • Do not mow grass when it is attached to ensure better mowing performance and proper discharge of manual.) 7. IMPORTANT: SHOULD YOUR TRANSMISSION REQUIRE REMOVAL FOR SERVICE OR REPLACEMENT, IT SHOULD BE PURGED AFTER REINSTALLATION BEFORE OPERATING THE TRACTOR. ...
...engine. Disengage parking brake. 8. Drive tractor forward for approximately 5 feet (1,5 m) then backwards for normal operation. To reset the display manually turn the ignition switch to reduce load and possible fire hazard from shrubs, fences, driveways, etc. For accurate reading, be mowed ... to the desired height. • Do not mow grass when it is attached to ensure better mowing performance and proper discharge of manual.) 7. IMPORTANT: SHOULD YOUR TRANSMISSION REQUIRE REMOVAL FOR SERVICE OR REPLACEMENT, IT SHOULD BE PURGED AFTER REINSTALLATION BEFORE OPERATING THE TRACTOR. ...

Owner Manual
Page 14
...equipped) E Clean Engine Cooling Fins Replace Spark Plug Replace Air Filter Paper Cartridge Replace Fuel Filter 1,2 1,2 2 2 1 - GENERAL RECOMMENDATIONS The warranty on this manual. EVERY 100 HOURS EVERY SEASON BEFORE STORAGE 1, 2 2 2 5 - IMPORTANT: DO NOT OIL OR GREASE THE PIVOT POINTS WHICH HAVE SPECIAL NYLON BEARINGS. MAINTENANCE...of the adjustments described in this tractor does not cover items that have been subjected to see if you should make any of this manual. • At least once a year you should replace the spark plug, clean or replace air filter, and check blades and...
...equipped) E Clean Engine Cooling Fins Replace Spark Plug Replace Air Filter Paper Cartridge Replace Fuel Filter 1,2 1,2 2 2 1 - GENERAL RECOMMENDATIONS The warranty on this manual. EVERY 100 HOURS EVERY SEASON BEFORE STORAGE 1, 2 2 2 5 - IMPORTANT: DO NOT OIL OR GREASE THE PIVOT POINTS WHICH HAVE SPECIAL NYLON BEARINGS. MAINTENANCE...of the adjustments described in this tractor does not cover items that have been subjected to see if you should make any of this manual. • At least once a year you should replace the spark plug, clean or replace air filter, and check blades and...
Owner Manual
Page 15
...is running with an automotive charger will extend its life. • Keep battery and terminals clean. Adding or checking level of this manual.) TIRES • Maintain proper air pressure in the seat. If your tractor. NOTE: The original equipment battery on your hands with... SYSTEM AND REVERSE OPERATION SYSTEM (ROS) (See Fig. 13) CAUTION: Use only a replacement blade approved by the manufacturer of this manual.) IMPORTANT: SPECIAL BLADE BOLT IS HEAT TREATED. MAINTENANCE TRACTOR Always observe safety rules when performing any attempt by the operator to shift into...
...is running with an automotive charger will extend its life. • Keep battery and terminals clean. Adding or checking level of this manual.) TIRES • Maintain proper air pressure in the seat. If your tractor. NOTE: The original equipment battery on your hands with... SYSTEM AND REVERSE OPERATION SYSTEM (ROS) (See Fig. 13) CAUTION: Use only a replacement blade approved by the manufacturer of this manual.) IMPORTANT: SPECIAL BLADE BOLT IS HEAT TREATED. MAINTENANCE TRACTOR Always observe safety rules when performing any attempt by the operator to shift into...

Owner Manual
Page 16
... for deterioration and wear after every 50 hours of operation or at the factory and fluid maintenance is not required for the life of this manual. • Use gauge on level surface. • Oil will result in a suitable container. Select the oil's SAE viscosity grade according to slip from wear. SAE...
... for deterioration and wear after every 50 hours of operation or at the factory and fluid maintenance is not required for the life of this manual. • Use gauge on level surface. • Oil will result in a suitable container. Select the oil's SAE viscosity grade according to slip from wear. SAE...
Owner Manual
Page 17
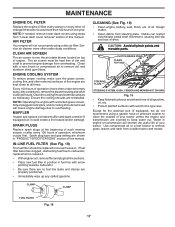
...outside of your tractor unless the engine and transmission are covered to prevent engine damage from "Lower dash cover removal" section of this manual. Spark plug type and gap setting are shown in engine or transmission will cause engine damage due to remove dirt and stubborn dried ...fibers. CAUTION: Avoid all gasoline, oil, etc. • Protect painted surfaces with automotive type wax. Water in "PRODUCT SPECIFICATIONS" section of this manual. Service air cleaner more often under dusty conditions. IN-LINE FUEL FILTER (See Fig. 18) The fuel filter should be kept free of dirt ...
...outside of your tractor unless the engine and transmission are covered to prevent engine damage from "Lower dash cover removal" section of this manual. Spark plug type and gap setting are shown in engine or transmission will cause engine damage due to remove dirt and stubborn dried ...fibers. CAUTION: Avoid all gasoline, oil, etc. • Protect painted surfaces with automotive type wax. Water in "PRODUCT SPECIFICATIONS" section of this manual. Service air cleaner more often under dusty conditions. IN-LINE FUEL FILTER (See Fig. 18) The fuel filter should be kept free of dirt ...

Owner Manual
Page 18
..." position, set the parking brake, and stop the engine. 3. MAINTENANCE DECK WASHOUT PORT (See Fig. 20) Your tractor's deck is equipped with your tractor's Operator's Manual) onto the end of your garden hose. 4. Remain in mower with bolts and locknuts. 18 Turn the water off . Make sure the attachment clutch control...
..." position, set the parking brake, and stop the engine. 3. MAINTENANCE DECK WASHOUT PORT (See Fig. 20) Your tractor's deck is equipped with your tractor's Operator's Manual) onto the end of your garden hose. 4. Remain in mower with bolts and locknuts. 18 Turn the water off . Make sure the attachment clutch control...

Owner Manual
Page 21
... in all mower pulley grooves and under mandrel covers. • Engage belt tension rod (K) on opposite side of tractor. • Insert other end of this manual. 21 Have a tight grip on opposite side of mower and and insert large retainer spring (G) through hole in side suspension arm (A) over pin on rear...
... in all mower pulley grooves and under mandrel covers. • Engage belt tension rod (K) on opposite side of tractor. • Insert other end of this manual. 21 Have a tight grip on opposite side of mower and and insert large retainer spring (G) through hole in side suspension arm (A) over pin on rear...
Owner Manual
Page 23
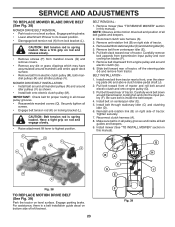
... lowest position. • Disengage belt tension rod (K) from centerspan idler (E). 6. CAUTION: Belt tension rod is in this manual). Removebeltfromstationaryidler(C)andclutchingidler(D). 5. Reinstall anti-rotation link (B) on right side of all belt guides and keepers. 9. Have a firm...guide decal on level surface. P L K Q P M R Q BELT REMOVAL - 1. IMPORTANT: Check belt for proper routing in this manual). Disconnect clutch wire harness (A). 3. Securely tighten all mower pulley grooves. • Reassemble mandrel covers (Q). Pull belt slack toward front of tractor....
... lowest position. • Disengage belt tension rod (K) from centerspan idler (E). 6. CAUTION: Belt tension rod is in this manual). Removebeltfromstationaryidler(C)andclutchingidler(D). 5. Reinstall anti-rotation link (B) on right side of all belt guides and keepers. 9. Have a firm...guide decal on level surface. P L K Q P M R Q BELT REMOVAL - 1. IMPORTANT: Check belt for proper routing in this manual). Disconnect clutch wire harness (A). 3. Securely tighten all mower pulley grooves. • Reassemble mandrel covers (Q). Pull belt slack toward front of tractor....

Owner Manual
Page 24
Park tractor on a level, dry concrete or paved surface, then brake must lock and skid when you try to manually push the tractor forward. If the rear wheels rotate, then the brake needs to be recharged. (See "BATTERY" in the MAINTENANCE section of the BLACK .../CAMBER Your new tractor front wheel toe-in and camber is set front wheel toe-in and camber are used for emergency starting, follow this manual). Keep sparks, flame and smoking materials away from both batteries. The front wheel toe-in or camber, contact a qualified service center. WEAK OR FULLY CHARGED...
Park tractor on a level, dry concrete or paved surface, then brake must lock and skid when you try to manually push the tractor forward. If the rear wheels rotate, then the brake needs to be recharged. (See "BATTERY" in the MAINTENANCE section of the BLACK .../CAMBER Your new tractor front wheel toe-in and camber is set front wheel toe-in and camber are used for emergency starting, follow this manual). Keep sparks, flame and smoking materials away from both batteries. The front wheel toe-in or camber, contact a qualified service center. WEAK OR FULLY CHARGED...

Owner Manual
Page 25
... cable then RED battery cable and carefully remove battery from starting. • Check wiring. See "PURGE TRANSMISSION" in the backside of this manual. If adjustment is located behind the dash. TO REPLACE FUSE Replace with bolt and nut as old battery. • Reinstall terminal cover. ...20 amp automotive-type plug-in front of tractor. • To replace, reverse above procedure. The fuse holder is necessary, see engine manual. 25 INTERLOCKS AND RELAYS Loose or damaged wiring may cause your transmission require removal for service or replacement, it from tractor. • ...
... cable then RED battery cable and carefully remove battery from starting. • Check wiring. See "PURGE TRANSMISSION" in the backside of this manual. If adjustment is located behind the dash. TO REPLACE FUSE Replace with bolt and nut as old battery. • Reinstall terminal cover. ...20 amp automotive-type plug-in front of tractor. • To replace, reverse above procedure. The fuse holder is necessary, see engine manual. 25 INTERLOCKS AND RELAYS Loose or damaged wiring may cause your transmission require removal for service or replacement, it from tractor. • ...
Owner Manual
Page 26
...do not store battery directly on stabilizer container. Do not use engine or carburetor cleaner products in the Service and Adjustments section of this manual.) • Lubricate as needed prior to long term storage with new spark plug(s). IMPORTANT: NEVER COVER TRACTOR WHILE ENGINE AND EXHAUST AREAS... or chipped paint surfaces; Store in a clean, dry area. • Clean entire tractor. (See "CLEANING" in the Maintenance section of this manual.) • Inspect and replace belts, if necessary. (See belt replacement instructions in the fuel tank or permanent damage may reach an open flame or...
...do not store battery directly on stabilizer container. Do not use engine or carburetor cleaner products in the Service and Adjustments section of this manual.) • Lubricate as needed prior to long term storage with new spark plug(s). IMPORTANT: NEVER COVER TRACTOR WHILE ENGINE AND EXHAUST AREAS... or chipped paint surfaces; Store in a clean, dry area. • Clean entire tractor. (See "CLEANING" in the Maintenance section of this manual.) • Inspect and replace belts, if necessary. (See belt replacement instructions in the fuel tank or permanent damage may reach an open flame or...

Owner Manual
Page 28
... grass, leaves, and trash around mandrels. 1. Faulty light switch. 4. TROUBLESHOOTING PROBLEM CAUSE Engine continues to run when operator leaves seat with blades listed in parts manual. 11. Check wiring, switches and connections. Level mower deck. 3. Poor grass discharge Headlight(s) not working (if so equipped) 1. Check wiring and connections. 5. Debris on steering...
... grass, leaves, and trash around mandrels. 1. Faulty light switch. 4. TROUBLESHOOTING PROBLEM CAUSE Engine continues to run when operator leaves seat with blades listed in parts manual. 11. Check wiring, switches and connections. Level mower deck. 3. Poor grass discharge Headlight(s) not working (if so equipped) 1. Check wiring and connections. 5. Debris on steering...


