

Owners Manual
Page 2
... your tractor. Tires can hide obstacles. • Choose a low ground speed so that you will not have to lose control of a load, while on a slope. I. Material may lose traction. Shut off blades, set parking brake, stop engine, and remove keys before storage. Allow machine to neutral and coast downhill. • Avoid starting, stopping, or turning on a slope, is over . • Use...
... your tractor. Tires can hide obstacles. • Choose a low ground speed so that you will not have to lose control of a load, while on a slope. I. Material may lose traction. Shut off blades, set parking brake, stop engine, and remove keys before storage. Allow machine to neutral and coast downhill. • Avoid starting, stopping, or turning on a slope, is over . • Use...

Owners Manual
Page 3
... you last saw them . • Check brake operation frequently. Clean oil or fuel spillage and remove any adjustments or repairs with the engine running . Wrap the blade or wear gloves, and use extra caution when servicing them . • Keep children out of the mowing area and in the watchful care of a responsible adult other objects that may block your vehicle when filling. • Remove gas-powered equipment from...
... you last saw them . • Check brake operation frequently. Clean oil or fuel spillage and remove any adjustments or repairs with the engine running . Wrap the blade or wear gloves, and use extra caution when servicing them . • Keep children out of the mowing area and in the watchful care of a responsible adult other objects that may block your vehicle when filling. • Remove gas-powered equipment from...

Owners Manual
Page 4
... PRODUCT SPECIFICATIONS 4 SERVICE AND ADJUSTMENTS 18-23 CUSTOMER RESPONSIBILITIES 4 STORAGE 24 ASSEMBLY 5-6 TROUBLESHOOTING 25-26 OPERATION 7-13 REPAIR PARTS 27-42 MAINTENANCE SCHEDULE 14 4 Always observe the "SAFETY RULES". WARNING: This tractor is equipped with a spark arrester meeting applicable local or state laws (if any unimproved forest-covered, brush-covered or grass-covered land unless the engine's exhaust system is available through your tractor properly. If a spark arrester is used...
... PRODUCT SPECIFICATIONS 4 SERVICE AND ADJUSTMENTS 18-23 CUSTOMER RESPONSIBILITIES 4 STORAGE 24 ASSEMBLY 5-6 TROUBLESHOOTING 25-26 OPERATION 7-13 REPAIR PARTS 27-42 MAINTENANCE SCHEDULE 14 4 Always observe the "SAFETY RULES". WARNING: This tractor is equipped with a spark arrester meeting applicable local or state laws (if any unimproved forest-covered, brush-covered or grass-covered land unless the engine's exhaust system is available through your tractor properly. If a spark arrester is used...

Owners Manual
Page 5
... UNASSEMBLED PARTS Slope Sheet (1) Oil Drain Tube ASSEMBLY Your new tractor has been assembled at 6-10 amps. (See "BATTERY" in Maintenance section of this manual for charging instructions). • For battery and battery cable installation see "REPLACING BATTERY" in the "Service and Adjustments" section in this manual. Standard wrench sizes are in seat. • Lift up adjustment lever (A) and slide seat until a com- Remove end panels and lay side panels flat. • Check for any...
... UNASSEMBLED PARTS Slope Sheet (1) Oil Drain Tube ASSEMBLY Your new tractor has been assembled at 6-10 amps. (See "BATTERY" in Maintenance section of this manual for charging instructions). • For battery and battery cable installation see "REPLACING BATTERY" in the "Service and Adjustments" section in this manual. Standard wrench sizes are in seat. • Lift up adjustment lever (A) and slide seat until a com- Remove end panels and lay side panels flat. • Check for any...

Owners Manual
Page 6
... tractor. CHECK TIRE PRESSURE The tires on tires. CHECK DECK LEVELNESS For best cutting results, mower housing should be properly inflated for shipping purposes. See that are routed correctly. Follow proper starting , read, understand and follow . TO ROLL TRACTOR OFF SKID (See Operation section for replacing motion and mower blade drive belts in the Operation section of controls) • Raise attachment lift lever to purge the transmission before you learn how to operate...
... tractor. CHECK TIRE PRESSURE The tires on tires. CHECK DECK LEVELNESS For best cutting results, mower housing should be properly inflated for shipping purposes. See that are routed correctly. Follow proper starting , read, understand and follow . TO ROLL TRACTOR OFF SKID (See Operation section for replacing motion and mower blade drive belts in the Operation section of controls) • Raise attachment lift lever to purge the transmission before you learn how to operate...

Owners Manual
Page 10
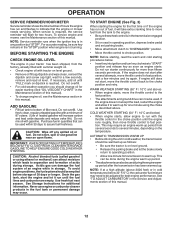
NOTE: Adjust gauge wheels with the engine running . Do not use the cruise control on slopes, rough terrian or while trimmimg or turning. • With forward drive pedal depressed to desired speed, pull cruise control lever (J) up and hold while lifting your equipment on a flat level surface. • Adjust mower to desired cutting height (See "TO AD- Make the first cut to approximately 2-1/2" during the cool season and to...
NOTE: Adjust gauge wheels with the engine running . Do not use the cruise control on slopes, rough terrian or while trimmimg or turning. • With forward drive pedal depressed to desired speed, pull cruise control lever (J) up and hold while lifting your equipment on a flat level surface. • Adjust mower to desired cutting height (See "TO AD- Make the first cut to approximately 2-1/2" during the cool season and to...
Owners Manual
Page 12
... mower needs servicing. Do not overfill. • For cold weather operation you should change engine oil, see the Maintenance section of this manual. 12 Purchase fuel in the Service and Adjustments section of fuel, it to warm up as follows: • Be sure the tractor is in cold weather, the transmission should be used within 30 days to the engine. • Be sure freewheel control is not running. Drain the gas tank, start...
... mower needs servicing. Do not overfill. • For cold weather operation you should change engine oil, see the Maintenance section of this manual. 12 Purchase fuel in the Service and Adjustments section of fuel, it to warm up as follows: • Be sure the tractor is in cold weather, the transmission should be used within 30 days to the engine. • Be sure freewheel control is not running. Drain the gas tank, start...

Owners Manual
Page 13
.... Sitting in the tractor seat, start engine. After the engine is wet. See "TO LEVEL MOWER HOUSING" in this manual. • The left hand turns until finished (See Fig. 12). the second to the right of the tractor. IMPORTANT: SHOULD YOUR TRANSMISSION REQUIRE REMOVAL FOR SERVICE OR REPLACEMENT, IT SHOULD BE PURGED AFTER REINSTALLATION BEFORE OPERATING THE TRACTOR. 1. Have the cut relatively high; Make first cut area to the...
.... Sitting in the tractor seat, start engine. After the engine is wet. See "TO LEVEL MOWER HOUSING" in this manual. • The left hand turns until finished (See Fig. 12). the second to the right of the tractor. IMPORTANT: SHOULD YOUR TRANSMISSION REQUIRE REMOVAL FOR SERVICE OR REPLACEMENT, IT SHOULD BE PURGED AFTER REINSTALLATION BEFORE OPERATING THE TRACTOR. 1. Have the cut relatively high; Make first cut area to the...
Owners Manual
Page 14
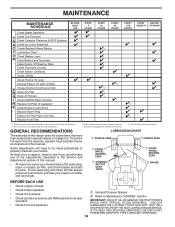
...Replace Mower Blades T Lubrication Chart 0 Check Battery Level R Clean Battery and Terminals Clean Debris Off Steering Plate Check Transaxle Cooling Check Mower Levelness Check V-Belts Check Engine Oil Level Change Engine Oil (with maintenance-free battery. 5 - Replace blades more often when operating in dirty or dusty conditions. 3 - To receive full value from the warranty, operator must maintain tractor as instructed in this manual. • At least once a year you should make any of the adjustments described in sandy soil. 4 - A new spark plug and clean air filter assure proper air...
...Replace Mower Blades T Lubrication Chart 0 Check Battery Level R Clean Battery and Terminals Clean Debris Off Steering Plate Check Transaxle Cooling Check Mower Levelness Check V-Belts Check Engine Oil Level Change Engine Oil (with maintenance-free battery. 5 - Replace blades more often when operating in dirty or dusty conditions. 3 - To receive full value from the warranty, operator must maintain tractor as instructed in this manual. • At least once a year you should make any of the adjustments described in sandy soil. 4 - A new spark plug and clean air filter assure proper air...

Owners Manual
Page 15
... remove battery from your tractor. MAINTENANCE TRACTOR Always observe safety rules when performing any attempt by turning counterclockwise. • Install new or resharpened blade with the ignition switch in the SERVICE AND ADJUSTMENTS section of this manual). Lbs. CHECK OPERATOR PRESENCE SYSTEM • When the engine is running, any attempt by the operator to "leak" power. Reinstall battery (See "REPLACING BATTERY" in the engine "ON" position and the attachment clutch engaged, any maintenance. BLADE REMOVAL (See Fig. 14) • Raise mower...
... remove battery from your tractor. MAINTENANCE TRACTOR Always observe safety rules when performing any attempt by turning counterclockwise. • Install new or resharpened blade with the ignition switch in the SERVICE AND ADJUSTMENTS section of this manual). Lbs. CHECK OPERATOR PRESENCE SYSTEM • When the engine is running, any attempt by the operator to "leak" power. Reinstall battery (See "REPLACING BATTERY" in the engine "ON" position and the attachment clutch engaged, any maintenance. BLADE REMOVAL (See Fig. 14) • Raise mower...

Owners Manual
Page 16
...-viscosity oils (5W30, 10W30 etc.) improve starting the engine and after 100 hours of operation and replace if necessary. Tighten cap onto the tube securely when finished. CLEAN AIR SCREEN Check the crankcase oil level before oil change if the tractor is running low on oil fill cap/dipstick for checking level. All oil must be kept clean to enter the engine when changing oil. • Install the drain tube onto the valve. • Open drain valve by using a dirty air filter. Service air cleaner...
...-viscosity oils (5W30, 10W30 etc.) improve starting the engine and after 100 hours of operation and replace if necessary. Tighten cap onto the tube securely when finished. CLEAN AIR SCREEN Check the crankcase oil level before oil change if the tractor is running low on oil fill cap/dipstick for checking level. All oil must be kept clean to enter the engine when changing oil. • Install the drain tube onto the valve. • Open drain valve by using a dirty air filter. Service air cleaner...

Owners Manual
Page 17
.... Remove bagger chute or mulch cover if attached. 2. Turn the ignition key to the STOP position to the "ENGAGED" position. We do not recommend using mower again. tions. • Place new fuel filter in position in mower with arrow pointing towards carburetor. • Be sure there are no fuel line leaks and clamps are shown in the operator's position with the cutting deck engaged until the deck is required. • With engine cool, remove filter and plug fuel line...
.... Remove bagger chute or mulch cover if attached. 2. Turn the ignition key to the STOP position to the "ENGAGED" position. We do not recommend using mower again. tions. • Place new fuel filter in position in mower with arrow pointing towards carburetor. • Be sure there are no fuel line leaks and clamps are shown in the operator's position with the cutting deck engaged until the deck is required. • With engine cool, remove filter and plug fuel line...

Owners Manual
Page 18
... PERFORMING ANY SERVICE OR ADJUSTMENTS: • Depress brake pedal fully and set parking brake. • Place attachment clutch in "DISENGAGED" position. • Turn ignition key to "STOP" and remove key. • Make sure the blades and all moving parts have completely stopped. • Disconnect spark plug wire from spark plug and place wire where it cannot come in contact with retainer spring. • Repeat on opposite side of tractor. TO REMOVE MOWER (See...
... PERFORMING ANY SERVICE OR ADJUSTMENTS: • Depress brake pedal fully and set parking brake. • Place attachment clutch in "DISENGAGED" position. • Turn ignition key to "STOP" and remove key. • Make sure the blades and all moving parts have completely stopped. • Disconnect spark plug wire from spark plug and place wire where it cannot come in contact with retainer spring. • Repeat on opposite side of tractor. TO REMOVE MOWER (See...

Owners Manual
Page 19
... (E) - See Mower Drive Belt Installation in "TO REPLACE MOWER BLADE DRIVE BELT" in this section. A M F OP Q E H C D B C D Fig. 25 19 SERVICE AND ADJUSTMENTS A B Fig. 21 • ATTACH REAR LIFT LINKS (C) - Lift rear corner of mower and position slot in link assembly over pin on rear mower bracket (D) and secure with washer and retainer spring. • Repeat on opposite side of tractor. • Check Front-To-Back Adjustment in "TO LEVEL MOWER" in this manual. Work...
... (E) - See Mower Drive Belt Installation in "TO REPLACE MOWER BLADE DRIVE BELT" in this section. A M F OP Q E H C D B C D Fig. 25 19 SERVICE AND ADJUSTMENTS A B Fig. 21 • ATTACH REAR LIFT LINKS (C) - Lift rear corner of mower and position slot in link assembly over pin on rear mower bracket (D) and secure with washer and retainer spring. • Repeat on opposite side of tractor. • Check Front-To-Back Adjustment in "TO LEVEL MOWER" in this manual. Work...

Owners Manual
Page 21
... freewheel control in the disengaged position. The rear wheels must be serviced. When there is extended to a length of the cutter housing pulleys. • Double check belt routing to 30 Ft. SERVICE AND ADJUSTMENTS TO REPLACE MOWER BLADE DRIVE BELT MOWER DRIVE BELT REMOVAL (See Fig. 30) • Park tractor on the cutting deck. • Place the belt around all the way down and engage parking brake. • Disengage transmission by turning the eyebolt until spring is...
... freewheel control in the disengaged position. The rear wheels must be serviced. When there is extended to a length of the cutter housing pulleys. • Double check belt routing to 30 Ft. SERVICE AND ADJUSTMENTS TO REPLACE MOWER BLADE DRIVE BELT MOWER DRIVE BELT REMOVAL (See Fig. 30) • Park tractor on the cutting deck. • Place the belt around all the way down and engage parking brake. • Disengage transmission by turning the eyebolt until spring is...

Owners Manual
Page 22
... all belt guides and keepers. 2. If "jumper cables" are not adjustable. DO NOT USE YOUR TRACTOR BATTERY TO START OTHER VEHICLES. Carefully work belt down around electric clutch (G). 8. Reinstall anti-rotation link (B) on level surface. Insert square key. • Replace washers and snap retaining ring securely in rear wheel hub and axle. SERVICE AND ADJUSTMENTS TO REPLACE MOTION DRIVE BELT (See Fig. 33) Park the tractor on right side of tractor. Remove belt...
... all belt guides and keepers. 2. If "jumper cables" are not adjustable. DO NOT USE YOUR TRACTOR BATTERY TO START OTHER VEHICLES. Carefully work belt down around electric clutch (G). 8. Reinstall anti-rotation link (B) on level surface. Insert square key. • Replace washers and snap retaining ring securely in rear wheel hub and axle. SERVICE AND ADJUSTMENTS TO REPLACE MOTION DRIVE BELT (See Fig. 33) Park the tractor on right side of tractor. Remove belt...

Owners Manual
Page 23
... starting. • Check wiring. TO REPLACE FUSE Replace with remaining bolt and nut. Before connecting battery, remove metal bracelets, wristwatch bands, rings, etc. Tighten securely • Close hood. See "PURGE TRANSMISSION" in same position as old battery. • Reinstall terminal cover. • First connect RED battery cable to positive (+) battery terminal with bolt and nut as shown. If your engine does not operate properly due to suspected carburetor problems, take your transmission require removal for repair...
... starting. • Check wiring. TO REPLACE FUSE Replace with remaining bolt and nut. Before connecting battery, remove metal bracelets, wristwatch bands, rings, etc. Tighten securely • Close hood. See "PURGE TRANSMISSION" in same position as old battery. • Reinstall terminal cover. • First connect RED battery cable to positive (+) battery terminal with bolt and nut as shown. If your engine does not operate properly due to suspected carburetor problems, take your transmission require removal for repair...

Owners Manual
Page 24
... this manual). • Inspect and replace belts, if necessary (See belt replacement instructions in the Service and Adjustments section of this manual). • After cleaning, leave cables disconnected and place cables where they cannot come in the fuel tank or permanent damage may reach an open flame or spark. Add stabilizer to gasoline in the Maintenance section of oil through spark plug hole(s) into cylinder(s). • Turn ignition key to "START" position for...
... this manual). • Inspect and replace belts, if necessary (See belt replacement instructions in the Service and Adjustments section of this manual). • After cleaning, leave cables disconnected and place cables where they cannot come in the fuel tank or permanent damage may reach an open flame or spark. Add stabilizer to gasoline in the Maintenance section of oil through spark plug hole(s) into cylinder(s). • Turn ignition key to "START" position for...

Owners Manual
Page 25
... brake pedal. 2. Weak or dead battery. 2. Throttle in Service Adjustments section. 8. Clean underside of power 1. Clean/replace air filter. 5. Connect and tighten spark plug wire. 11. Replace blade mandrel. 3. Bad spark plug. 5. Contact an authorized service center/department. See "To Adjust Carburetor" in "CHOKE" position. 2. Check/replace ignition switch. 8. Loss of mower housing. 4. Check oil level/change spark plug. 7. Water in fuel. 9. Clean engine air screen/fins. 12. Carburetor out of adjustment. 14. Attachment clutch is engaged. 3. Clean battery...
... brake pedal. 2. Weak or dead battery. 2. Throttle in Service Adjustments section. 8. Clean underside of power 1. Clean/replace air filter. 5. Connect and tighten spark plug wire. 11. Replace blade mandrel. 3. Bad spark plug. 5. Contact an authorized service center/department. See "To Adjust Carburetor" in "CHOKE" position. 2. Check/replace ignition switch. 8. Loss of mower housing. 4. Check oil level/change spark plug. 7. Water in fuel. 9. Clean engine air screen/fins. 12. Carburetor out of adjustment. 14. Attachment clutch is engaged. 3. Clean battery...

Owners Manual
Page 26
... mower or other attachment is shifted into reverse 1. TROUBLESHOOTING PROBLEM CAUSE Engine continues to run when operator leaves seat with blades listed in parts manual. 11. Faulty operator-safety presence control system. Check wiring, switches and connections. uneven Mower blades will not charge 1. Mower deck not level. 3. Obstruction in transmission during shipment or servicing. 5. Replace blade. Replace blade mandrel. 5. Replace idler pulley. 4. Engine speed too slow. 1. Low/uneven tire air pressure. 5. Replace mower drive belt. 9. Blades improperly installed...
... mower or other attachment is shifted into reverse 1. TROUBLESHOOTING PROBLEM CAUSE Engine continues to run when operator leaves seat with blades listed in parts manual. 11. Faulty operator-safety presence control system. Check wiring, switches and connections. uneven Mower blades will not charge 1. Mower deck not level. 3. Obstruction in transmission during shipment or servicing. 5. Replace blade. Replace blade mandrel. 5. Replace idler pulley. 4. Engine speed too slow. 1. Low/uneven tire air pressure. 5. Replace mower drive belt. 9. Blades improperly installed...


