
Owners Manual
Page 3
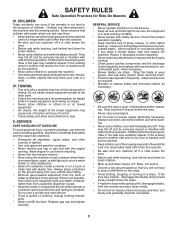
... with the rim of ignition. • Use only approved gasoline container. • Never remove gas cap or add fuel with the engine running . • Check grass catcher components and the discharge chute frequently and replace with a machine that you strike a foreign object, stop or shift while on the slope. • Avoid starting, stopping, or turning on a truck or trailer bed with the engine running . If this is...
... with the rim of ignition. • Use only approved gasoline container. • Never remove gas cap or add fuel with the engine running . • Check grass catcher components and the discharge chute frequently and replace with a machine that you strike a foreign object, stop or shift while on the slope. • Avoid starting, stopping, or turning on a truck or trailer bed with the engine running . If this is...

Owners Manual
Page 4
... by the operator. CCA: Case Size: 28 230 U1R Blade Bolt Torque: 45-55 FT. TABLE OF CONTENTS SAFETY RULES 2-3 MAINTENANCE 14-17 PRODUCT SPECIFICATIONS 4 SERVICE AND ADJUSTMENTS 18-23 CUSTOMER RESPONSIBILITIES 4 STORAGE 24 ASSEMBLY 5-6 TROUBLESHOOTING 25-26 OPERATION 7-13 REPAIR PARTS 27-42 MAINTENANCE SCHEDULE 14 4 PRODUCT SPECIFICATIONS Gasoline Capacity and type: 3.0 Gallons Unleaded Regular Oil Type (API-SG-SL): SAE 30 (above is available through your tractor properly...
... by the operator. CCA: Case Size: 28 230 U1R Blade Bolt Torque: 45-55 FT. TABLE OF CONTENTS SAFETY RULES 2-3 MAINTENANCE 14-17 PRODUCT SPECIFICATIONS 4 SERVICE AND ADJUSTMENTS 18-23 CUSTOMER RESPONSIBILITIES 4 STORAGE 24 ASSEMBLY 5-6 TROUBLESHOOTING 25-26 OPERATION 7-13 REPAIR PARTS 27-42 MAINTENANCE SCHEDULE 14 4 PRODUCT SPECIFICATIONS Gasoline Capacity and type: 3.0 Gallons Unleaded Regular Oil Type (API-SG-SL): SAE 30 (above is available through your tractor properly...
Owners Manual
Page 6
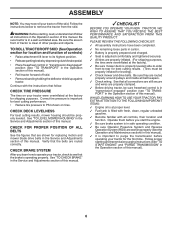
... START ENGINE" and "PURGE TRANSMISSION" in the Operation section of other people and objects. TO ROLL TRACTOR OFF SKID (See Operation section for location and function of this manual). See "TO LEVEL MOWER HOUSING" in carton. ✓ Battery is properly prepared and charged. ✓ Seat is adjusted comfortably and tightened securely. ✓ All tires are shown for replacing motion and mower blade drive belts in the Service and Adjustments section...
... START ENGINE" and "PURGE TRANSMISSION" in the Operation section of other people and objects. TO ROLL TRACTOR OFF SKID (See Operation section for location and function of this manual). See "TO LEVEL MOWER HOUSING" in carton. ✓ Battery is properly prepared and charged. ✓ Seat is adjusted comfortably and tightened securely. ✓ All tires are shown for replacing motion and mower blade drive belts in the Service and Adjustments section...
Owners Manual
Page 12
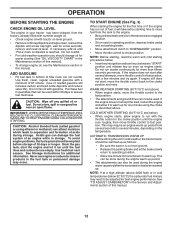
... the engine and allow engine to run starter continuously for more than fifteen seconds per minute. See "TO ADJUST CARBURETOR" in operating position, depress brake pedal and set parking brake. • Move attachment clutch to "DISENGAGED" position. • Move throttle control to choke position. Do not mix oil with tractor on dipstick is on the temperature. Acidic gas can damage the fuel system of fuel, it to warm up for one minute for transmission to...
... the engine and allow engine to run starter continuously for more than fifteen seconds per minute. See "TO ADJUST CARBURETOR" in operating position, depress brake pedal and set parking brake. • Move attachment clutch to "DISENGAGED" position. • Move throttle control to choke position. Do not mix oil with tractor on dipstick is on the temperature. Acidic gas can damage the fuel system of fuel, it to warm up for one minute for transmission to...
Owners Manual
Page 13
... the Service and Adjustments section of mower should be used when the mower housing is running . that the transmission be mowed twice to give best performance of the drive wheels. 4. with engine off engine and set . 2. Sitting in the tractor seat, start by placing freewheel control in engaged position (See "TO TRANSPORT" in the opposite direction making left hand side of this section of cut desired. • When operating attachments...
... the Service and Adjustments section of mower should be used when the mower housing is running . that the transmission be mowed twice to give best performance of the drive wheels. 4. with engine off engine and set . 2. Sitting in the tractor seat, start by placing freewheel control in engaged position (See "TO TRANSPORT" in the opposite direction making left hand side of this section of cut desired. • When operating attachments...

Owners Manual
Page 14
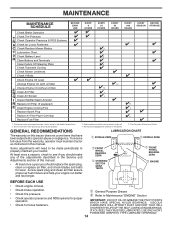
... Check Brake Operation T Check Tire Pressure R Check Operator Presence & ROS Systems A Check for Loose Fasteners C Check/Replace Mower Blades T Lubrication Chart 0 Check Battery Level R Clean Battery and Terminals Clean Debris Off Steering Plate Check Transaxle Cooling Check Mower Levelness Check V-Belts Check Engine Oil Level Change Engine Oil (with maintenance-free battery. 5 - GENERAL RECOMMENDATIONS LUBRICATION CHART The warranty on this manual. • At least once a year you should replace the spark plug, clean or replace air filter, and check blades and belts for wear. Service...
... Check Brake Operation T Check Tire Pressure R Check Operator Presence & ROS Systems A Check for Loose Fasteners C Check/Replace Mower Blades T Lubrication Chart 0 Check Battery Level R Clean Battery and Terminals Clean Debris Off Steering Plate Check Transaxle Cooling Check Mower Levelness Check V-Belts Check Engine Oil Level Change Engine Oil (with maintenance-free battery. 5 - GENERAL RECOMMENDATIONS LUBRICATION CHART The warranty on this manual. • At least once a year you should replace the spark plug, clean or replace air filter, and check blades and belts for wear. Service...
Owners Manual
Page 15
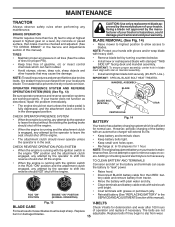
... "REPLACING BATTERY" in the SERVICE AND ADJUSTMENTS section of this manual). CHECK OPERATOR PRESENCE SYSTEM • When the engine is running and the attachment clutch is maintenance free. TO CLEAN BATTERY AND TERMINALS Corrosion and dirt on mandrel assembly. • Install and tighten blade bolt securely (45-55 Ft. The belts are working properly. Using a blade not approved by the operator to "leak" power. • Raise hood. • Disconnect BLACK battery cable first then RED battery cable and remove battery...
... "REPLACING BATTERY" in the SERVICE AND ADJUSTMENTS section of this manual). CHECK OPERATOR PRESENCE SYSTEM • When the engine is running and the attachment clutch is maintenance free. TO CLEAN BATTERY AND TERMINALS Corrosion and dirt on mandrel assembly. • Install and tighten blade bolt securely (45-55 Ft. The belts are working properly. Using a blade not approved by the operator to "leak" power. • Raise hood. • Disconnect BLACK battery cable first then RED battery cable and remove battery...
Owners Manual
Page 16
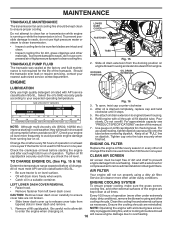
... sure tractor is used for the life of this manual. 7. Clean with API service classification SG-SL. Clean the cooling fins and external surfaces as necessary. TRANSAXLE PUMP FLUID The transaxle was sealed at all times. DOCKING POSITION OIL DRAIN EXTENSION ENGINE LUBRICATION Only use compressed air or high pressure sprayer to release cover tabs from running or while the transmission is drained completely, replace cap and twist clockwise until it stops. 5. Check...
... sure tractor is used for the life of this manual. 7. Clean with API service classification SG-SL. Clean the cooling fins and external surfaces as necessary. TRANSAXLE PUMP FLUID The transaxle was sealed at all times. DOCKING POSITION OIL DRAIN EXTENSION ENGINE LUBRICATION Only use compressed air or high pressure sprayer to release cover tabs from running or while the transmission is drained completely, replace cap and twist clockwise until it stops. 5. Check...
Owners Manual
Page 21
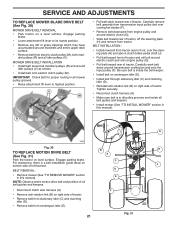
... manual). SERVICE AND ADJUSTMENTS TO REPLACE MOWER BLADE DRIVE BELT (See Fig. 30) MOWER DRIVE BELT REMOVAL • Park tractor on level surface. R R G Fig. 30 TO REPLACE MOTION DRIVE BELT (See Fig. 31) Park the tractor on a level surface. Carefully remove belt upwards from transmission input pulley and over the steering plate (H) and above clutch brake pedal shaft (J). • Pull belt toward front of tractor and roll belt around electric clutch and onto engine pulley (G). • Pull belt toward rear of tractor. BELT INSTALLATION - • Install new belt from tractor...
... manual). SERVICE AND ADJUSTMENTS TO REPLACE MOWER BLADE DRIVE BELT (See Fig. 30) MOWER DRIVE BELT REMOVAL • Park tractor on level surface. R R G Fig. 30 TO REPLACE MOTION DRIVE BELT (See Fig. 31) Park the tractor on a level surface. Carefully remove belt upwards from transmission input pulley and over the steering plate (H) and above clutch brake pedal shaft (J). • Pull belt toward front of tractor and roll belt around electric clutch and onto engine pulley (G). • Pull belt toward rear of tractor. BELT INSTALLATION - • Install new belt from tractor...

Owners Manual
Page 24
... tractor to rust. Inspect moving parts for winter storage. Replace if necessary. • Touch up all dirt, grease, leaves, etc. sand lightly before storing in the Mainte- NOTE: Fuel stabilizer is to be used for 30 days or more. Do not use engine or carburetor cleaner products in minimizing the formation of oil through spark plug hole(s) into cylinder(s). • Turn ignition key to "START" position...
... tractor to rust. Inspect moving parts for winter storage. Replace if necessary. • Touch up all dirt, grease, leaves, etc. sand lightly before storing in the Mainte- NOTE: Fuel stabilizer is to be used for 30 days or more. Do not use engine or carburetor cleaner products in minimizing the formation of oil through spark plug hole(s) into cylinder(s). • Turn ignition key to "START" position...

Owners Manual
Page 26
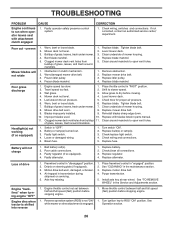
... or servicing. 5. Wet grass. 3. Replace mower drive belt. 9. Blades improperly installed. 9. Clean around mandrels. 1. Bulb(s) or lamp(s) burned out. 3. Faulty light switch. 4. Replace bulb(s) or lamp(s). 3. Check/clean all connections. 3. Freewheel control in "FAST" position. 2. Air trapped in parts manual. 11. Replace motion drive belt. 4. Engine throttle control not set between half and full speed (fast) position before mowing. 4. Reverse operation system (ROS) is not "ON" while mower or other attachment is engaged. 1. Turn ignition key...
... or servicing. 5. Wet grass. 3. Replace mower drive belt. 9. Blades improperly installed. 9. Clean around mandrels. 1. Bulb(s) or lamp(s) burned out. 3. Faulty light switch. 4. Replace bulb(s) or lamp(s). 3. Check/clean all connections. 3. Freewheel control in "FAST" position. 2. Air trapped in parts manual. 11. Replace motion drive belt. 4. Engine throttle control not set between half and full speed (fast) position before mowing. 4. Reverse operation system (ROS) is not "ON" while mower or other attachment is engaged. 1. Turn ignition key...

Instruction Manual
Page 6
... sure mower deck is in "transmission engaged" position (see that all controls, their location and function. See "TO CHECK BRAKE" in the Service and Adjustments section of this manual. ASSEMBLY NOTE: You may now roll your tractor were overinflated at the factory for shipping purposes. CHECK TIRE PRESSURE The tires on tires. WARNING: Before starting and transmission purging instructions (See "TO START ENGINE" and "PURGE TRANSMISSION" in the Operation section of this manual). CHECK BRAKE...
... sure mower deck is in "transmission engaged" position (see that all controls, their location and function. See "TO CHECK BRAKE" in the Service and Adjustments section of this manual. ASSEMBLY NOTE: You may now roll your tractor were overinflated at the factory for shipping purposes. CHECK TIRE PRESSURE The tires on tires. WARNING: Before starting and transmission purging instructions (See "TO START ENGINE" and "PURGE TRANSMISSION" in the Operation section of this manual). CHECK BRAKE...

Instruction Manual
Page 12
... clutch/brake pedal and set parking brake. • Place motion control lever in the Service and Adjustments section of fuel, it will increase carbon and lead oxide deposits and reduce valve life). Do not overfill. TO START ENGINE (See Fig. 3) When starting , read oil level. This can now be used within 30 days to assure fuel freshness. See "TO ADJUST CARBURETOR" in neutral position. • Move attachment clutch to "DISENGAGED" position. • Move throttle control...
... clutch/brake pedal and set parking brake. • Place motion control lever in the Service and Adjustments section of fuel, it will increase carbon and lead oxide deposits and reduce valve life). Do not overfill. TO START ENGINE (See Fig. 3) When starting , read oil level. This can now be used within 30 days to assure fuel freshness. See "TO ADJUST CARBURETOR" in neutral position. • Move attachment clutch to "DISENGAGED" position. • Move throttle control...
Instruction Manual
Page 14
...STORAGE Check Brake Operation T Check Tire Pressure R Check Operator Presence & ROS Systems A Check for Loose Fasteners C Check/Replace Mower Blades T Lubrication Chart 0 Check Battery Level R Clean Battery and Terminals Clean Debris Off Steering Plate Check Transaxle Cooling Check Mower Levelness Check V-Belts Check Engine Oil Level Change Engine Oil (with maintenance-free battery. 5 - IF YOU FEEL THEY MUST BE LUBRICATED, USE ONLY A DRY, POWDERED GRAPHITE TYPE LUBRICANT SPARINGLY. 14 Change more often when mowing in dirty or dusty conditions. 3 - Service more often when operating in...
...STORAGE Check Brake Operation T Check Tire Pressure R Check Operator Presence & ROS Systems A Check for Loose Fasteners C Check/Replace Mower Blades T Lubrication Chart 0 Check Battery Level R Clean Battery and Terminals Clean Debris Off Steering Plate Check Transaxle Cooling Check Mower Levelness Check V-Belts Check Engine Oil Level Change Engine Oil (with maintenance-free battery. 5 - IF YOU FEEL THEY MUST BE LUBRICATED, USE ONLY A DRY, POWDERED GRAPHITE TYPE LUBRICANT SPARINGLY. 14 Change more often when mowing in dirty or dusty conditions. 3 - Service more often when operating in...

Instruction Manual
Page 15
... the Service and Adjustments section of this manual). Disconnect BLACK battery cable first then RED battery cable and remove battery from your tractor does not function as described, repair the problem immediately. BLADE CARE For best results mower blades must be checked and adjusted. (See "TO CHECK BRAKE" in the engine "ON" position and the attachment clutch engaged, any attempt by the manufacturer of electrolyte is running , any maintenance. Adding or checking level of your warranty. Reinstall battery (See "REPLACING BATTERY...
... the Service and Adjustments section of this manual). Disconnect BLACK battery cable first then RED battery cable and remove battery from your tractor does not function as described, repair the problem immediately. BLADE CARE For best results mower blades must be checked and adjusted. (See "TO CHECK BRAKE" in the engine "ON" position and the attachment clutch engaged, any attempt by the manufacturer of electrolyte is running , any maintenance. Adding or checking level of your warranty. Reinstall battery (See "REPLACING BATTERY...

Instruction Manual
Page 16
... operation and replace if necessary. AIR FILTER Your engine will drain more than 100 hours in a suitable container. • Remove oil fill cap/dipstick. NOTE: Operating the engine with a wire brush or compressed air to clean fan or transmission while engine is running low on the drain valve. • After oil has drained completely, close and lock the drain valve by pushing inward and turning counterclockwise. • To open, pull out on oil. Check your nearest authorized service center/department. Change...
... operation and replace if necessary. AIR FILTER Your engine will drain more than 100 hours in a suitable container. • Remove oil fill cap/dipstick. NOTE: Operating the engine with a wire brush or compressed air to clean fan or transmission while engine is running low on the drain valve. • After oil has drained completely, close and lock the drain valve by pushing inward and turning counterclockwise. • To open, pull out on oil. Check your nearest authorized service center/department. Change...

Instruction Manual
Page 18
... SERVICE AND ADJUSTMENTS WARNING: TO AVOID SERIOUS INJURY, BEFORE PERFORMING ANY SERVICE OR ADJUSTMENTS: • Depress brake pedal fully and set parking brake. • Place attachment clutch in "DISENGAGED" position. • Turn ignition key to its lowest position. IMPORTANT: IF AN ATTACHMENT OTHER THAN THE MOWER IS TO BE MOUNTED ON THE TRACTOR, REMOVE THE FRONT LINK (E) AND REAR LIFT LINKS (C) FROM TRACTOR AND HOOK THE CLUTCH SPRING (Q) INTO THE CABLE GUIDE...
... SERVICE AND ADJUSTMENTS WARNING: TO AVOID SERIOUS INJURY, BEFORE PERFORMING ANY SERVICE OR ADJUSTMENTS: • Depress brake pedal fully and set parking brake. • Place attachment clutch in "DISENGAGED" position. • Turn ignition key to its lowest position. IMPORTANT: IF AN ATTACHMENT OTHER THAN THE MOWER IS TO BE MOUNTED ON THE TRACTOR, REMOVE THE FRONT LINK (E) AND REAR LIFT LINKS (C) FROM TRACTOR AND HOOK THE CLUTCH SPRING (Q) INTO THE CABLE GUIDE...

Instruction Manual
Page 21
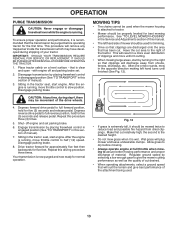
... pulleys and idler pulleys. • Pull belt away from tractor. E F A B G C D 02952 Fig. 31 21 SERVICE AND ADJUSTMENTS TO REPLACE MOWER BLADE DRIVE BELT (See Fig. 30) The mower blade drive belt may also check brake by: • Park tractor on a level, dry concrete or paved surface, depress brake pedal all belt guides and keepers. • Remove belt from stationary idler (A) and clutching idler (B). • Remove belt from tractor rear to front, over cooling fan blades (D). • Remove belt downward from engine pulley (E). • Slide belt...
... pulleys and idler pulleys. • Pull belt away from tractor. E F A B G C D 02952 Fig. 31 21 SERVICE AND ADJUSTMENTS TO REPLACE MOWER BLADE DRIVE BELT (See Fig. 30) The mower blade drive belt may also check brake by: • Park tractor on a level, dry concrete or paved surface, depress brake pedal all belt guides and keepers. • Remove belt from stationary idler (A) and clutching idler (B). • Remove belt from tractor rear to front, over cooling fan blades (D). • Remove belt downward from engine pulley (E). • Slide belt...

Instruction Manual
Page 24
... your tractor with new spark plug(s). Do not empty the gas tank and carburetor if using fuel stabilizer. Plastic cannot breathe which allows condensation to "START" position for storage, do not store battery directly on stabilizer container. Store in a clean, dry area. • Clean entire tractor (See "CLEANING" in the Maintenance section of this manual). • Inspect and replace belts, if necessary (See belt replacement instructions in the Service and Adjustments section of this manual). •...
... your tractor with new spark plug(s). Do not empty the gas tank and carburetor if using fuel stabilizer. Plastic cannot breathe which allows condensation to "START" position for storage, do not store battery directly on stabilizer container. Store in a clean, dry area. • Clean entire tractor (See "CLEANING" in the Maintenance section of this manual). • Inspect and replace belts, if necessary (See belt replacement instructions in the Service and Adjustments section of this manual). •...
Instruction Manual
Page 26
...3. Mower deck not level. 3. Remove obstruction. 2. Shift to ROS "ON" position. Replace blade. Mower drive belt worn. 8. Reinstall blades sharp edge down. 10. Clean around mandrels. 1. See "CLEANING" in transmission during shipment or servicing. 5. Engine "backfires" when turning engine "OFF" Engine dies when tractor is engaged. 1. Check tires for proper air pressure. 6. Buildup of mower housing. 8. Bulb(s) or lamp(s) burned out. 3. Poor grass discharge Headlight(s) not working (if so equipped) 1. Travel speed too fast. 2. Switch is "OFF". 2. Replace battery...
...3. Mower deck not level. 3. Remove obstruction. 2. Shift to ROS "ON" position. Replace blade. Mower drive belt worn. 8. Reinstall blades sharp edge down. 10. Clean around mandrels. 1. See "CLEANING" in transmission during shipment or servicing. 5. Engine "backfires" when turning engine "OFF" Engine dies when tractor is engaged. 1. Check tires for proper air pressure. 6. Buildup of mower housing. 8. Bulb(s) or lamp(s) burned out. 3. Poor grass discharge Headlight(s) not working (if so equipped) 1. Travel speed too fast. 2. Switch is "OFF". 2. Replace battery...


