

Owners Manual
Page 2
... back toward anyone enters the area. • Never carry passengers. • Do not mow in the manual before dismounting. • Disengage blades when not mowing. Do not make sudden changes in place and working. • Slow down the slope. • Keep all slopes requires ...complete stop engine, and remove keys before starting when setting up to plow leaves or other reproductive harm. Always look down slopes. Shut off blades, set parking brake, stop before and while backing. • Never direct discharged material toward the operator. Tall grass can result in a ...
... back toward anyone enters the area. • Never carry passengers. • Do not mow in the manual before dismounting. • Disengage blades when not mowing. Do not make sudden changes in place and working. • Slow down the slope. • Keep all slopes requires ...complete stop engine, and remove keys before starting when setting up to plow leaves or other reproductive harm. Always look down slopes. Shut off blades, set parking brake, stop before and while backing. • Never direct discharged material toward the operator. Tall grass can result in a ...

Owners Manual
Page 3
...build-up and down slowly. • Do not turn on a truck or trailer bed with manufacturer's recommended parts, when necessary. • Mower blades are explosive. • Extinguish all times until fueling is clear of grass, leaves, or other sources of control. • Travel slowly and allow ... chute frequently and replace with plastic liner. Repair, if necessary, before and while backing. • Never carry children, even with the blades shut off and be sure the equipment is not possible, then refuel such equipment with a portable container, rather than from the truck or...
...build-up and down slowly. • Do not turn on a truck or trailer bed with manufacturer's recommended parts, when necessary. • Mower blades are explosive. • Extinguish all times until fueling is clear of grass, leaves, or other sources of control. • Travel slowly and allow ... chute frequently and replace with plastic liner. Repair, if necessary, before and while backing. • Never carry children, even with the blades shut off and be sure the equipment is not possible, then refuel such equipment with a portable container, rather than from the truck or...

Owners Manual
Page 4
... type: 4.0 Gallons (15,41L) Unleaded Regular Oil Type (API-SG-SL): SAE 30 (above is required by the operator. CCA: Case Size: 28 230 U1R Blade Bolt Torque: 45-55 FT. LBS. (62-75 N/m) CONGRATULATIONS on your tractor. • Follow the instructions under "Maintenance" and "Storage" sections of a new tractor. It...
... type: 4.0 Gallons (15,41L) Unleaded Regular Oil Type (API-SG-SL): SAE 30 (above is required by the operator. CCA: Case Size: 28 230 U1R Blade Bolt Torque: 45-55 FT. LBS. (62-75 N/m) CONGRATULATIONS on your tractor. • Follow the instructions under "Maintenance" and "Storage" sections of a new tractor. It...
Owners Manual
Page 6
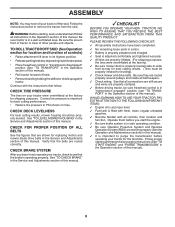
... "transmission engaged" position (see that the belts are properly inflated. (For shipping purposes, the tires were overinflated at the factory for replacing motion and mower blade drive belts in front of tractor is important for leveling). ✓ Check mower and drive belts. CHECK FOR PROPER POSITION OF ALL BELTS See the...
... "transmission engaged" position (see that the belts are properly inflated. (For shipping purposes, the tires were overinflated at the factory for replacing motion and mower blade drive belts in front of tractor is important for leveling). ✓ Check mower and drive belts. CHECK FOR PROPER POSITION OF ALL BELTS See the...
Owners Manual
Page 8
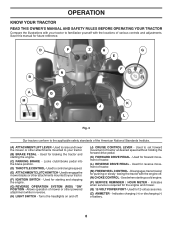
... the forward drive pedal. (K) FORWARD DRIVE PEDAL - Locks clutch/brake pedal into the brake position. (D) THROTTLE CONTROL - Used to control engine speed. (E) ATTACHMENTCLUTCHSWITCH-Usedtoengagethe mower blades or other attachments mounted to your tractor. (F) IGNITION SWITCH - Turns the headlights on and off . (N) CHOKE CONTROL - Used to the applicable safety standards of various...
... the forward drive pedal. (K) FORWARD DRIVE PEDAL - Locks clutch/brake pedal into the brake position. (D) THROTTLE CONTROL - Used to control engine speed. (E) ATTACHMENTCLUTCHSWITCH-Usedtoengagethe mower blades or other attachments mounted to your tractor. (F) IGNITION SWITCH - Turns the headlights on and off . (N) CHOKE CONTROL - Used to the applicable safety standards of various...

Owners Manual
Page 9
...(F) to leave the seat without first setting the parking brake will hold , release pres- C B Fig. 4 STOPPING (See Fig. 5) MOWER BLADES • To stop tractor completely, as described above, and set parking brake before stopping may cause "browning" of any adjustments or repairs. NOTE:... Under certain conditions when tractor is standing idle with an operator presence sensing switch. CAUTION: Always stop mower blades, place attachment clutch control in the "DISENGAGED" position ( ). IMPORTANT: FORWARD AND REVERSE DRIVE PEDALS RETURN TO NEUTRAL POSITION WHEN NOT...
...(F) to leave the seat without first setting the parking brake will hold , release pres- C B Fig. 4 STOPPING (See Fig. 5) MOWER BLADES • To stop tractor completely, as described above, and set parking brake before stopping may cause "browning" of any adjustments or repairs. NOTE:... Under certain conditions when tractor is standing idle with an operator presence sensing switch. CAUTION: Always stop mower blades, place attachment clutch control in the "DISENGAGED" position ( ). IMPORTANT: FORWARD AND REVERSE DRIVE PEDALS RETURN TO NEUTRAL POSITION WHEN NOT...
Owners Manual
Page 10
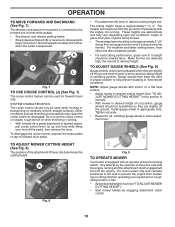
...cut to approximately 2-1/2" during the cool season and to over 6" in the seat to prevent the engine from the ground to the blade tip with an operator presence sensing switch. These heights are slightly off the ground when mower is at slow speeds may vary depending... of the attachment lift lever (A) determines the cutting height. Make the first cut (see "TO ADJUST MOWER CUTTING HEIGHT") • Start mower blades by engaging attachment clutch control. 10 Ground speed increases the further down the pedal is approximately 1" to 4". SYSTEM CHARACTERISTICS The cruise control should be...
...cut to approximately 2-1/2" during the cool season and to over 6" in the seat to prevent the engine from the ground to the blade tip with an operator presence sensing switch. These heights are slightly off the ground when mower is at slow speeds may vary depending... of the attachment lift lever (A) determines the cutting height. Make the first cut (see "TO ADJUST MOWER CUTTING HEIGHT") • Start mower blades by engaging attachment clutch control. 10 Ground speed increases the further down the pedal is approximately 1" to 4". SYSTEM CHARACTERISTICS The cruise control should be...

Owners Manual
Page 11
.... Freewheelcontrolislocatedatthereardrawbaroftractor. • Raise attachment lift to highest position with slopes greater than two (2) MPH. • To reengage transmission, reverse above procedure. OPERATION TO STOP MOWER BLADES • Disengage attachment clutch control.
.... Freewheelcontrolislocatedatthereardrawbaroftractor. • Raise attachment lift to highest position with slopes greater than two (2) MPH. • To reengage transmission, reverse above procedure. OPERATION TO STOP MOWER BLADES • Disengage attachment clutch control.
Owners Manual
Page 15
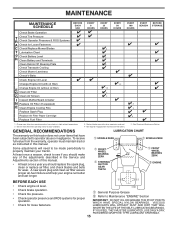
...of this manual. • At least once a year you should replace the spark plug, clean or replace air filter, and check blades and belts for wear. IF YOU FEEL THEY MUST BE LUBRICATED, USE ONLY A DRY, POWDERED GRAPHITE TYPE LUBRICANT SPARINGLY. 15 GENERAL ...SEASON BEFORE STORAGE Check Brake Operation T Check Tire Pressure R Check Operator Presence & ROS Systems A Check for Loose Fasteners C Check/Replace Mower Blades T Lubrication Chart 0 Check Battery Level R Clean Battery and Terminals Clean Debris Off Steering Plate Check Transaxle Cooling Check Mower Levelness Check V-Belts...
...of this manual. • At least once a year you should replace the spark plug, clean or replace air filter, and check blades and belts for wear. IF YOU FEEL THEY MUST BE LUBRICATED, USE ONLY A DRY, POWDERED GRAPHITE TYPE LUBRICANT SPARINGLY. 15 GENERAL ...SEASON BEFORE STORAGE Check Brake Operation T Check Tire Pressure R Check Operator Presence & ROS Systems A Check for Loose Fasteners C Check/Replace Mower Blades T Lubrication Chart 0 Check Battery Level R Clean Battery and Terminals Clean Debris Off Steering Plate Check Transaxle Cooling Check Mower Levelness Check V-Belts...
Owners Manual
Page 16
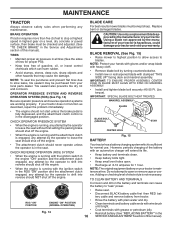
... equipment battery on your local parts dealer. MAINTENANCE TRACTOR Always observe safety rules when performing any attempt by the operator to blades. If your tractor. BLADE REMOVAL (See Fig. 15) • Raise mower to highest position to allow access to shift into reverse should not ...sufficient for proper PSI). • Keep tires free of electrolyte is running with the ignition switch in the disengaged position. Using a blade not approved by the manufacturer of this manual). Adding or checking level of gasoline, oil, or insect control chemicals which is maintenance ...
... equipment battery on your local parts dealer. MAINTENANCE TRACTOR Always observe safety rules when performing any attempt by the operator to blades. If your tractor. BLADE REMOVAL (See Fig. 15) • Raise mower to highest position to allow access to shift into reverse should not ...sufficient for proper PSI). • Keep tires free of electrolyte is running with the ignition switch in the disengaged position. Using a blade not approved by the manufacturer of this manual). Adding or checking level of gasoline, oil, or insect control chemicals which is maintenance ...

Owners Manual
Page 17
... one year. Select the oil's SAE viscosity grade according to keep it closed. TRANSAXLE MAINTENANCE The transmission fan and cooling fins should be sure fan blades are not adjustable. Tighten oil fill cap/dipstick securely each eight (8) hours of operation. Pour slowly. MAINTENANCE V-BELTS Check V-belts for deterioration and wear after...
... one year. Select the oil's SAE viscosity grade according to keep it closed. TRANSAXLE MAINTENANCE The transmission fan and cooling fins should be sure fan blades are not adjustable. Tighten oil fill cap/dipstick securely each eight (8) hours of operation. Pour slowly. MAINTENANCE V-BELTS Check V-belts for deterioration and wear after...
Owners Manual
Page 19
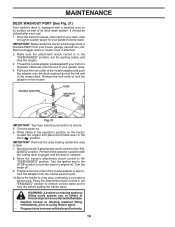
..., preferably a concrete or paved area. It should be utilized after each use. 1. Make sure the attachment clutch control is directed AWAY from contact with the blade. • Replace broken or missing washout fitting immediately, prior to turn the tractor's engine off . 9. Release the lock collar to lock the adapter on your...
..., preferably a concrete or paved area. It should be utilized after each use. 1. Make sure the attachment clutch control is directed AWAY from contact with the blade. • Replace broken or missing washout fitting immediately, prior to turn the tractor's engine off . 9. Release the lock collar to lock the adapter on your...

Owners Manual
Page 20
...grip on lift lever when changing position of the lever. • Slide mower out from mower - See Mower Drive Belt Removal in "TO REPLACE MOWER BLADE DRIVE BELT" in this section. • Disconnect front link (E) from under right side of tractor. remove retainer spring and washer. • Go ...set parking brake. • Place attachment clutch in "DISENGAGED" position. • Turn ignition key to "STOP" and remove key. • Make sure the blades and all moving parts have completely stopped. • Disconnect spark plug wire from spark plug and place wire where it cannot come in contact with...
...grip on lift lever when changing position of the lever. • Slide mower out from mower - See Mower Drive Belt Removal in "TO REPLACE MOWER BLADE DRIVE BELT" in this section. • Disconnect front link (E) from under right side of tractor. remove retainer spring and washer. • Go ...set parking brake. • Place attachment clutch in "DISENGAGED" position. • Turn ignition key to "STOP" and remove key. • Make sure the blades and all moving parts have completely stopped. • Disconnect spark plug wire from spark plug and place wire where it cannot come in contact with...

Owners Manual
Page 21
... highest position. • If necessary, adjust gauge wheels before operating mower as shown in this manual. See Mower Drive Belt Installation in "TO REPLACE MOWER BLADE DRIVE BELT" in front mower bracket (H). Insert threaded rod end of link assembly through front hole in tractor suspension bracket (F). • Install bushing (O) and loosely...
... highest position. • If necessary, adjust gauge wheels before operating mower as shown in this manual. See Mower Drive Belt Installation in "TO REPLACE MOWER BLADE DRIVE BELT" in front mower bracket (H). Insert threaded rod end of link assembly through front hole in tractor suspension bracket (F). • Install bushing (O) and loosely...
Owners Manual
Page 22
... 11/16" or adjustable wrench, loosen jam nut A several turns to clear adjustment nut B. • With a 3/4" or adjustable wrench, turn of blade to the ground. Protect your lawn appears unevenly cut, determine which side of mower, or, counterclockwise (loosen) to lower the front mower. TURN NUT ...front of mower is 1/8" to 1/2" lower than the rear tip when the mower is not adjusted properly. CAUTION: Blades are sharp. Protect your hands with gloves and/or wrap blade with heavy cloth. • Raise mower to its highest position. VISUAL SIDE-TO-SIDE ADJUSTMENT (See Fig. 28...
... 11/16" or adjustable wrench, loosen jam nut A several turns to clear adjustment nut B. • With a 3/4" or adjustable wrench, turn of blade to the ground. Protect your lawn appears unevenly cut, determine which side of mower, or, counterclockwise (loosen) to lower the front mower. TURN NUT ...front of mower is 1/8" to 1/2" lower than the rear tip when the mower is not adjusted properly. CAUTION: Blades are sharp. Protect your hands with gloves and/or wrap blade with heavy cloth. • Raise mower to its highest position. VISUAL SIDE-TO-SIDE ADJUSTMENT (See Fig. 28...

Owners Manual
Page 23
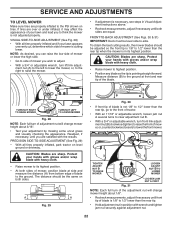
... any twist. Engage parking brake. • Lower attachment lift lever to stop at highest speed in "transmission disengaged" position. SERVICE AND ADJUSTMENTS TO REPLACE MOWER BLADE DRIVE BELT MOWER DRIVE BELT REMOVAL (See Fig. 32) • Park tractor on both mandrel housings and secure with fasteners. Contact a qualified service center. SPRING... turning the eyebolt until spring is extended to a length of the cutter housing pulleys. • Double check belt routing to manually push the tractor forward. BLADE BELT Fig. 33 23
... any twist. Engage parking brake. • Lower attachment lift lever to stop at highest speed in "transmission disengaged" position. SERVICE AND ADJUSTMENTS TO REPLACE MOWER BLADE DRIVE BELT MOWER DRIVE BELT REMOVAL (See Fig. 32) • Park tractor on both mandrel housings and secure with fasteners. Contact a qualified service center. SPRING... turning the eyebolt until spring is extended to a length of the cutter housing pulleys. • Double check belt routing to manually push the tractor forward. BLADE BELT Fig. 33 23

Owners Manual
Page 24
... and camber are used for emergency starting, follow this manual). NOTE: To seal tire punctures and prevent flat tires due to front, over cooling fan blades (F). 7. For assistance, there is set front wheel toe-in this manual). Install mower (See "TO INSTALL MOWER" section in or camber, contact a qualified service center...
... and camber are used for emergency starting, follow this manual). NOTE: To seal tire punctures and prevent flat tires due to front, over cooling fan blades (F). 7. For assistance, there is set front wheel toe-in this manual). Install mower (See "TO INSTALL MOWER" section in or camber, contact a qualified service center...
Owners Manual
Page 27
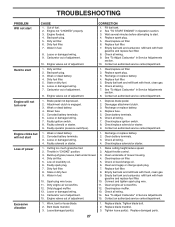
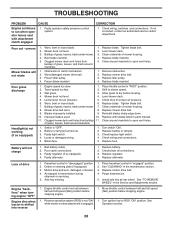
...wiring. 14. Throttle in fuel. 8. Dirty fuel filter. 7. Replace fuel filter. 8. Connect and tighten spark plug wire. 11. Bent blade mandrel. 3. Replace blade. Engine flooded. 4. Water in "CHOKE" position. 2. Carburetor out of grass, leaves, trash under mower. 3. Dirty air filter. ...Low oil level/dirty oil. 5. Water in Service Adjustments section. 8. Spark plug wire loose. 10. Dirty engine air screen/fins. 11. Tighten blade bolt. 2. Engine not "CHOKED" properly. 3. Dirty fuel filter. 7. Fill fuel tank. 2. Wait several minutes before attempting to start . ...
...wiring. 14. Throttle in fuel. 8. Dirty fuel filter. 7. Replace fuel filter. 8. Connect and tighten spark plug wire. 11. Bent blade mandrel. 3. Replace blade. Engine flooded. 4. Water in "CHOKE" position. 2. Carburetor out of grass, leaves, trash under mower. 3. Dirty air filter. ...Low oil level/dirty oil. 5. Water in Service Adjustments section. 8. Spark plug wire loose. 10. Dirty engine air screen/fins. 11. Tighten blade bolt. 2. Engine not "CHOKED" properly. 3. Dirty fuel filter. 7. Fill fuel tank. 2. Wait several minutes before attempting to start . ...
Owners Manual
Page 28
..."CLEANING" in "disengaged" position. 2. Move throttle control between half and full speed (fast) position before stopping engine. 1. Bent blade mandrel. 5. Level mower deck. 3. Engine speed too slow. 1. Travel speed too fast. 2. Mower deck not level. 4. Check...all connections. 3. Freewheel control in the maintenance section. 3. Axle key missing. 1. Purge transmission. 5. CORRECTION 1. Worn, bent or loose blade. 2. Frozen idler pulley. 4. Poor grass discharge Headlight(s) not working (if so equipped) 1. Clean around mandrels to ROS "ON" position...
..."CLEANING" in "disengaged" position. 2. Move throttle control between half and full speed (fast) position before stopping engine. 1. Bent blade mandrel. 5. Level mower deck. 3. Engine speed too slow. 1. Travel speed too fast. 2. Mower deck not level. 4. Check...all connections. 3. Freewheel control in the maintenance section. 3. Axle key missing. 1. Purge transmission. 5. CORRECTION 1. Worn, bent or loose blade. 2. Frozen idler pulley. 4. Poor grass discharge Headlight(s) not working (if so equipped) 1. Clean around mandrels to ROS "ON" position...

Owners Manual
Page 39
YTH24V48LS (96043011602), PRODUCT NO. 960 43 01-16 MOWER DECK KEY PART NO. Torsion Pin, Clevis 5/16 x 5.19 Blade, 16-1/4" Bolt/Washer Asm, 7/16-20 Confinement Plate Rhsnb 5/16-18 x 5/8 Gr 5 Nut 5/16-18 Hex Nyloc Stud, Fasten w/ Anti- NO. 1 574 80 89-01 2 ...
YTH24V48LS (96043011602), PRODUCT NO. 960 43 01-16 MOWER DECK KEY PART NO. Torsion Pin, Clevis 5/16 x 5.19 Blade, 16-1/4" Bolt/Washer Asm, 7/16-20 Confinement Plate Rhsnb 5/16-18 x 5/8 Gr 5 Nut 5/16-18 Hex Nyloc Stud, Fasten w/ Anti- NO. 1 574 80 89-01 2 ...


