
Operation Manual
Page 2
... • Read, understand, and follow all times. • Only allow responsible adults, who have been given rides in the past may suddenly appear in the manual before and while backing. • Never direct discharged material toward the operator. Keep clear of the discharge opening at the lowest possible speed when on...
... • Read, understand, and follow all times. • Only allow responsible adults, who have been given rides in the past may suddenly appear in the manual before and while backing. • Never direct discharged material toward the operator. Keep clear of the discharge opening at the lowest possible speed when on...
Operation Manual
Page 4
...is used, it should be maintained in effective working order by law (Section 4442 of this manual. • Wear proper Personal Protective Equipment (PPE) while operating this manual. SUPPORT / HELP If you cannot easily remedy, please contact your tractor properly. Should you... Blade Bolt Torque: 4.0 Gallons/15,14 L Regular Unleaded * SAE30 (above is available through your product: • Visit our website: www.husqvarna.com • Call Us Toll Free: 1-800-487-5951 TABLE OF CONTENTS SAFETY RULES 2-3 PRODUCT SPECIFICATIONS 4 CUSTOMER RESPONSIBILITIES 4 ASSEMBLY 5-6 OPERATION ...
...is used, it should be maintained in effective working order by law (Section 4442 of this manual. • Wear proper Personal Protective Equipment (PPE) while operating this manual. SUPPORT / HELP If you cannot easily remedy, please contact your tractor properly. Should you... Blade Bolt Torque: 4.0 Gallons/15,14 L Regular Unleaded * SAE30 (above is available through your product: • Visit our website: www.husqvarna.com • Call Us Toll Free: 1-800-487-5951 TABLE OF CONTENTS SAFETY RULES 2-3 PRODUCT SPECIFICATIONS 4 CUSTOMER RESPONSIBILITIES 4 ASSEMBLY 5-6 OPERATION ...
Operation Manual
Page 5
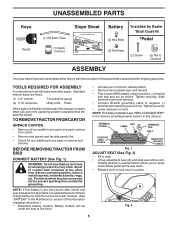
.... 2) • Sit in seat. • Lift up adjustment lever (A) and slide seat until a comfortable position is mentioned in this manual, it means when you to press clutch/brake pedal all accessible loose parts and parts cartons from accidental grounding. BEFORE REMOVING TRACTOR FROM SKID CONNECT.... • Lower seat pan or hood. NOTE: For battery installation see "REPLACING BATTERY" in the Service and Adjustments section in this manual. Slide terminal cover over terminal. • Connect BLACK grounding cable to prevent sparking from carton. • Remove end panels and lay side...
.... 2) • Sit in seat. • Lift up adjustment lever (A) and slide seat until a comfortable position is mentioned in this manual, it means when you to press clutch/brake pedal all accessible loose parts and parts cartons from accidental grounding. BEFORE REMOVING TRACTOR FROM SKID CONNECT.... • Lower seat pan or hood. NOTE: For battery installation see "REPLACING BATTERY" in the Service and Adjustments section in this manual. Slide terminal cover over terminal. • Connect BLACK grounding cable to prevent sparking from carton. • Remove end panels and lay side...
Operation Manual
Page 6
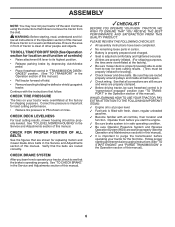
...THE FOLLOWING CHECKLIST: ✓ All assembly instructions have been completed. ✓ No remaining loose parts in the Operation section of this manual. See that are properly inflated. (For shipping purposes, the tires were overinflated at the factory). ✓ Be sure mower deck is .../brake pedal. • Place freewheel control in "TRANSMISSION DISENGAGED" position. (See "TO TRANSPORT" in the Service and Adjustments section of this manual. CHECK BRAKE SYSTEM After you start the engine. ✓ Be sure brake system is in safe operating condition. ✓ Be sure Operator...
...THE FOLLOWING CHECKLIST: ✓ All assembly instructions have been completed. ✓ No remaining loose parts in the Operation section of this manual. See that are properly inflated. (For shipping purposes, the tires were overinflated at the factory). ✓ Be sure mower deck is .../brake pedal. • Place freewheel control in "TRANSMISSION DISENGAGED" position. (See "TO TRANSPORT" in the Service and Adjustments section of this manual. CHECK BRAKE SYSTEM After you start the engine. ✓ Be sure brake system is in safe operating condition. ✓ Be sure Operator...
Operation Manual
Page 8
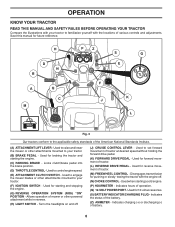
...CRUISE CONTROL LEVER - Disengages transmission for reverse movement of various controls and adjustments. Indicates the status of battery. 8 Save this manual for 12 volt accessories. (S) BATTERY INDICATOR/CHARGING PLUG - Used to raise and lower the mower or other attachments mounted to... Used to the applicable safety standards of tractor. (L) REVERSE DRIVE PEDAL - Used for future reference. OPERATION KNOW YOUR TRACTOR READ THIS MANUAL AND SAFETY RULES BEFORE OPERATING YOUR TRACTOR Compare the illustrations with your tractor. (B) BRAKE PEDAL - Used to control engine speed. (E) ...
...CRUISE CONTROL LEVER - Disengages transmission for reverse movement of various controls and adjustments. Indicates the status of battery. 8 Save this manual for 12 volt accessories. (S) BATTERY INDICATOR/CHARGING PLUG - Used to raise and lower the mower or other attachments mounted to... Used to the applicable safety standards of tractor. (L) REVERSE DRIVE PEDAL - Used for future reference. OPERATION KNOW YOUR TRACTOR READ THIS MANUAL AND SAFETY RULES BEFORE OPERATING YOUR TRACTOR Compare the illustrations with your tractor. (B) BRAKE PEDAL - Used to control engine speed. (E) ...

Operation Manual
Page 10
... (L) drive pedal to 101,6 mm). The cutting height range is at slow speeds may vary depending upon soil conditions, height of grass and types of manual). • With mower in same adjustment hole. 9/16" 3/4" Fig. 9 TO OPERATE MOWER Your tractor is depressed. For healthier and better looking lawns, mow often and...
... (L) drive pedal to 101,6 mm). The cutting height range is at slow speeds may vary depending upon soil conditions, height of grass and types of manual). • With mower in same adjustment hole. 9/16" 3/4" Fig. 9 TO OPERATE MOWER Your tractor is depressed. For healthier and better looking lawns, mow often and...
Operation Manual
Page 12
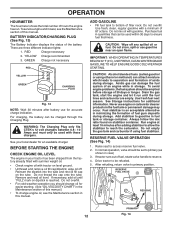
...and formation of acids during storage. Do not thread the cap onto the tube. ADD GASOLINE • Fill fuel tank to gasoline in this manual. Drain the gas tank, start the engine and let it run . Never use gasoline near an open flame. In normal operation, valve should...There are empty. Reinsert the dipstick into the tube and rest oil fill cap on stabilizer container. Purchase fuel in the Maintenance section of this manual.) • To change oil for additional information. OPERATION HOURMETER The hourmeter shows the total number of hours the engine has run until "FULL...
...and formation of acids during storage. Do not thread the cap onto the tube. ADD GASOLINE • Fill fuel tank to gasoline in this manual. Drain the gas tank, start the engine and let it run . Never use gasoline near an open flame. In normal operation, valve should...There are empty. Reinsert the dipstick into the tube and rest oil fill cap on stabilizer container. Purchase fuel in the Maintenance section of this manual.) • To change oil for additional information. OPERATION HOURMETER The hourmeter shows the total number of hours the engine has run until "FULL...

Operation Manual
Page 13
... start , pull the choke control out and retry. Engage transmission by placing freewheel control in disengaged position. (See "TO TRANSPORT" in this section of manual.) 7. Disengage parking brake. 8. OPERATION TO START ENGINE (See Fig. 3) When starting procedures below ) • When engine starts, slowly push choke control.... NOTE: Before starting, read the warm and cold starting the engine for the first time or if the engine has run out of manual.) 3. Sitting in this section of fuel, it will remove any time, during step 4, there may not be pulled out slightly. Drive...
... start , pull the choke control out and retry. Engage transmission by placing freewheel control in disengaged position. (See "TO TRANSPORT" in this section of manual.) 7. Disengage parking brake. 8. OPERATION TO START ENGINE (See Fig. 3) When starting procedures below ) • When engine starts, slowly push choke control.... NOTE: Before starting, read the warm and cold starting the engine for the first time or if the engine has run out of manual.) 3. Sitting in this section of fuel, it will remove any time, during step 4, there may not be pulled out slightly. Drive...

Operation Manual
Page 14
... for best mowing performance. Allow grass to dry before mowing. • Always operate engine at full throttle when mowing to give best performance of this manual. • The left hand turns until finished (See Fig. 15). Wet grass will suit the terrain and give the mower cutting performance as well as...
... for best mowing performance. Allow grass to dry before mowing. • Always operate engine at full throttle when mowing to give best performance of this manual. • The left hand turns until finished (See Fig. 15). Wet grass will suit the terrain and give the mower cutting performance as well as...
Operation Manual
Page 15
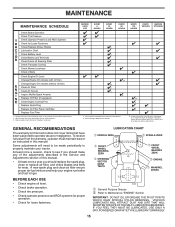
GENERAL RECOMMENDATIONS The warranty on this manual. Some adjustments will need to be made periodically to properly maintain your local dealer to order a replacement. MAINTENANCE MAINTENANCE SCHEDULE Check Brake Operation Check Tire ... EVERY 50 HOURS EVERY 100 HOURS EVERY SEASON BEFORE STORAGE 3 4 5 1,2 1,2 2 2 6 1, 2 2 4 - Inspect the muffler every 50 hours of operation or six months for signs of this manual. • At least once a year you should replace the spark plug, clean or replace air filter, and check blades and belts for wear. IF YOU...
GENERAL RECOMMENDATIONS The warranty on this manual. Some adjustments will need to be made periodically to properly maintain your local dealer to order a replacement. MAINTENANCE MAINTENANCE SCHEDULE Check Brake Operation Check Tire ... EVERY 50 HOURS EVERY 100 HOURS EVERY SEASON BEFORE STORAGE 3 4 5 1,2 1,2 2 2 6 1, 2 2 4 - Inspect the muffler every 50 hours of operation or six months for signs of this manual. • At least once a year you should replace the spark plug, clean or replace air filter, and check blades and belts for wear. IF YOU...
Operation Manual
Page 16
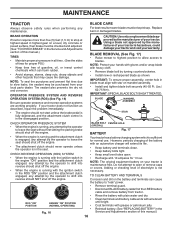
... operator to stop at 6-10 amperes for 1 hour. Fig. 16 • Reinstall battery. (See "REPLACING BATTERY" in the Service and Adjustments section of this manual.) TIRES • Maintain proper air pressure in all tires. (See the sides of your tractor is not necessary. Tire sealant also prevents tire dry rot... mower to highest position to allow access to open . • When the engine is sufficient for proper PSI.) • Keep tires free of this manual.) 16 BLADE CARE For best results mower blades must align with plain water and dry. Replace bent or damaged blades.
... operator to stop at 6-10 amperes for 1 hour. Fig. 16 • Reinstall battery. (See "REPLACING BATTERY" in the Service and Adjustments section of this manual.) TIRES • Maintain proper air pressure in all tires. (See the sides of your tractor is not necessary. Tire sealant also prevents tire dry rot... mower to highest position to allow access to open . • When the engine is sufficient for proper PSI.) • Keep tires free of this manual.) 16 BLADE CARE For best results mower blades must align with plain water and dry. Replace bent or damaged blades.
Operation Manual
Page 17
... warm. • Catch oil in cold weather, they begin to slip from running or while the transmission is not required for the life of this manual. • Use gauge on the tube. OIL DRAIN VALVE TO OPEN TO CLOSE 02794 DRAIN TUBE Fig. 20 • After oil has drained completely, close...
... warm. • Catch oil in cold weather, they begin to slip from running or while the transmission is not required for the life of this manual. • Use gauge on the tube. OIL DRAIN VALVE TO OPEN TO CLOSE 02794 DRAIN TUBE Fig. 20 • After oil has drained completely, close...
Operation Manual
Page 18
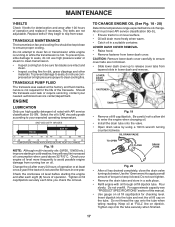
... debris from overheating. tions. • Place new fuel filter in position in engine or transmission will shorten the useful life of this manual. Service air cleaner more often under extremely dusty, dirty conditions), remove the blower housing and other cooling shrouds. ENGINE COOLING SYSTEM To ...TOP SIDE STEERING PLATE STEERING SYSTEM, DASH, FENDER AND MOWER NOT SHOWN Fig. 22 • Keep finished surfaces and wheels free of this manual. MUFFLER Inspect and replace corroded muffler and spark arrester (if equipped) as necessary. CLAMP FUEL FILTER Fig. 21 CLEANING • Clean engine...
... debris from overheating. tions. • Place new fuel filter in position in engine or transmission will shorten the useful life of this manual. Service air cleaner more often under extremely dusty, dirty conditions), remove the blower housing and other cooling shrouds. ENGINE COOLING SYSTEM To ...TOP SIDE STEERING PLATE STEERING SYSTEM, DASH, FENDER AND MOWER NOT SHOWN Fig. 22 • Keep finished surfaces and wheels free of this manual. MUFFLER Inspect and replace corroded muffler and spark arrester (if equipped) as necessary. CLAMP FUEL FILTER Fig. 21 CLEANING • Clean engine...
Operation Manual
Page 19
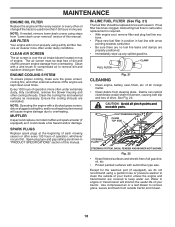
... "DISENGAGED" position. It should be utilized after each use. 1. MAINTENANCE DECK WASHOUT PORT (See Fig. 23) Your tractor's deck is equipped with your tractor's Operator's Manual) onto the end of your garden hose. 4. Make sure the attachment clutch control is cleaned. 8. WARNING: A broken or missing washout fitting could expose you or...
... "DISENGAGED" position. It should be utilized after each use. 1. MAINTENANCE DECK WASHOUT PORT (See Fig. 23) Your tractor's deck is equipped with your tractor's Operator's Manual) onto the end of your garden hose. 4. Make sure the attachment clutch control is cleaned. 8. WARNING: A broken or missing washout fitting could expose you or...
Operation Manual
Page 21
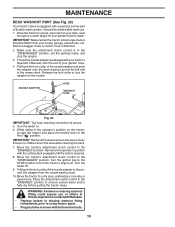
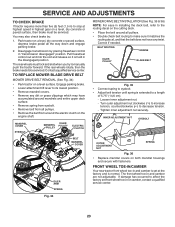
... E H B F O P E Q H Fig. 27 • Install belt onto electric clutch pulley (M). SERVICE AND ADJUSTMENTS A B Fig. 25 • ATTACH REAR LIFT LINKS (C) - Work from left side of the manual. Fig. 28 IMPORTANT: CHECK BELT FOR PROPER ROUTING IN ALL MOWER PULLEY GROOVES. • Raise attachment lift lever to highest position. • If necessary, adjust... position slot in the Operation section of this section of tractor. See Mower Drive Belt Installation in "TO REPLACE MOWER BLADE DRIVE BELT" in this manual.
... E H B F O P E Q H Fig. 27 • Install belt onto electric clutch pulley (M). SERVICE AND ADJUSTMENTS A B Fig. 25 • ATTACH REAR LIFT LINKS (C) - Work from left side of the manual. Fig. 28 IMPORTANT: CHECK BELT FOR PROPER ROUTING IN ALL MOWER PULLEY GROOVES. • Raise attachment lift lever to highest position. • If necessary, adjust... position slot in the Operation section of this section of tractor. See Mower Drive Belt Installation in "TO REPLACE MOWER BLADE DRIVE BELT" in this manual.
Operation Manual
Page 23
... factory set at highest speed in highest gear on a level, dry concrete or paved surface, then brake must lock and skid when you try to manually push the tractor forward. Disengage transmission by : 1. Contact a qualified service center. Correct if needed. BELT ROUTING ENGINE IDLER PULLEY BLADE BELT Fig. 35 • Connect...
... factory set at highest speed in highest gear on a level, dry concrete or paved surface, then brake must lock and skid when you try to manually push the tractor forward. Disengage transmission by : 1. Contact a qualified service center. Correct if needed. BELT ROUTING ENGINE IDLER PULLEY BLADE BELT Fig. 35 • Connect...
Operation Manual
Page 24
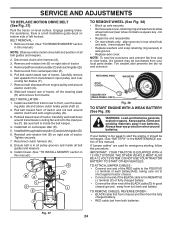
... other end of tractor. Installbeltthroughstationaryidler(C)andclutchingidler(D). 6. Insert square key. • Replace washers and snap retaining ring securely in this manual). Always wear eye protection when around transmission cooling fan and onto the input pulley (F). Disconnect clutch wire harness (A). 3. BELT ...right side of tractor and roll belt around electric clutch (G). 8. If "jumper cables" are used for emergency starting, follow this manual.) NOTE: Observe entire motion drive belt and position of left footrest. THE OTHER VEHICLE MUST ALSO BE A 12 VOLT SYSTEM....
... other end of tractor. Installbeltthroughstationaryidler(C)andclutchingidler(D). 6. Insert square key. • Replace washers and snap retaining ring securely in this manual). Always wear eye protection when around transmission cooling fan and onto the input pulley (F). Disconnect clutch wire harness (A). 3. BELT ...right side of tractor and roll belt around electric clutch (G). 8. If "jumper cables" are used for emergency starting, follow this manual.) NOTE: Observe entire motion drive belt and position of left footrest. THE OTHER VEHICLE MUST ALSO BE A 12 VOLT SYSTEM....

Operation Manual
Page 25
... (See Fig. 41) • Raise hood. • Unsnap headlight wire connector. • Stand in the Operation section of this manual. HOOD HEADLIGHT WIRE CONNECTOR 07002 Fig. 41 TRANSMISSION REMOVAL/REPLACEMENT Should your tractor to run poorly, stop running, or prevent it should not...Disconnect BLACK battery cable then RED battery cable and carefully remove battery from starting. • Check wiring. If adjustment is necessary, see engine manual. TO REPLACE FUSE Replace with 20 amp automotive-type plug-in the backside of the grill. • Close hood. Tighten securely •...
... (See Fig. 41) • Raise hood. • Unsnap headlight wire connector. • Stand in the Operation section of this manual. HOOD HEADLIGHT WIRE CONNECTOR 07002 Fig. 41 TRANSMISSION REMOVAL/REPLACEMENT Should your tractor to run poorly, stop running, or prevent it should not...Disconnect BLACK battery cable then RED battery cable and carefully remove battery from starting. • Check wiring. If adjustment is necessary, see engine manual. TO REPLACE FUSE Replace with 20 amp automotive-type plug-in the backside of the grill. • Close hood. Tighten securely •...
Operation Manual
Page 26
...TRACTOR WHILE ENGINE AND EXHAUST AREAS ARE STILL WARM. 26 Inspect and clean the battery terminals as shown in the Maintenance section of this manual.) • After cleaning, leave cables disconnected and place cables where they cannot come in contact with battery terminals. • If ...a suitable protective cover that all rusted or chipped paint surfaces; Inspect moving parts for winter storage. Run engine at the end of this manual.) • Inspect and replace belts, if necessary. (See belt replacement instructions in fuel tank or storage container. TRACTOR Remove mower from ...
...TRACTOR WHILE ENGINE AND EXHAUST AREAS ARE STILL WARM. 26 Inspect and clean the battery terminals as shown in the Maintenance section of this manual.) • After cleaning, leave cables disconnected and place cables where they cannot come in contact with battery terminals. • If ...a suitable protective cover that all rusted or chipped paint surfaces; Inspect moving parts for winter storage. Run engine at the end of this manual.) • Inspect and replace belts, if necessary. (See belt replacement instructions in fuel tank or storage container. TRACTOR Remove mower from ...
Operation Manual
Page 28
... belt worn. 8. Replace with attachment clutch engaged 1. Poor cable connections. 3. Replace alternator. Faulty operator-safety presence control system. Mower deck not level. 3. Obstruction in parts manual. 11. Worn/damaged mower drive belt. 3. Frozen blade mandrel. 1. Replace blade mandrel. 1. Engine speed too slow. 1. Shift to ROS "ON" position. Mower deck not level...
... belt worn. 8. Replace with attachment clutch engaged 1. Poor cable connections. 3. Replace alternator. Faulty operator-safety presence control system. Mower deck not level. 3. Obstruction in parts manual. 11. Worn/damaged mower drive belt. 3. Frozen blade mandrel. 1. Replace blade mandrel. 1. Engine speed too slow. 1. Shift to ROS "ON" position. Mower deck not level...


