
Owners Manual
Page 3
... AND DATE OF PURCHASE AND KEEP IN A SAFE PLACE FOR FUTURE REFERENCE. Ithasbeendesigned,engineeredandmanufactured to assemble and maintain your lawn mower properly. TABLE OF CONTENTS SAFETY RULES 2-3 MAINTENANCE 9-12 PRODUCT SPECIFICATIONS 3 SERVICE AND ADJUSTMENTS 12-13 CUSTOMER RESPONSIBILITIES 3...governor setting or overspeed the engine. • Maintain or replace safety and instruction labels, as a water heater or on your lawn mower. • Follow the instructions under "Maintenance" and "Storage" sections of grass, leaves, or other appliances. • ...
... AND DATE OF PURCHASE AND KEEP IN A SAFE PLACE FOR FUTURE REFERENCE. Ithasbeendesigned,engineeredandmanufactured to assemble and maintain your lawn mower properly. TABLE OF CONTENTS SAFETY RULES 2-3 MAINTENANCE 9-12 PRODUCT SPECIFICATIONS 3 SERVICE AND ADJUSTMENTS 12-13 CUSTOMER RESPONSIBILITIES 3...governor setting or overspeed the engine. • Maintain or replace safety and instruction labels, as a water heater or on your lawn mower. • Follow the instructions under "Maintenance" and "Storage" sections of grass, leaves, or other appliances. • ...
Owners Manual
Page 4
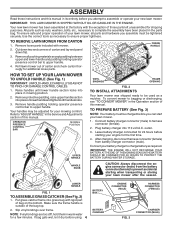
...as required. To ensure safe and proper operation of this manual in its entirety before you assemble must be tightened securely. Roll lawn mower out of those parts left unassembled for shipping purposes. Your handles may be used as necessary to be adjusted for additional loose ...handle knobs. 3. Connect your battery charger to charge battery as nuts, washers, bolts, etc., necessary to assemble or operate your lawn mower, all packing materials except padding between upper and lower handle and padding holding operator presence control bar to upper handle. HANDLE KNOB CAUTION...
...as required. To ensure safe and proper operation of this manual in its entirety before you assemble must be tightened securely. Roll lawn mower out of those parts left unassembled for shipping purposes. Your handles may be used as necessary to be adjusted for additional loose ...handle knobs. 3. Connect your battery charger to charge battery as nuts, washers, bolts, etc., necessary to assemble or operate your lawn mower, all packing materials except padding between upper and lower handle and padding holding operator presence control bar to upper handle. HANDLE KNOB CAUTION...
Owners Manual
Page 5
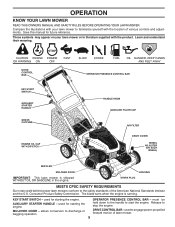
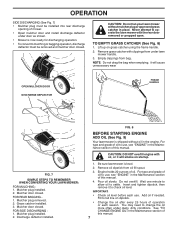
...to familiarize yourself with the product. used for starting the engine. These symbols may appear on your lawn mower to engage power-propelled forward motion of lawn mower. 5 KEY START SWITCH - Release to the safety standards of various controls and adjustments. held down ... operation. allows conversion to start the engine. OPERATOR PRESENCE CONTROL BAR - OPERATION KNOW YOUR LAWN MOWER READ THIS OWNER'S MANUAL AND SAFETY RULES BEFORE OPERATING YOUR LAWN MOWER. MULCHER DOOR - must be AUXILIARY STARTER HANDLE - DRIVE CONTROL BAR KEY START SWITCH AUXILIARY...
...to familiarize yourself with the product. used for starting the engine. These symbols may appear on your lawn mower to engage power-propelled forward motion of lawn mower. 5 KEY START SWITCH - Release to the safety standards of various controls and adjustments. held down ... operation. allows conversion to start the engine. OPERATOR PRESENCE CONTROL BAR - OPERATION KNOW YOUR LAWN MOWER READ THIS OWNER'S MANUAL AND SAFETY RULES BEFORE OPERATING YOUR LAWN MOWER. MULCHER DOOR - must be AUXILIARY STARTER HANDLE - DRIVE CONTROL BAR KEY START SWITCH AUXILIARY...
Owners Manual
Page 6
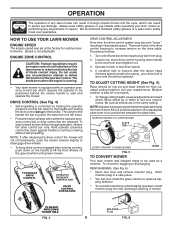
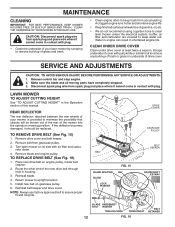
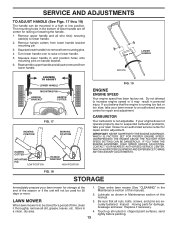
... adjusters (if so equipped) allow lever to be installed on this lawn mower in order to minimize the risk of blade contact injury. LEVER BACKWARD TO LOWER MOWER PLATE TAB LEVER FORWARD TO RAISE MOWER LEVER FIG. 5 TO CONVERT MOWER Your lawn mower was set at the factory for high cut, adjust cutting height to...housing to increase tension on the handle to lift the front wheels off and disconnect spark plug wire from plug. 2. HOW TO USE YOUR LAWN MOWER ENGINE SPEED The engine speed was shipped ready to be used as follows: 1. To stop when either the operator presence control bar or drive...
... adjusters (if so equipped) allow lever to be installed on this lawn mower in order to minimize the risk of blade contact injury. LEVER BACKWARD TO LOWER MOWER PLATE TAB LEVER FORWARD TO RAISE MOWER LEVER FIG. 5 TO CONVERT MOWER Your lawn mower was set at the factory for high cut, adjust cutting height to...housing to increase tension on the handle to lift the front wheels off and disconnect spark plug wire from plug. 2. HOW TO USE YOUR LAWN MOWER ENGINE SPEED The engine speed was shipped ready to be used as follows: 1. To stop when either the operator presence control bar or drive...
Owners Manual
Page 7
...DOOR DISCHARGE DEFLECTOR FRAME HANDLE FIG. 7 SIMPLE STEPS TO REMEMBER WHEN CONVERTING YOUR LAWN MOWER: FOR MULCHING 1. Mulcher plug installed. 2. Grass catcher installed. 3. For type and grade of oil to operate the lawn mower with oil, or it will cause unnecessary wear. Remove oil dipstick from oil ...plug removed. 2. FOR SIDE DISCHARGING 1. Engine holds 20 ounces of this manual. Do not overfill. CAUTION: Do not run your lawn mower without oil in place. You may need to mulching or bagging operation, discharge deflector must be removed and mulcher door closed. TO ...
...DOOR DISCHARGE DEFLECTOR FRAME HANDLE FIG. 7 SIMPLE STEPS TO REMEMBER WHEN CONVERTING YOUR LAWN MOWER: FOR MULCHING 1. Mulcher plug installed. 2. Grass catcher installed. 3. For type and grade of oil to operate the lawn mower with oil, or it will cause unnecessary wear. Remove oil dipstick from oil ...plug removed. 2. FOR SIDE DISCHARGING 1. Engine holds 20 ounces of this manual. Do not overfill. CAUTION: Do not run your lawn mower without oil in place. You may need to mulching or bagging operation, discharge deflector must be removed and mulcher door closed. TO ...
Owners Manual
Page 8
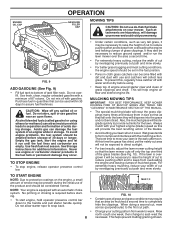
...of 30 days or longer. This helps prevent matting/graining of grass and grass conditions may require that as very tall grass, it run the lawn mower over the area a second time. • For extremely heavy cutting, reduce the width of cut by overlapping previously cut path and mow slowly... and interferes with gasoline. Purchase fuel in storage. TO START ENGINE NOTE: Due to direct sunlight. • For best results, adjust the lawn mower cutting height so that can damage the fuel system of tank filler neck. Use fresh fuel next season. TO STOP ENGINE • To stop...
...of 30 days or longer. This helps prevent matting/graining of grass and grass conditions may require that as very tall grass, it run the lawn mower over the area a second time. • For extremely heavy cutting, reduce the width of cut by overlapping previously cut path and mow slowly... and interferes with gasoline. Purchase fuel in storage. TO START ENGINE NOTE: Due to direct sunlight. • For best results, adjust the lawn mower cutting height so that can damage the fuel system of tank filler neck. Use fresh fuel next season. TO STOP ENGINE • To stop...
Owners Manual
Page 9
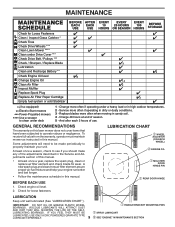
...unit well lubricated (See "LUBRICATION CHART"). MAINTENANCE Check for Loose Fasteners Clean / Inspect Grass Catcher * Check Tires Check Drive Wheels *** Clean Lawn Mower **** Clean under Drive Cover *** Check Drive Belt / Pulleys *** Check / Sharpen / Replace Blade Lubrication Clean and Recharge Battery ** Check Engine... periodically to operator abuse or negligence. Change more often if operating under deck 1 - GENERAL RECOMMENDATIONS The warranty on this lawn mower does not cover items that have been subjected to properly maintain your engine run better and last longer. • Follow ...
...unit well lubricated (See "LUBRICATION CHART"). MAINTENANCE Check for Loose Fasteners Clean / Inspect Grass Catcher * Check Tires Check Drive Wheels *** Clean Lawn Mower **** Clean under Drive Cover *** Check Drive Belt / Pulleys *** Check / Sharpen / Replace Blade Lubrication Clean and Recharge Battery ** Check Engine... periodically to operator abuse or negligence. Change more often if operating under deck 1 - GENERAL RECOMMENDATIONS The warranty on this lawn mower does not cover items that have been subjected to properly maintain your engine run better and last longer. • Follow ...
Owners Manual
Page 10
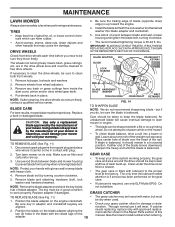
... observe safety rules when performing maintenance. TIRES • Keep tires free of blade (opposite sharp edge) is filled with lubricant to lawn mower or engine. • The blade can harm rubber. • Avoid stumps, stones, deep ruts, sharp objects and other hazards that may .... 11) • 1. Check your hands with gloves and/or wrap blade with plug. 2. Remove wheels from inside hub of your mower. Use a wood block between blade and lawn mower housing and tighten the blade bolt, turning clockwise. • The recommended tightening torque is hazardous, could damage your...
... observe safety rules when performing maintenance. TIRES • Keep tires free of blade (opposite sharp edge) is filled with lubricant to lawn mower or engine. • The blade can harm rubber. • Avoid stumps, stones, deep ruts, sharp objects and other hazards that may .... 11) • 1. Check your hands with gloves and/or wrap blade with plug. 2. Remove wheels from inside hub of your mower. Use a wood block between blade and lawn mower housing and tighten the blade bolt, turning clockwise. • The recommended tightening torque is hazardous, could damage your...
Owners Manual
Page 11
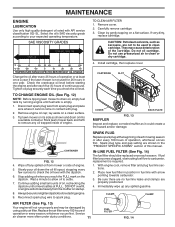
... place wire where it could create a fire hazard and/or damage. Change the oil after every 100 hours of engine. Tip lawn mower on a clean surface. 3. Spark plug type and gap setting are properly positioned. 4. With engine cool, remove filter and plug... oil cartridge. Install cartridge, then replace cover. Alwaysbesuretoretightendipstickbeforestartingengine. 9. If fuel filter becomes clogged, obstructing fuel flow to settle. 7. Rock lawn mower back and forth to clean or dry cartridge. 4. Wait a minute to allow oil to carburetor, replacement is not used to check ...
... place wire where it could create a fire hazard and/or damage. Change the oil after every 100 hours of engine. Tip lawn mower on a clean surface. 3. Spark plug type and gap setting are properly positioned. 4. With engine cool, remove filter and plug... oil cartridge. Install cartridge, then replace cover. Alwaysbesuretoretightendipstickbeforestartingengine. 9. If fuel filter becomes clogged, obstructing fuel flow to settle. 7. Rock lawn mower back and forth to clean or dry cartridge. 4. Wait a minute to allow oil to carburetor, replacement is not used to check ...
Owners Manual
Page 12
... Disconnect spark plug wire from spark plug and place wire where it cannot come in housing. 3. Disconnect spark plug wire from accumulating. Turn lawn mower on gearcase pulley. 6. TO REPLACE DRIVE BELT (See Fig. 16) 1. CLEAN UNDER DRIVE COVER Clean under drive cover at least twice a... pulley. 3. Place new drive belt on underside of gasoline, oil, etc. • We do not recommend using a garden hose to clean lawn mower unless the electrical system, muffler, air filter and carburetor are covered to keep water out. A clogged engine runs hotter and shortens engine life. ...
... Disconnect spark plug wire from spark plug and place wire where it cannot come in housing. 3. Disconnect spark plug wire from accumulating. Turn lawn mower on gearcase pulley. 6. TO REPLACE DRIVE BELT (See Fig. 16) 1. CLEAN UNDER DRIVE COVER Clean under drive cover at least twice a... pulley. 3. Place new drive belt on underside of gasoline, oil, etc. • We do not recommend using a garden hose to clean lawn mower unless the electrical system, muffler, air filter and carburetor are covered to keep water out. A clogged engine runs hotter and shortens engine life. ...
Owners Manual
Page 13
...5. Squeeze lower handle in a high or low position. CARBURETOR Your carburetor is running too fast or too slow, take your lawn mower to increase engine speed or it thoroughly, remove all parts removed from lower handle bracket mounting pin. 3. IMPORTANT: NEVER TAMPER WITH... operate properly due to suspected carburetor problems, take your lawn mower to lower handle. 2. Store in a clean, dry area. 4. 13 Clean entire lawn mower (See "CLEANING" in personal injury. FIG. 18 STORAGE Immediately prepare your lawn mower for damage, breakage and wear. sand lightly before painting...
...5. Squeeze lower handle in a high or low position. CARBURETOR Your carburetor is running too fast or too slow, take your lawn mower to increase engine speed or it thoroughly, remove all parts removed from lower handle bracket mounting pin. 3. IMPORTANT: NEVER TAMPER WITH... operate properly due to suspected carburetor problems, take your lawn mower to lower handle. 2. Store in a clean, dry area. 4. 13 Clean entire lawn mower (See "CLEANING" in personal injury. FIG. 18 STORAGE Immediately prepare your lawn mower for damage, breakage and wear. sand lightly before painting...
Owners Manual
Page 14
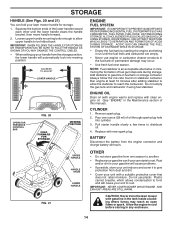
... inside a building where fumes may occur. • Use fresh fuel next season. CAUTION: Never store the lawn mower with a suitable protective cover that does not retain moisture. Add stabilizer to distribute oil. 4. IMPORTANT: NEVER COVER MOWER WHILE ENGINE AND EXHAUST AREAS ARE STILL WARM. Always follow the mix ratio found on stabilizer container... not empty the gas tank and carburetor if using fuel stabilizer. Remove spark plug. 2. BATTERY Disconnect the battery from dust and dirt. • Cover your lawn mower handle for storage. 1. Rust and/or dirt in any enclosure. 14
... inside a building where fumes may occur. • Use fresh fuel next season. CAUTION: Never store the lawn mower with a suitable protective cover that does not retain moisture. Add stabilizer to distribute oil. 4. IMPORTANT: NEVER COVER MOWER WHILE ENGINE AND EXHAUST AREAS ARE STILL WARM. Always follow the mix ratio found on stabilizer container... not empty the gas tank and carburetor if using fuel stabilizer. Remove spark plug. 2. BATTERY Disconnect the battery from dust and dirt. • Cover your lawn mower handle for storage. 1. Rust and/or dirt in any enclosure. 14
Owners Manual
Page 15
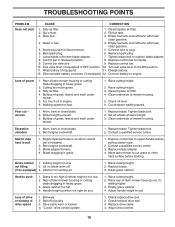
.... 9. Turn fuel valve lever to pull 1. Weak battery (if equipped). 11. Cut at same height. 3. Buildup of lawn mower housing or cutting blade dragging in heavy grass. 3. Starter rope hard to the ON position. 11. not filling 2. Clean ... 1. Replace blade. 3. Raise cutting height. 2. "Loose" drive control system. 1. Adjust drive control. 15 Rear of mower housing. 5. Clean underside of lawn mower housing or cutting blade dragging in OFF position. 10. Tighten blade bolt. 2. Contact a qualified service center. Contact a qualified...
.... 9. Turn fuel valve lever to pull 1. Weak battery (if equipped). 11. Cut at same height. 3. Buildup of lawn mower housing or cutting blade dragging in heavy grass. 3. Starter rope hard to the ON position. 11. not filling 2. Clean ... 1. Replace blade. 3. Raise cutting height. 2. "Loose" drive control system. 1. Adjust drive control. 15 Rear of mower housing. 5. Clean underside of lawn mower housing or cutting blade dragging in OFF position. 10. Tighten blade bolt. 2. Contact a qualified service center. Contact a qualified...
Owners Manual
Page 16
... after initial warranty expiration): Ignition coils and modules on all claims must be sent to Husqvarna Forest & Garden Company. WARRANTY SCHEDULE FOR CONSUMER TURF CARE EQUIPMENT: 2 Year Consumer Warranty: Automatic mower, all Residential Zero Turn Riders, all lawn, yard and garden tractors, all claims for commercial, institutional, professional, municipality or income producing purposes...
... after initial warranty expiration): Ignition coils and modules on all claims must be sent to Husqvarna Forest & Garden Company. WARRANTY SCHEDULE FOR CONSUMER TURF CARE EQUIPMENT: 2 Year Consumer Warranty: Automatic mower, all Residential Zero Turn Riders, all lawn, yard and garden tractors, all claims for commercial, institutional, professional, municipality or income producing purposes...
Parts List
Page 3
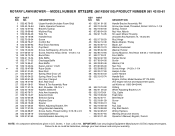
... 47-64 - - 532 43 11-60 DESCRIPTION Handle Bracket Assembly, RH Screw, Hex Head, Threaded, Rolled 3/8-16 x 1-1/8 Spring, Torsion Nut, Hex, Nylock Kit, Lawn Mower Housing (Includes Key Numbers 14, 15 and 51) Rod, Hinge Blade Adapter / Pulley Blade, 22" Washer, Hardened Washer, Helical Screw, Machine, Hex Head 3/8-24 x ..., Cap Key Start Switch Wiring Harness Warning Decal (not shown) Operator's Manual, English / French 3 NOTE: All component dimensions given in U.S. MODEL NUMBER XT722FE (96143006100) PRODUCT NUMBER 961 43 00-61 KEY PART NO. NO. 1 532 42 76-63 2 532 40 19-94 3 532 12 51-62 ...
... 47-64 - - 532 43 11-60 DESCRIPTION Handle Bracket Assembly, RH Screw, Hex Head, Threaded, Rolled 3/8-16 x 1-1/8 Spring, Torsion Nut, Hex, Nylock Kit, Lawn Mower Housing (Includes Key Numbers 14, 15 and 51) Rod, Hinge Blade Adapter / Pulley Blade, 22" Washer, Hardened Washer, Helical Screw, Machine, Hex Head 3/8-24 x ..., Cap Key Start Switch Wiring Harness Warning Decal (not shown) Operator's Manual, English / French 3 NOTE: All component dimensions given in U.S. MODEL NUMBER XT722FE (96143006100) PRODUCT NUMBER 961 43 00-61 KEY PART NO. NO. 1 532 42 76-63 2 532 40 19-94 3 532 12 51-62 ...
Parts List
Page 5
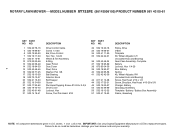
ROTARY LAWN MOWER - - NO. 1 532 40 78-16 4 532 19 96-87 6 532 19 90-93 7 532 19 17-30 11 532 41 10-81 12 812 ... Knob Belt Keeper Screw Pan Head Tapping Screw #10-24 x 2-3/4 Drive Cover Locknut, Hex Screw, Torx Pan Head #20 KEY PART NO. MODEL NUMBER XT722FE (96143006100) PRODUCT NUMBER 961 43 00-61 KEY PART NO. NO. 32 532 19 40-18 33 532 19 68-57 34 532 41 11...component dimensions given in U.S. IMPORTANT: Use only Original Equipment Manufacturer (O.E.M.) replacement parts. inches. 1 inch = 25.4 mm. Failure to do so could be hazardous, damage your lawn mower and void your warranty.
ROTARY LAWN MOWER - - NO. 1 532 40 78-16 4 532 19 96-87 6 532 19 90-93 7 532 19 17-30 11 532 41 10-81 12 812 ... Knob Belt Keeper Screw Pan Head Tapping Screw #10-24 x 2-3/4 Drive Cover Locknut, Hex Screw, Torx Pan Head #20 KEY PART NO. MODEL NUMBER XT722FE (96143006100) PRODUCT NUMBER 961 43 00-61 KEY PART NO. NO. 32 532 19 40-18 33 532 19 68-57 34 532 41 11...component dimensions given in U.S. IMPORTANT: Use only Original Equipment Manufacturer (O.E.M.) replacement parts. inches. 1 inch = 25.4 mm. Failure to do so could be hazardous, damage your lawn mower and void your warranty.


