

Operation Manual
Page 1
The use in this machine. Operator Manual Commercial Mower W436 / 967334301-00 W448 / 967334401-00 Please read the operator manual carefully and make sure you understand the instructions before using the machine. Gasoline containing up to 10% ethanol (E10) is acceptable for use of any gasoline exceeding 10% ethanol (E10) will void the product warranty. EN
The use in this machine. Operator Manual Commercial Mower W436 / 967334301-00 W448 / 967334401-00 Please read the operator manual carefully and make sure you understand the instructions before using the machine. Gasoline containing up to 10% ethanol (E10) is acceptable for use of any gasoline exceeding 10% ethanol (E10) will void the product warranty. EN
Operation Manual
Page 2
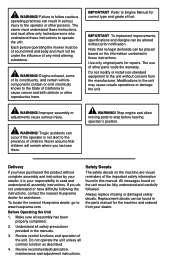
...California to operate the unit. Note that children will remain where you have difficulty following the instructions, contact the nearest Husqvarna dealer for repairs. WARNING! Review recommended lubrication, maintenance and adjustment instructions. The use of children. Tragic accidents can be...and allow only trained persons who understand these instructions. Review control functions and operation of fuel. Each person operating the mower must be of sound mind and body and must not be altered without prior notification. IMPORTANT To implement improvements, specifications...
...California to operate the unit. Note that children will remain where you have difficulty following the instructions, contact the nearest Husqvarna dealer for repairs. WARNING! Review recommended lubrication, maintenance and adjustment instructions. The use of children. Tragic accidents can be...and allow only trained persons who understand these instructions. Review control functions and operation of fuel. Each person operating the mower must be of sound mind and body and must not be altered without prior notification. IMPORTANT To implement improvements, specifications...

Operation Manual
Page 4
...- All other general safety regulations, occupational safety rules, and traffic regulations must be adjusted by a Husqvarna dealer or an authorized engine manufacturer's service center. Lawn mowers and all power equipment can only be carefully followed. Use only approved repair parts to the design... of uses are incorrect. Contact a Husqvarna dealer concerning emission controls and components. The machine ...
...- All other general safety regulations, occupational safety rules, and traffic regulations must be adjusted by a Husqvarna dealer or an authorized engine manufacturer's service center. Lawn mowers and all power equipment can only be carefully followed. Use only approved repair parts to the design... of uses are incorrect. Contact a Husqvarna dealer concerning emission controls and components. The machine ...
Operation Manual
Page 5
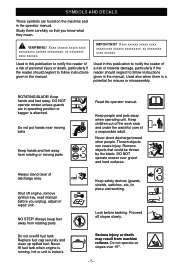
....) in place and working. Do not operate on the machine and in the operator manual. DO NOT operate mower unless guards are found on slopes over gravel and hard surfaces. DO NOT operate mower over 15O. - 5 - WARNING! Read the operator manual. Remove objects that you unplug, adjust or repair unit. Xxxx xxxxxx...
....) in place and working. Do not operate on the machine and in the operator manual. DO NOT operate mower unless guards are found on slopes over gravel and hard surfaces. DO NOT operate mower over 15O. - 5 - WARNING! Read the operator manual. Remove objects that you unplug, adjust or repair unit. Xxxx xxxxxx...

Operation Manual
Page 6
... light. • Never leave a running machine unattended. Avoid discharging material against a wall or obstruction. services this machine must first read and • Do not pull mower backwards while the understand this equipment come to a complete stop engine and remove ignition key before turning. • Operate the machine only in reverse unless...
... light. • Never leave a running machine unattended. Avoid discharging material against a wall or obstruction. services this machine must first read and • Do not pull mower backwards while the understand this equipment come to a complete stop engine and remove ignition key before turning. • Operate the machine only in reverse unless...

Operation Manual
Page 8
... injected into the skin must not be sure the equipment is in safe working condition. • Never tamper with manufacturer's recommended parts, when necessary. • Mower blades are stored in an open device. • If leaks arise in spaces lacking proper ventilation. Adjust and service as required. • • Maintain or...
... injected into the skin must not be sure the equipment is in safe working condition. • Never tamper with manufacturer's recommended parts, when necessary. • Mower blades are stored in an open device. • If leaks arise in spaces lacking proper ventilation. Adjust and service as required. • • Maintain or...
Operation Manual
Page 13
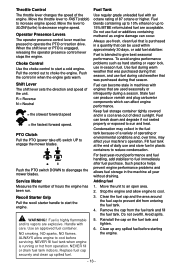
.... PTO Clutch Pull the PTO (power take off) switch UP to choke the engine. Fuel is blended to disengage the mower blades. Condensation may collect in a cool area out of direct sunlight. Adding fuel 1. Push the PTO switch DOWN to give best seasonal performance. Service Meter ...
.... PTO Clutch Pull the PTO (power take off) switch UP to choke the engine. Fuel is blended to disengage the mower blades. Condensation may collect in a cool area out of direct sunlight. Adding fuel 1. Push the PTO switch DOWN to give best seasonal performance. Service Meter ...

Operation Manual
Page 15
...hold levers in the neutral position. • To lock unit in neutral and release steering latch levers. • To move shift lever to engage mower. 6. Engage the operator presence control and move the shift lever to your mowing conditions. Lock steering levers in neutral. 2. NOTE: Operator presence control .... Mowing 1. Keep one hand on the operator presence control and move shift lever to the PTO belt, do not engage the PTO if the mower is plugged with grass or other material. 7. Stop Mowing 1. Hold steering levers against the handlebar and release the lock latches. 8. Put the...
...hold levers in the neutral position. • To lock unit in neutral and release steering latch levers. • To move shift lever to engage mower. 6. Engage the operator presence control and move the shift lever to your mowing conditions. Lock steering levers in neutral. 2. NOTE: Operator presence control .... Mowing 1. Keep one hand on the operator presence control and move shift lever to the PTO belt, do not engage the PTO if the mower is plugged with grass or other material. 7. Stop Mowing 1. Hold steering levers against the handlebar and release the lock latches. 8. Put the...
Operation Manual
Page 16
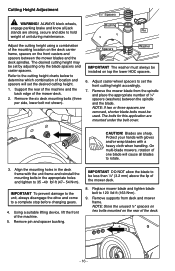
... mounting bolts in the appropriate holes and tighten to set the desired cutting height. 1. Using a suitable lifting device, lift the front of the mower deck. 2. Remove pin and spacer bushing. Adjust caster wheel spacers to 35 -40 lbf-ft (47- 54 N•m). Support the rear of...lip of one blade will set the front cutting height accordingly. 7. On multi-blade mowers, rotation of the mower deck. 8. IMPORTANT DO NOT allow the blade to hold weight of ¼" spacers (washers) between the mower blades and the deck spindles. Refer to the cutting height charts below to rotate....
... mounting bolts in the appropriate holes and tighten to set the desired cutting height. 1. Using a suitable lifting device, lift the front of the mower deck. 2. Remove pin and spacer bushing. Adjust caster wheel spacers to 35 -40 lbf-ft (47- 54 N•m). Support the rear of...lip of one blade will set the front cutting height accordingly. 7. On multi-blade mowers, rotation of the mower deck. 8. IMPORTANT DO NOT allow the blade to hold weight of ¼" spacers (washers) between the mower blades and the deck spindles. Refer to the cutting height charts below to rotate....
Operation Manual
Page 19
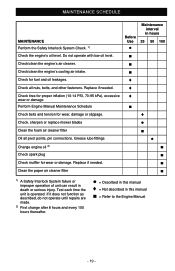
... operated. Grease lube fittings ● Change engine oil 2) ■ Check spark plug ■ Check muffler for wear, damage or slippage. ♦ Check, sharpen or replace mower blades ● Clean the foam air cleaner filter ■ Oil all nuts, bolts, and other fasteners. Replace if needed . ■ Clean the paper air cleaner...
... operated. Grease lube fittings ● Change engine oil 2) ■ Check spark plug ■ Check muffler for wear, damage or slippage. ♦ Check, sharpen or replace mower blades ● Clean the foam air cleaner filter ■ Oil all nuts, bolts, and other fasteners. Replace if needed . ■ Clean the paper air cleaner...

Operation Manual
Page 22
... possible. Put PTO lever in neutral. 2. Replacing Transmission Belt 1. Put the shift lever in the OFF position. Remove old transmission belt from mower clutch sheave. Slide idler pulley to the belt to hold the position. 3. Tighten the nut until the idler spring compresses to 17 lbf-ft... and turn the clutch stop , replace engine bolt, and torque both engine bolts to 2 in. ± 1/8 in gear Position 2 on mower clutch sheave. Turn the idler spring adjusting nut to tension the belt. Tighten the adjusting nut to relieve tension from the clutch. Loosen the two...
... possible. Put PTO lever in neutral. 2. Replacing Transmission Belt 1. Put the shift lever in the OFF position. Remove old transmission belt from mower clutch sheave. Slide idler pulley to the belt to hold the position. 3. Tighten the nut until the idler spring compresses to 17 lbf-ft... and turn the clutch stop , replace engine bolt, and torque both engine bolts to 2 in. ± 1/8 in gear Position 2 on mower clutch sheave. Turn the idler spring adjusting nut to tension the belt. Tighten the adjusting nut to relieve tension from the clutch. Loosen the two...

Operation Manual
Page 23
...to tension the belt. Protect your hands with gloves and/or wrap blades with a wooden block to relieve tension from deck sheaves and mower clutch sheave. 6. Turn off the engine, remove the ignition key and the ignition wire from deck sheaves. 5. Tighten the nut ...in . (5.1 cm ± .32 cm). 8. Blade Removal 1. Remove the bolts, blades and spacers (number of one blade will vary depending on deck sheaves and mower clutch sheave. 7. Remove deck cover. 3. Install new deck belt. 6. CAUTION! Blades are sharp. Replace deck cover. Remove deck belt. 4. Turn off the engine...
...to tension the belt. Protect your hands with gloves and/or wrap blades with a wooden block to relieve tension from deck sheaves and mower clutch sheave. 6. Turn off the engine, remove the ignition key and the ignition wire from deck sheaves. 5. Tighten the nut ...in . (5.1 cm ± .32 cm). 8. Blade Removal 1. Remove the bolts, blades and spacers (number of one blade will vary depending on deck sheaves and mower clutch sheave. 7. Remove deck cover. 3. Install new deck belt. 6. CAUTION! Blades are sharp. Replace deck cover. Remove deck belt. 4. Turn off the engine...

Operation Manual
Page 24
... a wooden block to 85 lbf-ft (115 N•m). 12. Tighten nut to prevent blade rotation. 3. Tighten bolt to a torque of mower blade moves downward, sharpen the heavy end until blade is bent or broken. 2. Remove the ignition wire from spindle housing. Discard bearing. 5....bearing and the housing is used under sandy soil conditions, replace blades when air lifts become eroded. • Blade is balanced. 4. Slide mower blade on the spindle shafts. 2. Install the upper bearing. 10. Nut Spacer Grease Fitting Washer Pulley Bearing Retaining Ring Housing Spacer Bearing ...
... a wooden block to 85 lbf-ft (115 N•m). 12. Tighten nut to prevent blade rotation. 3. Tighten bolt to a torque of mower blade moves downward, sharpen the heavy end until blade is bent or broken. 2. Remove the ignition wire from spindle housing. Discard bearing. 5....bearing and the housing is used under sandy soil conditions, replace blades when air lifts become eroded. • Blade is balanced. 4. Slide mower blade on the spindle shafts. 2. Install the upper bearing. 10. Nut Spacer Grease Fitting Washer Pulley Bearing Retaining Ring Housing Spacer Bearing ...

Operation Manual
Page 25
... to sit on caster yoke. Check metal clip in fuse window and discard fuse if clip is located on top of the height-of the mower deck. 3. Remove lynch pin, spacer bushings, washer and caster yoke and wheel assembly. 4. When replacing fuses use only 25-amp fuses to avoid damage to...
... to sit on caster yoke. Check metal clip in fuse window and discard fuse if clip is located on top of the height-of the mower deck. 3. Remove lynch pin, spacer bushings, washer and caster yoke and wheel assembly. 4. When replacing fuses use only 25-amp fuses to avoid damage to...
Operation Manual
Page 27
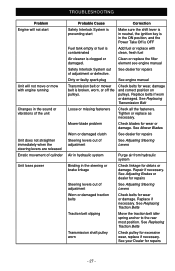
... repairs - 27 - See Replacing Traction Belts Check pulley for repairs Dirty or faulty spark plug See engine manual Transmission belt or mower belt is contaminated Add fuel or replace with engine running Changes in the sound or vibrations of the unit Unit does not straighten ...immediately when the steering levers are released Erratic movement of adjustment or defective. See dealer for excessive wear, replace if necessary. See Mower Blades Worn or damaged clutch See dealer for debris or damage. Replace if necessary. See Replacing Traction Belts Move the traction belt idler...
... repairs - 27 - See Replacing Traction Belts Check pulley for repairs Dirty or faulty spark plug See engine manual Transmission belt or mower belt is contaminated Add fuel or replace with engine running Changes in the sound or vibrations of the unit Unit does not straighten ...immediately when the steering levers are released Erratic movement of adjustment or defective. See dealer for excessive wear, replace if necessary. See Mower Blades Worn or damaged clutch See dealer for debris or damage. Replace if necessary. See Replacing Traction Belts Move the traction belt idler...
Operation Manual
Page 28
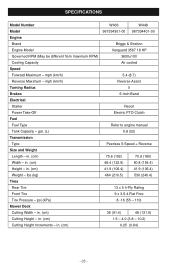
... Model Governed RPM (May be different from maximum RPM) Cooling Capacity Speed Forward Maximum - in . (cm) Width - psi (kPa) Mower Deck Cutting Width - in . (cm) Height - in . (cm) W436 967334301-00 W448 967334401-00 Briggs & Stratton Vanguard 3567 18 HP 3600±100 Air cooled 5.4 (8.7) Reverse Assist 0 6-Inch Band Recoil Electric PTO...
... Model Governed RPM (May be different from maximum RPM) Cooling Capacity Speed Forward Maximum - in . (cm) Width - psi (kPa) Mower Deck Cutting Width - in . (cm) Height - in . (cm) W436 967334301-00 W448 967334401-00 Briggs & Stratton Vanguard 3567 18 HP 3600±100 Air cooled 5.4 (8.7) Reverse Assist 0 6-Inch Band Recoil Electric PTO...

