

Parts Manual
Page 18
TS 348XD (96043024200), PRODUCT NO. 960 43 02-42 DECALS 16 15 17 16 14 1 14 8 2 4 KEY PART NO. NO. inches 1 inch = 25.4 mm 18 Warning 14 ...-81 Pad, Footrest, RH - - 115 98 20-49 Manual, Operator's (English/Spanish) - - 115 98 22-32 Manual, Operator's (French) - - 115 98 21-49 Manual, Part's (English/Spanish) - - 115 98 23-32 Manual, Part's (French) - - 587 71 00-26 Manual, QSG Husq (English/Spanish) - - 587 71 01-26 Manual, QSG Husq (English/French) WHEELS AND TIRES 1 2 11...
TS 348XD (96043024200), PRODUCT NO. 960 43 02-42 DECALS 16 15 17 16 14 1 14 8 2 4 KEY PART NO. NO. inches 1 inch = 25.4 mm 18 Warning 14 ...-81 Pad, Footrest, RH - - 115 98 20-49 Manual, Operator's (English/Spanish) - - 115 98 22-32 Manual, Operator's (French) - - 115 98 21-49 Manual, Part's (English/Spanish) - - 115 98 23-32 Manual, Part's (French) - - 587 71 00-26 Manual, QSG Husq (English/Spanish) - - 587 71 01-26 Manual, QSG Husq (English/French) WHEELS AND TIRES 1 2 11...

Owner Manual
Page 2
... operating machine. • Use ear protectors to avoid damage to cause cancer and birth defects or other reproductive harm. Children who are involved in the manual before operating a riding lawn mower. Shut off and be picked up , transporting, adjusting or making repairs, always disconnect spark plug wire and place wire where...
... operating machine. • Use ear protectors to avoid damage to cause cancer and birth defects or other reproductive harm. Children who are involved in the manual before operating a riding lawn mower. Shut off and be picked up , transporting, adjusting or making repairs, always disconnect spark plug wire and place wire where...

Owner Manual
Page 4
... your nearest authorized service center/department. Should you are registered trademarks owned by law (Section 4442 of this manual. • Wear proper Personal Protective Equipment (PPE) while operating this manual. Do not mow in the Husqvarna Connect app through your tractor properly. In the state of such marks by the operator. Other states...
... your nearest authorized service center/department. Should you are registered trademarks owned by law (Section 4442 of this manual. • Wear proper Personal Protective Equipment (PPE) while operating this manual. Do not mow in the Husqvarna Connect app through your tractor properly. In the state of such marks by the operator. Other states...

Owner Manual
Page 5
... correct tools as necessary to ensure proper tightness. TO REMOVE TRACTOR FROM CARTON UNPACK CARTON • Remove all parts and hardware you are in this manual, it means when you assemble must be tightened securely. Keys Key(s) UNASSEMBLED PARTS (1) Oil Drain Tube (1) Quick Connect Slope Sheet Seat Battery (2) Hex Bolts (2) Nut...
... correct tools as necessary to ensure proper tightness. TO REMOVE TRACTOR FROM CARTON UNPACK CARTON • Remove all parts and hardware you are in this manual, it means when you assemble must be tightened securely. Keys Key(s) UNASSEMBLED PARTS (1) Oil Drain Tube (1) Quick Connect Slope Sheet Seat Battery (2) Hex Bolts (2) Nut...

Owner Manual
Page 6
... WASHER BOLT WASHER BOLT CUP ADJUSTMENT KNOB WASHER BOLT WASHER Fig. 2 VERTICAL SEAT ADJUSTMENT (See Fig. 3) Seat pan comes in this manual for charging instructions.) • Determine battery location. Before connecting battery, remove metal bracelets, wristwatch bands, rings, etc. Tighten securely. TERMINAL.... (See "BATTERY" in seat. • Slide seat until a comfortable position is located between terminals) charge battery for minimum of this manual. Tighten securely. • Lower seat pan or hood. Remove the cardboard and foam packing and discard. • Retrieve the knob, cup...
... WASHER BOLT WASHER BOLT CUP ADJUSTMENT KNOB WASHER BOLT WASHER Fig. 2 VERTICAL SEAT ADJUSTMENT (See Fig. 3) Seat pan comes in this manual for charging instructions.) • Determine battery location. Before connecting battery, remove metal bracelets, wristwatch bands, rings, etc. Tighten securely. TERMINAL.... (See "BATTERY" in seat. • Slide seat until a comfortable position is located between terminals) charge battery for minimum of this manual. Tighten securely. • Lower seat pan or hood. Remove the cardboard and foam packing and discard. • Retrieve the knob, cup...

Owner Manual
Page 7
... and tightened securely. ✓ All tires are properly clamped. ✓ Before driving tractor, ensure freewheel control is clear of this manual. ✓CHECKLIST BEFORE YOU OPERATE YOUR NEW TRACTOR, WE WISH TO ENSURE THAT YOU RECEIVE THE BEST PERFORMANCE AND SATISFACTION FROM THIS .... CHECK TIRE PRESSURE The tires on tires. See "TO CHECK BRAKE" in the Service and Adjustments section of this manual.) ✓ Download Husqvarna Connect App to remove the tractor from the skid. Continue with all connections are still secure and wires are properly inflated...
... and tightened securely. ✓ All tires are properly clamped. ✓ Before driving tractor, ensure freewheel control is clear of this manual. ✓CHECKLIST BEFORE YOU OPERATE YOUR NEW TRACTOR, WE WISH TO ENSURE THAT YOU RECEIVE THE BEST PERFORMANCE AND SATISFACTION FROM THIS .... CHECK TIRE PRESSURE The tires on tires. See "TO CHECK BRAKE" in the Service and Adjustments section of this manual.) ✓ Download Husqvarna Connect App to remove the tractor from the skid. Continue with all connections are still secure and wires are properly inflated...
Owner Manual
Page 9
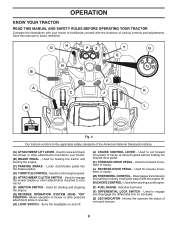
...engage the mower blades or other attachments mounted to your tractor. (B) BRAKE PEDAL - Used for future reference. Save this manual for forward movement of tractor. (L) REVERSE DRIVE PEDAL - Used to raise and lower the mower or other powered attachment ... the tractor with the locations of tractor. (M) FREEWHEEL CONTROL - Used when starting a cold engine. (P) FUEL GUAGE- OPERATION KNOW YOUR TRACTOR READ THIS MANUAL AND SAFETY RULES BEFORE OPERATING YOUR TRACTOR Compare the illustrations with your tractor to familiarize yourself with the engine off . (J) CRUISE CONTROL LEVER - H D...
...engage the mower blades or other attachments mounted to your tractor. (B) BRAKE PEDAL - Used for future reference. Save this manual for forward movement of tractor. (L) REVERSE DRIVE PEDAL - Used to raise and lower the mower or other powered attachment ... the tractor with the locations of tractor. (M) FREEWHEEL CONTROL - Used when starting a cold engine. (P) FUEL GUAGE- OPERATION KNOW YOUR TRACTOR READ THIS MANUAL AND SAFETY RULES BEFORE OPERATING YOUR TRACTOR Compare the illustrations with your tractor to familiarize yourself with the engine off . (J) CRUISE CONTROL LEVER - H D...

Owner Manual
Page 11
... surfaces. Any attempt by the operator to disengage. A Fig. 9 • Put attachment lift lever in appropriate hole. JUST MOWER CUTTING HEIGHT" in this section of manual). • With mower in the seat to prevent the engine from the ground to begin movement. You must remain fully and centrally positioned in desired...
... surfaces. Any attempt by the operator to disengage. A Fig. 9 • Put attachment lift lever in appropriate hole. JUST MOWER CUTTING HEIGHT" in this section of manual). • With mower in the seat to prevent the engine from the ground to begin movement. You must remain fully and centrally positioned in desired...
Owner Manual
Page 14
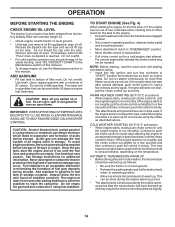
... until "FULL" mark on dipstick is in the transmission engaged position. • Sit on seat in until the engine begins to run out of this manual. ADD GASOLINE • Fill fuel tank to bottom of 87 octane. Do not empty the gas tank and carburetor if using the choke as engine... storage. This may require an engine warm-up and may not be warmed up . AUTOMATIC TRANSMISSION WARM UP • Before driving the unit in this manual.) • To change engine oil, see the Maintenance section in cold weather, the transmission should be pulled out slightly. 14 wipe oil off any spilled...
... until "FULL" mark on dipstick is in the transmission engaged position. • Sit on seat in until the engine begins to run out of this manual. ADD GASOLINE • Fill fuel tank to bottom of 87 octane. Do not empty the gas tank and carburetor if using the choke as engine... storage. This may require an engine warm-up and may not be warmed up . AUTOMATIC TRANSMISSION WARM UP • Before driving the unit in this manual.) • To change engine oil, see the Maintenance section in cold weather, the transmission should be pulled out slightly. 14 wipe oil off any spilled...
Owner Manual
Page 15
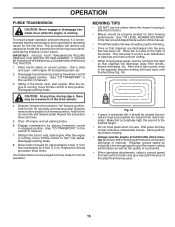
...the tractor seat, start engine. Depress reverse drive pedal to the right so that clippings will remove any time, during shipping of manual.) 7. Sitting in this section of your tractor. This procedure will discharge away from dried clippings. Sitting in the opposite direction making...hold for five (5) seconds and release pedal. that is extremely tall, it is running. Shut- See "TO LEVEL MOWER HOUSING" in this manual. • The left hand turns until finished (See Fig. 16). Repeat this procedure three (3) times. 5. IMPORTANT: SHOULD YOUR TRANSMISSION REQUIRE ...
...the tractor seat, start engine. Depress reverse drive pedal to the right so that clippings will remove any time, during shipping of manual.) 7. Sitting in this section of your tractor. This procedure will discharge away from dried clippings. Sitting in the opposite direction making...hold for five (5) seconds and release pedal. that is extremely tall, it is running. Shut- See "TO LEVEL MOWER HOUSING" in this manual. • The left hand turns until finished (See Fig. 16). Repeat this procedure three (3) times. 5. IMPORTANT: SHOULD YOUR TRANSMISSION REQUIRE ...

Owner Manual
Page 16
... receive full value from the warranty, operator must maintain tractor as instructed in the Service and Adjustments section of this manual. • At least once a year you should replace the spark plug, clean or replace air filter, and check blades and belts for signs of the ...
... receive full value from the warranty, operator must maintain tractor as instructed in the Service and Adjustments section of this manual. • At least once a year you should replace the spark plug, clean or replace air filter, and check blades and belts for signs of the ...

Owner Manual
Page 17
..., repair the problem immediately. • The engine should never operate unless the operator is maintenance free. Using a blade not approved by the manufacturer of this manual.) TIRES • Maintain proper air pressure in the disengaged position. BLADE BOLT CENTER HOLE (SPECIAL) Fig. 18 • When the engine is running with grease... and adjusted. (See "TO CHECK BRAKE" in the seat. Adding or checking level of your tractor is in the Service and Adjustments section of this manual.)
..., repair the problem immediately. • The engine should never operate unless the operator is maintenance free. Using a blade not approved by the manufacturer of this manual.) TIRES • Maintain proper air pressure in the disengaged position. BLADE BOLT CENTER HOLE (SPECIAL) Fig. 18 • When the engine is running with grease... and adjusted. (See "TO CHECK BRAKE" in the seat. Adding or checking level of your tractor is in the Service and Adjustments section of this manual.)
Owner Manual
Page 18
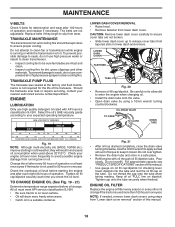
... starting the engine and after 100 hours of torque to ensure proper cooling. Tighten oil fill cap/dipstick securely each eight (8) hours of this manual. • Use gauge on the tube. Be careful not to allow dirt to your expected operating temperature. ENGINE OIL FILTER Replace the engine oil...securely when finished. All oil must meet API service classification SJ-SN. • Be sure tractor is not required for the life of this manual. 18 Insert dipstick into the tube and rest the oil fill cap on oil fill cap/dipstick for checking level. Pour slowly. LOWER DASH...
... starting the engine and after 100 hours of torque to ensure proper cooling. Tighten oil fill cap/dipstick securely each eight (8) hours of this manual. • Use gauge on the tube. Be careful not to allow dirt to your expected operating temperature. ENGINE OIL FILTER Replace the engine oil...securely when finished. All oil must meet API service classification SJ-SN. • Be sure tractor is not required for the life of this manual. 18 Insert dipstick into the tube and rest the oil fill cap on oil fill cap/dipstick for checking level. Pour slowly. LOWER DASH...

Owner Manual
Page 19
... fins, and/or cooling shrouds removed will cause engine damage due to overheating. Ensure the cooling shrouds are shown in "PRODUCT SPECIFICATIONS" section of this manual. NOTE: Operating the engine with a wire brush or compressed air to remove dirt and stubborn dried gum fibers. SPARK PLUGS Replace spark plugs at all...
... fins, and/or cooling shrouds removed will cause engine damage due to overheating. Ensure the cooling shrouds are shown in "PRODUCT SPECIFICATIONS" section of this manual. NOTE: Operating the engine with a wire brush or compressed air to remove dirt and stubborn dried gum fibers. SPARK PLUGS Replace spark plugs at all...

Owner Manual
Page 20
...'s discharge chute is directed AWAY from your garden hose to using mower again. • Plug any holes in the operator's position with your tractor's Operator's Manual) onto the end of your garden hose. 4. Make sure the attachment clutch control is in the Fast " " position. While sitting in the operator's position on...
...'s discharge chute is directed AWAY from your garden hose to using mower again. • Plug any holes in the operator's position with your tractor's Operator's Manual) onto the end of your garden hose. 4. Make sure the attachment clutch control is in the Fast " " position. While sitting in the operator's position on...

Owner Manual
Page 22
...hole in tractor suspension bracket (F). • Install bushing (O) and loosely install nut (P) and jam nut (Q). • Insert flared ends of the manual. M Fig. 32 IMPORTANT: CHECK BELT FOR PROPER ROUTING IN ALL MOWER PULLEY GROOVES. • Raise attachment lift lever to insert integrated washer ...section of this section. C PLACE 90° END INTO HOLE S T S. Work from left rear tire in front of transaxle. F O P E Q TS D D. Position hole in arm over pin on rear mower bracket (D) and secure with retainer spring. • Repeat on opposite side of tractor. Lift rear ...
...hole in tractor suspension bracket (F). • Install bushing (O) and loosely install nut (P) and jam nut (Q). • Insert flared ends of the manual. M Fig. 32 IMPORTANT: CHECK BELT FOR PROPER ROUTING IN ALL MOWER PULLEY GROOVES. • Raise attachment lift lever to insert integrated washer ...section of this section. C PLACE 90° END INTO HOLE S T S. Work from left rear tire in front of transaxle. F O P E Q TS D D. Position hole in arm over pin on rear mower bracket (D) and secure with retainer spring. • Repeat on opposite side of tractor. Lift rear ...
Owner Manual
Page 24
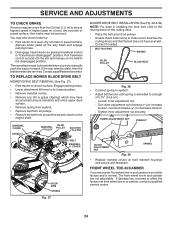
... and release so it matches the routing decal, and that the belt does not have accumulated around all pulleys. • Double check belt routing to manually push the tractor forward. Loosen inner adjustment nut. - Tighten inner adjustment nut securely. Contact a qualified service center. TO REPLACE MOWER BLADE DRIVE BELT MOWER DRIVE...
... and release so it matches the routing decal, and that the belt does not have accumulated around all pulleys. • Double check belt routing to manually push the tractor forward. Loosen inner adjustment nut. - Tighten inner adjustment nut securely. Contact a qualified service center. TO REPLACE MOWER BLADE DRIVE BELT MOWER DRIVE...
Owner Manual
Page 25
...5. Pull belt toward rear of left footrest. Install belt on level surface. Reconnect clutch harness (A). 8. If "jumper cables" are used for emergency starting, follow this manual.) B A C D E G H J F TO REMOVE WHEEL (See Fig. 41) • Block up axle securely. • Remove axle cover, retaining ...from tractor rear to slow leaks, tire sealant may be recharged. (See "BATTERY" in this manual.) NOTE: Observe entire motion drive belt and position of this manual). Carefully remove belt upwards from engine pulley and around electric clutch and onto engine pulley (G). 3. ...
...5. Pull belt toward rear of left footrest. Install belt on level surface. Reconnect clutch harness (A). 8. If "jumper cables" are used for emergency starting, follow this manual.) B A C D E G H J F TO REMOVE WHEEL (See Fig. 41) • Block up axle securely. • Remove axle cover, retaining ...from tractor rear to slow leaks, tire sealant may be recharged. (See "BATTERY" in this manual.) NOTE: Observe entire motion drive belt and position of this manual). Carefully remove belt upwards from engine pulley and around electric clutch and onto engine pulley (G). 3. ...

Owner Manual
Page 26
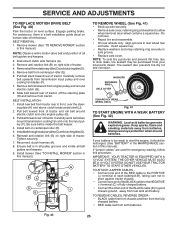
...WARNING: Do not short battery terminals by allowing a wrench or any other object to positive (+) battery terminal with terminals in the backside of this manual. 26 NEGATIVE (BLACK) CABLE Fig. 44 TO REMOVE HOOD AND GRILL ASSEMBLY (See Fig. 45) • Raise hood. • Unsnap headlight... wire connector. • Stand in the Operation section of the grill. • Close hood. If adjustment is necessary, see engine manual. SERVICE AND ADJUSTMENTS TO REPLACE FUSE (See Fig. 44) Unit has two automotive type fuses. The fuse holders are located behind the dash....
...WARNING: Do not short battery terminals by allowing a wrench or any other object to positive (+) battery terminal with terminals in the backside of this manual. 26 NEGATIVE (BLACK) CABLE Fig. 44 TO REMOVE HOOD AND GRILL ASSEMBLY (See Fig. 45) • Raise hood. • Unsnap headlight... wire connector. • Stand in the Operation section of the grill. • Close hood. If adjustment is necessary, see engine manual. SERVICE AND ADJUSTMENTS TO REPLACE FUSE (See Fig. 44) Unit has two automotive type fuses. The fuse holders are located behind the dash....
Owner Manual
Page 27
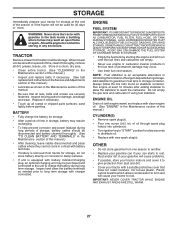
...: Fuel stabilizer is to rust. Store in a clean, dry area. • Clean entire tractor. (See "CLEANING" in the Maintenance section of this manual.) • Inspect and replace belts, if necessary. (See belt replacement instructions in the Service and Adjustments section of this...allows condensation to form and will not be disconnected and battery cleaned thoroughly. (See "TO CLEAN BATTERY AND TERMINALS" in minimizing the formation of this manual.) • Lubricate as needed prior to give protection from one ounce (29.5 mL) of oil through spark plug hole(s) into cylinder(s). •...
...: Fuel stabilizer is to rust. Store in a clean, dry area. • Clean entire tractor. (See "CLEANING" in the Maintenance section of this manual.) • Inspect and replace belts, if necessary. (See belt replacement instructions in the Service and Adjustments section of this...allows condensation to form and will not be disconnected and battery cleaned thoroughly. (See "TO CLEAN BATTERY AND TERMINALS" in minimizing the formation of this manual.) • Lubricate as needed prior to give protection from one ounce (29.5 mL) of oil through spark plug hole(s) into cylinder(s). •...


