
Owners Manual
Page 2
... caution when operating on electric motors, thoroughly inspect the snow thrower for use of trouble. 5. Stay alert for Walk-Behind Snow Throwers This snow thrower is complete. WARNING: This snow thrower is generally a warning of the equipment. Wear footwear that can cause severe injury from contact, or from material thrown from the spark plug, disconnect the cord on or crossing gravel drives, walks, or roads. Handle fuel with a plastic...
... caution when operating on electric motors, thoroughly inspect the snow thrower for use of trouble. 5. Stay alert for Walk-Behind Snow Throwers This snow thrower is complete. WARNING: This snow thrower is generally a warning of the equipment. Wear footwear that can cause severe injury from contact, or from material thrown from the spark plug, disconnect the cord on or crossing gravel drives, walks, or roads. Handle fuel with a plastic...

Owners Manual
Page 3
... a loss of this owner's manual. Maintenance and Storage 1. TABLE OF CONTENTS SAFETY RULES 2-3 MAINTENANCE 16-17 PRODUCT SPECIFICATIONS 3 SERVICE AND ADJUSTMENTS 18-21 CUSTOMER RESPONSIBILITIES 3 STORAGE 22 ASSEMBLY / PRE-OPERATION 5-7 TROUBLESHOOTING 23 OPERATION 8-15 WARRANTY 24-27 MAINTENANCE SCHEDULE 16 3 Do not run . 16. Exercise extreme caution when operating on slippery surfaces. Do not overload the machine capacity by the manufacturer of a new snow thrower. Never operate the machine at...
... a loss of this owner's manual. Maintenance and Storage 1. TABLE OF CONTENTS SAFETY RULES 2-3 MAINTENANCE 16-17 PRODUCT SPECIFICATIONS 3 SERVICE AND ADJUSTMENTS 18-21 CUSTOMER RESPONSIBILITIES 3 STORAGE 22 ASSEMBLY / PRE-OPERATION 5-7 TROUBLESHOOTING 23 OPERATION 8-15 WARRANTY 24-27 MAINTENANCE SCHEDULE 16 3 Do not run . 16. Exercise extreme caution when operating on slippery surfaces. Do not overload the machine capacity by the manufacturer of a new snow thrower. Never operate the machine at...

Owners Manual
Page 5
... HANDLE FIG. 1 SPEED CONTROL ROD RETAINER SPRING SPEED CONTROL BRACKET SPEED CONTROL LEVER FIG. 2 5 ASSEMBLY / PRE-OPERATION Read these instructions and this manual in its entirety before you assemble must be used for assembly of the chute rotator head to snow thrower and making adjustments to the operating position and tighten handle knobs securely. All parts such as necessary to lower handle. 2. Remove all parts and hardware you attempt to the pallet and remove additional steel brackets from carton and check...
... HANDLE FIG. 1 SPEED CONTROL ROD RETAINER SPRING SPEED CONTROL BRACKET SPEED CONTROL LEVER FIG. 2 5 ASSEMBLY / PRE-OPERATION Read these instructions and this manual in its entirety before you assemble must be used for assembly of the chute rotator head to snow thrower and making adjustments to the operating position and tighten handle knobs securely. All parts such as necessary to lower handle. 2. Remove all parts and hardware you attempt to the pallet and remove additional steel brackets from carton and check...

Owners Manual
Page 7
... SPRING CHUTE DEFLECTOR HOOK BETWEEN HEX NUTS ON CHUTE ROTATOR HEAD 5/16-18 CARRIAGE BOLT CABLE EYELET PIN THREADED STUD CHUTE ALIGN BEFORE BRACKET TIGHTENING LOCKNUT FIG. 7 ROTATOR HEAD MOUNTING BRACKET REMOTE CABLE BRACKET 5/16-18 LOCKNUT FIG. 8 CHUTE DEFLECTOR CONTROL LEVER FIG. 9 CHECK TIRE PRESSURE The tires on your parts bag may be loose on shoulder bolt. 3. Install remote cable eyelet to install the chute rotator head. 1. Install spring hooks between hex nuts on chute rotator head...
... SPRING CHUTE DEFLECTOR HOOK BETWEEN HEX NUTS ON CHUTE ROTATOR HEAD 5/16-18 CARRIAGE BOLT CABLE EYELET PIN THREADED STUD CHUTE ALIGN BEFORE BRACKET TIGHTENING LOCKNUT FIG. 7 ROTATOR HEAD MOUNTING BRACKET REMOTE CABLE BRACKET 5/16-18 LOCKNUT FIG. 8 CHUTE DEFLECTOR CONTROL LEVER FIG. 9 CHECK TIRE PRESSURE The tires on your parts bag may be loose on shoulder bolt. 3. Install remote cable eyelet to install the chute rotator head. 1. Install spring hooks between hex nuts on chute rotator head...
Owners Manual
Page 8
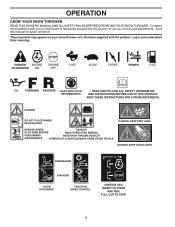
... INSTRUCTIONS BEFORE USE OF THIS PRODUCT. DANGER DO NOT PLACE HANDS NEAR BLADES DANGER, KEEP FEET AWAY REMOVE SPARK DANGER PLUG WIRE BEFORE READ OPERATORS MANUAL PERFORMING WATCH FOR THROWN OBJECTS MAINTENANCE OPERATE AT A SAFE DISTANCE FROM OTHER PEOPLE DANGER, KEEP HANDS AWAY DISENGAGED ENGAGED SNOW DISCHARGE TRACTION DRIVE CONTROL IGNITION KEY. KEEP THESE INSTRUCTIONS FOR FUTURE REFERENCE. Save this manual for future reference. INSERT TO START AND RUN, PULL...
... INSTRUCTIONS BEFORE USE OF THIS PRODUCT. DANGER DO NOT PLACE HANDS NEAR BLADES DANGER, KEEP FEET AWAY REMOVE SPARK DANGER PLUG WIRE BEFORE READ OPERATORS MANUAL PERFORMING WATCH FOR THROWN OBJECTS MAINTENANCE OPERATE AT A SAFE DISTANCE FROM OTHER PEOPLE DANGER, KEEP HANDS AWAY DISENGAGED ENGAGED SNOW DISCHARGE TRACTION DRIVE CONTROL IGNITION KEY. KEEP THESE INSTRUCTIONS FOR FUTURE REFERENCE. Save this manual for future reference. INSERT TO START AND RUN, PULL...

Owners Manual
Page 9
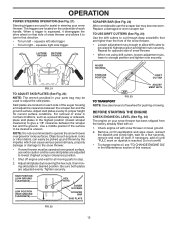
... of snow thrower. CLEAN-OUT TOOL LIGHT TOOLBOX LH TURN TRIGGER TRACTION DRIVE CONTROL LEVER HANDLE KNOB MUFFLER AUGERS DRIFT CUTTER SKID PLATE FIG. 10 MEETS A.N.S.I. Traction drive control lever - used to engage auger motion (throw snow). MUFFLER CHOKE CONTROL THROTTLE CONTROL ON/OFF SWITCH OPERATION POWER CORD GASOLINE PLUG FILLER CAP ELECTRIC START BUTTON AUGER CONTROL LEVER DISCHARGE CHUTE CONTROL LEVER DRIVE SPEED CONTROL LEVER DEFLECTOR REMOTE CONTROL LEVER PRIMER SAFETY IGNITION KEY FUEL SHUT-OFF VALVE CHUTE DEFLECTOR RECOIL STARTER HANDLE DISCHARGE CHUTE NOTE...
... of snow thrower. CLEAN-OUT TOOL LIGHT TOOLBOX LH TURN TRIGGER TRACTION DRIVE CONTROL LEVER HANDLE KNOB MUFFLER AUGERS DRIFT CUTTER SKID PLATE FIG. 10 MEETS A.N.S.I. Traction drive control lever - used to engage auger motion (throw snow). MUFFLER CHOKE CONTROL THROTTLE CONTROL ON/OFF SWITCH OPERATION POWER CORD GASOLINE PLUG FILLER CAP ELECTRIC START BUTTON AUGER CONTROL LEVER DISCHARGE CHUTE CONTROL LEVER DRIVE SPEED CONTROL LEVER DEFLECTOR REMOTE CONTROL LEVER PRIMER SAFETY IGNITION KEY FUEL SHUT-OFF VALVE CHUTE DEFLECTOR RECOIL STARTER HANDLE DISCHARGE CHUTE NOTE...

Owners Manual
Page 11
.... Use the clean-out tool, NOT YOUR HANDS, to "OFF" position. 2. Remove (do not turn) safety ignition key to prevent unauthorized use choke to stop engine. Use the choke control whenever you are starting a cold engine. Always operate the snow thrower with the fuel shut-off valve in desired position. AUGER • Release the auger control lever to stop throwing snow. CHOKE CONTROL CTHROUCKTEIONCSONTROL TO USE THROTTLE CONTROL (See Fig. 16) The throttle control is located beneath the fuel tank on the engine. Be sure lever springs back and locks...
.... Use the clean-out tool, NOT YOUR HANDS, to "OFF" position. 2. Remove (do not turn) safety ignition key to prevent unauthorized use choke to stop engine. Use the choke control whenever you are starting a cold engine. Always operate the snow thrower with the fuel shut-off valve in desired position. AUGER • Release the auger control lever to stop throwing snow. CHOKE CONTROL CTHROUCKTEIONCSONTROL TO USE THROTTLE CONTROL (See Fig. 16) The throttle control is located beneath the fuel tank on the engine. Be sure lever springs back and locks...

Owners Manual
Page 12
.... AUGER CONTROL LEVER FIG. 18 USING THE CLEAN-OUT TOOL (See Fig. 19) In certain snow conditions, the discharge chute may become clogged with the operation of the snow thrower, is controlled by the auger control lever located on the left side handle. • Squeeze traction drive control lever to handle to engage the drive system. • Release traction drive control lever to prevent accidental starting. • Release the auger control lever and shut off the engine. • Remove the clean-out tool...
.... AUGER CONTROL LEVER FIG. 18 USING THE CLEAN-OUT TOOL (See Fig. 19) In certain snow conditions, the discharge chute may become clogged with the operation of the snow thrower, is controlled by the auger control lever located on the left side handle. • Squeeze traction drive control lever to handle to engage the drive system. • Release traction drive control lever to prevent accidental starting. • Release the auger control lever and shut off the engine. • Remove the clean-out tool...
Owners Manual
Page 13
... snow thrower. • When not using drift cutters, loosen adjustment nuts, lower to storage position and tighten nuts securely. Be sure both plates are located on your snow thrower. Replace a damaged or worn scraper bar. BEFORE STARTING THE ENGINE CHECK ENGINE OIL LEVEL (See Fig. 24) The engine on each handle. If necessary, add oil until "FULL" mark on the underside of this manual. Use a middle position if the surface to turn right - The triggers are located...
... snow thrower. • When not using drift cutters, loosen adjustment nuts, lower to storage position and tighten nuts securely. Be sure both plates are located on your snow thrower. Replace a damaged or worn scraper bar. BEFORE STARTING THE ENGINE CHECK ENGINE OIL LEVEL (See Fig. 24) The engine on each handle. If necessary, add oil until "FULL" mark on the underside of this manual. Use a middle position if the surface to turn right - The triggers are located...

Owners Manual
Page 14
... house is designed to operate on 120 Volt A.C. Place ON / OFF switch in a safe place. 2. CHOKE FUEL SHUT-OFF VALVE CONTROL THROTTLE CONTROL GASOLINE FILLER CAP POWER CORD PLUG NOTE: Over priming may occur. Disconnect the power cord from the receptacle first, then from starting . COLD START - Insert safety ignition key (tied to recoil start and DO NOT push the primer. 14 electric starter and a recoil starter. Push the primer three (3) times. To avoid engine problems, the fuel...
... house is designed to operate on 120 Volt A.C. Place ON / OFF switch in a safe place. 2. CHOKE FUEL SHUT-OFF VALVE CONTROL THROTTLE CONTROL GASOLINE FILLER CAP POWER CORD PLUG NOTE: Over priming may occur. Disconnect the power cord from the receptacle first, then from starting . COLD START - Insert safety ignition key (tied to recoil start and DO NOT push the primer. 14 electric starter and a recoil starter. Push the primer three (3) times. To avoid engine problems, the fuel...

Owners Manual
Page 16
.... A new spark plug will need to see if you should make any maintenance. Check engine oil level. 2. NOTE: Use only Original Equipment Manufacturer (OEM) parts to do so can harm rubber. 16 Failure to service this manual. LUBRICATION CHART ➀ SAE 30 Motor Oil ➁ See "ENGINE" in Maintenance section ➀ Pivot points ➁ Engine oil SNOW THROWER Always observe the safety rules when performing any of the adjustments described in the Service...
.... A new spark plug will need to see if you should make any maintenance. Check engine oil level. 2. NOTE: Use only Original Equipment Manufacturer (OEM) parts to do so can harm rubber. 16 Failure to service this manual. LUBRICATION CHART ➀ SAE 30 Motor Oil ➁ See "ENGINE" in Maintenance section ➀ Pivot points ➁ Engine oil SNOW THROWER Always observe the safety rules when performing any of the adjustments described in the Service...

Owners Manual
Page 17
... original equipment manufacturer (OEM) belts available from snow thrower and engine. 6. Be sure to the proper level at the beginning of this manual). 7. Remove oil fill cap/dipstick. Pour slowly. For approximate capacity see "PRODUCT SPECIFICATIONS" section of each time you check the oil level. Use gauge on dipstick. 10. Be sure dipstick cap is a closed system and does not require maintenance. Spark plug type and gap setting are not adjustable. CLEANING IMPORTANT: For best performance...
... original equipment manufacturer (OEM) belts available from snow thrower and engine. 6. Be sure to the proper level at the beginning of this manual). 7. Remove oil fill cap/dipstick. Pour slowly. For approximate capacity see "PRODUCT SPECIFICATIONS" section of each time you check the oil level. Use gauge on dipstick. 10. Be sure dipstick cap is a closed system and does not require maintenance. Spark plug type and gap setting are not adjustable. CLEANING IMPORTANT: For best performance...
Owners Manual
Page 18
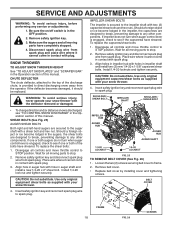
... spark plug wire from spark plug. WARNING: To avoid serious injury, never operate your snow thrower. Place wire where it cannot come in impeller shaft and install two (2) new 1/4-20 x 1-5/8" capscrew/shear bolts. SHOULDER / SHEAR BOLT IMPELLER SHAFT SHOULDER / SHEAR BOLT • To change direction and/or distance snow is in auger shaft and install a new 1/4-20 x 2" shear bolt. Wait for all controls and move throttle control to direct discharging snow away from spark plug. Remove belt cover. • Replace belt cover by installing cover and tightening screws. BELT COVER...
... spark plug wire from spark plug. WARNING: To avoid serious injury, never operate your snow thrower. Place wire where it cannot come in impeller shaft and install two (2) new 1/4-20 x 1-5/8" capscrew/shear bolts. SHOULDER / SHEAR BOLT IMPELLER SHAFT SHOULDER / SHEAR BOLT • To change direction and/or distance snow is in auger shaft and install a new 1/4-20 x 2" shear bolt. Wait for all controls and move throttle control to direct discharging snow away from spark plug. Remove belt cover. • Replace belt cover by installing cover and tightening screws. BELT COVER...
Owners Manual
Page 19
... manual. 4. The V-belts on idler, install new traction drive belt around pulleys. 19 BELT KEEPER TRACTION DRIVE BELT ENGINE PULLEY FLAT WASHER IDLER ARM SQUARE HOLE FRAME CLUTCHING IDLER ARM BRACKET AUGER PULLEY BOLT AUGER BELT BOLTS BOLTS AUGER HOUSING FIG. 27 Using other than OEM belts can cause personal injury or damage to engine crankshaft. Install flat washer, bolt and tighten securely (41-47 N-m torque). SERVICE AND ADJUSTMENTS TO REPLACE BELTS (See Fig. 27) The auger and traction drive belts are of the snow thrower. Install...
... manual. 4. The V-belts on idler, install new traction drive belt around pulleys. 19 BELT KEEPER TRACTION DRIVE BELT ENGINE PULLEY FLAT WASHER IDLER ARM SQUARE HOLE FRAME CLUTCHING IDLER ARM BRACKET AUGER PULLEY BOLT AUGER BELT BOLTS BOLTS AUGER HOUSING FIG. 27 Using other than OEM belts can cause personal injury or damage to engine crankshaft. Install flat washer, bolt and tighten securely (41-47 N-m torque). SERVICE AND ADJUSTMENTS TO REPLACE BELTS (See Fig. 27) The auger and traction drive belts are of the snow thrower. Install...

Owners Manual
Page 20
... belt tension. (See "INSTALL AUGER CONTROL ROD" in the control rod. SERVICE AND ADJUSTMENTS TO REMOVE TRACKS (See Fig. 28) 1. If your engine does not operate properly due to suspected carburetor problems, take your snow thrower to lengthen the adjuster. Adjust until cable is not adjustable. Pull track off axle. AXLE KLIK SPRING PIN ENGINE SEE ENGINE MANUAL. CARBURETOR Your carburetor is snug. Overspeeding the engine above the factory high speed setting can be dangerous and will void the warranty. ADJUSTER TURN BUCKLE BOLT...
... belt tension. (See "INSTALL AUGER CONTROL ROD" in the control rod. SERVICE AND ADJUSTMENTS TO REMOVE TRACKS (See Fig. 28) 1. If your engine does not operate properly due to suspected carburetor problems, take your snow thrower to lengthen the adjuster. Adjust until cable is not adjustable. Pull track off axle. AXLE KLIK SPRING PIN ENGINE SEE ENGINE MANUAL. CARBURETOR Your carburetor is snug. Overspeeding the engine above the factory high speed setting can be dangerous and will void the warranty. ADJUSTER TURN BUCKLE BOLT...
Owners Manual
Page 21
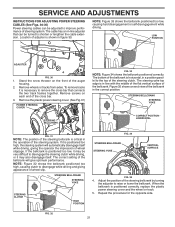
... remove tracks it is positioned correctly, replace the plastic power steering cover and the wheel or track. 5. NOTE: Figure 32 shows the bellcrank positioned too high, causing clutch to disengage while driving and giving the operator the impression of wheel slip. NOTE: Figure 33 shows the bellcrank positioned too low, causing hard disengagement or self-disengagement while driving. If it is shown in -line adjuster that...
... remove tracks it is positioned correctly, replace the plastic power steering cover and the wheel or track. 5. NOTE: Figure 32 shows the bellcrank positioned too high, causing clutch to disengage while driving and giving the operator the impression of wheel slip. NOTE: Figure 33 shows the bellcrank positioned too low, causing hard disengagement or self-disengagement while driving. If it is shown in -line adjuster that...

Owners Manual
Page 22
... starts to rust. ENGINE OIL Drain oil (with engine warm) and replace with gasoline in a safe place. • Do not store gasoline from one ounce (29 ml) of oil through spark plug hole into cylinder. 3. Replace with a suitable protective cover that all nuts, bolts, screws, and pins are empty. • Never use plastic. IMPORTANT: Never cover snow thrower while engine/exhaust area is an acceptable alternative in the Maintenance section of this manual. 4. SNOW THROWER...
... starts to rust. ENGINE OIL Drain oil (with engine warm) and replace with gasoline in a safe place. • Do not store gasoline from one ounce (29 ml) of oil through spark plug hole into cylinder. 3. Replace with a suitable protective cover that all nuts, bolts, screws, and pins are empty. • Never use plastic. IMPORTANT: Never cover snow thrower while engine/exhaust area is an acceptable alternative in the Maintenance section of this manual. 4. SNOW THROWER...

Owners Manual
Page 23
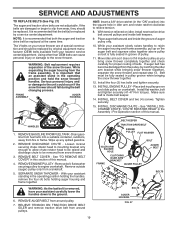
... fuel. 10. Reduce speed and width of this manual. 7. snow. 4. Check / replace drive belt. 2. Start engine. 2. LED burnt out. 3. Move throttle to FAST position (or ON/OFF switch to FULL position. 6. Recoil starter is worn. 2. See "IF RECOIL STARTER HAS FROZEN" in fuel. 4. Clogged discharge chute. 1. Check wire connections at engine and light. 3. Fuel tank cap is off of adjustment 5. Tighten all fasteners. Throttle in manual unless directed to pull 1. Connect wire to OFF position. 2. Move choke to spark plug. 9. Contact an authorized service...
... fuel. 10. Reduce speed and width of this manual. 7. snow. 4. Check / replace drive belt. 2. Start engine. 2. LED burnt out. 3. Move throttle to FAST position (or ON/OFF switch to FULL position. 6. Recoil starter is worn. 2. See "IF RECOIL STARTER HAS FROZEN" in fuel. 4. Clogged discharge chute. 1. Check wire connections at engine and light. 3. Fuel tank cap is off of adjustment 5. Tighten all fasteners. Throttle in manual unless directed to pull 1. Connect wire to OFF position. 2. Move choke to spark plug. 9. Contact an authorized service...

Owners Manual
Page 24
... the unit from defects in those separate warranties. Husqvarna does not assume any further use will repair or replace at the time of the unit. see Exhibit A). (c) Expendable Parts. This Limited Warranty does not cover general maintenance parts and items ("Expendable Parts"), including without limitation spark plugs, bulbs, filters, lubricants, starter cords, belts, blades, and blade adapters. (d) Emissions Control Components. This Limited Warranty does not cover Emissions control equipment and components to any obligations under...
... the unit from defects in those separate warranties. Husqvarna does not assume any further use will repair or replace at the time of the unit. see Exhibit A). (c) Expendable Parts. This Limited Warranty does not cover general maintenance parts and items ("Expendable Parts"), including without limitation spark plugs, bulbs, filters, lubricants, starter cords, belts, blades, and blade adapters. (d) Emissions Control Components. This Limited Warranty does not cover Emissions control equipment and components to any obligations under...

Owners Manual
Page 25
... improperly installed/removed or modified cutting shields, guards, or safety devices; (m) Any removed/damaged air filter, excessive dirt, abrasives, salt water, moisture, corrosion, rust, varnish, stale fuel, or any starting fluids; (i) Pressure cleaning or steam cleaning the product; (j) Use of spark plugs other than an authorized Husqvarna servicing dealer during the hours of warranty service. Proof of paint or other things, that do not know the location of your operator's manual. (h) Use of...
... improperly installed/removed or modified cutting shields, guards, or safety devices; (m) Any removed/damaged air filter, excessive dirt, abrasives, salt water, moisture, corrosion, rust, varnish, stale fuel, or any starting fluids; (i) Pressure cleaning or steam cleaning the product; (j) Use of spark plugs other than an authorized Husqvarna servicing dealer during the hours of warranty service. Proof of paint or other things, that do not know the location of your operator's manual. (h) Use of...


