

Owner Manual
Page 3
... 4 Good service 4 Serial Number 4 Symbols and Decals 6 Decal Locations 7 Safety 8 General Use 8 Preparations 9 Operating 10 Movement/Transport 11 Storage 11 Children 11 Fuel System 12 Maintenance 13 Assembly/Controls 14 Controls 15 Engine 16 Fueling 16 Cutting Unit 16 Depth Lever 16 Clutch 16 Blade versatility 17 Flail Blades 17 Delta Blades 17 Spring Tines 17 Operation 18 Before Starting 18 Dethatching 18 Finishing 18 Seed Application 19 Preparing the Lawn 19 Seed...
... 4 Good service 4 Serial Number 4 Symbols and Decals 6 Decal Locations 7 Safety 8 General Use 8 Preparations 9 Operating 10 Movement/Transport 11 Storage 11 Children 11 Fuel System 12 Maintenance 13 Assembly/Controls 14 Controls 15 Engine 16 Fueling 16 Cutting Unit 16 Depth Lever 16 Clutch 16 Blade versatility 17 Flail Blades 17 Delta Blades 17 Spring Tines 17 Operation 18 Before Starting 18 Dethatching 18 Finishing 18 Seed Application 19 Preparing the Lawn 19 Seed...
Owner Manual
Page 4
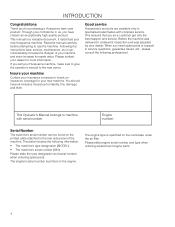
... give the operator's manual to use , service, maintenance, etc.) can be found on the printed plate attached to check on the crankcase under the air filter. The engine's serial number is a valuable document. Through your confidence in us, you as a customer get only the best support and service. Before the machine was delivered it underwent inspection and was adjusted by your new Husqvarna machine. The engine type is specified...
... give the operator's manual to use , service, maintenance, etc.) can be found on the printed plate attached to check on the crankcase under the air filter. The engine's serial number is a valuable document. Through your confidence in us, you as a customer get only the best support and service. Before the machine was delivered it underwent inspection and was adjusted by your new Husqvarna machine. The engine type is specified...

Owner Manual
Page 5
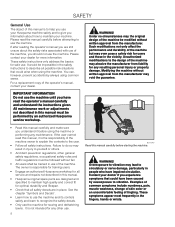
... you in the safe operation and proper maintenance of your dealer or Husqvarna if additional information is required. Call your Husqvarna equipment. Safety Procedures DO • Read all maintenance and service instructions before attempting work. • Read engine manufacturer's operating and maintenance instructions. • Remove spark plug wire before commencing service. • Before starting, inspect the lawn and remove rocks, wire, string and other than grass. • Do not operate on slopes exceeding...
... you in the safe operation and proper maintenance of your dealer or Husqvarna if additional information is required. Call your Husqvarna equipment. Safety Procedures DO • Read all maintenance and service instructions before attempting work. • Read engine manufacturer's operating and maintenance instructions. • Remove spark plug wire before commencing service. • Before starting, inspect the lawn and remove rocks, wire, string and other than grass. • Do not operate on slopes exceeding...
Owner Manual
Page 8
... accidents by an authorized Husqvarna service workshop. • Read this manual carefully and make sure you understand it is responsible for training users. • Engage an authorized Husqvarna workshop for all service and repairs not described in the fingers, hands or wrists. The owner is the responsibility of tingling. WARNING! Please read the operator's manual carefully and understand the instructions given.
... accidents by an authorized Husqvarna service workshop. • Read this manual carefully and make sure you understand it is responsible for training users. • Engage an authorized Husqvarna workshop for all service and repairs not described in the fingers, hands or wrists. The owner is the responsibility of tingling. WARNING! Please read the operator's manual carefully and understand the instructions given.

Owner Manual
Page 11
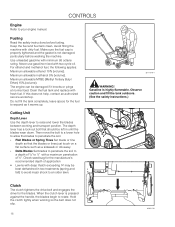
... 8011-038-1 Children Serious accidents can come in contact with approved fasteners, such as tension belts, chains or rope. Storage • Allow the engine to be on the back wheels. • Turn off the machine if children enter the work area. 8011-039-1 11 Never store the ... handle. • Be careful and use safe lifting and moving techniques when loading/unloading the machine. • We recommend having two people to operate the machine. • Be particularly careful near a open flame. • Store the machine with the fuel valve closed. • Store the machine and fuel...
... 8011-038-1 Children Serious accidents can come in contact with approved fasteners, such as tension belts, chains or rope. Storage • Allow the engine to be on the back wheels. • Turn off the machine if children enter the work area. 8011-039-1 11 Never store the ... handle. • Be careful and use safe lifting and moving techniques when loading/unloading the machine. • We recommend having two people to operate the machine. • Be particularly careful near a open flame. • Store the machine with the fuel valve closed. • Store the machine and fuel...

Owner Manual
Page 12
... started until it was filled. • Turn off the fuel supply for the fuel to expand and overflow. • Avoid overfilling. If you spill gasoline on the machine, wipe up the spill and wait until the problem has been resolved. • Check the fuel level before starting the engine. Close the fuel valve. 8011-037-1 8011-036 Fueling always poses an element of sparks...
... started until it was filled. • Turn off the fuel supply for the fuel to expand and overflow. • Avoid overfilling. If you spill gasoline on the machine, wipe up the spill and wait until the problem has been resolved. • Check the fuel level before starting the engine. Close the fuel valve. 8011-037-1 8011-036 Fueling always poses an element of sparks...
Owner Manual
Page 13
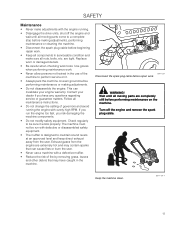
... before making adjustments, performing maintenance or cleaning the machine. • Disconnect the spark plug cable before performing maintenance or making adjustments. • Do not disassemble the engine. Exhaust gases from the user. Wait until all moving parts are tight. Replace worn or damaged decals. • Be careful when checking work . • Keep all components in serviceable condition and make adjustments with overly high RPM. Use gloves when...
... before making adjustments, performing maintenance or cleaning the machine. • Disconnect the spark plug cable before performing maintenance or making adjustments. • Do not disassemble the engine. Exhaust gases from the user. Wait until all moving parts are tight. Replace worn or damaged decals. • Be careful when checking work . • Keep all components in serviceable condition and make adjustments with overly high RPM. Use gloves when...

Owner Manual
Page 14
... oil. Idle speed is 3600 RPM. Engine Oil refill 2. Test the clutch. Clutch cable 3. Depth lever 6. Maximum engine speed is 1250-1400 RPM. Clutch bail 4. Engine 5. Shaft guard 9. Make sure that the clutch expansion spring disengages 6.35 mm (¼") easily. 4. The engine RPM is not within these limits. 3 2 7 6 5 4 9 1 8 1. Belt shield 14 See the engine manual for collapsible handle 7. assembly/CONTROLS 1. See section "Lubrication/ Engine oil". 3. Handle 8. Rotate the handle and tighten it in place. 2. Knob for instructions on adjusting...
... oil. Idle speed is 3600 RPM. Engine Oil refill 2. Test the clutch. Clutch cable 3. Depth lever 6. Maximum engine speed is 1250-1400 RPM. Clutch bail 4. Engine 5. Shaft guard 9. Make sure that the clutch expansion spring disengages 6.35 mm (¼") easily. 4. The engine RPM is not within these limits. 3 2 7 6 5 4 9 1 8 1. Belt shield 14 See the engine manual for collapsible handle 7. assembly/CONTROLS 1. See section "Lubrication/ Engine oil". 3. Handle 8. Rotate the handle and tighten it in place. 2. Knob for instructions on adjusting...
Owner Manual
Page 16
...: Maximum allowable ethanol 10% (volume). Drain the fuel tank and replace with two-cycle oil. Gasoline is not damaged, particularly before fueling. Make sure the fuel cap is properly tightened and the gasket is highly flammable. When the clutch lever is pressed against the handle, the blades begin to your engine manual. CONTROLS Engine Refer to rotate. The depth lever has a lock-out bolt that the blades or tines just touch on...
...: Maximum allowable ethanol 10% (volume). Drain the fuel tank and replace with two-cycle oil. Gasoline is not damaged, particularly before fueling. Make sure the fuel cap is properly tightened and the gasket is highly flammable. When the clutch lever is pressed against the handle, the blades begin to your engine manual. CONTROLS Engine Refer to rotate. The depth lever has a lock-out bolt that the blades or tines just touch on...
Owner Manual
Page 18
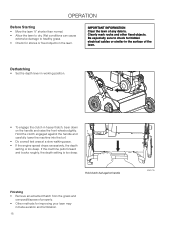
... pace. • If the engine speed drops excessively, the depth setting is too deep. Wet conditions can cause extensive damage to healthy grass. • Check for hidden electrical cables or similar in heavy thatch, bear down on the handle and raise the front wheels slightly. Dethatching • Set the depth lever in working position. • To engage the clutch in the surface of...
... pace. • If the engine speed drops excessively, the depth setting is too deep. Wet conditions can cause extensive damage to healthy grass. • Check for hidden electrical cables or similar in heavy thatch, bear down on the handle and raise the front wheels slightly. Dethatching • Set the depth lever in working position. • To engage the clutch in the surface of...

Owner Manual
Page 19
... bag is run. Bagger Attachment and Removal To attach bagger, place foot on seeder 8060-021 2 1 1. Set the bagger onto the door and up to cover the rear opening until door is spring loaded and will flip up against the chute. 1 2 3 1. OPEN/CLOSE lever Set application per chart and turn the seeder dial to the desired sowing setting. quantities of old grass cuttings (thatch...
... bag is run. Bagger Attachment and Removal To attach bagger, place foot on seeder 8060-021 2 1 1. Set the bagger onto the door and up to cover the rear opening until door is spring loaded and will flip up against the chute. 1 2 3 1. OPEN/CLOSE lever Set application per chart and turn the seeder dial to the desired sowing setting. quantities of old grass cuttings (thatch...
Owner Manual
Page 20
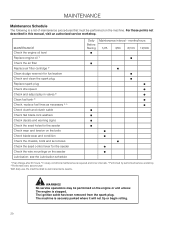
... belts Check blade wear and condition Check the chassis, bolts and set screws Check the seed control lever for the seeder Check the wire mountings on the seeder Lubrication; see the Lubrication schedule Daily Before Staring ● ● Maintenance interval - With daily use, the machine shall be performed on the machine. The ignition cable has been removed from the spark plug. No service operations may be lubricated twice weekly. MAINTENANCE Check the engine oil level Replace engine oil 1) Check the air filter Replace air filter...
... belts Check blade wear and condition Check the chassis, bolts and set screws Check the seed control lever for the seeder Check the wire mountings on the seeder Lubrication; see the Lubrication schedule Daily Before Staring ● ● Maintenance interval - With daily use, the machine shall be performed on the machine. The ignition cable has been removed from the spark plug. No service operations may be lubricated twice weekly. MAINTENANCE Check the engine oil level Replace engine oil 1) Check the air filter Replace air filter...
Owner Manual
Page 21
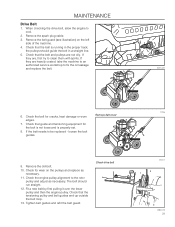
Remove the spark plug cable. 3. Check that the tensioning pulley and belt guides end up outside the belt loop. 13. If they are not oily. Check that the belt is properly set. 8. Fit a new belt by first pulling it over the lower pulley and then the engine pulley. MAINTENANCE Drive Belt 1. Check that guide and tensioning equipment for the belt is not loose and is running in a straight line. 5. If they are, first try to fix the...
Remove the spark plug cable. 3. Check that the tensioning pulley and belt guides end up outside the belt loop. 13. If they are not oily. Check that the belt is properly set. 8. Fit a new belt by first pulling it over the lower pulley and then the engine pulley. MAINTENANCE Drive Belt 1. Check that guide and tensioning equipment for the belt is not loose and is running in a straight line. 5. If they are, first try to fix the...

Owner Manual
Page 22
... the striking edge. New blade B. Remove the belt guard and pulley from the rotor shaft (see illustration. The drive belt should run smoothly in the correct direction. Remove belt cover 22 8011-027 see illustration). 5. Disconnect the spark plug. 3. Tighten the pulleys. 12. Rotate the rotor shaft as necessary. Remove the belt guard (see illustration). 3.5" / 89mm B C 8011-006 4. Refit the pulley and check that it is aligned with top pulley. 10. Adjust as follows...
... the striking edge. New blade B. Remove the belt guard and pulley from the rotor shaft (see illustration. The drive belt should run smoothly in the correct direction. Remove belt cover 22 8011-027 see illustration). 5. Disconnect the spark plug. 3. Tighten the pulleys. 12. Rotate the rotor shaft as necessary. Remove the belt guard (see illustration). 3.5" / 89mm B C 8011-006 4. Refit the pulley and check that it is aligned with top pulley. 10. Adjust as follows...

Owner Manual
Page 24
... use spring tines with nuts holding the blade in place. Turn the new blade until it will be replaced without removing the rotor shaft. see illustration. Spring tines can no longer be adjusted to comb ¼" (6 mm) into the soil, the tines must be about 2½" (64 mm), and it is possible to replace delta blades without removing the rotor shaft by removing the two screws with bagger attachment...
... use spring tines with nuts holding the blade in place. Turn the new blade until it will be replaced without removing the rotor shaft. see illustration. Spring tines can no longer be adjusted to comb ¼" (6 mm) into the soil, the tines must be about 2½" (64 mm), and it is possible to replace delta blades without removing the rotor shaft by removing the two screws with bagger attachment...
Owner Manual
Page 28
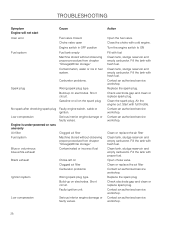
.... Contact an authorized service workshop. Faulty ignition unit. Turn the engine switch to ON Fill with proper fuel. Air the engine out. Start with full throttle. Contact an authorized service workshop. Clean tank, sludge reservoir and empty carburetor. Build-up on the spark plug. Low compression Serious interior engine damage or faulty valves. Clean the spark plug. No spark after checking spark plug Faulty engine switch, cable or ignition. TROUBLESHOOTING Symptom Engine will not start User error Fuel system Cause Fuel valve closed. Low compression...
.... Contact an authorized service workshop. Faulty ignition unit. Turn the engine switch to ON Fill with proper fuel. Air the engine out. Start with full throttle. Contact an authorized service workshop. Clean tank, sludge reservoir and empty carburetor. Build-up on the spark plug. Low compression Serious interior engine damage or faulty valves. Clean the spark plug. No spark after checking spark plug Faulty engine switch, cable or ignition. TROUBLESHOOTING Symptom Engine will not start User error Fuel system Cause Fuel valve closed. Low compression...

Owner Manual
Page 29
... engine oil in use for at an authorized service workshop is very flammable and careless use genuine Husqvarna spare parts. dispose of properly. 4. Mend damage to the paint to person and property. Service When ordering spare parts, please specify the purchase year, model, type, and serial number. Close the fuel valve. 6. Fuel stabilizers are unnecessary because this fuel is evenly distributed and then refit the spark plug...
... engine oil in use for at an authorized service workshop is very flammable and careless use genuine Husqvarna spare parts. dispose of properly. 4. Mend damage to the paint to person and property. Service When ordering spare parts, please specify the purchase year, model, type, and serial number. Close the fuel valve. 6. Fuel stabilizers are unnecessary because this fuel is evenly distributed and then refit the spark plug...

Owner Manual
Page 30
... drive Dethatching width Clutch control Clutch Depth setting Flail blade reel Delta blade reel Handle Weight Width Length Height Distance between axles Bearings Wheels, Front and Rear TECHNICAL DATA 18" POWER RAKE Briggs & Stratton V-belt 18" Handle-mounted with automatic safety declutching Belt tightener with spring return and idling pulley mechanism Adjustable depth control with lever mechanism 26 case-hardened steel blades with 5/8" (1.6 cm) spacers 1/8" x 1" x 3½" (0.3 x 2.5 x 8.9 cm) 24 austempered 12-gauge...
... drive Dethatching width Clutch control Clutch Depth setting Flail blade reel Delta blade reel Handle Weight Width Length Height Distance between axles Bearings Wheels, Front and Rear TECHNICAL DATA 18" POWER RAKE Briggs & Stratton V-belt 18" Handle-mounted with automatic safety declutching Belt tightener with spring return and idling pulley mechanism Adjustable depth control with lever mechanism 26 case-hardened steel blades with 5/8" (1.6 cm) spacers 1/8" x 1" x 3½" (0.3 x 2.5 x 8.9 cm) 24 austempered 12-gauge...

Owner Manual
Page 31
Engine Primary drive Dethatching width Clutch control Clutch Seeding Width Depth setting Flail blade reel Delta blade reel Handle Catcher Bag Seed hopper Weight Width Length Height Distance between axles Bearings Wheels TECHNICAL DATA 22" POWER RAKE Briggs & Stratton or none V-belt 22" Handle-mounted with automatic safety declutching Belt tightener with spring return and idling pulley mechanism 22" (55.8 cm) Adjustable depth control with lever mechanism 32 case-hardened steel blades with...
Engine Primary drive Dethatching width Clutch control Clutch Seeding Width Depth setting Flail blade reel Delta blade reel Handle Catcher Bag Seed hopper Weight Width Length Height Distance between axles Bearings Wheels TECHNICAL DATA 22" POWER RAKE Briggs & Stratton or none V-belt 22" Handle-mounted with automatic safety declutching Belt tightener with spring return and idling pulley mechanism 22" (55.8 cm) Adjustable depth control with lever mechanism 32 case-hardened steel blades with...
Owner Manual
Page 32
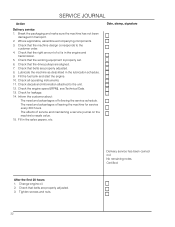
... lubrication schedule. 9. Lubricate the machine as described in the engine and transmission. 5. Check decals and information attached to the customer order. 4. Date, stamp, signature After the first 20 hours 1. Fill the fuel tank and start the engine. 10. Check all operating instruments. 11. SERVICE JOURNAL Action Delivery service 1. Check for service every 300 hours. Check that the drive pulleys are aligned. 7. Check the engine speed (RPM), see Technical Data. 13.
... lubrication schedule. 9. Lubricate the machine as described in the engine and transmission. 5. Check decals and information attached to the customer order. 4. Date, stamp, signature After the first 20 hours 1. Fill the fuel tank and start the engine. 10. Check all operating instruments. 11. SERVICE JOURNAL Action Delivery service 1. Check for service every 300 hours. Check that the drive pulleys are aligned. 7. Check the engine speed (RPM), see Technical Data. 13.


