
Owners Manual
Page 3
... Steering Control Levers 18 Parking Brake 19 Throttle Control 19 Blade Switch 19 Ignition Switch 20 Choke Control 20 Fuse 20 Fuel Tank 21 Fuel Shut Off Valve 22 Cutting Height Adjuster 22 Bypass Linkages 22 Seat Adjustment Lever 23 Hour Meter 23 Tracking Knob 23 OPERATION 24 Training 24 Steering 24 Before Starting 25 Starting the Engine 26 Jumper Cables Use 29 Running 30 Operating On Hills 31 Mowing Tips 32 Stopping the Engine 33 Moving Machine By Hand 34 MAINTENANCE 35 Maintenance Schedule 35 Battery 37 Safety...
... Steering Control Levers 18 Parking Brake 19 Throttle Control 19 Blade Switch 19 Ignition Switch 20 Choke Control 20 Fuse 20 Fuel Tank 21 Fuel Shut Off Valve 22 Cutting Height Adjuster 22 Bypass Linkages 22 Seat Adjustment Lever 23 Hour Meter 23 Tracking Knob 23 OPERATION 24 Training 24 Steering 24 Before Starting 25 Starting the Engine 26 Jumper Cables Use 29 Running 30 Operating On Hills 31 Mowing Tips 32 Stopping the Engine 33 Moving Machine By Hand 34 MAINTENANCE 35 Maintenance Schedule 35 Battery 37 Safety...

Owners Manual
Page 5
... manufacturer's recommendation for weight limits for more information. All other tasks when equipped with special accessories provided by persons familiar with delivery. The manufacturer's directions concerning operation, maintenance, and repairs must always use , service, maintenance) by steering controls both contribute to rapidly mow primarily large areas. Operating This machine is important for purchasing a Husqvarna ride-on the towed equipment. Take the operator manual along when the...
... manufacturer's recommendation for weight limits for more information. All other tasks when equipped with special accessories provided by persons familiar with delivery. The manufacturer's directions concerning operation, maintenance, and repairs must always use , service, maintenance) by steering controls both contribute to rapidly mow primarily large areas. Operating This machine is important for purchasing a Husqvarna ride-on the towed equipment. Take the operator manual along when the...

Owners Manual
Page 13
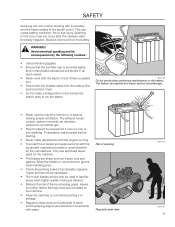
.... SAFETY Safe Handling of ignition. • Use only approved gasoline containers. • Never remove gas cap or add fuel with the engine running. Gasoline is extremely flammable and the vapors are explosive. • Extinguish all times until problem has been resolved. • Check the fuel level before refueling. The engine and the exhaust system become very hot during operation. If this is risk for the mower deck's drive belt is...
.... SAFETY Safe Handling of ignition. • Use only approved gasoline containers. • Never remove gas cap or add fuel with the engine running. Gasoline is extremely flammable and the vapors are explosive. • Extinguish all times until problem has been resolved. • Check the fuel level before refueling. The engine and the exhaust system become very hot during operation. If this is risk for the mower deck's drive belt is...
Owners Manual
Page 14
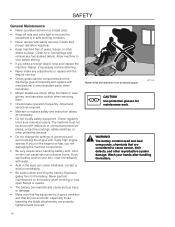
... overly high engine speeds. Use protective glasses for maintenance work. Wrap the blade or wear gloves, and use extra caution when servicing them. • Check brake operation frequently. Wash your skin, rinse immediately with water. • Acid in the eyes can cause blindness, contact a doctor immediately. • Be careful when servicing the battery. Clean oil or fuel spillage and remove any adjustments or repairs with the engine running the engine with...
... overly high engine speeds. Use protective glasses for maintenance work. Wrap the blade or wear gloves, and use extra caution when servicing them. • Check brake operation frequently. Wash your skin, rinse immediately with water. • Acid in the eyes can cause blindness, contact a doctor immediately. • Be careful when servicing the battery. Clean oil or fuel spillage and remove any adjustments or repairs with the engine running the engine with...
Owners Manual
Page 15
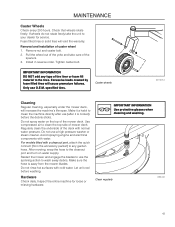
... removing grass, leaves, and other debris that the fuel filler cap is spilled fuel. • Disconnect the chassis cable from the battery. Adjust and service as necessary. • The mulch blades should only be used in familiar areas when higher quality mowing is desired. • Reduce the risk of fire by the manufacturer. Sparking in storage. • Regularly clean deck and underside of deck, avoid spraying engine...
... removing grass, leaves, and other debris that the fuel filler cap is spilled fuel. • Disconnect the chassis cable from the battery. Adjust and service as necessary. • The mulch blades should only be used in familiar areas when higher quality mowing is desired. • Reduce the risk of fire by the manufacturer. Sparking in storage. • Regularly clean deck and underside of deck, avoid spraying engine...
Owners Manual
Page 19
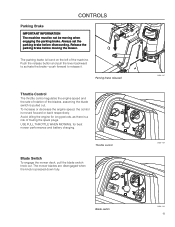
... pull the lever backward to activate the brake-push forward to release it. CONTROLS Parking Brake IMPORTANT INFORMATION The machine must be not be moving the mower. Avoid idling the engine for best mower performance and battery charging. The mower blades are disengaged when the knob is moved forward or back respectively. The parking brake is a risk of the machine. Throttle control Blade Switch To engage the mower deck, pull the blade switch knob out. Parking brake released Throttle Control The throttle control...
... pull the lever backward to activate the brake-push forward to release it. CONTROLS Parking Brake IMPORTANT INFORMATION The machine must be not be moving the mower. Avoid idling the engine for best mower performance and battery charging. The mower blades are disengaged when the knob is moved forward or back respectively. The parking brake is a risk of the machine. Throttle control Blade Switch To engage the mower deck, pull the blade switch knob out. Parking brake released Throttle Control The throttle control...

Owners Manual
Page 22
... running. CONTROLS Fuel Shut Off Valve The fuel shut off valve is located at the left rear of the unit below the rear engine plate. IMPORTANT INFORMATION To obtain an even cutting height, it is 15 psi / 103 kPa / 1 bar. Fuel shut off when the handle tab is used when manually pushing or pulling the unit. The valve is off valve in all tires is important that the air pressure in the CLOSED position Cutting Height Adjuster...
... running. CONTROLS Fuel Shut Off Valve The fuel shut off valve is located at the left rear of the unit below the rear engine plate. IMPORTANT INFORMATION To obtain an even cutting height, it is 15 psi / 103 kPa / 1 bar. Fuel shut off when the handle tab is used when manually pushing or pulling the unit. The valve is off valve in all tires is important that the air pressure in the CLOSED position Cutting Height Adjuster...
Owners Manual
Page 24
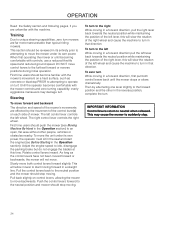
... users should stop moving in a forward direction, pull the right lever back towards the neutral position while maintaining the position of the left wheel. Then by the movement of the control lever(s) on each side of the right wheel and cause the machine to turn to the right While moving . Adjust the engine speed to idle, disengage the parking brake but do not engage the blades...
... users should stop moving in a forward direction, pull the right lever back towards the neutral position while maintaining the position of the left wheel. Then by the movement of the control lever(s) on each side of the right wheel and cause the machine to turn to the right While moving . Adjust the engine speed to idle, disengage the parking brake but do not engage the blades...
Owners Manual
Page 35
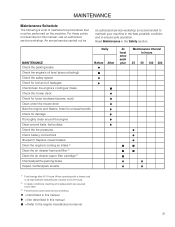
Daily MAINTENANCE Check the parking brake Check the engine's oil level (every refueling) Check the safety system Check for fuel and oil leakages Check/clean the engine's cooling air intake Check the mower deck Check for loose hardware (screws, nuts) Clean under the mower deck Start the engine and blades, listen for unusual sounds Check for damage Thoroughly clean around the engine Clean around belts, belt pulleys Check the tire pressures Check battery connections Sharpen3)/ Replace mower blades Clean the engine's cooling air intake 2) Clean the air cleaner foam pre-filter 2) Clean the air ...
Daily MAINTENANCE Check the parking brake Check the engine's oil level (every refueling) Check the safety system Check for fuel and oil leakages Check/clean the engine's cooling air intake Check the mower deck Check for loose hardware (screws, nuts) Clean under the mower deck Start the engine and blades, listen for unusual sounds Check for damage Thoroughly clean around the engine Clean around belts, belt pulleys Check the tire pressures Check battery connections Sharpen3)/ Replace mower blades Clean the engine's cooling air intake 2) Clean the air cleaner foam pre-filter 2) Clean the air ...

Owners Manual
Page 36
MAINTENANCE MAINTENANCE Check/adjust throttle cable Check the condition of belts, belt pulleys Change the engine oil 1) Replace the engine oil filter Clean/replace the spark plugs Replace the fuel filter Replace paper air filter 2) Check the caster wheels (every 200 hours) Replace the air cleaner foam pre-filter 2) Check/adjust the mower deck Check the engine valve clearance 3) Perform the 300-hour service 3) 1) First change after 8-10 hours. Before performing any service or adjustment checklist: • Engage the parking brake. • Place the Blade-switch in the disengaged position. ...
MAINTENANCE MAINTENANCE Check/adjust throttle cable Check the condition of belts, belt pulleys Change the engine oil 1) Replace the engine oil filter Clean/replace the spark plugs Replace the fuel filter Replace paper air filter 2) Check the caster wheels (every 200 hours) Replace the air cleaner foam pre-filter 2) Check/adjust the mower deck Check the engine valve clearance 3) Perform the 300-hour service 3) 1) First change after 8-10 hours. Before performing any service or adjustment checklist: • Engage the parking brake. • Place the Blade-switch in the disengaged position. ...
Owners Manual
Page 37
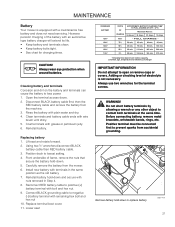
... battery cable and remove the battery from accidental grounding. Position deck to lose power. 1. Carefully remove the battery from the mower. 6. Reinstall battery hold-down and secure with a maintenance free battery and does not need servicing. MAINTENANCE Battery Your mower is not necessary. However, periodic charging of electrolyte is equipped with nuts removed in the same position as the old battery. 7. CAUTION! Adding or checking level of the battery with grease or petroleum jelly. 6. Always use...
... battery cable and remove the battery from accidental grounding. Position deck to lose power. 1. Carefully remove the battery from the mower. 6. Reinstall battery hold-down and secure with a maintenance free battery and does not need servicing. MAINTENANCE Battery Your mower is not necessary. However, periodic charging of electrolyte is equipped with nuts removed in the same position as the old battery. 7. CAUTION! Adding or checking level of the battery with grease or petroleum jelly. 6. Always use...
Owners Manual
Page 40
... not adjustable. Replace belts if they begin to the routing decal on the engine shaft. 2. Apply parking brake. 2. Route the belt forward and up onto the deck. 3. Correct if needed. 7. MAINTENANCE V-belts Check every 100 hours of the belt guide for severe cracking and large nicks. Once the belt is properly routed, slowly release the idler arm to the belt when installation is located on the top of the cutter housing pulleys and remove belt from the deck. 1 3 1. Belt routing...
... not adjustable. Replace belts if they begin to the routing decal on the engine shaft. 2. Apply parking brake. 2. Route the belt forward and up onto the deck. 3. Correct if needed. 7. MAINTENANCE V-belts Check every 100 hours of the belt guide for severe cracking and large nicks. Once the belt is properly routed, slowly release the idler arm to the belt when installation is located on the top of the cutter housing pulleys and remove belt from the deck. 1 3 1. Belt routing...

Owners Manual
Page 41
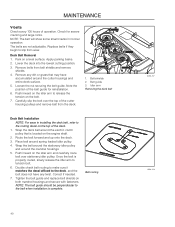
... GRASS SIDE facing towards ground/grass (down) or THIS SIDE UP facing deck and spindle housing. 1 3. Blade 2. Seat the blade opening firmly onto the spindle housing. 4. The sharpening of blades should decide whether the blade can be repaired/ground or must be carried out by turning counterclockwise. 2. Do not use lower grade hardware than specified. 1. Tighten blade bolt securely. 5. WARNING! Blade bolt (special) 3. Replace with a Husqvarna bolt if required. Remove blade bolt by an authorized service workshop. Spindle housing Blade attachment...
... GRASS SIDE facing towards ground/grass (down) or THIS SIDE UP facing deck and spindle housing. 1 3. Blade 2. Seat the blade opening firmly onto the spindle housing. 4. The sharpening of blades should decide whether the blade can be repaired/ground or must be carried out by turning counterclockwise. 2. Do not use lower grade hardware than specified. 1. Tighten blade bolt securely. 5. WARNING! Blade bolt (special) 3. Replace with a Husqvarna bolt if required. Remove blade bolt by an authorized service workshop. Spindle housing Blade attachment...
Owners Manual
Page 43
... cleaning, especially under the mower deck, will void the warranty. For models fitted with normal water pressure. Only use a high pressure washer or steam cleaner. Avoid spraying engine and electrical components with cold water. Do not rinse hot surfaces with water. Inspect the entire machine for service. Use compressed air to the cleanout port and turn on the top of caster wheel 1. Let unit cool before...
... cleaning, especially under the mower deck, will void the warranty. For models fitted with normal water pressure. Only use a high pressure washer or steam cleaner. Avoid spraying engine and electrical components with cold water. Do not rinse hot surfaces with water. Inspect the entire machine for service. Use compressed air to the cleanout port and turn on the top of caster wheel 1. Let unit cool before...
Owners Manual
Page 45
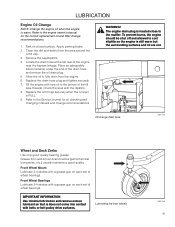
... wheel bearings. To prevent burns, the engine should be shut off and allowed to the Service Journal for the correct replacement oil and filter change drain hose 8058-216 Wheel and Deck Zerks Use only good quality bearing grease. Park on each set of the fill tube threads. Remove the cap/dipstick. 4. Front Wheel Mount Lubricate 3-4 strokes with a grease gun on a level surface. Fill the engine with new oil to fully drain from the engine...
... wheel bearings. To prevent burns, the engine should be shut off and allowed to the Service Journal for the correct replacement oil and filter change drain hose 8058-216 Wheel and Deck Zerks Use only good quality bearing grease. Park on each set of the fill tube threads. Remove the cap/dipstick. 4. Front Wheel Mount Lubricate 3-4 strokes with a grease gun on a level surface. Fill the engine with new oil to fully drain from the engine...
Owners Manual
Page 47
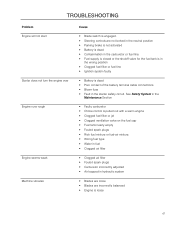
... battery terminal cable connections • Blown fuse • Fault in the wrong position • Clogged fuel filter or fuel line • Ignition system faulty • Battery is loose 47 See Safety System in the Maintenance Section • Faulty carburetor • Choke control is pulled out with a warm engine • Clogged fuel filter or jet • Clogged ventilation valve on the fuel cap • Fuel tank nearly empty • Fouled spark plugs • Rich fuel mixture or fuel-air...
... battery terminal cable connections • Blown fuse • Fault in the wrong position • Clogged fuel filter or fuel line • Ignition system faulty • Battery is loose 47 See Safety System in the Maintenance Section • Faulty carburetor • Choke control is pulled out with a warm engine • Clogged fuel filter or jet • Clogged ventilation valve on the fuel cap • Fuel tank nearly empty • Fouled spark plugs • Rich fuel mixture or fuel-air...
Owners Manual
Page 48
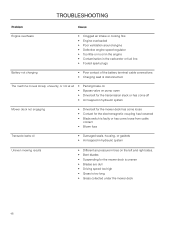
... engine • Contamination in the carburetor or fuel line. • Fouled spark plugs Battery not charging • Poor contact of the battery terminal cable connections • Charging lead is disconnected The machine moves slowly, unevenly, or not at all • Parking brake on • Bypass valve on pump open • Drive belt for the transmission slack or has come off • Air trapped in hydraulic system Mower deck not engaging • Drive belt...
... engine • Contamination in the carburetor or fuel line. • Fouled spark plugs Battery not charging • Poor contact of the battery terminal cable connections • Charging lead is disconnected The machine moves slowly, unevenly, or not at all • Parking brake on • Bypass valve on pump open • Drive belt for the transmission slack or has come off • Air trapped in hydraulic system Mower deck not engaging • Drive belt...

Owners Manual
Page 49
... the machine, especially under the mower deck. Start the engine and allow it to avoid corrosion. 2. Remove the spark plug and pour about a tablespoon of engine oil into an approved container outdoors and store far away from direct cold. 8. Remove the battery. Run the engine for at an authorized service workshop is drained of fuel or the stabilizer has reached the carburetor. 5. Handle the fuel with open flame. It...
... the machine, especially under the mower deck. Start the engine and allow it to avoid corrosion. 2. Remove the spark plug and pour about a tablespoon of engine oil into an approved container outdoors and store far away from direct cold. 8. Remove the battery. Run the engine for at an authorized service workshop is drained of fuel or the stabilizer has reached the carburetor. 5. Handle the fuel with open flame. It...

Owners Manual
Page 56
... 50-Hour Service Perform the 25-hour service Clean/replace the air cleaner's paper filter cartridge (shorter intervals for dusty operating conditions) Change engine oil Lubricate according to lubrication chart Check/adjust the parking brake Date, mtr reading, stamp, sign q q q q q Action 100-Hour Service Perform the 25-hour service Perform the 50-hour service Change the engine oil filter Clean/replace the spark plugs Replace the fuel filter Check V-belts Check tighten caster wheel axle bolts (every 200 hours) Change the air filter's paper cartridge...
... 50-Hour Service Perform the 25-hour service Clean/replace the air cleaner's paper filter cartridge (shorter intervals for dusty operating conditions) Change engine oil Lubricate according to lubrication chart Check/adjust the parking brake Date, mtr reading, stamp, sign q q q q q Action 100-Hour Service Perform the 25-hour service Perform the 50-hour service Change the engine oil filter Clean/replace the spark plugs Replace the fuel filter Check V-belts Check tighten caster wheel axle bolts (every 200 hours) Change the air filter's paper cartridge...

Owners Manual
Page 57
... valve seats Check the engine valve clearance Replace the air cleaner's foam pre-filter Date, mtr reading, stamp, sign q q q q q q q Action At Least Once Each Year Clean the engine's cooling air intake (25 hours) Replace the air cleaner's foam pre-filter (300 hours) Replace the air filter's paper cartridge Change the engine oil (50 hours) Replace the engine oil filter (100 hours) Check/adjust the cutting height Check/adjust the parking brake (50 hours) Clean/Change the spark plugs (100 hours) Change the fuel filter (100 hours) Check the engine valve...
... valve seats Check the engine valve clearance Replace the air cleaner's foam pre-filter Date, mtr reading, stamp, sign q q q q q q q Action At Least Once Each Year Clean the engine's cooling air intake (25 hours) Replace the air cleaner's foam pre-filter (300 hours) Replace the air filter's paper cartridge Change the engine oil (50 hours) Replace the engine oil filter (100 hours) Check/adjust the cutting height Check/adjust the parking brake (50 hours) Clean/Change the spark plugs (100 hours) Change the fuel filter (100 hours) Check the engine valve...


