Owners Manual
Page 3
... Parking Brake 21 Blade Switch 21 Ignition Switch 21 Fuses 23 Choke Control 23 Cutting Height Pedal 23 Seat Adjustment Lever 24 Fuel Shut Off Valve 24 Hydro Release Levers 24 Refueling 25 OPERATION 26 Training 26 Steering 26 Roll Bar and Safety Belt 27 Before Starting 27 Starting the Engine 28 Jumper Cables 30 Running 31 Operating on Hills 32 Stopping the Engine 33 Mowing Tips 34 Manual Transport 35 MAINTENANCE 36 Battery 38 Safety System 39 Tire Pressures 39 Parking Brake 39 Deck Belt 40 Pump Belt 41 V-belts 41 Cutting Blades...
... Parking Brake 21 Blade Switch 21 Ignition Switch 21 Fuses 23 Choke Control 23 Cutting Height Pedal 23 Seat Adjustment Lever 24 Fuel Shut Off Valve 24 Hydro Release Levers 24 Refueling 25 OPERATION 26 Training 26 Steering 26 Roll Bar and Safety Belt 27 Before Starting 27 Starting the Engine 28 Jumper Cables 30 Running 31 Operating on Hills 32 Stopping the Engine 33 Mowing Tips 34 Manual Transport 35 MAINTENANCE 36 Battery 38 Safety System 39 Tire Pressures 39 Parking Brake 39 Deck Belt 40 Pump Belt 41 V-belts 41 Cutting Blades...
Owners Manual
Page 5
... its resale value. Operating instructions for the accessories are subject to change without fail. Safety requires good judgment, careful use , service, maintenance) by the manufacturer. This manual is equipped with the machine's special characteristics and who operate this machine. The final chapter of uses are used improperly. A well-kept service journal reduces service costs for purchasing a Husqvarna ride-on public roadways. General In this operator's manual, left and...
... its resale value. Operating instructions for the accessories are subject to change without fail. Safety requires good judgment, careful use , service, maintenance) by the manufacturer. This manual is equipped with the machine's special characteristics and who operate this machine. The final chapter of uses are used improperly. A well-kept service journal reduces service costs for purchasing a Husqvarna ride-on public roadways. General In this operator's manual, left and...

Owners Manual
Page 13
... the mower deck's drive belt is removed. Always place containers on the ground away from the vehicle when filling. • Remove gas-powered equipment from a gasoline dispenser nozzle. • Keep the nozzle in handling gasoline. Never fill the fuel tank indoors 8011-516 WARNING! Replace gas cap and tighten securely. • Do not start the engine near spilled fuel. • Never use a nozzle lock-open flame, spark, or pilot light such...
... the mower deck's drive belt is removed. Always place containers on the ground away from the vehicle when filling. • Remove gas-powered equipment from a gasoline dispenser nozzle. • Keep the nozzle in handling gasoline. Never fill the fuel tank indoors 8011-516 WARNING! Replace gas cap and tighten securely. • Do not start the engine near spilled fuel. • Never use a nozzle lock-open flame, spark, or pilot light such...
Owners Manual
Page 14
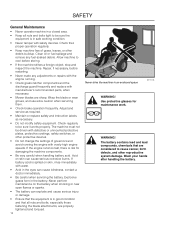
.... Use protective glasses for damaging the machine components. • Be very careful when handling battery acid. Clean oil or fuel spillage and remove any adjustments or repairs with the engine running the engine with overly high engine speeds. Check regularly to be sure the equipment is in good condition and that are sharp. The machine must not be driven with manufacturer's recommended parts, when necessary. • Mower blades...
.... Use protective glasses for damaging the machine components. • Be very careful when handling battery acid. Clean oil or fuel spillage and remove any adjustments or repairs with the engine running the engine with overly high engine speeds. Check regularly to be sure the equipment is in good condition and that are sharp. The machine must not be driven with manufacturer's recommended parts, when necessary. • Mower blades...

Owners Manual
Page 15
... removing grass, leaves, and other debris that the fuel filler cap is mounted tightly and no flammable substances are sharp and can occur when working with the battery and the heavy cables of sparking Regularly clean deck 8009-728 8011-514 15 Avoid electrical sparking and its consequences by the manufacturer. Only use protective gloves when handling them. • Check the parking brake's functionality regularly. Adjust...
... removing grass, leaves, and other debris that the fuel filler cap is mounted tightly and no flammable substances are sharp and can occur when working with the battery and the heavy cables of sparking Regularly clean deck 8009-728 8011-514 15 Avoid electrical sparking and its consequences by the manufacturer. Only use protective gloves when handling them. • Check the parking brake's functionality regularly. Adjust...

Owners Manual
Page 26
... the control lever(s) on each side of mower. To turn mowers are far more maneuverable than typical riding mowers. This may damage turf. DO NOT move backwards. First time users should be reviewed in its own power, the operator must sit in the seat and start moving in a forward direction, first pull both control levers forward slightly. The left control lever controls the left lever, this time. Rotate control levers inward. Steering To...
... the control lever(s) on each side of mower. To turn mowers are far more maneuverable than typical riding mowers. This may damage turf. DO NOT move backwards. First time users should be reviewed in its own power, the operator must sit in the seat and start moving in a forward direction, first pull both control levers forward slightly. The left control lever controls the left lever, this time. Rotate control levers inward. Steering To...

Owners Manual
Page 36
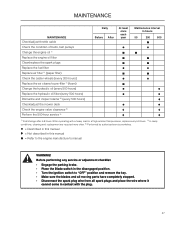
maintenance MAINTENANCE Check the parking brake Check the engine's oil level (every refueling) Check the safety system Check for fuel and oil leakages Check/clean the engine's cooling air intake Check the mower deck Check for loose hardware (screws, nuts) Clean under the mower deck Start the engine and blades, listen for unusual sounds Check for damage Thoroughly clean around the engine Clean around belts, belt pulleys Check the tire pressures Check battery connections Sharpen3)/ Replace mower blades Clean the engine's cooling air intake 2) Clean the air cleaner's pre-filter 2) (foam) Clean...
maintenance MAINTENANCE Check the parking brake Check the engine's oil level (every refueling) Check the safety system Check for fuel and oil leakages Check/clean the engine's cooling air intake Check the mower deck Check for loose hardware (screws, nuts) Clean under the mower deck Start the engine and blades, listen for unusual sounds Check for damage Thoroughly clean around the engine Clean around belts, belt pulleys Check the tire pressures Check battery connections Sharpen3)/ Replace mower blades Clean the engine's cooling air intake 2) Clean the air cleaner's pre-filter 2) (foam) Clean...
Owners Manual
Page 37
... First change after 5-8 hours. maintenance MAINTENANCE Check/adjust throttle cable Check the condition of belts, belt pulleys Change the engine oil 1) Replace the engine oil filter Clean/replace the spark plugs Replace the fuel filter Replace air filter 2) (paper filter) Check the caster wheels (every 200 hours) Replace the air cleaner's pre-filter 2) (foam) Change the hydraulic oil (every 500 hours) Replace the hydraulic oil filter (every 500 hours) Dismantle and inspect starter 3) (every 500 hours) Check/adjust the mower deck Check the engine valve clearance 3) Perform the 500-hour service...
... First change after 5-8 hours. maintenance MAINTENANCE Check/adjust throttle cable Check the condition of belts, belt pulleys Change the engine oil 1) Replace the engine oil filter Clean/replace the spark plugs Replace the fuel filter Replace air filter 2) (paper filter) Check the caster wheels (every 200 hours) Replace the air cleaner's pre-filter 2) (foam) Change the hydraulic oil (every 500 hours) Replace the hydraulic oil filter (every 500 hours) Dismantle and inspect starter 3) (every 500 hours) Check/adjust the mower deck Check the engine valve clearance 3) Perform the 500-hour service...

Owners Manual
Page 38
... Amps 30 Amps 20 Amps 10 Amps - Using two ½" wrenches disconnect BLACK battery cable then RED battery cable. 4. Clean terminals and battery cable ends with terminals in the same position as the old battery. Install the new battery with a wire brush until supported by allowing a wrench or any other object to open or remove caps or covers. For replacing 7. FULL CHARGE - 20 min. 35 min. 48 min...
... Amps 30 Amps 20 Amps 10 Amps - Using two ½" wrenches disconnect BLACK battery cable then RED battery cable. 4. Clean terminals and battery cable ends with terminals in the same position as the old battery. Install the new battery with a wire brush until supported by allowing a wrench or any other object to open or remove caps or covers. For replacing 7. FULL CHARGE - 20 min. 35 min. 48 min...
Owners Manual
Page 41
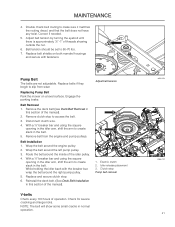
... this section of the manual). Idler release placement 3. Correct if needed. 5. Replace belt shields on a level surface. Replacing Pump Belt Park the mower on both mandrel housings and secure with the breaker bar, wrap the belt around the engine pulley. 2. Route the belt around the left pump pulley. 3. Electric clutch 2. Belt Removal 1. With a ½" breaker bar and using the square opening in the idler arm, shift the arm to create slack in normal operation. 8065-054 2 8068-092...
... this section of the manual). Idler release placement 3. Correct if needed. 5. Replace belt shields on a level surface. Replacing Pump Belt Park the mower on both mandrel housings and secure with the breaker bar, wrap the belt around the engine pulley. 2. Route the belt around the left pump pulley. 3. Electric clutch 2. Belt Removal 1. With a ½" breaker bar and using the square opening in the idler arm, shift the arm to create slack in normal operation. 8065-054 2 8068-092...

Owners Manual
Page 43
If tires are equal. Four bolts control the height and pitch of leveling procedure, mower deck drive belt must be installed prior to begin measurements 8065-093 Level the mower deck 8065-100 43 Record this measurement. If adjustment is required, use the nuts to adjust the right and left side eyebolts up or down until both outer blades to align with a heavy cloth when handling. 1 Align blades side-to...
If tires are equal. Four bolts control the height and pitch of leveling procedure, mower deck drive belt must be installed prior to begin measurements 8065-093 Level the mower deck 8065-100 43 Record this measurement. If adjustment is required, use the nuts to adjust the right and left side eyebolts up or down until both outer blades to align with a heavy cloth when handling. 1 Align blades side-to...
Owners Manual
Page 44
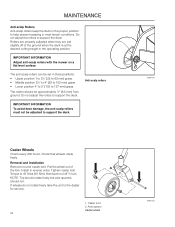
... bolt 2. NOTE: Tire should rotate freely but axle spacers should be adjusted to support the deck. 8065-094 Caster Wheels Check every 200 hours. Pull the wheel out of the ground when the deck is at the desired cutting height in most terrain conditions. Do not adjust the rollers to help prevent scalping in the operating position. Tighten caster bolt. 2 Torque to support the deck. Removal and Installation Remove nut and caster bolt. Install...
... bolt 2. NOTE: Tire should rotate freely but axle spacers should be adjusted to support the deck. 8065-094 Caster Wheels Check every 200 hours. Pull the wheel out of the ground when the deck is at the desired cutting height in most terrain conditions. Do not adjust the rollers to help prevent scalping in the operating position. Tighten caster bolt. 2 Torque to support the deck. Removal and Installation Remove nut and caster bolt. Install...

Owners Manual
Page 45
... blades. Let unit cool before conducting maintenance of the deck with water. Regular external maintenance of the transaxle. 6. Check oil level in expansion tanks. Slippage can occur. Remove any obstructions such as grass clippings, leaves or dirt. 4. Do not use (after use a high pressure washer or steam cleaner. Use protective glasses when cleaning and washing. Inspect the transmission cooling fan for loose or missing hardware. Inspect the parking brake...
... blades. Let unit cool before conducting maintenance of the deck with water. Regular external maintenance of the transaxle. 6. Check oil level in expansion tanks. Slippage can occur. Remove any obstructions such as grass clippings, leaves or dirt. 4. Do not use (after use a high pressure washer or steam cleaner. Use protective glasses when cleaning and washing. Inspect the transmission cooling fan for loose or missing hardware. Inspect the parking brake...
Owners Manual
Page 48
... quality levels and longer life, an oil filter change 2 1 8019-010 48 Remove the three ¼" filter guard screws and filter guard. Drain old oil filters of all free-flowing oil prior to one full turn after the filter gasket contacts the filter base surface. 5. See illustration. 2. Install the new filter by hand. Install the top port lug into each . 6. Remove the cap from the transaxle. 10. Remove the oil filter from the transaxles' expansion tank located on...
... quality levels and longer life, an oil filter change 2 1 8019-010 48 Remove the three ¼" filter guard screws and filter guard. Drain old oil filters of all free-flowing oil prior to one full turn after the filter gasket contacts the filter base surface. 5. See illustration. 2. Install the new filter by hand. Install the top port lug into each . 6. Remove the cap from the transaxle. 10. Remove the oil filter from the transaxles' expansion tank located on...

Owners Manual
Page 49
See Safety System in the Maintenance section Engine runs rough. • Faulty carburetor. • Choke control is pulled out with warm engine. • Clogged fuel filter or jet. • Clogged ventilation valve on the battery terminal cable connections. • Fuse blown. • Ignition system faulty. • Fault in the starter safety circuit. troubleshooting guide Problem Engine will not start. Cause • Blade switch is engaged. • Steering controls are not locked in the neutral position. • Parking brake is not activated...
See Safety System in the Maintenance section Engine runs rough. • Faulty carburetor. • Choke control is pulled out with warm engine. • Clogged fuel filter or jet. • Clogged ventilation valve on the battery terminal cable connections. • Fuse blown. • Ignition system faulty. • Fault in the starter safety circuit. troubleshooting guide Problem Engine will not start. Cause • Blade switch is engaged. • Steering controls are not locked in the neutral position. • Parking brake is not activated...

Owners Manual
Page 50
... all. troubleshooting guide Cause • Blades are loose. • Blades are dull. • Driving speed too high. • Grass is faulty or has come loose, from the cable contact. • Fuse has blown. • Damaged seals, housing, or gaskets. • Air trapped in the engine. • Fouled spark plug. Hydraulic drive leaks oil. • Poor contact with battery terminal cable connectors. • Charging lead is disconnected. • Parking brake on. • Bypass valve on the...
... all. troubleshooting guide Cause • Blades are loose. • Blades are dull. • Driving speed too high. • Grass is faulty or has come loose, from the cable contact. • Fuse has blown. • Damaged seals, housing, or gaskets. • Air trapped in the engine. • Fouled spark plug. Hydraulic drive leaks oil. • Poor contact with battery terminal cable connectors. • Charging lead is disconnected. • Parking brake on. • Bypass valve on the...
Owners Manual
Page 51
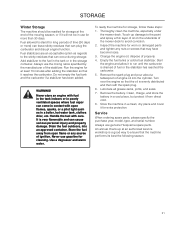
.... Never use genuine Husqvarna spare parts. dispose of the mower deck to run until the carburetor is evenly distributed and then refit the spark plug. 6. Clean, charge, and store the battery in a boiler, hot water tank, clothes drier, etc. Fuel stabilizers are an acceptable option as in a cool place, but protect it to avoid corrosion. 2. Store the fuel away from direct cold. 8. Start the engine and...
.... Never use genuine Husqvarna spare parts. dispose of the mower deck to run until the carburetor is evenly distributed and then refit the spark plug. 6. Clean, charge, and store the battery in a boiler, hot water tank, clothes drier, etc. Fuel stabilizers are an acceptable option as in a cool place, but protect it to avoid corrosion. 2. Store the fuel away from direct cold. 8. Start the engine and...

Owners Manual
Page 63
... and choke cables Inspect hardware Check the tire pressures Change the engine oil and filter Change air filter Inspect spark plug Inspect fuel filter Check engine RPM Clean underside of deck Check blade pitch Grease blade spindles Inspect spindle bearings Inspect deck belt and blades Inspect idler arm bearings Inspect deck idler pulleys Inspect hydraulic filter Inspect hydraulic drive belt Inspect hydraulic hoses Check neutral position Inspect battery connections Check safety system Check seat belt Check ROPS Check fuel system for leaks Inspect safety guards and shields Check brake adjustment...
... and choke cables Inspect hardware Check the tire pressures Change the engine oil and filter Change air filter Inspect spark plug Inspect fuel filter Check engine RPM Clean underside of deck Check blade pitch Grease blade spindles Inspect spindle bearings Inspect deck belt and blades Inspect idler arm bearings Inspect deck idler pulleys Inspect hydraulic filter Inspect hydraulic drive belt Inspect hydraulic hoses Check neutral position Inspect battery connections Check safety system Check seat belt Check ROPS Check fuel system for leaks Inspect safety guards and shields Check brake adjustment...

Owners Manual
Page 64
... Change air filter Inspect spark plug Inspect fuel filter Check engine RPM Clean underside of deck Check blade pitch Grease blade spindles Inspect spindle bearings Inspect deck belt and blades Inspect idler arm bearings Inspect deck idler pulleys Change hydraulic oil level Change hydraulic filter Replace hydraulic drive belt Inspect hydraulic hoses Check neutral position Inspect battery connections Load test battery Clean electrical connections Inspect the clutch Check safety system Check seat belt Check ROPS Check fuel system for leaks Inspect safety guards and shields Check brake adjustment...
... Change air filter Inspect spark plug Inspect fuel filter Check engine RPM Clean underside of deck Check blade pitch Grease blade spindles Inspect spindle bearings Inspect deck belt and blades Inspect idler arm bearings Inspect deck idler pulleys Change hydraulic oil level Change hydraulic filter Replace hydraulic drive belt Inspect hydraulic hoses Check neutral position Inspect battery connections Load test battery Clean electrical connections Inspect the clutch Check safety system Check seat belt Check ROPS Check fuel system for leaks Inspect safety guards and shields Check brake adjustment...

Parts Manual
Page 23
...; BEARING, IDLER ARM 24.. 522 729701 1 �� BEARING, IDLER PIVOT 25.. 574 262102 1 �� BELT GUIDE, BLK 26.. 574 262201 1 �� BELT KEEPER 27.. 574 197002 1 �� BRACKET, CHUTE PIVOT BLK 28.. 525 486002 1 �� SUPPORT, BRACKET BLK ITEM PART NO. QTY. DESCRIPTION 29.. 539 976998 3 �� ZERK, GREASE 30.. 574 202001 1 �� EYE BOLT 31...
...; BEARING, IDLER ARM 24.. 522 729701 1 �� BEARING, IDLER PIVOT 25.. 574 262102 1 �� BELT GUIDE, BLK 26.. 574 262201 1 �� BELT KEEPER 27.. 574 197002 1 �� BRACKET, CHUTE PIVOT BLK 28.. 525 486002 1 �� SUPPORT, BRACKET BLK ITEM PART NO. QTY. DESCRIPTION 29.. 539 976998 3 �� ZERK, GREASE 30.. 574 202001 1 �� EYE BOLT 31...


