Parts Manual
Page 15
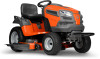
Torsion Blade Bolt Washer Assy 7/16-20 Stud, Fasten w/ Anti- NO. 55 539 11 55-74 56 539 99 05-85 57 587 35 84-01 58 ... 10 53-04 - - 532 41 64-05 - - 589 42 88-01 DESCRIPTION Eyebolt 5/16 x 3-1/2 Nut 5/16-18 Hx Spring Extn. inches 1 inch = 25.4 mm 15 LGT48DXL (96043026000), PRODUCT NO. 960 43 02-60 MOWER DECK KEY NO. 1 2 3 4 5 7 8 10 11 15 16 17 18 19 22 23 24 26 31 34 36...
Torsion Blade Bolt Washer Assy 7/16-20 Stud, Fasten w/ Anti- NO. 55 539 11 55-74 56 539 99 05-85 57 587 35 84-01 58 ... 10 53-04 - - 532 41 64-05 - - 589 42 88-01 DESCRIPTION Eyebolt 5/16 x 3-1/2 Nut 5/16-18 Hx Spring Extn. inches 1 inch = 25.4 mm 15 LGT48DXL (96043026000), PRODUCT NO. 960 43 02-60 MOWER DECK KEY NO. 1 2 3 4 5 7 8 10 11 15 16 17 18 19 22 23 24 26 31 34 36...
Owner Manual
Page 2
... if a child enters the area. • Before and while backing, look down and behind and down before storage. 2 Stop the blades when crossing gravel surfaces. • Do not operate machine without the entire grass catcher, discharge chute, or other debris build-up to cause...SERIOUSLY INJURED OR KILLED BY THIS EQUIPMENT. Always look behind before operating. Clean any oil or fuel spillage before dismounting. • Disengage blades when not mowing. II. These operators should evaluate their ability to operate the riding mower safely enough to operate the machine. •...
... if a child enters the area. • Before and while backing, look down and behind and down before storage. 2 Stop the blades when crossing gravel surfaces. • Do not operate machine without the entire grass catcher, discharge chute, or other debris build-up to cause...SERIOUSLY INJURED OR KILLED BY THIS EQUIPMENT. Always look behind before operating. Clean any oil or fuel spillage before dismounting. • Disengage blades when not mowing. II. These operators should evaluate their ability to operate the riding mower safely enough to operate the machine. •...

Owner Manual
Page 3
... restarting. • Never make sudden changes in safe working condition. • Never tamper with manufacturer's recommended parts, when necessary. • Mower blades are explosive. • Extinguish all movement on the ground. • Do not mow near drop-offs, ditches, or embankments. Always wear eye ...before storing. • If you cannot back up and down slowly. • Do not turn slowly and gradually downhill, if possible. Wrap the blade or wear gloves, and use extreme care in . • If machine stops while going down the slope. • Keep all cigarettes, cigars, ...
... restarting. • Never make sudden changes in safe working condition. • Never tamper with manufacturer's recommended parts, when necessary. • Mower blades are explosive. • Extinguish all movement on the ground. • Do not mow near drop-offs, ditches, or embankments. Always wear eye ...before storing. • If you cannot back up and down slowly. • Do not turn slowly and gradually downhill, if possible. Wrap the blade or wear gloves, and use extreme care in . • If machine stops while going down the slope. • Keep all cigarettes, cigars, ...
Owner Manual
Page 4
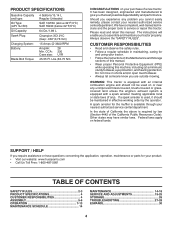
... Code). CCA: Case size: 28 230 U1R 45-55 Ft. Federal laws apply on your product: • Visit our website: www.husqvarna.com • Call Us Toll Free: 1-800-487-5951 TABLE OF CONTENTS SAFETY RULES 2-3 PRODUCT SPECIFICATIONS 4 CUSTOMER RESPONSIBILITIES 4 ASSEMBLY 5-6 OPERATION...the operator. PRODUCT SPECIFICATIONS Gasoline Capacity and type: Oil Type: (API: SJ-SN) Oil Capacity: Spark Plug: Charging System: Battery: Blade Bolt Torque: 4 Gallons/15,14 L Regular Unleaded SAE 10W30 (above is available through your nearest authorized service center/department. Should you...
... Code). CCA: Case size: 28 230 U1R 45-55 Ft. Federal laws apply on your product: • Visit our website: www.husqvarna.com • Call Us Toll Free: 1-800-487-5951 TABLE OF CONTENTS SAFETY RULES 2-3 PRODUCT SPECIFICATIONS 4 CUSTOMER RESPONSIBILITIES 4 ASSEMBLY 5-6 OPERATION...the operator. PRODUCT SPECIFICATIONS Gasoline Capacity and type: Oil Type: (API: SJ-SN) Oil Capacity: Spark Plug: Charging System: Battery: Blade Bolt Torque: 4 Gallons/15,14 L Regular Unleaded SAE 10W30 (above is available through your nearest authorized service center/department. Should you...
Owner Manual
Page 6
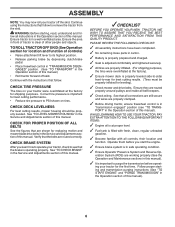
... in the Service and Adjustments section of this manual). ✓ It is clear of this manual. Ensure they are shown for replacing motion and mower blade drive belts in this manual). Operate them before operating your tractor, check to remove the tractor from the skid. Verify that all belt keepers. ✓...
... in the Service and Adjustments section of this manual). ✓ It is clear of this manual. Ensure they are shown for replacing motion and mower blade drive belts in this manual). Operate them before operating your tractor, check to remove the tractor from the skid. Verify that all belt keepers. ✓...
Owner Manual
Page 8
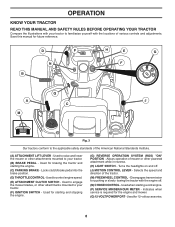
Used to engage the mower blades, or other attachments mounted to control engine speed. (E) ATTACHMENT CLUTCH SWITCH - Used for braking the tractor and starting and stopping the engine. (G) REVERSE OPERATION SYSTEM (...
Used to engage the mower blades, or other attachments mounted to control engine speed. (E) ATTACHMENT CLUTCH SWITCH - Used for braking the tractor and starting and stopping the engine. (G) REVERSE OPERATION SYSTEM (...

Owner Manual
Page 9
... (B) all the way down and hold. • Pull parking brake lever (C) up and hold tractor secure. Fig. 4 STOPPING (See Fig. 5) MOWER BLADES • To stop the engine. Do not use the choke to start a warm engine. • To engage choke control (N), pull knob out. We recommend...wide vision safety mask worn over spectacles. Always remove key when leaving tractor to prevent unauthorized use. • Never use to stop mower blades, place attachment clutch control in severe eye damage. OPERATION The operation of grass. sure from brake pedal (B), then release parking brake lever. ...
... (B) all the way down and hold. • Pull parking brake lever (C) up and hold tractor secure. Fig. 4 STOPPING (See Fig. 5) MOWER BLADES • To stop the engine. Do not use the choke to start a warm engine. • To engage choke control (N), pull knob out. We recommend...wide vision safety mask worn over spectacles. Always remove key when leaving tractor to prevent unauthorized use. • Never use to stop mower blades, place attachment clutch control in severe eye damage. OPERATION The operation of grass. sure from brake pedal (B), then release parking brake lever. ...
Owner Manual
Page 10
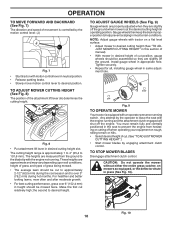
...rough, rolling terrain or hills. • Select desired height of cut . (See "TO ADJUST MOWER CUTTING HEIGHT".) • Start mower blades by engaging attachment clutch control. the second to desired position. NOTE: Adjust gauge wheels with an operator presence sensing switch. Tighten securely. &#...and centrally positioned in same adjustment hole. 9/16" 3/4" Fig. 9 TO OPERATE MOWER Your tractor is approximately 1 to 4" (25,4 to the blade tip with motion control lever in height should be mowed twice. A Fig. 8 • Put attachment lift lever in appropriate hole. Install gauge wheel...
...rough, rolling terrain or hills. • Select desired height of cut . (See "TO ADJUST MOWER CUTTING HEIGHT".) • Start mower blades by engaging attachment clutch control. the second to desired position. NOTE: Adjust gauge wheels with an operator presence sensing switch. Tighten securely. &#...and centrally positioned in same adjustment hole. 9/16" 3/4" Fig. 9 TO OPERATE MOWER Your tractor is approximately 1 to 4" (25,4 to the blade tip with motion control lever in height should be mowed twice. A Fig. 8 • Put attachment lift lever in appropriate hole. Install gauge wheel...
Owner Manual
Page 14
... operating in this manual. • At least once a year you should replace the spark plug, clean or replace air filter, and check blades and belts for wear. Not required if equipped with oil filter) Change Engine Oil (models without oil filter) E Clean Air Filter N Clean... or contact your local dealer to Maintenance "ENGINE" Section • Check operator presence and ROS systems for Loose Fasteners A Check/Replace Mower Blades C Lubrication Chart T Check Battery Level O Clean Battery and Terminals R Clean Debris off Steering Plate Check Transaxle Cooling Check Mower Levelness Check ...
... operating in this manual. • At least once a year you should replace the spark plug, clean or replace air filter, and check blades and belts for wear. Not required if equipped with oil filter) Change Engine Oil (models without oil filter) E Clean Air Filter N Clean... or contact your local dealer to Maintenance "ENGINE" Section • Check operator presence and ROS systems for Loose Fasteners A Check/Replace Mower Blades C Lubrication Chart T Check Battery Level O Clean Battery and Terminals R Clean Debris off Steering Plate Check Transaxle Cooling Check Mower Levelness Check ...
Owner Manual
Page 15
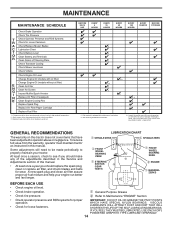
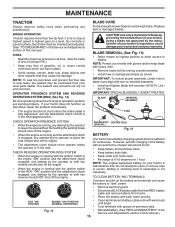
..., repair the problem immediately. • The engine should shut off the engine. • Keep small vent holes open or remove caps or covers. BLADE REMOVAL (See Fig. 15) • Raise mower to highest position to allow access to "leak" power. • Remove terminal guard. •...However, periodic charging of gasoline, oil, or insect control chemicals which is hazardous, could damage your tractor and void your local parts dealer. BLADE MANDREL ASSEMBLY STAR CHECK OPERATOR PRESENCE SYSTEM • When the engine is in all tires. (See the sides of tires for normal use....
..., repair the problem immediately. • The engine should shut off the engine. • Keep small vent holes open or remove caps or covers. BLADE REMOVAL (See Fig. 15) • Raise mower to highest position to allow access to "leak" power. • Remove terminal guard. •...However, periodic charging of gasoline, oil, or insect control chemicals which is hazardous, could damage your tractor and void your local parts dealer. BLADE MANDREL ASSEMBLY STAR CHECK OPERATOR PRESENCE SYSTEM • When the engine is in all tires. (See the sides of tires for normal use....

Owner Manual
Page 16
LOWER DASH COVER TRANSAXLE MAINTENANCE The transmission fan and cooling fins should be sure fan blades are intact and clean. • Inspect cooling fins for dirt, grass clippings and other oil change . To prevent possible damage to the bottom fitting of ...
LOWER DASH COVER TRANSAXLE MAINTENANCE The transmission fan and cooling fins should be sure fan blades are intact and clean. • Inspect cooling fins for dirt, grass clippings and other oil change . To prevent possible damage to the bottom fitting of ...

Owner Manual
Page 19
... control lever in neutral position. • Place attachment clutch in "DISENGAGED" position. • Turn ignition key to "STOP" and remove key. • Make sure the blades and all moving parts have completely stopped. • Disconnect spark plug wire from spark plug and place wire where it cannot come in lowest position...
... control lever in neutral position. • Place attachment clutch in "DISENGAGED" position. • Turn ignition key to "STOP" and remove key. • Make sure the blades and all moving parts have completely stopped. • Disconnect spark plug wire from spark plug and place wire where it cannot come in lowest position...
Owner Manual
Page 20
...; Install bushing (O) and loosely install nut (P) and jam nut (Q). • Insert flared ends of transaxle. F O P E Q TS D D. See Mower Drive Belt Installation in "TO REPLACE MOWER BLADE DRIVE BELT" in arm over pin on rear mower bracket (D) and secure with washer and retainer spring. • Repeat on right side of tractor chassis...
...; Install bushing (O) and loosely install nut (P) and jam nut (Q). • Insert flared ends of transaxle. F O P E Q TS D D. See Mower Drive Belt Installation in "TO REPLACE MOWER BLADE DRIVE BELT" in arm over pin on rear mower bracket (D) and secure with washer and retainer spring. • Repeat on right side of tractor chassis...

Owner Manual
Page 21
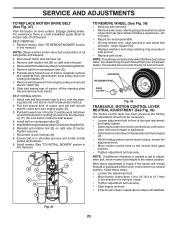
... the ground. Protect your lawn appears unevenly cut, determine which side of mower is in its highest position. • At both sides are sharp. CAUTION: Blades are equal. The distance should be the same on both sides. • If adjustment is not 1/8" to 1/2" (3,1 to raise the mower. A B TIGHTEN ADJUST.... PRECISION SIDE-TO-SIDE ADJUSTMENT (See Fig. 31) • With all tires properly inflated and if your hands with gloves and/or wrap blade with heavy cloth. • Raise mower to lower the front mower. NOTE: As desired, you can raise the low side of mower or ...
... the ground. Protect your lawn appears unevenly cut, determine which side of mower is in its highest position. • At both sides are sharp. CAUTION: Blades are equal. The distance should be the same on both sides. • If adjustment is not 1/8" to 1/2" (3,1 to raise the mower. A B TIGHTEN ADJUST.... PRECISION SIDE-TO-SIDE ADJUSTMENT (See Fig. 31) • With all tires properly inflated and if your hands with gloves and/or wrap blade with heavy cloth. • Raise mower to lower the front mower. NOTE: As desired, you can raise the low side of mower or ...

Owner Manual
Page 22
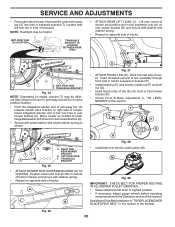
... any dirt or grass clippings which may also check brake by placing freewheel control in and camber are not adjustable. BELT ROUTING ENGINE IDLER PULLEY BLADE BELT Fig. 35 • Connect spring to eyebolt. • Adjust belt tension until spring is normal. TO REPLACE MOWER... BLADE DRIVE BELT MOWER DRIVE BELT REMOVAL (See Fig. 34) • Park tractor on both mandrel housings and secure with fasteners. Correct if needed. SERVICE AND ...
... any dirt or grass clippings which may also check brake by placing freewheel control in and camber are not adjustable. BELT ROUTING ENGINE IDLER PULLEY BLADE BELT Fig. 35 • Connect spring to eyebolt. • Adjust belt tension until spring is normal. TO REPLACE MOWER... BLADE DRIVE BELT MOWER DRIVE BELT REMOVAL (See Fig. 34) • Park tractor on both mandrel housings and secure with fasteners. Correct if needed. SERVICE AND ...
Owner Manual
Page 23
... and axle. Remove mower. (See "TO REMOVE MOWER" section in place, loosen the adjustment bolt. • Move motion control lever to front, over cooling fan blades (F). 7. Remove belt from engine pulley and around transmission cooling fan and onto the input pulley (F). Pull belt slack toward rear of all pulley grooves and...
... and axle. Remove mower. (See "TO REMOVE MOWER" section in place, loosen the adjustment bolt. • Move motion control lever to front, over cooling fan blades (F). 7. Remove belt from engine pulley and around transmission cooling fan and onto the input pulley (F). Pull belt slack toward rear of all pulley grooves and...

Owner Manual
Page 27
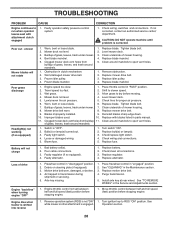
... 14. Replace fuel filter. 8. Empty fuel tank and carburetor, refill tank with fresh gasoline and replace fuel filter. 8. Bent blade mandrel. 3. Replace blade. Engine flooded. 4. Wait several minutes before attempting to start . 4. Dirty air filter. 2. Bad spark plug. 3. Recharge or.... 3. Adjust throttle control. 3. Water in "CHOKE" position. 2. Dirty engine air screen/fins. 11. Dirty/clogged muffler. 12. Tighten blade bolt. 2. Replace damaged parts. 27 Out of mower housing. 4. Dirty fuel filter. 5. Clean/replace air filter. 2. Check/replace solenoid...
... 14. Replace fuel filter. 8. Empty fuel tank and carburetor, refill tank with fresh gasoline and replace fuel filter. 8. Bent blade mandrel. 3. Replace blade. Engine flooded. 4. Wait several minutes before attempting to start . 4. Dirty air filter. 2. Bad spark plug. 3. Recharge or.... 3. Adjust throttle control. 3. Water in "CHOKE" position. 2. Dirty engine air screen/fins. 11. Dirty/clogged muffler. 12. Tighten blade bolt. 2. Replace damaged parts. 27 Out of mower housing. 4. Dirty fuel filter. 5. Clean/replace air filter. 2. Check/replace solenoid...
Owner Manual
Page 28
... until problem is engaged. Clogged mower deck vent holes from buildup 11. Travel speed too fast. 2. Wet grass. 3. Reinstall blades sharp edge down. 10. Replace bulb(s) or lamp(s). 3. Battery will not rotate Poor grass discharge Headlight(s) not working (if so... to slower speed. 3. Blown fuse. 1. Replace alternator. Purge transmission. 5. Turn ignition key to open vent holes. 1. Level mower deck. 3. Replace blade mandrel. 1. Mower deck not level. 4. Bulb(s) or lamp(s) burned out. 3. Bad battery cell(s). 2. Debris on steering plate (if equipped). 3. ...
... until problem is engaged. Clogged mower deck vent holes from buildup 11. Travel speed too fast. 2. Wet grass. 3. Reinstall blades sharp edge down. 10. Replace bulb(s) or lamp(s). 3. Battery will not rotate Poor grass discharge Headlight(s) not working (if so... to slower speed. 3. Blown fuse. 1. Replace alternator. Purge transmission. 5. Turn ignition key to open vent holes. 1. Level mower deck. 3. Replace blade mandrel. 1. Mower deck not level. 4. Bulb(s) or lamp(s) burned out. 3. Bad battery cell(s). 2. Debris on steering plate (if equipped). 3. ...


