
Owners Manual
Page 5
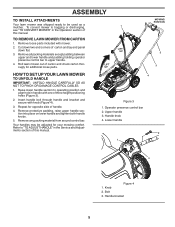
... three height positioning holes (Figure 3). 2. Refer to "TO ADJUST HANDLE" in the Operation section of this manual. 4 Figure 3 1. Knob 2. Your handles may be used as a mulcher. Lower handle 2 1 3 Figure 4 1. Handle bracket 5 Repeat for your mowing comfort. Handle knob 4. Cut down flat. 3. Remove any packing material from around control bar. Remove protective...
... three height positioning holes (Figure 3). 2. Refer to "TO ADJUST HANDLE" in the Operation section of this manual. 4 Figure 3 1. Knob 2. Your handles may be used as a mulcher. Lower handle 2 1 3 Figure 4 1. Handle bracket 5 Repeat for your mowing comfort. Handle knob 4. Cut down flat. 3. Remove any packing material from around control bar. Remove protective...
Owners Manual
Page 8
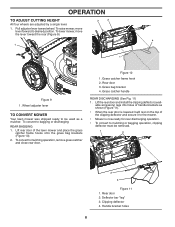
...; When the rear door is now ready for rear discharging operation. • To convert to mulching or bagging operation, clipping deflector must be used as a mulcher. Clipping deflector 4. OPERATION TO ADJUST CUTTING HEIGHT All four wheels are adjusted by a single lever. 1. Pull adjuster lever toward the rear (Figure 9). 3 2 4 1 1 Figure 9 1. Wheel adjuster...
...; When the rear door is now ready for rear discharging operation. • To convert to mulching or bagging operation, clipping deflector must be used as a mulcher. Clipping deflector 4. OPERATION TO ADJUST CUTTING HEIGHT All four wheels are adjusted by a single lever. 1. Pull adjuster lever toward the rear (Figure 9). 3 2 4 1 1 Figure 9 1. Wheel adjuster...
Owners Manual
Page 9
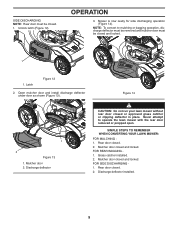
... the lawn mower with the rear door removed or propped open. Mulcher door 2. Rear door closed and locked. Mulcher door closed . 2. Never attempt to mulching or bagging operation, discharge deflector must be removed and mulcher door must be closed and locked. 1 1. Rear door closed ...and locked. Mower is now ready for side discharging operation (Figure 14). Figure 14 1 2 Figure 13 1. Mulcher door closed . 2. SIDE DISCHARGING NOTE: Rear door must be closed. 1. Latch Figure 12 2. Discharge deflector CAUTION: Do not run your lawn...
... the lawn mower with the rear door removed or propped open. Mulcher door 2. Rear door closed and locked. Mulcher door closed . 2. Never attempt to mulching or bagging operation, discharge deflector must be removed and mulcher door must be closed and locked. 1 1. Rear door closed ...and locked. Mower is now ready for side discharging operation (Figure 14). Figure 14 1 2 Figure 13 1. Mulcher door closed . 2. SIDE DISCHARGING NOTE: Rear door must be closed. 1. Latch Figure 12 2. Discharge deflector CAUTION: Do not run your lawn...
Owners Manual
Page 13
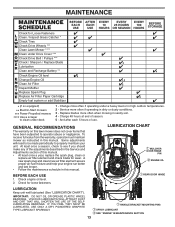
... AND DIRT THAT WILL SHORTEN THE LIFE OF THE SELFLUBRICATING BEARINGS. Some adjustments will need to be made periodically to clean under deck 1 - LUBRICATION CHART MULCHER DOOR HINGE PIN ENGINE OIL REAR DOOR HINGE LUBRICATION Keep unit well lubricated (See "LUBRICATION CHART"). MAINTENANCE Check for Loose Fasteners Clean / Inspect Grass Catcher...
... AND DIRT THAT WILL SHORTEN THE LIFE OF THE SELFLUBRICATING BEARINGS. Some adjustments will need to be made periodically to clean under deck 1 - LUBRICATION CHART MULCHER DOOR HINGE PIN ENGINE OIL REAR DOOR HINGE LUBRICATION Keep unit well lubricated (See "LUBRICATION CHART"). MAINTENANCE Check for Loose Fasteners Clean / Inspect Grass Catcher...
Owners Manual
Page 17
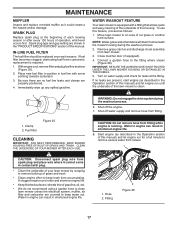
... the fitting. With engine cool, remove filter and plug fuel line sections (Figure 25). 2. Move lawn mower to the fitting where shown (Figure 26). Close mulcher door (if equipped). 4. Be sure there are no leaks are properly positioned. 4. If no fuel line leaks and clamps are present, start engine (as described...
... the fitting. With engine cool, remove filter and plug fuel line sections (Figure 25). 2. Move lawn mower to the fitting where shown (Figure 26). Close mulcher door (if equipped). 4. Be sure there are no leaks are properly positioned. 4. If no fuel line leaks and clamps are present, start engine (as described...
Parts List
Page 3
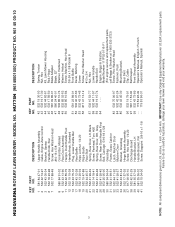
...RH, Grey Screw, Rear Door/Handle Pivot Bolt, Carriage 5/16-18 x 5/8 Grassbag Frame, Grass Catcher Latch, Mulcher Door Mulcher Door Bracket, Grassbag Hinge Bracket Assembly Screw, Hex Head 1/4-20 Discharge Guard Handle Bracket, LH Handle Bracket, RH Screw..., Dogpoint 3/8-16 x 1-1/8 KEY PART NO. HUSQVARNA ROTARY LAWN MOWER - Failure to do... 3 NOTE: All component dimensions given in U.S. MODEL NO. HU775H (96145001000) PRODUCT NO. 961 45 00-10 KEY PART NO.
...RH, Grey Screw, Rear Door/Handle Pivot Bolt, Carriage 5/16-18 x 5/8 Grassbag Frame, Grass Catcher Latch, Mulcher Door Mulcher Door Bracket, Grassbag Hinge Bracket Assembly Screw, Hex Head 1/4-20 Discharge Guard Handle Bracket, LH Handle Bracket, RH Screw..., Dogpoint 3/8-16 x 1-1/8 KEY PART NO. HUSQVARNA ROTARY LAWN MOWER - Failure to do... 3 NOTE: All component dimensions given in U.S. MODEL NO. HU775H (96145001000) PRODUCT NO. 961 45 00-10 KEY PART NO.