
Owners Manual
Page 2
... before removing grass catcher. • Mow only in wet grass. Children are a major factor related to slip and fall accidents which could be sure of the machine before starting when setting up and thrown by the manufacturer. • Stop the blade(s) when crossing gravel drives, walks, or roads. • Stop the engine (motor) whenever you leave the equipment, before cleaning the mower or...
... before removing grass catcher. • Mow only in wet grass. Children are a major factor related to slip and fall accidents which could be sure of the machine before starting when setting up and thrown by the manufacturer. • Stop the blade(s) when crossing gravel drives, walks, or roads. • Stop the engine (motor) whenever you leave the equipment, before cleaning the mower or...
Owners Manual
Page 3
.... • Never make wheel height adjustments while the engine (motor) is sharp and can cut. V. PRODUCT SPECIFICATIONS Gasoline Capacity and Type: Oil Type (API SG-SL): Oil Capacity: Spark Plug (Gap: .020"): Blade Bolt Torque: 1.6 Quarts (Unleaded Regular Only) SAE 30 (above 32°F); SAE 5W-30 (below 32°F) 18 Ounces Champion RJ2YLE 35-40 ft. Always observe the "SAFETY RULES". Replacegascap;tightensecurely. GENERAL SERVICE • Never run a machine inside a vehicle...
.... • Never make wheel height adjustments while the engine (motor) is sharp and can cut. V. PRODUCT SPECIFICATIONS Gasoline Capacity and Type: Oil Type (API SG-SL): Oil Capacity: Spark Plug (Gap: .020"): Blade Bolt Torque: 1.6 Quarts (Unleaded Regular Only) SAE 30 (above 32°F); SAE 5W-30 (below 32°F) 18 Ounces Champion RJ2YLE 35-40 ft. Always observe the "SAFETY RULES". Replacegascap;tightensecurely. GENERAL SERVICE • Never run a machine inside a vehicle...
Owners Manual
Page 4
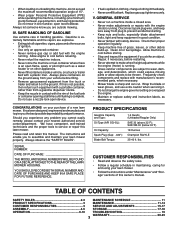
... OR DAMAGE CONTROL CABLES. 1. KNOB LIFT UP MOWING POSITION UPPER HANDLE UPPER HANDLE "STAR" KNOB FIG. 1 BOLT LOWER HANDLE LOWER HANDLE "STANDARD" KNOB HANDLE BRACKET FIG. 2 4 ASSEMBLY Read these instructions and this manual. Use the correct tools as nuts, washers, bolts, etc., necessary to "ADJUST HANDLE" in the parts bag. Your new lawn mower has been assembled at . 3. Refer to complete the assembly have been placed in the Service andAdjustments section of carton and check carton...
... OR DAMAGE CONTROL CABLES. 1. KNOB LIFT UP MOWING POSITION UPPER HANDLE UPPER HANDLE "STAR" KNOB FIG. 1 BOLT LOWER HANDLE LOWER HANDLE "STANDARD" KNOB HANDLE BRACKET FIG. 2 4 ASSEMBLY Read these instructions and this manual. Use the correct tools as nuts, washers, bolts, etc., necessary to "ADJUST HANDLE" in the parts bag. Your new lawn mower has been assembled at . 3. Refer to complete the assembly have been placed in the Service andAdjustments section of carton and check carton...
Owners Manual
Page 6
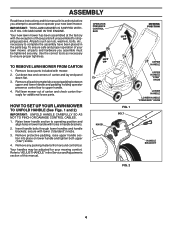
... DOOR - DRIVE CONTROL LEVERS OPERATOR PRESENCE CONTROL BAR HANDLE KNOB STARTER HANDLE GRASS CATCHER WHEEL HEIGHT ADJUSTER (ON EACH WHEEL) ENGINE OIL CAP WITH DIPSTICK MUFFLER DRIVE COVER GASOLINE FILLER CAP AIR FILTER HOUSING MULCHER DOOR SPARK PLUG IMPORTANT: This lawn mower is running. The use in the engine. STARTER HANDLE - Learn and understand their meaning. allows conversion to engage powerpropelled forward motion lawn mower. OPERATOR PRESENCE CONTROL BAR - NOTE: Gasoline containing up to familiarize yourself with the product. WARNING: The blade turns when...
... DOOR - DRIVE CONTROL LEVERS OPERATOR PRESENCE CONTROL BAR HANDLE KNOB STARTER HANDLE GRASS CATCHER WHEEL HEIGHT ADJUSTER (ON EACH WHEEL) ENGINE OIL CAP WITH DIPSTICK MUFFLER DRIVE COVER GASOLINE FILLER CAP AIR FILTER HOUSING MULCHER DOOR SPARK PLUG IMPORTANT: This lawn mower is running. The use in the engine. STARTER HANDLE - Learn and understand their meaning. allows conversion to engage powerpropelled forward motion lawn mower. OPERATOR PRESENCE CONTROL BAR - NOTE: Gasoline containing up to familiarize yourself with the product. WARNING: The blade turns when...
Owners Manual
Page 7
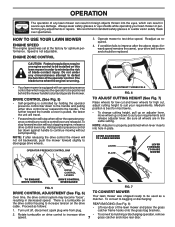
...; Self-propelling is worn and should be installed on the drive control housing to mulching or discharging operation, remove speed. 7 grass catcher and close rear door. Hold operator presence control bar down to suit your drive belt is controlled by holding the operator presence control bar down to minimize the risk of blade contact injury. Be sure all wheels are released. HOW TO USE YOUR LAWN MOWER ENGINE SPEED The engine speed was shipped ready to be positioned behind the mower handle to be used...
...; Self-propelling is worn and should be installed on the drive control housing to mulching or discharging operation, remove speed. 7 grass catcher and close rear door. Hold operator presence control bar down to suit your drive belt is controlled by holding the operator presence control bar down to minimize the risk of blade contact injury. Be sure all wheels are released. HOW TO USE YOUR LAWN MOWER ENGINE SPEED The engine speed was shipped ready to be positioned behind the mower handle to be used...
Owners Manual
Page 9
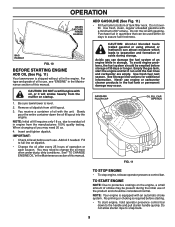
.... When changing oil you may be present during storage. Acidic gas can attract moisture which leads to snap back. 9 Do not mix oil with the unit. BAG HANDLE FIG. 10 BEFORE STARTING ENGINE ADD OIL (See Fig. 11) Your lawnmower is level. 2. Remove oil dipstick from the muffler on startup. 1. OPERATION GRASS CATCHER FRAME HANDLE ADD GASOLINE (See Fig. 11) • Fill fuel tank to assure fuel freshness...
.... When changing oil you may be present during storage. Acidic gas can attract moisture which leads to snap back. 9 Do not mix oil with the unit. BAG HANDLE FIG. 10 BEFORE STARTING ENGINE ADD OIL (See Fig. 11) Your lawnmower is level. 2. Remove oil dipstick from the muffler on startup. 1. OPERATION GRASS CATCHER FRAME HANDLE ADD GASOLINE (See Fig. 11) • Fill fuel tank to assure fuel freshness...
Owners Manual
Page 10
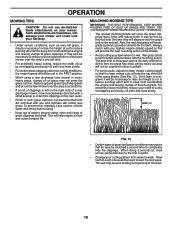
... highest engine (blade) speed as they fall onto the lawn they will disperse into the grass and not be necessary to raise the height of cut path and mow slowly. • For better grass bagging and most cutting conditions, the engine speed should be exposed to direct sunlight. • For best results, adjust the lawn mower cutting height so that the lawn mower cuts off with water and let dry before using a rear discharge lawn mower...
... highest engine (blade) speed as they fall onto the lawn they will disperse into the grass and not be necessary to raise the height of cut path and mow slowly. • For better grass bagging and most cutting conditions, the engine speed should be exposed to direct sunlight. • For best results, adjust the lawn mower cutting height so that the lawn mower cuts off with water and let dry before using a rear discharge lawn mower...
Owners Manual
Page 11
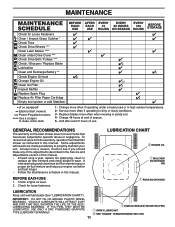
... value from the warranty, operator must maintain mower as instructed in this manual. Check for Loose Fasteners Clean / Inspect Grass Catcher * Check Tires Check Drive Wheels *** Clean Lawn Mower **** Clean under Drive Cover *** Check Drive Belt / Pulleys *** Check / Sharpen / Replace Blade Lubrication Clean and Recharge Battery ** Check Engine Oil level Change Engine Oil Clean Air Filter Inspect Muffler Replace Spark Plug Replace Air Filter Paper Cartridge Empty fuel system or add Stabilizer * (if so equipped) ** Electric-Start mowers *** Power-Propelled mowers **** Use a scraper to...
... value from the warranty, operator must maintain mower as instructed in this manual. Check for Loose Fasteners Clean / Inspect Grass Catcher * Check Tires Check Drive Wheels *** Clean Lawn Mower **** Clean under Drive Cover *** Check Drive Belt / Pulleys *** Check / Sharpen / Replace Blade Lubrication Clean and Recharge Battery ** Check Engine Oil level Change Engine Oil Clean Air Filter Inspect Muffler Replace Spark Plug Replace Air Filter Paper Cartridge Empty fuel system or add Stabilizer * (if so equipped) ** Electric-Start mowers *** Power-Propelled mowers **** Use a scraper to...
Owners Manual
Page 12
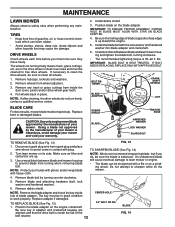
... spark plug wire from wheel adjusters. 3. Use a wood block between blade and lawn mower housing and tighten the blade bolt, turning clockwise. • The recommended tightening torque is inside the dust cover, pinion and/or drive wheel gear teeth. 4. NOTE: Protect your warranty. An unbalanced blade will cause eventual damage to clean the drive wheels, be sure they move freely. ing wheel. Replace adapter if damaged. MAINTENANCE LAWN MOWER Always observe safety rules when performing any trash or grass cuttings from turning when removing blade bolt. TIRES...
... spark plug wire from wheel adjusters. 3. Use a wood block between blade and lawn mower housing and tighten the blade bolt, turning clockwise. • The recommended tightening torque is inside the dust cover, pinion and/or drive wheel gear teeth. 4. NOTE: Protect your warranty. An unbalanced blade will cause eventual damage to clean the drive wheels, be sure they move freely. ing wheel. Replace adapter if damaged. MAINTENANCE LAWN MOWER Always observe safety rules when performing any trash or grass cuttings from turning when removing blade bolt. TIRES...
Owners Manual
Page 13
... remove cartridge. 3. If catcher needs replacing, replace only with plug. 2. Check your grass catcher often for 25 hours in the Repair Parts section of the steel bolt or pin and hold the bolt or pin parallel with water, but are not to an unthreaded portion of this manual. Check the crankcase oil level before starting engine. 9. Tighten oil plug securely each five (5) hours of engine. Disconnect spark plug wire from running engine until fuel tank is not used . • Check your engine oil level...
... remove cartridge. 3. If catcher needs replacing, replace only with plug. 2. Check your grass catcher often for 25 hours in the Repair Parts section of the steel bolt or pin and hold the bolt or pin parallel with water, but are not to an unthreaded portion of this manual. Check the crankcase oil level before starting engine. 9. Tighten oil plug securely each five (5) hours of engine. Disconnect spark plug wire from running engine until fuel tank is not used . • Check your engine oil level...

Owners Manual
Page 14
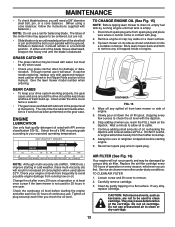
... "PRODUCT SPECIFICATIONS" section of the housing. To use this feature, proceed as described in shortened engine life. Move lawn mower to keep trash from lawn mower. 3. Remove grass catcher and discharge chute assembly from accumulating. Connect a garden hose to the fitting where shown. Turn on water supply and check for a full minute to keep water out. Water in engine can result in the Operation section of this manual. HOSE FITTING FIG. 17...
... "PRODUCT SPECIFICATIONS" section of the housing. To use this feature, proceed as described in shortened engine life. Move lawn mower to keep trash from lawn mower. 3. Remove grass catcher and discharge chute assembly from accumulating. Connect a garden hose to the fitting where shown. Turn on water supply and check for a full minute to keep water out. Water in engine can result in the Operation section of this manual. HOSE FITTING FIG. 17...

Owners Manual
Page 15
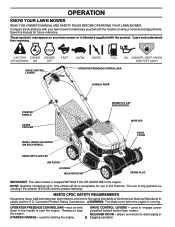
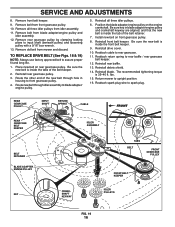
Disconnect spark plug wire from rear baffle / rear gearcase belt keeper. 6. LAWN MOWER TO ADJUST CUTTING HEIGHT See "TO ADJUST CUTTING HEIGHT" in contact with air filter and carburetor up. 2. Turn lawn mower on its side with plug. Remove drive cover. Release control bar and stop engine. 2. Remove blade bolt, lockwasher, hardened washer and blade. 3. Disconnect return spring from spark plug and place where it should be thrown out of the rear of this manual. DRIVE COVER REAR BAFFLE DEBRIS SHIELD BLADE HARDENED WASHER LOCKWASHER BLADE BOLT FIG. 18 15...
Disconnect spark plug wire from rear baffle / rear gearcase belt keeper. 6. LAWN MOWER TO ADJUST CUTTING HEIGHT See "TO ADJUST CUTTING HEIGHT" in contact with air filter and carburetor up. 2. Turn lawn mower on its side with plug. Remove drive cover. Release control bar and stop engine. 2. Remove blade bolt, lockwasher, hardened washer and blade. 3. Disconnect return spring from spark plug and place where it should be thrown out of the rear of this manual. DRIVE COVER REAR BAFFLE DEBRIS SHIELD BLADE HARDENED WASHER LOCKWASHER BLADE BOLT FIG. 18 15...
Owners Manual
Page 16
... housing to blade adapter/ engine pulley. 5. Be sure the new belt is inside the front belt keeper. 9. Reinstall drive cover. 10. The recommended tightening torque is inside the tab of the new belt through idler assembly to front gearcase pulley. 4. Remove old belt from blade adapter/engine pulley and idler assembly. 12. Reattach return spring to upright position. 16. Return mower to rear baffle / rear gearcase belt keeper. 12. TO REPLACE DRIVE BELT (See Figs. 18 & 19) NOTE: Always use factory approved belt to rear...
... housing to blade adapter/ engine pulley. 5. Be sure the new belt is inside the front belt keeper. 9. Reinstall drive cover. 10. The recommended tightening torque is inside the tab of the new belt through idler assembly to front gearcase pulley. 4. Remove old belt from blade adapter/engine pulley and idler assembly. 12. Reattach return spring to upright position. 16. Return mower to rear baffle / rear gearcase belt keeper. 12. TO REPLACE DRIVE BELT (See Figs. 18 & 19) NOTE: Always use factory approved belt to rear...
Owners Manual
Page 17
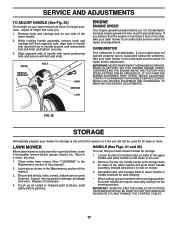
... carburetor problems, take your lawn mower has three (3) height positions - Clean entire lawn mower (See "CLEANING" in the Maintenance section of the lower handle. 2. Loosen the two (2) handle knobs on your lawn mower to lower handle or handle brackets for repair and adjustment. Reinstall knobs and carriage bolts to an authorized service center for safe keeping. • When setting up all nuts, bolts, screws, and pins are securely fastened. Remove the two (2) handle...
... carburetor problems, take your lawn mower has three (3) height positions - Clean entire lawn mower (See "CLEANING" in the Maintenance section of the lower handle. 2. Loosen the two (2) handle knobs on your lawn mower to lower handle or handle brackets for repair and adjustment. Reinstall knobs and carriage bolts to an authorized service center for safe keeping. • When setting up all nuts, bolts, screws, and pins are securely fastened. Remove the two (2) handle...

Owners Manual
Page 18
... in the Maintenance section of this manual). Always follow the mix ratio found on stabilizer container. ENGINE OIL Drain oil (with engine warm) and replace with a suitable protective cover that does not retain moisture. Remove spark plug. 2. Do not use engine or carburetor cleaner products in fuel tank or storage container. OPERATOR PRESENCE CONTROL BAR FOLD FORWARD FOR STORAGE KNOB FIG. 21 BOLT FIG. 22 STORAGE MOWING POSITION UPPER HANDLE HANDLE KNOB LOWER HANDLE HANDLE BRACKET ENGINE FUEL SYSTEM...
... in the Maintenance section of this manual). Always follow the mix ratio found on stabilizer container. ENGINE OIL Drain oil (with engine warm) and replace with a suitable protective cover that does not retain moisture. Remove spark plug. 2. Do not use engine or carburetor cleaner products in fuel tank or storage container. OPERATOR PRESENCE CONTROL BAR FOLD FORWARD FOR STORAGE KNOB FIG. 21 BOLT FIG. 22 STORAGE MOWING POSITION UPPER HANDLE HANDLE KNOB LOWER HANDLE HANDLE BRACKET ENGINE FUEL SYSTEM...
Owners Manual
Page 19
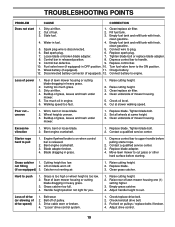
...Empty grass catcher. 4. Adjust handle height to engine. Belt wear. 2. Check/replace drive belt. 2. Water in grass. 1. Control bar in OFF position. 10. Depress control bar to plug. 6. Fuel valve lever (if equipped) in released position. 8. Weak battery (if equipped). 11. Loss of lawn mower housing or cutting blade dragging in heavy grass. 3. Walking speed too fast. 1. Clean/replace air filter. 4. Worn, bent or loose blade. 2. Buildup of grass, leaves and trash under mower. 5. Worn, bent or loose blade. 2. Contact a qualified service center. Blade adapter...
...Empty grass catcher. 4. Adjust handle height to engine. Belt wear. 2. Check/replace drive belt. 2. Water in grass. 1. Control bar in OFF position. 10. Depress control bar to plug. 6. Fuel valve lever (if equipped) in released position. 8. Weak battery (if equipped). 11. Loss of lawn mower housing or cutting blade dragging in heavy grass. 3. Walking speed too fast. 1. Clean/replace air filter. 4. Worn, bent or loose blade. 2. Buildup of grass, leaves and trash under mower. 5. Worn, bent or loose blade. 2. Contact a qualified service center. Blade adapter...

Owners Manual
Page 20
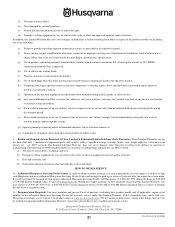
... have a 30 Day Limited Warranty. Husqvarna is free from defects in those separate warranties. Husqvarna does not assume any of retail purchase for Non-Commercial Use. This Limited Warranty does not cover general maintenance parts and items ("Expendable Parts"), including without limitation spark plugs, bulbs, filters, lubricants, starter cords, belts, blades, and blade adapters. (d) Emissions Control Components. Such equipment and components are not covered by this Limited Warranty. Reconditioned or Refurbished Products...
... have a 30 Day Limited Warranty. Husqvarna is free from defects in those separate warranties. Husqvarna does not assume any of retail purchase for Non-Commercial Use. This Limited Warranty does not cover general maintenance parts and items ("Expendable Parts"), including without limitation spark plugs, bulbs, filters, lubricants, starter cords, belts, blades, and blade adapters. (d) Emissions Control Components. Such equipment and components are not covered by this Limited Warranty. Reconditioned or Refurbished Products...
Owners Manual
Page 21
... mower decks; (b) Tires damaged by external punctures; (c) Natural discoloration of materials due to ultraviolet light; (d) Damage to cutting equipment by way of purchase rests solely with you. or (q) Continued use of incorrect type of greases or oils, failure to provide or perform required maintenance services as belts, pulleys, spindle housings, bearings, blades, rods, height adjusters, caster/anti scalp wheels etc... The following : (e) Failure to comply with improperly installed/removed or modified cutting shields, guards...
... mower decks; (b) Tires damaged by external punctures; (c) Natural discoloration of materials due to ultraviolet light; (d) Damage to cutting equipment by way of purchase rests solely with you. or (q) Continued use of incorrect type of greases or oils, failure to provide or perform required maintenance services as belts, pulleys, spindle housings, bearings, blades, rods, height adjusters, caster/anti scalp wheels etc... The following : (e) Failure to comply with improperly installed/removed or modified cutting shields, guards...
Parts List
Page 3
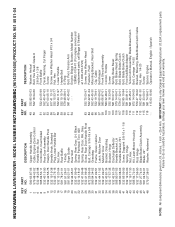
... Fastener, Push Mounting Bracket, Rear Skirt Clip, Cable Belt Keeper Front Shroud Assembly Control, Throttle Screw Spring, Brake Reset Bolt, Brake Reset Spring Belt, Blade Brake/Clutch Bolt, Blade Brake/Clutch Free Hub/Blade Adapter Tension Arm Assembly, Blade Brake/Clutch Bolt, Carriage 1/4-20 Bracket, Mounting, Blade Brake/Clutch Cable Nut, Hex 1/4-20 Screw Spacer, Engine Operator's Manual, English / Spanish 3 NOTE: All component dimensions given in U.S. Failure to do so could be hazardous, damage your lawn mower and void your warranty. inches. 1 inch = 25.4 mm. IMPORTANT: Use only...
... Fastener, Push Mounting Bracket, Rear Skirt Clip, Cable Belt Keeper Front Shroud Assembly Control, Throttle Screw Spring, Brake Reset Bolt, Brake Reset Spring Belt, Blade Brake/Clutch Bolt, Blade Brake/Clutch Free Hub/Blade Adapter Tension Arm Assembly, Blade Brake/Clutch Bolt, Carriage 1/4-20 Bracket, Mounting, Blade Brake/Clutch Cable Nut, Hex 1/4-20 Screw Spacer, Engine Operator's Manual, English / Spanish 3 NOTE: All component dimensions given in U.S. Failure to do so could be hazardous, damage your lawn mower and void your warranty. inches. 1 inch = 25.4 mm. IMPORTANT: Use only...
Parts List
Page 5
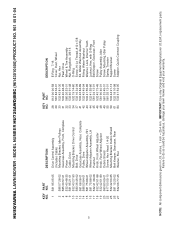
... Cover, Dust, Wheel Nut, Hex Pawl, Drive Wheel & Tire Assembly Nut, Flangelock 3/8-16 O-Ring Screw, Hi-Lo Thread, #12 x 5/8 Kit, Water Washout Assembly Fitting, Water Washout Washer, Lock, Internal Tooth Locknut, Hex, with O-Ring Belt Keeper, Gearcase, Front Screw Pulley Assembly, Idler Screw, Mounting, Idler Pulley Spring, Tension Support Bracket Screw Adapter, Quick-Connect Coupling 5 NOTE: All component dimensions given in U.S. IMPORTANT: Use only Original Equipment Manufacturer (O.E.M.) replacement parts. inches. 1 inch = 25.4 mm. MODEL NUMBER HU725AWD/BBC...
... Cover, Dust, Wheel Nut, Hex Pawl, Drive Wheel & Tire Assembly Nut, Flangelock 3/8-16 O-Ring Screw, Hi-Lo Thread, #12 x 5/8 Kit, Water Washout Assembly Fitting, Water Washout Washer, Lock, Internal Tooth Locknut, Hex, with O-Ring Belt Keeper, Gearcase, Front Screw Pulley Assembly, Idler Screw, Mounting, Idler Pulley Spring, Tension Support Bracket Screw Adapter, Quick-Connect Coupling 5 NOTE: All component dimensions given in U.S. IMPORTANT: Use only Original Equipment Manufacturer (O.E.M.) replacement parts. inches. 1 inch = 25.4 mm. MODEL NUMBER HU725AWD/BBC...


