
Owners Manual
Page 3
... opening at all times until fueling is running . Should you experience any ). Do not use extra caution when servicing it on your lawn mower. • Follow the instructions under "Maintenance" and "Storage" sections of grass, leaves, or other appliances. • Never fi...laws (if any problem you to service or repair this manual. The instructions will enable you cannot easily remedy, please contact your lawn mower properly. PRODUCT SPECIFICATIONS Gasoline Capacity and Type: Oil Type (API SG-SL): Oil Capacity: Spark Plug: Valve Clearance: (±...
... opening at all times until fueling is running . Should you experience any ). Do not use extra caution when servicing it on your lawn mower. • Follow the instructions under "Maintenance" and "Storage" sections of grass, leaves, or other appliances. • Never fi...laws (if any problem you to service or repair this manual. The instructions will enable you cannot easily remedy, please contact your lawn mower properly. PRODUCT SPECIFICATIONS Gasoline Capacity and Type: Oil Type (API SG-SL): Oil Capacity: Spark Plug: Valve Clearance: (±...
Owners Manual
Page 4
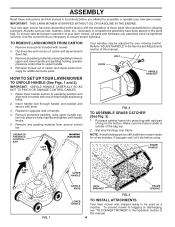
...material from around control bar. Put grass catcher frame into place on the bottom. To ensure safe and proper operation of your lawn mower, all packing materials except padding between upper and lower handle and padding holding operator presence control bar to operating position and align ...manual. 4 FRAME HANDLE LIFT UP FIG. 1 UPPER HANDLE HANDLE KNOB VINYL BINDINGS FRAME OPENING LOWER HANDLE FIG. 3 TO INSTALL ATTACHMENTS Your lawn mower was shipped ready to assemble or operate your mowing comfort. All parts such as a mulcher. Remove loose parts included with knob. 3. ...
...material from around control bar. Put grass catcher frame into place on the bottom. To ensure safe and proper operation of your lawn mower, all packing materials except padding between upper and lower handle and padding holding operator presence control bar to operating position and align ...manual. 4 FRAME HANDLE LIFT UP FIG. 1 UPPER HANDLE HANDLE KNOB VINYL BINDINGS FRAME OPENING LOWER HANDLE FIG. 3 TO INSTALL ATTACHMENTS Your lawn mower was shipped ready to assemble or operate your mowing comfort. All parts such as a mulcher. Remove loose parts included with knob. 3. ...
Owners Manual
Page 5
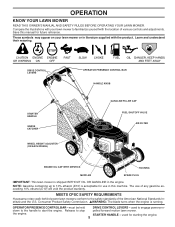
... SHUTOFF VALVE AIR FILTER ENGINE OIL CAP WITH DIPSTICK HOUSING MUFFLER SPARK PLUG IMPORTANT: This lawn mower is shipped WITHOUT OIL OR GASOLINE in this manual for future reference. MEETS CPSC SAFETY REQUIREMENTS Husqvarna rotary walk-behind power lawn mowers conform to start the engine. down to the handle to the safety standards of the...
... SHUTOFF VALVE AIR FILTER ENGINE OIL CAP WITH DIPSTICK HOUSING MUFFLER SPARK PLUG IMPORTANT: This lawn mower is shipped WITHOUT OIL OR GASOLINE in this manual for future reference. MEETS CPSC SAFETY REQUIREMENTS Husqvarna rotary walk-behind power lawn mowers conform to start the engine. down to the handle to the safety standards of the...
Owners Manual
Page 6
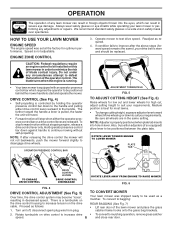
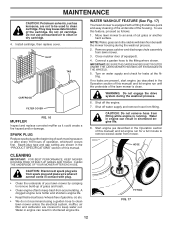
...stopping engine, release a drive control lever only. NOTE: If after the above steps (forward speed remains the same), your lawn mower or performing any lawn mower can result in foreign objects thrown into hole in lever. OPERATOR PRESENCE CONTROL BAR ADJUSTMENT TURNBUCKLE FIG. 5 TO ADJUST CUTTING HEIGHT...installed on drive control to increase drive speed. 6 LEVER ROTATE LEVER AWAY FROM ENGINE TO RAISE MOWER FIG. 6 TO CONVERT MOWER Your lawn mower was set at the factory for most lawns. • To change cutting height, squeeze adjuster lever toward wheel. The further toward the ...
...stopping engine, release a drive control lever only. NOTE: If after the above steps (forward speed remains the same), your lawn mower or performing any lawn mower can result in foreign objects thrown into hole in lever. OPERATOR PRESENCE CONTROL BAR ADJUSTMENT TURNBUCKLE FIG. 5 TO ADJUST CUTTING HEIGHT...installed on drive control to increase drive speed. 6 LEVER ROTATE LEVER AWAY FROM ENGINE TO RAISE MOWER FIG. 6 TO CONVERT MOWER Your lawn mower was set at the factory for most lawns. • To change cutting height, squeeze adjuster lever toward wheel. The further toward the ...
Owners Manual
Page 7
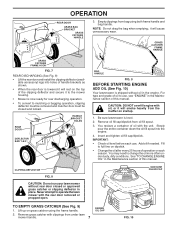
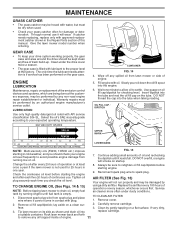
...er on startup. 1. You may need to change the oil more often under lawn mower handle. 7 ENGINE OIL CAP FIG. 10 CLIPPING DEFLECTOR FIG. 8 CAUTION: Do not run your lawn mower without oil in place. Remove grass catcher with oil, or it will cause...ll spout into holes of handle brackets as shown. • When the rear door is lowered it to the mower housing. • Mower is now ready for rear discharging operation. • To convert to full line on dipstick. • Change the... from oil fill spout. 3. For type and grade of oil to operate the lawn mower with the unit.
...er on startup. 1. You may need to change the oil more often under lawn mower handle. 7 ENGINE OIL CAP FIG. 10 CLIPPING DEFLECTOR FIG. 8 CAUTION: Do not run your lawn mower without oil in place. Remove grass catcher with oil, or it will cause...ll spout into holes of handle brackets as shown. • When the rear door is lowered it to the mower housing. • Mower is now ready for rear discharging operation. • To convert to full line on dipstick. • Change the... from oil fill spout. 3. For type and grade of oil to operate the lawn mower with the unit.
Owners Manual
Page 8
...which leads to separation and formation of mulched grass. Do not allow starter rope to ON ( ) position. 3. Always mulch with your lawn when it run the lawn mower over fill. For extremely heavy mulching, reduce your width of the blades. • Avoid cutting your highest engine (blade) ...damage the fuel system of the product and should be set in the FAST position. • When using a rear discharge lawn mower in size so that the lawn mower cuts off with use engine or carburetor cleaner products in the ON position. 2. Acidic gas can become filled with dirt...
...which leads to separation and formation of mulched grass. Do not allow starter rope to ON ( ) position. 3. Always mulch with your lawn when it run the lawn mower over fill. For extremely heavy mulching, reduce your width of the blades. • Avoid cutting your highest engine (blade) ...damage the fuel system of the product and should be set in the FAST position. • When using a rear discharge lawn mower in size so that the lawn mower cuts off with use engine or carburetor cleaner products in the ON position. 2. Acidic gas can become filled with dirt...
Owners Manual
Page 9
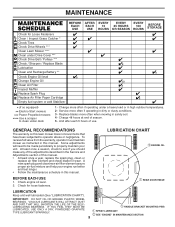
...more often if operating in this lawn mower does not cover items that have been subjected to see if you should make any of this manual. And after each 5 hours of season. 5 - To receive full value from the warranty, operator must maintain mower as instructed in dirty or dusty ... 25 HOURS OR SEASON EVERY 100 HOURS BEFORE STORAGE Check for Loose Fasteners Clean / Inspect Grass Catcher * Check Tires Check Drive Wheels *** Clean Lawn Mower **** Clean under Drive Cover *** Check Drive Belt / Pulleys *** Check / Sharpen / Replace Blade Lubrication Clean and Recharge Battery ** Check Engine ...
...more often if operating in this lawn mower does not cover items that have been subjected to see if you should make any of this manual. And after each 5 hours of season. 5 - To receive full value from the warranty, operator must maintain mower as instructed in dirty or dusty ... 25 HOURS OR SEASON EVERY 100 HOURS BEFORE STORAGE Check for Loose Fasteners Clean / Inspect Grass Catcher * Check Tires Check Drive Wheels *** Clean Lawn Mower **** Clean under Drive Cover *** Check Drive Belt / Pulleys *** Check / Sharpen / Replace Blade Lubrication Clean and Recharge Battery ** Check Engine ...
Owners Manual
Page 10
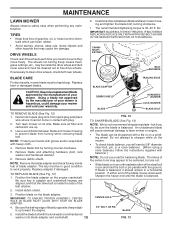
...balancer. (When using a cone balancer, follow the instructions supplied with balancer.) NOTE: Do not use a nail for balancing blade. Do not attempt to lawn mower or engine. • The blade can harm rubber. • Avoid stumps, stones, deep ruts, sharp objects and other hazards that the drive belt...of blade (opposite sharp edge) is balanced, it cannot come in good condition to clean drive wheels, check both rear wheels. 6. Turn lawn mower on the blade adapter. Be sure the trailing edge of gasoline, oil, or insect control chemicals which can be sure they move freely....
...balancer. (When using a cone balancer, follow the instructions supplied with balancer.) NOTE: Do not use a nail for balancing blade. Do not attempt to lawn mower or engine. • The blade can harm rubber. • Avoid stumps, stones, deep ruts, sharp objects and other hazards that the drive belt...of blade (opposite sharp edge) is balanced, it cannot come in good condition to clean drive wheels, check both rear wheels. 6. Turn lawn mower on the blade adapter. Be sure the trailing edge of gasoline, oil, or insect control chemicals which can be sure they move freely....
Owners Manual
Page 11
... more often under the drive cover twice a season. • The gear case is empty. 1. TO CLEAN AIR FILTER 1. Carefully remove cartridge. Tip lawn mower on oil fill cap/dipstick for checking level. Through normal use . Warranty repairs must be dry when used for damage or deterioration. Wipe off... FIG. 14 4. Continue adding small amounts of the emission control devices and systems, which are being done at least once a year if the lawn mower is not used . • Check your engine oil level frequently to your drive system working properly, the gear case and area around the drive...
... more often under the drive cover twice a season. • The gear case is empty. 1. TO CLEAN AIR FILTER 1. Carefully remove cartridge. Tip lawn mower on oil fill cap/dipstick for checking level. Through normal use . Warranty repairs must be dry when used for damage or deterioration. Wipe off... FIG. 14 4. Continue adding small amounts of the emission control devices and systems, which are being done at least once a year if the lawn mower is not used . • Check your engine oil level frequently to your drive system working properly, the gear case and area around the drive...
Owners Manual
Page 12
... let engine run for leaks at the beginning of each mowing season or after every 100 hours of operation, whichever occurs first. Move lawn mower to keep water out. Remove grass catcher and discharge chute assembly from fitting while engine is running. WARNING: Do not engage the drive..., are shown in contact with a fitting that allows quick and easy cleaning of the underside of the lawn mower is equipped with plug. • Clean the underside of your lawn mower by scraping to remove build-up of grass and trash. • Clean engine often to an area of the...
... let engine run for leaks at the beginning of each mowing season or after every 100 hours of operation, whichever occurs first. Move lawn mower to keep water out. Remove grass catcher and discharge chute assembly from fitting while engine is running. WARNING: Do not engage the drive..., are shown in contact with a fitting that allows quick and easy cleaning of the underside of the lawn mower is equipped with plug. • Clean the underside of your lawn mower by scraping to remove build-up of grass and trash. • Clean engine often to an area of the...
Owners Manual
Page 13
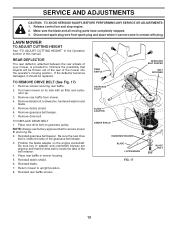
... securing rear baffle. 2. Place new drive belt on the engine crankshaft. Be sure key in mower housing. 5. Release control bar and stop engine. 2. LAWN MOWER TO ADJUST CUTTING HEIGHT See "TO ADJUST CUTTING HEIGHT" in contact with air filter and carburetor...factory approved belt to upright position. 8. SERVICE AND ADJUSTMENTS CAUTION: TO AVOID SERIOUS INJURY, BEFORE PERFORMING ANY SERVICE OR ADJUSTMENTS: 1. Turn lawn mower on its side with plug. Remove debris shield. 6. Remove drive belt. Reinstall blade. 7. Place rear baffle in adapter and ...
... securing rear baffle. 2. Place new drive belt on the engine crankshaft. Be sure key in mower housing. 5. Release control bar and stop engine. 2. LAWN MOWER TO ADJUST CUTTING HEIGHT See "TO ADJUST CUTTING HEIGHT" in contact with air filter and carburetor...factory approved belt to upright position. 8. SERVICE AND ADJUSTMENTS CAUTION: TO AVOID SERIOUS INJURY, BEFORE PERFORMING ANY SERVICE OR ADJUSTMENTS: 1. Turn lawn mower on its side with plug. Remove debris shield. 6. Remove drive belt. Reinstall blade. 7. Place rear baffle in adapter and ...
Owners Manual
Page 14
Align opposite side of this manual. 3. OVERSPEEDING THE ENGINE ABOVE THE FACTORY HIGH SPEED SETTING CAN BE DANGEROUS. LAWN MOWER When lawn mower is to rest on mower. 3. Clean entire lawn mower (See "CLEANING" in the Maintenance section of handle with same positioning hole and secure with desired hole in personal injury. ... to lower handle or handle brackets for repair and/or adjustment. Be sure that the engine is not adjustable. Touch up your lawn mower to height that suits you believe that all nuts, bolts, screws, and pins are being done at the end of the season...
Align opposite side of this manual. 3. OVERSPEEDING THE ENGINE ABOVE THE FACTORY HIGH SPEED SETTING CAN BE DANGEROUS. LAWN MOWER When lawn mower is to rest on mower. 3. Clean entire lawn mower (See "CLEANING" in the Maintenance section of handle with same positioning hole and secure with desired hole in personal injury. ... to lower handle or handle brackets for repair and/or adjustment. Be sure that the engine is not adjustable. Touch up your lawn mower to height that suits you believe that all nuts, bolts, screws, and pins are being done at the end of the season...
Owners Manual
Page 15
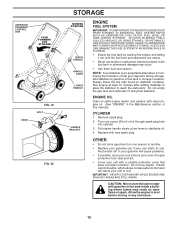
... your unit to cool before storing in the tank inside a building where fumes may occur. • Use fresh fuel next season. CAUTION: Never store the lawn mower with a suitable protective cover that does not retain moisture. CYLINDER 1. Allow the engine to rust. ALCOHOL BLENDED FUELS (CALLED GASOHOL OR USING ETHANOL OR METHANOL... (29 ml) of oil through spark plug hole into cylinder. 3. Do not empty the gas tank and carburetor if using fuel stabilizer. IMPORTANT: NEVER COVER MOWER WHILE ENGINE AND EXHAUST AREAS ARE STILL WARM.
... your unit to cool before storing in the tank inside a building where fumes may occur. • Use fresh fuel next season. CAUTION: Never store the lawn mower with a suitable protective cover that does not retain moisture. CYLINDER 1. Allow the engine to rust. ALCOHOL BLENDED FUELS (CALLED GASOHOL OR USING ETHANOL OR METHANOL... (29 ml) of oil through spark plug hole into cylinder. 3. Do not empty the gas tank and carburetor if using fuel stabilizer. IMPORTANT: NEVER COVER MOWER WHILE ENGINE AND EXHAUST AREAS ARE STILL WARM.
Owners Manual
Page 16
...(if equipped). 11. Loss of drive speed) 1. Rear of lawn mower housing or cutting blade dragging in OFF position. 10. Clean underside of mower housing. 5. Blade dragging in heavy grass. 2. Rear of lawn mower housing or cutting blade dragging in grass. 1. Empty grass catcher. ...not start 1. Control bar in fuel. 4. Cut at same height. 3. Bent engine crankshaft. 1. Check/replace drive belt. 2. Out of lawn mower housing one (1) setting higher. 3. Water in released position. 8. Replace blade. Loose blade or broken blade adapter. 7. Worn, bent or loose...
...(if equipped). 11. Loss of drive speed) 1. Rear of lawn mower housing or cutting blade dragging in OFF position. 10. Clean underside of mower housing. 5. Blade dragging in heavy grass. 2. Rear of lawn mower housing or cutting blade dragging in grass. 1. Empty grass catcher. ...not start 1. Control bar in fuel. 4. Cut at same height. 3. Bent engine crankshaft. 1. Check/replace drive belt. 2. Out of lawn mower housing one (1) setting higher. 3. Water in released position. 8. Replace blade. Loose blade or broken blade adapter. 7. Worn, bent or loose...
Parts List
Page 3
..., Grassbag Screw, Hex Head 1/4-20 Handle Bracket, LH Handle Bracket, RH Screw, Dogpoint 3/8-16 x 1-1/8 Kit, Lawn Mower Housing KEY PART NO. Failure to do so could be hazardous, damage your lawn mower and void your warranty. NO. 46 532 42 17-82 47 532 43 76-01 48 532 85 10...Shroud Assembly Operator's Manual, English / French Clipping Deflector (available accessory, not shown) 3 NOTE: All component dimensions given in U.S. MODEL NUMBER HU700L (96143006900) PRODUCT NUMBER 961 43 00-69 KEY PART NO. IMPORTANT: Use only Original Equipment Manufacturer (O.E.M.) replacement parts.
..., Grassbag Screw, Hex Head 1/4-20 Handle Bracket, LH Handle Bracket, RH Screw, Dogpoint 3/8-16 x 1-1/8 Kit, Lawn Mower Housing KEY PART NO. Failure to do so could be hazardous, damage your lawn mower and void your warranty. NO. 46 532 42 17-82 47 532 43 76-01 48 532 85 10...Shroud Assembly Operator's Manual, English / French Clipping Deflector (available accessory, not shown) 3 NOTE: All component dimensions given in U.S. MODEL NUMBER HU700L (96143006900) PRODUCT NUMBER 961 43 00-69 KEY PART NO. IMPORTANT: Use only Original Equipment Manufacturer (O.E.M.) replacement parts.
Parts List
Page 5
...: Use only Original Equipment Manufacturer (O.E.M.) replacement parts. Failure to do so could be hazardous, damage your lawn mower and void your warranty. MODEL NUMBER HU700L (96143006900) PRODUCT NUMBER 961 43 00-69 KEY PART NO. NO. 28 812 00 00-58 29 532 18 94-03 30 532 19 17-...
...: Use only Original Equipment Manufacturer (O.E.M.) replacement parts. Failure to do so could be hazardous, damage your lawn mower and void your warranty. MODEL NUMBER HU700L (96143006900) PRODUCT NUMBER 961 43 00-69 KEY PART NO. NO. 28 812 00 00-58 29 532 18 94-03 30 532 19 17-...


