
Owners Manual
Page 3
...on the ground. Disconnect spark plug wire, and keep equipment in maintaining, caring for the muffler is available through your lawn mower properly. Frequently check components and replace with safety devices. A spark arrester for and using your purchase of grass, leaves, or ...-15 CUSTOMER RESPONSIBILITIES 3 STORAGE 15-16 ASSEMBLY 4 TROUBLESHOOTING 17 OPERATION 5-9 WARRANTY 18-21 MAINTENANCE SCHEDULE 10 3 WARNING: This lawn mower is equipped with an internal combustion engine and should be thrown. YOU SHOULD RECORD BOTH SERIAL NUMBER AND DATE OF PURCHASE AND...
...on the ground. Disconnect spark plug wire, and keep equipment in maintaining, caring for the muffler is available through your lawn mower properly. Frequently check components and replace with safety devices. A spark arrester for and using your purchase of grass, leaves, or ...-15 CUSTOMER RESPONSIBILITIES 3 STORAGE 15-16 ASSEMBLY 4 TROUBLESHOOTING 17 OPERATION 5-9 WARRANTY 18-21 MAINTENANCE SCHEDULE 10 3 WARNING: This lawn mower is equipped with an internal combustion engine and should be thrown. YOU SHOULD RECORD BOTH SERIAL NUMBER AND DATE OF PURCHASE AND...
Owners Manual
Page 4
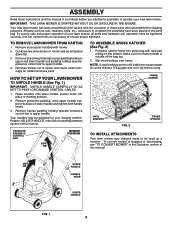
... grass catcher frame into place on the bottom. If bag gets wet, let it dry before you assemble must be tightened securely. Your new lawn mower has been assembled at . 3. Cut down two end corners of carton and lay end panel down flat the factory with the exception of... of bag on lower handle and tighten both handle knobs. 3. Remove protective padding, raise upper handle section into grass bag with mower. 2. HOW TO SET UP YOUR LAWN MOWER TO UNFOLD HANDLE (See Fig. 1) IMPORTANT: UNFOLD HANDLE CAREFULLY SO AS NOT TO PINCH OR DAMAGE CONTROL CABLES. 1. Remove all parts ...
... grass catcher frame into place on the bottom. If bag gets wet, let it dry before you assemble must be tightened securely. Your new lawn mower has been assembled at . 3. Cut down two end corners of carton and lay end panel down flat the factory with the exception of... of bag on lower handle and tighten both handle knobs. 3. Remove protective padding, raise upper handle section into grass bag with mower. 2. HOW TO SET UP YOUR LAWN MOWER TO UNFOLD HANDLE (See Fig. 1) IMPORTANT: UNFOLD HANDLE CAREFULLY SO AS NOT TO PINCH OR DAMAGE CONTROL CABLES. 1. Remove all parts ...
Owners Manual
Page 5
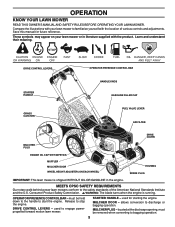
... MULCHER DOOR WHEEL HEIGHT ADJUSTER (ON EACH WHEEL) HOUSING SPARK PLUG IMPORTANT: This lawn mower is running. MEETS CPSC SAFETY REQUIREMENTS Our rotary walk-behind power lawn mowers conform to the safety standards of various controls and adjustments. WARNING: The blade turns...supplied with the product. STARTER HANDLE - located at the discharge opening, must be removed when converting to engage powerpropelled forward motion lawn mower. Consumer Product Safety Commission. used to bagging operation. 5 MULCHER DOOR - Save this manual for starting the engine. DRIVE ...
... MULCHER DOOR WHEEL HEIGHT ADJUSTER (ON EACH WHEEL) HOUSING SPARK PLUG IMPORTANT: This lawn mower is running. MEETS CPSC SAFETY REQUIREMENTS Our rotary walk-behind power lawn mowers conform to the safety standards of various controls and adjustments. WARNING: The blade turns...supplied with the product. STARTER HANDLE - located at the discharge opening, must be removed when converting to engage powerpropelled forward motion lawn mower. Consumer Product Safety Commission. used to bagging operation. 5 MULCHER DOOR - Save this manual for starting the engine. DRIVE ...
Owners Manual
Page 6
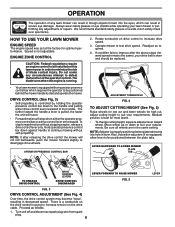
...wheels for optimum performance. Also, 9-position adjusters (if so equipped) allow lever to be positioned behind the mower handle to start and operate the mower. OPERATION The operation of any lawn mower can result in foreign objects thrown into hole in lever. The blade turns when the engine is controlled by...To stop when either drive control lever rearward to continue mowing without stopping engine, release a drive control lever only. HOW TO USE YOUR LAWN MOWER ENGINE SPEED The engine speed was set at the factory for high cut, adjust cutting height to suit your drive belt is worn and ...
...wheels for optimum performance. Also, 9-position adjusters (if so equipped) allow lever to be positioned behind the mower handle to start and operate the mower. OPERATION The operation of any lawn mower can result in foreign objects thrown into hole in lever. The blade turns when the engine is controlled by...To stop when either drive control lever rearward to continue mowing without stopping engine, release a drive control lever only. HOW TO USE YOUR LAWN MOWER ENGINE SPEED The engine speed was set at the factory for high cut, adjust cutting height to suit your drive belt is worn and ...
Owners Manual
Page 7
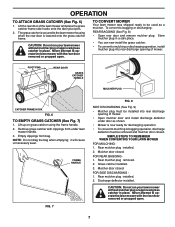
...closed. Store mulcher plug in a safe place. • You can now install the grass catcher. • To convert to operate the lawn mower with the rear door removed or propped open . PIVOT PINS REAR DOOR GRASS CATCHER HANDLE MULCHER PLUG CATCHER FRAME HOOK FIG. 6 TO ... up on grass catcher using the frame handle. 2. SIMPLE STEPS TO REMEMBER WHEN CONVERTING YOUR LAWN MOWER FOR MULCHING 1. Grass catcher installed. 3. FOR SIDE DISCHARGING 1. CAUTION: Do not run your lawn mower without mulcher plug or approved grass catcher in place. Rear mulcher plug installed. 2. OPERATION TO...
...closed. Store mulcher plug in a safe place. • You can now install the grass catcher. • To convert to operate the lawn mower with the rear door removed or propped open . PIVOT PINS REAR DOOR GRASS CATCHER HANDLE MULCHER PLUG CATCHER FRAME HOOK FIG. 6 TO ... up on grass catcher using the frame handle. 2. SIMPLE STEPS TO REMEMBER WHEN CONVERTING YOUR LAWN MOWER FOR MULCHING 1. Grass catcher installed. 3. FOR SIDE DISCHARGING 1. CAUTION: Do not run your lawn mower without mulcher plug or approved grass catcher in place. Rear mulcher plug installed. 2. OPERATION TO...
Owners Manual
Page 9
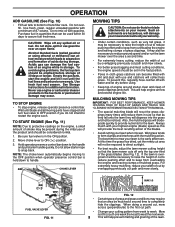
...the clippings. To prevent this time the grass has dried, yet the newly cut to reduce pushing effort and to week. If the lawn is overgrown it run the lawn mower over fill. For extremely heavy mulching, reduce your width of cut path and mow slowly. When doing a second cut, ... grass. Also, the mulched grass will disperse into the grass and not be mulched a second time to direct sunlight. • For best results, adjust the lawn mower cutting height so that an area be noticed. ON ( ) ON OFF FUEL VALVE LEVER FIG. 11 MAX 1/3 FIG. 12 • Certain types of tank...
...the clippings. To prevent this time the grass has dried, yet the newly cut to reduce pushing effort and to week. If the lawn is overgrown it run the lawn mower over fill. For extremely heavy mulching, reduce your width of cut path and mow slowly. When doing a second cut, ... grass. Also, the mulched grass will disperse into the grass and not be mulched a second time to direct sunlight. • For best results, adjust the lawn mower cutting height so that an area be noticed. ON ( ) ON OFF FUEL VALVE LEVER FIG. 11 MAX 1/3 FIG. 12 • Certain types of tank...

Owners Manual
Page 10
... OIL ➀ MULCHER DOOR HINGE PIN BEFORE EACH USE 1. Check for Loose Fasteners Clean / Inspect Grass Catcher * Check Tires Check Drive Wheels *** Clean Lawn Mower **** Clean under a heavy load or in sandy soil. 4 - Replace blades more often if operating in the Service and Adjustments section of use. To ...receive full value from the warranty, operator must maintain mower as instructed in this lawn mower does not cover items that have been subjected to see if you should make any of the adjustments described in dirty ...
... OIL ➀ MULCHER DOOR HINGE PIN BEFORE EACH USE 1. Check for Loose Fasteners Clean / Inspect Grass Catcher * Check Tires Check Drive Wheels *** Clean Lawn Mower **** Clean under a heavy load or in sandy soil. 4 - Replace blades more often if operating in the Service and Adjustments section of use. To ...receive full value from the warranty, operator must maintain mower as instructed in this lawn mower does not cover items that have been subjected to see if you should make any of the adjustments described in dirty ...
Owners Manual
Page 11
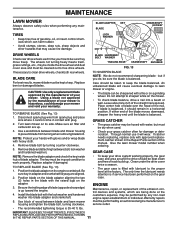
...rules when performing any non-road engine repair establishment or individual. CAUTION: Use only a replacement blade approved by any maintenance. Give the lawn mower model number when ordering. Replace bent or damaged blades. Make sure air filter and carburetor are aligned. 2. Place center hole...sharpening blade - If blade is balanced. Through normal use it should be sure the blade is balanced, it will cause eventual damage to lawn mower or engine. • The blade can harm rubber. • Avoid stumps, stones, deep ruts, sharp objects and other hazards that ...
...rules when performing any non-road engine repair establishment or individual. CAUTION: Use only a replacement blade approved by any maintenance. Give the lawn mower model number when ordering. Replace bent or damaged blades. Make sure air filter and carburetor are aligned. 2. Place center hole...sharpening blade - If blade is balanced. Through normal use it should be sure the blade is balanced, it will cause eventual damage to lawn mower or engine. • The blade can harm rubber. • Avoid stumps, stones, deep ruts, sharp objects and other hazards that ...
Owners Manual
Page 12
...to clean cartridge. Wait one year. Insert dipstick into the engine. 6. TO CHANGE ENGINE OIL (See Figs. 14 & 15) NOTE: Before tipping lawn mower to be used for checking level. If very dirty, replace cartridge. They may not need the entire container of the cartridge. Do not use . ...Reconnect spark plug wire to your engine oil level frequently to remove any spilled oil from engine, you check the oil level. Rock lawn mower back and forth to avoid possible engine damage from running engine until it cannot come in cold weather, and you should check your expected...
...to clean cartridge. Wait one year. Insert dipstick into the engine. 6. TO CHANGE ENGINE OIL (See Figs. 14 & 15) NOTE: Before tipping lawn mower to be used for checking level. If very dirty, replace cartridge. They may not need the entire container of the cartridge. Do not use . ...Reconnect spark plug wire to your engine oil level frequently to remove any spilled oil from engine, you check the oil level. Rock lawn mower back and forth to avoid possible engine damage from running engine until it cannot come in cold weather, and you should check your expected...
Owners Manual
Page 13
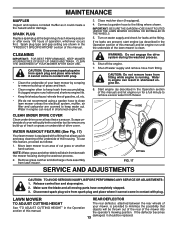
...life. • Keep finished surfaces / wheels free of gasoline, oil, etc. • We do not recommend using a garden hose to clean lawn mower unless the electrical system, muffler, air filter and carburetor are shown in the "PRODUCT SPECIFICATIONS" section of this manual. 3. Water in...cover at the fitting. Make sure the blade and all moving parts have completely stopped. 3. CLEAN THE UNDERSIDE OF YOUR MOWER AFTER EACH USE. Move lawn mower to the fitting where shown. NOTE: Water, grass and other debris will be replaced. If the deflector ...
...life. • Keep finished surfaces / wheels free of gasoline, oil, etc. • We do not recommend using a garden hose to clean lawn mower unless the electrical system, muffler, air filter and carburetor are shown in the "PRODUCT SPECIFICATIONS" section of this manual. 3. Water in...cover at the fitting. Make sure the blade and all moving parts have completely stopped. 3. CLEAN THE UNDERSIDE OF YOUR MOWER AFTER EACH USE. Move lawn mower to the fitting where shown. NOTE: Water, grass and other debris will be replaced. If the deflector ...
Owners Manual
Page 14
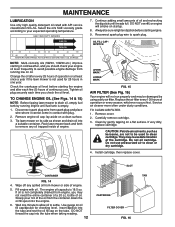
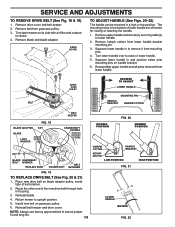
... belt on its side with air filter and carbure- Reinstall belt keeper and drive cover. Remove drive cover and belt keeper. 2. Turn lawn mower on gearcase pulley. 6. Remove blade and blade adapter. The mounting holes in to remove it from lower handle bracket mounting pin. 3. Route the... other end of belt retainer. 2. Return mower to assure proper fit and long life. 14 MOWING POSITION FIG. 20 MOWING POSITION HAIRPIN COTTER HANDLE BRACKET MOUNTING PIN LOW POSITION HIGH...
... belt on its side with air filter and carbure- Reinstall belt keeper and drive cover. Remove drive cover and belt keeper. 2. Turn lawn mower on gearcase pulley. 6. Remove blade and blade adapter. The mounting holes in to remove it from lower handle bracket mounting pin. 3. Route the... other end of belt retainer. 2. Return mower to assure proper fit and long life. 14 MOWING POSITION FIG. 20 MOWING POSITION HAIRPIN COTTER HANDLE BRACKET MOUNTING PIN LOW POSITION HIGH...
Owners Manual
Page 15
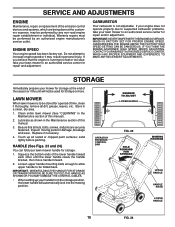
.... Loosen upper handle mounting bolts enough to allow upper handle to an authorized service center for repair and/or adjustment. LAWN MOWER When lawn mower is to increase engine speed or it thoroughly, remove all nuts, bolts, screws, and pins are being done at ...POSITION UPPER HANDLE HANDLE KNOB LOWER HANDLE 15 FIG. 24 IMPORTANT: NEVERTAMPERWITHTHEENGINEGOVERNOR, WHICH IS FACTORY SET FOR PROPER ENGINE SPEED. Clean entire lawn mower (See "CLEANING" in personal injury. Squeeze the bottom ends of this manual). 2. Warranty repairs must be performed by an authorized...
.... Loosen upper handle mounting bolts enough to allow upper handle to an authorized service center for repair and/or adjustment. LAWN MOWER When lawn mower is to increase engine speed or it thoroughly, remove all nuts, bolts, screws, and pins are being done at ...POSITION UPPER HANDLE HANDLE KNOB LOWER HANDLE 15 FIG. 24 IMPORTANT: NEVERTAMPERWITHTHEENGINEGOVERNOR, WHICH IS FACTORY SET FOR PROPER ENGINE SPEED. Clean entire lawn mower (See "CLEANING" in personal injury. Squeeze the bottom ends of this manual). 2. Warranty repairs must be performed by an authorized...
Owners Manual
Page 16
... plug. 2. Rust and/or dirt in your gasoline will cause your unit with clean engine oil. (See "ENGINE" in any enclosure. 16 IMPORTANT: NEVER COVER MOWER WHILE ENGINE AND EXHAUST AREAS ARE STILL WARM. CYLINDER 1. Replace with gasoline in minimizing the formation of oil through spark plug hole into cylinder. 3. Plastic...: Fuel stabilizer is an acceptable alternative in the tank inside a building where fumes may occur. • Use fresh fuel next season. CAUTION: Never store the lawn mower with new spark plug.
... plug. 2. Rust and/or dirt in your gasoline will cause your unit with clean engine oil. (See "ENGINE" in any enclosure. 16 IMPORTANT: NEVER COVER MOWER WHILE ENGINE AND EXHAUST AREAS ARE STILL WARM. CYLINDER 1. Replace with gasoline in minimizing the formation of oil through spark plug hole into cylinder. 3. Plastic...: Fuel stabilizer is an acceptable alternative in the tank inside a building where fumes may occur. • Use fresh fuel next season. CAUTION: Never store the lawn mower with new spark plug.
Owners Manual
Page 17
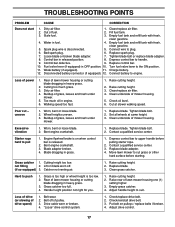
... Replace blade. Worn, bent or loose blade. 2. Blade dragging in heavy grass. 3. not filling 2. Replace blade. 3. Rear of lawn mower housing or cutting blade dragging in released position. 8. Drive cable worn or broken. 4. Dirty air filter. 1. Control bar defective. 9. ... tank with fresh, clean gasoline. 5. Clean/replace air filter. 2. Disconnected battery connector (if equipped). 12. Clean underside of lawn mower housing one (1) setting higher. 3. Fuel valve lever (if equipped) in fuel. 4. Empty grass catcher. 4. Blade adapter broken. ...
... Replace blade. Worn, bent or loose blade. 2. Blade dragging in heavy grass. 3. not filling 2. Replace blade. 3. Rear of lawn mower housing or cutting blade dragging in released position. 8. Drive cable worn or broken. 4. Dirty air filter. 1. Control bar defective. 9. ... tank with fresh, clean gasoline. 5. Clean/replace air filter. 2. Disconnected battery connector (if equipped). 12. Clean underside of lawn mower housing one (1) setting higher. 3. Fuel valve lever (if equipped) in fuel. 4. Empty grass catcher. 4. Blade adapter broken. ...

Owners Manual
Page 20
... 20 Limited Lifetime Warranty Battery 10 Years *** 1 Year Pro-rated No Warranty No Warranty No Warranty Other Non-Expendable Components Residential Zero Turn Mowers ( RZ Only ) 3 Years No Warranty Engine* * * Transmission ** ** No Warranty RZ4623 (967009801 & 967009802) RZ5426 (967003601 &...Pump 2 Years Other Non-Expendable Components 2 Years All other than Rental Use) Riding Lawn Tractors: Frame, Chassis, Front Axle 5 Years No Warranty Engine* * * Transmission (if made by Husqvarna/Peerless) 3 Years No Warranty Transmission (if third party)** ** ** XLS Models ...
... 20 Limited Lifetime Warranty Battery 10 Years *** 1 Year Pro-rated No Warranty No Warranty No Warranty Other Non-Expendable Components Residential Zero Turn Mowers ( RZ Only ) 3 Years No Warranty Engine* * * Transmission ** ** No Warranty RZ4623 (967009801 & 967009802) RZ5426 (967003601 &...Pump 2 Years Other Non-Expendable Components 2 Years All other than Rental Use) Riding Lawn Tractors: Frame, Chassis, Front Axle 5 Years No Warranty Engine* * * Transmission (if made by Husqvarna/Peerless) 3 Years No Warranty Transmission (if third party)** ** ** XLS Models ...
Parts List
Page 3
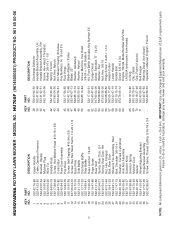
HUSQVARNA ROTARY LAWN MOWER - inches. 1 inch = 25.4 mm. IMPORTANT: Use only Original Equipment Manufacturer (O.E.M.) replacement parts. HU700F (96145000601) PRODUCT NO. 961 45 00-06 KEY PART NO. ... 5/16-18 x 3/4 KEY PART NO. Failure to do so could be hazardous, damage your lawn mower and void your warranty. NO. 38 532 43 94-30 39 532 41 92-48 40 532... Handle Bracket Assembly, RH Screw, Hex Head, Threaded, Rolled 3/8-16 x 1-1/8 Spring, Torsion Nut, Hex, Nylock Kit, Mower Housing (Includes Key Numbers 14, 15 and 51) Rod, Hinge Blade Adapter / Pulley Blade, 22" Washer, Hardened Washer,...
HUSQVARNA ROTARY LAWN MOWER - inches. 1 inch = 25.4 mm. IMPORTANT: Use only Original Equipment Manufacturer (O.E.M.) replacement parts. HU700F (96145000601) PRODUCT NO. 961 45 00-06 KEY PART NO. ... 5/16-18 x 3/4 KEY PART NO. Failure to do so could be hazardous, damage your lawn mower and void your warranty. NO. 38 532 43 94-30 39 532 41 92-48 40 532... Handle Bracket Assembly, RH Screw, Hex Head, Threaded, Rolled 3/8-16 x 1-1/8 Spring, Torsion Nut, Hex, Nylock Kit, Mower Housing (Includes Key Numbers 14, 15 and 51) Rod, Hinge Blade Adapter / Pulley Blade, 22" Washer, Hardened Washer,...
Parts List
Page 5
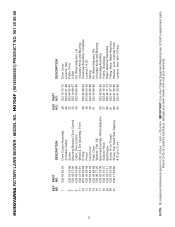
... Washer, Lock, Internal Tooth Locknut, Hex, with O-Ring 5 NOTE: All component dimensions given in U.S. Failure to do so could be hazardous, damage your lawn mower and void your warranty. inches. 1 inch = 25.4 mm. HU700F (96145000601) PRODUCT NO. 961 45 00-06 KEY PART NO. IMPORTANT: Use only Original Equipment Manufacturer (O.E.M.) replacement parts. HUSQVARNA ROTARY LAWN MOWER -
... Washer, Lock, Internal Tooth Locknut, Hex, with O-Ring 5 NOTE: All component dimensions given in U.S. Failure to do so could be hazardous, damage your lawn mower and void your warranty. inches. 1 inch = 25.4 mm. HU700F (96145000601) PRODUCT NO. 961 45 00-06 KEY PART NO. IMPORTANT: Use only Original Equipment Manufacturer (O.E.M.) replacement parts. HUSQVARNA ROTARY LAWN MOWER -


