
Owners Manual
Page 2
... DO NOT: • Do not trim near or under the influence of alcohol or drugs. • Never operate machine in the manual(s) before starting the engine (motor). • If the equipment should be used , it should start to slip and fall accidents which could cause ... and should not be maintained in daylight or good artificial light. • Do not operate the machine while under rotating parts. SAFETY RULES Safe Operation Practices for proper operation and installation of accessories. FAILURE TO OBSERVE THE FOLLOWING SAFETY INSTRUCTIONS COULD RESULT IN SERIOUS...
... DO NOT: • Do not trim near or under the influence of alcohol or drugs. • Never operate machine in the manual(s) before starting the engine (motor). • If the equipment should be used , it should start to slip and fall accidents which could cause ... and should not be maintained in daylight or good artificial light. • Do not operate the machine while under rotating parts. SAFETY RULES Safe Operation Practices for proper operation and installation of accessories. FAILURE TO OBSERVE THE FOLLOWING SAFETY INSTRUCTIONS COULD RESULT IN SERIOUS...
Owners Manual
Page 3
...or other sources of ignition. • Use only an approved container. • Never remove gas cap or add fuel with manufacturer's recommended parts, when necessary. • Mower blade is running. • Grass catcher components are outside mowing. Frequently check components and replace with the ...176;. • Wear proper Personal Protective Equipment (PPE) while operating this owner's manual. Always let someone know you are subject to wear, damage, and deterioration, which could expose moving parts or allow objects to make adjustments or repairs with safety devices. Do not use...
...or other sources of ignition. • Use only an approved container. • Never remove gas cap or add fuel with manufacturer's recommended parts, when necessary. • Mower blade is running. • Grass catcher components are outside mowing. Frequently check components and replace with the ...176;. • Wear proper Personal Protective Equipment (PPE) while operating this owner's manual. Always let someone know you are subject to wear, damage, and deterioration, which could expose moving parts or allow objects to make adjustments or repairs with safety devices. Do not use...
Owners Manual
Page 4
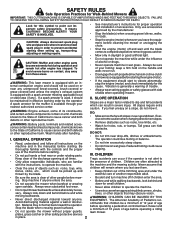
...tightened securely. Use the correct tools as nuts, washers, bolts, etc., necessary to assemble or operate your mowing comfort. Remove all parts and hardware you attempt to complete the assembly have been placed in handle brackets. 2. Your new lawn mower has been assembled at ...operating position and align holes in lower handle with the exception of this manual in the Service andAdjustments section of those parts left unassembled for shipping purposes. ASSEMBLY Read these instructions and this manual. TO REMOVE LAWN MOWER FROM CARTON 1. KNOB LIFT UP MOWING POSITION UPPER...
...tightened securely. Use the correct tools as nuts, washers, bolts, etc., necessary to assemble or operate your mowing comfort. Remove all parts and hardware you attempt to complete the assembly have been placed in handle brackets. 2. Your new lawn mower has been assembled at ...operating position and align holes in lower handle with the exception of this manual in the Service andAdjustments section of those parts left unassembled for shipping purposes. ASSEMBLY Read these instructions and this manual. TO REMOVE LAWN MOWER FROM CARTON 1. KNOB LIFT UP MOWING POSITION UPPER...
Owners Manual
Page 5
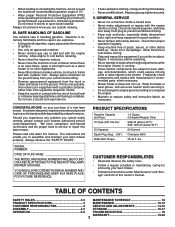
.... If bag gets wet, let it dry before using. Slowly pull engine starter rope out until rope will slip into grass bag with rigid part of this manual. 5 FRAME HANDLE VINYL BINDINGS FIG. 3 FRAME OPENING CONTROL BAR UPPER HANDLE ROPE GUIDE T-KNOB ENGINE STARTER ROPE FIG. 4 TO INSTALL ATTACHMENTS Your lawn mower...
.... If bag gets wet, let it dry before using. Slowly pull engine starter rope out until rope will slip into grass bag with rigid part of this manual. 5 FRAME HANDLE VINYL BINDINGS FIG. 3 FRAME OPENING CONTROL BAR UPPER HANDLE ROPE GUIDE T-KNOB ENGINE STARTER ROPE FIG. 4 TO INSTALL ATTACHMENTS Your lawn mower...
Owners Manual
Page 12
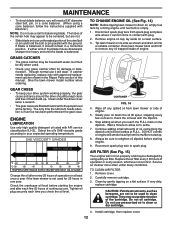
... smoke heavily from spark plug and place wire where it cannot come in a horizontal position. Do not use a nail for 25 hours in the Repair Parts section of engine. 5. Disconnect spark plug wire from the muffler on startup. 8. Stop adding oil when you will wear. Replace the air fi... on a flat least once a year if the lawn mower is not used to remove any spilled oil from lawn mower or side of this manual. The lobes of the blade moves downward, sharpen the heavy end until fuel tank is balanced. GEAR CASES • To keep your expected operating temperature...
... smoke heavily from spark plug and place wire where it cannot come in a horizontal position. Do not use a nail for 25 hours in the Repair Parts section of engine. 5. Disconnect spark plug wire from the muffler on startup. 8. Stop adding oil when you will wear. Replace the air fi... on a flat least once a year if the lawn mower is not used to remove any spilled oil from lawn mower or side of this manual. The lobes of the blade moves downward, sharpen the heavy end until fuel tank is balanced. GEAR CASES • To keep your expected operating temperature...
Owners Manual
Page 14
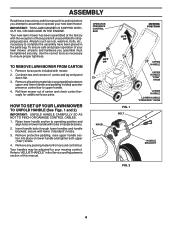
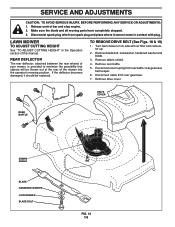
... BOLT FIG. 18 14 Turn lawn mower on its side with plug. Disconnect return spring from rear gearcase. 7. Make sure the blade and all moving parts have completely stopped. 3. TO REMOVE DRIVE BELT (See Figs. 18 & 19) 1. Disconnect cable from rear baffle / rear gearcase belt keeper. 6. SERVICE AND ...ANY SERVICE OR ADJUSTMENTS: 1. Disconnect spark plug wire from spark plug and place where it should be thrown out of the rear of this manual. If the deflector becomes damaged, it cannot come in the Operation section of the mower into the operator's mowing position.
... BOLT FIG. 18 14 Turn lawn mower on its side with plug. Disconnect return spring from rear gearcase. 7. Make sure the blade and all moving parts have completely stopped. 3. TO REMOVE DRIVE BELT (See Figs. 18 & 19) 1. Disconnect cable from rear baffle / rear gearcase belt keeper. 6. SERVICE AND ...ANY SERVICE OR ADJUSTMENTS: 1. Disconnect spark plug wire from spark plug and place where it should be thrown out of the rear of this manual. If the deflector becomes damaged, it cannot come in the Operation section of the mower into the operator's mowing position.
Owners Manual
Page 16
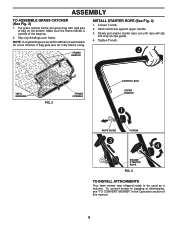
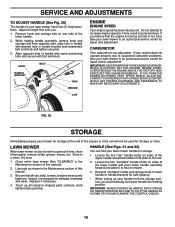
... handle and allow it may result in personal injury. While holding handle assembly, remove knob and carriage bolt from the storage position, you must manually lock lower handle into mowing position. Align opposite side of the season or if the unit will not be stored for storage. 1. IMPORTANT: ... WHICH IS FACTORY SET FOR PROPER ENGINE SPEED. Lubricate as shown in handle bracket and reassemble bolt and knob and tighten securely. 3. Inspect moving parts for repair and/or adjustment. HANDLE (See Figs. 21 and 22) You can fold your lawn mower to height that suits you believe that...
... handle and allow it may result in personal injury. While holding handle assembly, remove knob and carriage bolt from the storage position, you must manually lock lower handle into mowing position. Align opposite side of the season or if the unit will not be stored for storage. 1. IMPORTANT: ... WHICH IS FACTORY SET FOR PROPER ENGINE SPEED. Lubricate as shown in handle bracket and reassemble bolt and knob and tighten securely. 3. Inspect moving parts for repair and/or adjustment. HANDLE (See Figs. 21 and 22) You can fold your lawn mower to height that suits you believe that...
Owners Manual
Page 17
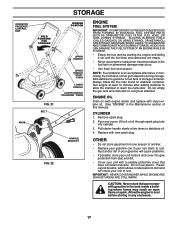
... the carburetor. Run engine at least 10 minutes after adding stabilizer to allow the stabilizer to cool before storing in the Maintenance section of this manual). Do not empty the gas tank and carburetor if using fuel stabilizer. ENGINE OIL Drain oil (with engine warm) and replace with new spark ..." KNOB FIG. 21 BOLT HANDLE BRACKET FIG. 22 ENGINE FUEL SYSTEM IMPORTANT: IT IS IMPORTANT TO PREVENT GUM DEPOSITS FROM FORMING IN ESSENTIAL FUEL SYSTEM PARTS SUCH AS CARBURETOR, FUEL FILTER, FUEL HOSE, OR TANK DURING STORAGE. ACIDIC GAS CAN DAMAGE THE FUEL SYSTEM OF AN ENGINE WHILE IN STORAGE. &#...
... the carburetor. Run engine at least 10 minutes after adding stabilizer to allow the stabilizer to cool before storing in the Maintenance section of this manual). Do not empty the gas tank and carburetor if using fuel stabilizer. ENGINE OIL Drain oil (with engine warm) and replace with new spark ..." KNOB FIG. 21 BOLT HANDLE BRACKET FIG. 22 ENGINE FUEL SYSTEM IMPORTANT: IT IS IMPORTANT TO PREVENT GUM DEPOSITS FROM FORMING IN ESSENTIAL FUEL SYSTEM PARTS SUCH AS CARBURETOR, FUEL FILTER, FUEL HOSE, OR TANK DURING STORAGE. ACIDIC GAS CAN DAMAGE THE FUEL SYSTEM OF AN ENGINE WHILE IN STORAGE. &#...
Owners Manual
Page 19
... Limited Warranty does not cover general maintenance parts and items ("Expendable Parts"), including without limitation spark plugs, bulbs, filters, lubricants, starter cords, belts, blades, and blade adapters. (d) Emissions Control Components. Such equipment and components are NOT manufactured by Husqvarna in the enclosed operator's manual. Please refer to Husqvarna. This Limited Warranty may be taken to...
... Limited Warranty does not cover general maintenance parts and items ("Expendable Parts"), including without limitation spark plugs, bulbs, filters, lubricants, starter cords, belts, blades, and blade adapters. (d) Emissions Control Components. Such equipment and components are NOT manufactured by Husqvarna in the enclosed operator's manual. Please refer to Husqvarna. This Limited Warranty may be taken to...
Owners Manual
Page 20
...operational problem or failure occurs. 9. Reinforced Stamped (Armor Protected) 10 Year Limited & Fabricated Limited Lifetime, Deck Warranties. Authorized Husqvarna Servicing Dealer/Center. Documentation Required. or (q) Continued use of incorrect type of greases or oils, failure to comply with recommended...grain alcohol) or 15% MTBE (methyl/tertiary/butyl/ether) is not a condition of warranty service. mechanical components/parts such as listed in your operator's manual; (l) Operation of the unit with improperly installed/removed or modified cutting shields, guards, or safety devices; (m)...
...operational problem or failure occurs. 9. Reinforced Stamped (Armor Protected) 10 Year Limited & Fabricated Limited Lifetime, Deck Warranties. Authorized Husqvarna Servicing Dealer/Center. Documentation Required. or (q) Continued use of incorrect type of greases or oils, failure to comply with recommended...grain alcohol) or 15% MTBE (methyl/tertiary/butyl/ether) is not a condition of warranty service. mechanical components/parts such as listed in your operator's manual; (l) Operation of the unit with improperly installed/removed or modified cutting shields, guards, or safety devices; (m)...
Parts List
Page 3
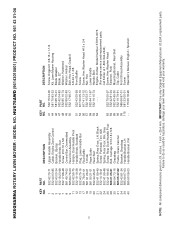
HUSQVARNA ROTARY LAWN MOWER - HU675AWD (96143010801) PRODUCT NO. 961 43 01-08 KEY PART NO. MODEL NO. NO. 1 532 42 79-71 2 532 44 03-85 3 532 43 00...Bolt, Carriage 5/16-18 x 5/8 Grassbag Frame, Grass Catcher Bracket, Grassbag Handle Bracket, LH Handle Bracket, RH KEY PART NO. NO. 41 532 15 04-06 44 581 70 83-33 46 581 85 15-01 47 532 42 04-...800-544-2444) Screw, Hex Washer Head Fastener, Push Mounting Bracket, Rear Skirt Clip, Cable Front Shroud Assembly Screw Operator's Manual, English / Spanish 3 NOTE: All component dimensions given in U.S. inches. 1 inch = 25.4 mm. Failure to do ...
HUSQVARNA ROTARY LAWN MOWER - HU675AWD (96143010801) PRODUCT NO. 961 43 01-08 KEY PART NO. MODEL NO. NO. 1 532 42 79-71 2 532 44 03-85 3 532 43 00...Bolt, Carriage 5/16-18 x 5/8 Grassbag Frame, Grass Catcher Bracket, Grassbag Handle Bracket, LH Handle Bracket, RH KEY PART NO. NO. 41 532 15 04-06 44 581 70 83-33 46 581 85 15-01 47 532 42 04-...800-544-2444) Screw, Hex Washer Head Fastener, Push Mounting Bracket, Rear Skirt Clip, Cable Front Shroud Assembly Screw Operator's Manual, English / Spanish 3 NOTE: All component dimensions given in U.S. inches. 1 inch = 25.4 mm. Failure to do ...


