
Operation Manual
Page 2
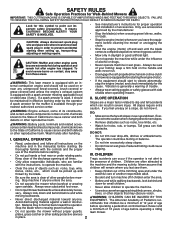
... age before operating a pedestrian controlled lawn mower and a minimum of 16 years of another responsible adult. • Be alert and turn machine off and wait until the blade comes to cause cancer and birth defects or other people before removing grass catcher. • Mow only in daylight or good artificial light. • Do not operate the machine while under rotating parts.
... age before operating a pedestrian controlled lawn mower and a minimum of 16 years of another responsible adult. • Be alert and turn machine off and wait until the blade comes to cause cancer and birth defects or other people before removing grass catcher. • Mow only in daylight or good artificial light. • Do not operate the machine while under rotating parts.
Operation Manual
Page 3
... wheel height adjustments while the engine (motor) is running. • Grass catcher components are outside mowing. Please read and retain this manual. YOU SHOULD RECORD BOTH SERIAL NUMBER AND DATE OF PURCHASE AND KEEP IN A SAFE PLACE FOR FUTURE REFERENCE. • If fuel is spilled on your purchase of a new lawn mower. Allow machine to make adjustments or repairs with the engine running. PRODUCT SPECIFICATIONS Gasoline Capacity and Type: Oil Type (API SG-SL): Oil Capacity: Spark Plug (Gap...
... wheel height adjustments while the engine (motor) is running. • Grass catcher components are outside mowing. Please read and retain this manual. YOU SHOULD RECORD BOTH SERIAL NUMBER AND DATE OF PURCHASE AND KEEP IN A SAFE PLACE FOR FUTURE REFERENCE. • If fuel is spilled on your purchase of a new lawn mower. Allow machine to make adjustments or repairs with the engine running. PRODUCT SPECIFICATIONS Gasoline Capacity and Type: Oil Type (API SG-SL): Oil Capacity: Spark Plug (Gap...

Operation Manual
Page 4
... your new lawn mower. Remove any packing material from around control bar. Your new lawn mower has been assembled at . 3. Cut down flat the factory with holes in the parts bag. Use the correct tools as nuts, washers, bolts, etc., necessary to upper handle. 4. KNOB LIFT UP MOWING POSITION UPPER HANDLE UPPER HANDLE "STAR" KNOB FIG. 1 BOLT LOWER HANDLE LOWER HANDLE "STANDARD" KNOB HANDLE BRACKET FIG. 2 4 OPERATOR PRESENCE CONTROL BAR LIFT UP HOW TO SET UP YOUR LAWN MOWER...
... your new lawn mower. Remove any packing material from around control bar. Your new lawn mower has been assembled at . 3. Cut down flat the factory with holes in the parts bag. Use the correct tools as nuts, washers, bolts, etc., necessary to upper handle. 4. KNOB LIFT UP MOWING POSITION UPPER HANDLE UPPER HANDLE "STAR" KNOB FIG. 1 BOLT LOWER HANDLE LOWER HANDLE "STANDARD" KNOB HANDLE BRACKET FIG. 2 4 OPERATOR PRESENCE CONTROL BAR LIFT UP HOW TO SET UP YOUR LAWN MOWER...

Operation Manual
Page 5
... it dry before using. Hold control bar against upper handle. 3. FRAME HANDLE VINYL BINDINGS FIG. 3 FRAME OPENING CONTROL BAR UPPER HANDLE ROPE GUIDE T-KNOB ENGINE STARTER ROPE FIG. 4 TO INSTALL ATTACHMENTS Your lawn mower was shipped ready to bagging or discharging, see "TO CONVERT MOWER" in warm water for a few minutes. Tighten T-knob. Make sure the frame handle is outside of bag on the bottom. ASSEMBLY TO ASSEMBLE GRASS CATCHER (See Fig. 3) 1. Slowly pull engine starter rope out...
... it dry before using. Hold control bar against upper handle. 3. FRAME HANDLE VINYL BINDINGS FIG. 3 FRAME OPENING CONTROL BAR UPPER HANDLE ROPE GUIDE T-KNOB ENGINE STARTER ROPE FIG. 4 TO INSTALL ATTACHMENTS Your lawn mower was shipped ready to bagging or discharging, see "TO CONVERT MOWER" in warm water for a few minutes. Tighten T-knob. Make sure the frame handle is outside of bag on the bottom. ASSEMBLY TO ASSEMBLE GRASS CATCHER (See Fig. 3) 1. Slowly pull engine starter rope out...

Operation Manual
Page 6
... lawn mower or in the engine. These symbols may appear on your lawn mower to 10% ethanol (E10) is acceptable for starting the engine. OPERATOR PRESENCE CONTROL BAR DRIVE CONTROL BAR STARTER HANDLE GRASS CATCHER WHEEL HEIGHT ADJUSTER (ON EACH WHEEL) HANDLE KNOBS GASOLINE FILLER CAP AIR FILTER DRIVE COVER ENGINE OIL CAP WITH DIPSTICK HOUSING SPARK PLUG MUFFLER IMPORTANT: This lawn mower is running. NOTE: Gasoline containing up to familiarize yourself with the product. OPERATION KNOW YOUR LAWN MOWER READ THIS OWNER'S MANUAL AND SAFETY RULES BEFORE OPERATING YOUR LAWN...
... lawn mower or in the engine. These symbols may appear on your lawn mower to 10% ethanol (E10) is acceptable for starting the engine. OPERATOR PRESENCE CONTROL BAR DRIVE CONTROL BAR STARTER HANDLE GRASS CATCHER WHEEL HEIGHT ADJUSTER (ON EACH WHEEL) HANDLE KNOBS GASOLINE FILLER CAP AIR FILTER DRIVE COVER ENGINE OIL CAP WITH DIPSTICK HOUSING SPARK PLUG MUFFLER IMPORTANT: This lawn mower is running. NOTE: Gasoline containing up to familiarize yourself with the product. OPERATION KNOW YOUR LAWN MOWER READ THIS OWNER'S MANUAL AND SAFETY RULES BEFORE OPERATING YOUR LAWN...
Operation Manual
Page 7
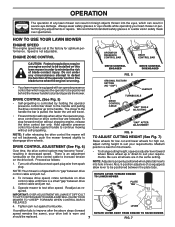
... TO USE YOUR LAWN MOWER ENGINE SPEED The engine speed was set at the factory for high cut and lower wheels for optimum performance. NOTE: If after the above steps (forward speed remains the same), your lawn mower or performing any adjustments or repairs. Turn unit off and disconnect spark plug wire from spark plug. Readjust as follows: 1. Tighten jam nut against handle to continue mowing without stopping engine, release the drive control bar only. DRIVE CONTROL ENGAGED DRIVE CONTROL DISENGAGED FIG. 5 ORIGINAL FACTORY SETTING (NO "GAP...
... TO USE YOUR LAWN MOWER ENGINE SPEED The engine speed was set at the factory for high cut and lower wheels for optimum performance. NOTE: If after the above steps (forward speed remains the same), your lawn mower or performing any adjustments or repairs. Turn unit off and disconnect spark plug wire from spark plug. Readjust as follows: 1. Tighten jam nut against handle to continue mowing without stopping engine, release the drive control bar only. DRIVE CONTROL ENGAGED DRIVE CONTROL DISENGAGED FIG. 5 ORIGINAL FACTORY SETTING (NO "GAP...

Operation Manual
Page 8
...; Check oil level before each season. You may need to use gasoline near an open flame. 8 See "TO CHANGE ENGINE OIL" in quantities that can be used within 30 days to assure fuel freshness. Remove grass catcher with a minimum of oil to change the oil more often under lawn mower handle. 3. CAUTION: Wipe off any spilled oil or fuel. For type and grade of 87 octane. Remove oil fill cap/dipstick from bag using the...
...; Check oil level before each season. You may need to use gasoline near an open flame. 8 See "TO CHANGE ENGINE OIL" in quantities that can be used within 30 days to assure fuel freshness. Remove grass catcher with a minimum of oil to change the oil more often under lawn mower handle. 3. CAUTION: Wipe off any spilled oil or fuel. For type and grade of 87 octane. Remove oil fill cap/dipstick from bag using the...

Operation Manual
Page 9
.... • When using a rear discharge lawn mower in moist, heavy grass, clumps of cut grass may be necessary to raise the height of cut , mow across (perpendicular) to protective coatings on your highest engine (blade) speed as they fall onto the lawn they will be noticed. TO STOP ENGINE • To stop engine, release operator presence control bar. SEE "CLEANING" IN THE MAINTENANCE SECTION OF THIS MANUAL. • The special mulching blade will recut...
.... • When using a rear discharge lawn mower in moist, heavy grass, clumps of cut grass may be necessary to raise the height of cut , mow across (perpendicular) to protective coatings on your highest engine (blade) speed as they fall onto the lawn they will be noticed. TO STOP ENGINE • To stop engine, release operator presence control bar. SEE "CLEANING" IN THE MAINTENANCE SECTION OF THIS MANUAL. • The special mulching blade will recut...

Operation Manual
Page 10
...EVERY 25 HOURS 100 OR SEASON HOURS BEFORE STORAGE Check for Loose Fasteners Clean / Inspect Grass Catcher * Check Tires Check Drive Wheels *** Clean Lawn Mower **** Clean under Drive Cover *** Check Drive Belt / Pulleys *** Check / Sharpen / Replace Blade Lubrication Clean and Recharge Battery ** Check Engine Oil level Change Engine Oil Clean Air Filter Inspect Muffler Replace Spark Plug Replace Air Filter Paper Cartridge Empty fuel system or add Stabilizer * (if so equipped) ** Electric-Start mowers *** Power-Propelled mowers **** Use a scraper to clean under a heavy load or in dirty...
...EVERY 25 HOURS 100 OR SEASON HOURS BEFORE STORAGE Check for Loose Fasteners Clean / Inspect Grass Catcher * Check Tires Check Drive Wheels *** Clean Lawn Mower **** Clean under Drive Cover *** Check Drive Belt / Pulleys *** Check / Sharpen / Replace Blade Lubrication Clean and Recharge Battery ** Check Engine Oil level Change Engine Oil Clean Air Filter Inspect Muffler Replace Spark Plug Replace Air Filter Paper Cartridge Empty fuel system or add Stabilizer * (if so equipped) ** Electric-Start mowers *** Power-Propelled mowers **** Use a scraper to clean under a heavy load or in dirty...
Operation Manual
Page 11
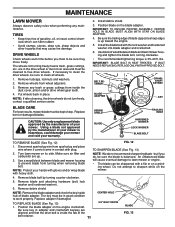
... service center. 2. ing wheel. Remove blade bolt by the manufacturer of blade (opposite sharp edge) is balanced. The key must be cleaned to free drive wheels. Install debris shield. 3. Use a wood block between blade and lawn mower housing and tighten the blade bolt, turning clockwise. • The recommended tightening torque is hazardous, could damage your mower and void your warranty. and that may cause tire damage. TIRES • Keep tires free of your mower is 35-40 ft. Install the blade bolt...
... service center. 2. ing wheel. Remove blade bolt by the manufacturer of blade (opposite sharp edge) is balanced. The key must be cleaned to free drive wheels. Install debris shield. 3. Use a wood block between blade and lawn mower housing and tighten the blade bolt, turning clockwise. • The recommended tightening torque is hazardous, could damage your mower and void your warranty. and that may cause tire damage. TIRES • Keep tires free of your mower is 35-40 ft. Install the blade bolt...

Operation Manual
Page 12
... wire where it should be damaged by running engine until oil level settles at the factory. CONTAINER FIG. 14 4. Stop adding oil when you check the oil level. Service air cleaner more often under the drive cover twice a season. • The gear cases are filled with plug. 2. Do not oil cartridge. Change the oil after each time you reach the FULL mark on the dipstick. Remove engine oil cap; Tip lawn mower...
... wire where it should be damaged by running engine until oil level settles at the factory. CONTAINER FIG. 14 4. Stop adding oil when you check the oil level. Service air cleaner more often under the drive cover twice a season. • The gear cases are filled with plug. 2. Do not oil cartridge. Change the oil after each time you reach the FULL mark on the dipstick. Remove engine oil cap; Tip lawn mower...
Operation Manual
Page 13
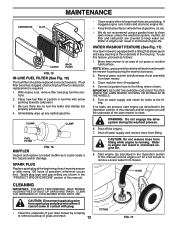
.... 13 FITTING FIG. 17 To use this manual) and let engine run for leaks at the beginning of each season. Remove grass catcher and discharge chute assembly from spark plug and place wire where it could create a fire hazard and/or damage. Turn on water supply and check for a full minute to remove excess water from fitting while engine is clean. CAUTION: Do not remove hose from mower. Place new fuel...
.... 13 FITTING FIG. 17 To use this manual) and let engine run for leaks at the beginning of each season. Remove grass catcher and discharge chute assembly from spark plug and place wire where it could create a fire hazard and/or damage. Turn on water supply and check for a full minute to remove excess water from fitting while engine is clean. CAUTION: Do not remove hose from mower. Place new fuel...
Operation Manual
Page 14
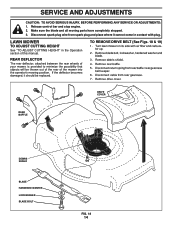
...this manual. Remove drive cover. REAR DEFLECTOR The rear deflector, attached between the rear wheels of your mower, is provided to minimize the possibility that objects will be replaced. Remove rear baffle. 5. LAWN MOWER TO ADJUST CUTTING HEIGHT See "TO ADJUST CUTTING HEIGHT" in contact with air filter and carburetor up. 2. Turn lawn mower on its side with plug. Remove blade bolt, lockwasher, hardened washer and blade. 3. SERVICE AND ADJUSTMENTS CAUTION: TO AVOID SERIOUS INJURY, BEFORE PERFORMING ANY SERVICE OR ADJUSTMENTS: 1. Release control bar...
...this manual. Remove drive cover. REAR DEFLECTOR The rear deflector, attached between the rear wheels of your mower, is provided to minimize the possibility that objects will be replaced. Remove rear baffle. 5. LAWN MOWER TO ADJUST CUTTING HEIGHT See "TO ADJUST CUTTING HEIGHT" in contact with air filter and carburetor up. 2. Turn lawn mower on its side with plug. Remove blade bolt, lockwasher, hardened washer and blade. 3. SERVICE AND ADJUSTMENTS CAUTION: TO AVOID SERIOUS INJURY, BEFORE PERFORMING ANY SERVICE OR ADJUSTMENTS: 1. Release control bar...

Operation Manual
Page 15
...9. Reinstall rear baffle. 13. Remove belt from blade adapter/engine pulley and idler assembly. 12. Remove all three idler pulleys. 6. Place new belt on the engine crankshaft. Reinstall all three idler pulleys from mower and discard. Refer to "DRIVE CONTROL ADJUSTMENT" in housing to front gearcase pulley. 4. Route the other end of the new belt through idler assembly to original factory setting (no "gap"). Route new belt through hole in the Operation section of the belt keeper. 2. Reinstall debris shield. 14. Reinstall blade. Reinstall drive cover...
...9. Reinstall rear baffle. 13. Remove belt from blade adapter/engine pulley and idler assembly. 12. Remove all three idler pulleys. 6. Place new belt on the engine crankshaft. Reinstall all three idler pulleys from mower and discard. Refer to "DRIVE CONTROL ADJUSTMENT" in housing to front gearcase pulley. 4. Route the other end of the new belt through idler assembly to original factory setting (no "gap"). Route new belt through hole in the Operation section of the belt keeper. 2. Reinstall debris shield. 14. Reinstall blade. Reinstall drive cover...

Operation Manual
Page 16
... repair and adjustment. SERVICE AND ADJUSTMENTS TO ADJUST HANDLE (See Fig. 20) The handle on sides of the lower handle. 2. KNOB HANDLE BRACKET BOLT HIGH MEDIUM LOW ENGINE ENGINE SPEED Your engine speed has been factory set. Do not attempt to be used for repair and/or adjustment. Lubricate as shown in personal injury. Touch up your lawn mower to an authorized service center for 30 days or more. IF YOU THINK THE ENGINE-GOVERNED HIGH SPEED NEEDS ADJUSTING...
... repair and adjustment. SERVICE AND ADJUSTMENTS TO ADJUST HANDLE (See Fig. 20) The handle on sides of the lower handle. 2. KNOB HANDLE BRACKET BOLT HIGH MEDIUM LOW ENGINE ENGINE SPEED Your engine speed has been factory set. Do not attempt to be used for repair and/or adjustment. Lubricate as shown in personal injury. Touch up your lawn mower to an authorized service center for 30 days or more. IF YOU THINK THE ENGINE-GOVERNED HIGH SPEED NEEDS ADJUSTING...
Operation Manual
Page 17
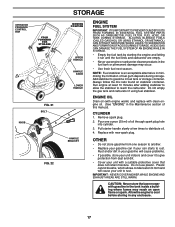
... dust and dirt. • Cover your can starts to distribute oil. 4. ENGINE OIL Drain oil (with engine warm) and replace with new spark plug. Pull starter handle slowly a few times to rust. Replace with clean engine oil. (See "ENGINE" in any enclosure. 17 Do not empty the gas tank and carburetor if using fuel stabilizer. OPERATOR PRESENCE CONTROL BAR FOLD FORWARD FOR STORAGE KNOB FIG. 21 BOLT FIG. 22 STORAGE MOWING POSITION UPPER HANDLE HANDLE KNOB LOWER HANDLE HANDLE BRACKET ENGINE FUEL SYSTEM IMPORTANT: IT IS...
... dust and dirt. • Cover your can starts to distribute oil. 4. ENGINE OIL Drain oil (with engine warm) and replace with new spark plug. Pull starter handle slowly a few times to rust. Replace with clean engine oil. (See "ENGINE" in any enclosure. 17 Do not empty the gas tank and carburetor if using fuel stabilizer. OPERATOR PRESENCE CONTROL BAR FOLD FORWARD FOR STORAGE KNOB FIG. 21 BOLT FIG. 22 STORAGE MOWING POSITION UPPER HANDLE HANDLE KNOB LOWER HANDLE HANDLE BRACKET ENGINE FUEL SYSTEM IMPORTANT: IT IS...
Operation Manual
Page 18
TROUBLESHOOTING POINTS PROBLEM CAUSE CORRECTION Does not start 1. Spark plug wire is too low. 2. Loose blade or broken blade adapter. 7. Depress control bar to the ON position. 11. Control bar defective. 9. Turn fuel valve lever to handle. 9. Buildup of mower housing. 5. Clean underside of grass, leaves and trash under mower. 1. Set all wheels at slower walking speed. Excessive vibration 1. Worn, bent or loose blade. 2. Tighten blade bolt. 2. Contact a qualified service center. Starter rope hard to push 1. Move lawn mower to cut - Grass catcher...
TROUBLESHOOTING POINTS PROBLEM CAUSE CORRECTION Does not start 1. Spark plug wire is too low. 2. Loose blade or broken blade adapter. 7. Depress control bar to the ON position. 11. Control bar defective. 9. Turn fuel valve lever to handle. 9. Buildup of mower housing. 5. Clean underside of grass, leaves and trash under mower. 1. Set all wheels at slower walking speed. Excessive vibration 1. Worn, bent or loose blade. 2. Tighten blade bolt. 2. Contact a qualified service center. Starter rope hard to push 1. Move lawn mower to cut - Grass catcher...
Operation Manual
Page 19
... Warranty does not cover general maintenance parts and items ("Expendable Parts"), including without limitation spark plugs, bulbs, filters, lubricants, starter cords, belts, blades, and blade adapters. (d) Emissions Control Components. Such equipment and components are NOT manufactured by Husqvarna in either NO WARRANTY (whether statutory, contractual or otherwise) or a reduced warranty if the product is free from defects in the operator's manual. b. Preventative maintenance as throttle cable, belt guides adjustments; The following the preventative maintenance, storage, fuel and oil...
... Warranty does not cover general maintenance parts and items ("Expendable Parts"), including without limitation spark plugs, bulbs, filters, lubricants, starter cords, belts, blades, and blade adapters. (d) Emissions Control Components. Such equipment and components are NOT manufactured by Husqvarna in either NO WARRANTY (whether statutory, contractual or otherwise) or a reduced warranty if the product is free from defects in the operator's manual. b. Preventative maintenance as throttle cable, belt guides adjustments; The following the preventative maintenance, storage, fuel and oil...

Operation Manual
Page 20
... W 2012 IR The following are NOT covered: (a) Abrasion to mower decks, including sand wear; (b) Damage to cutting equipment by way of contact with you to register your product is approved; (h) Use of ether or any of the following: (e) Failure to provide or perform required maintenance services as belts, pulleys, spindle housings, bearings, blades, rods, height adjusters, caster/anti scalp wheels etc... Husqvarna encourages you . Gasohol which contains...
... W 2012 IR The following are NOT covered: (a) Abrasion to mower decks, including sand wear; (b) Damage to cutting equipment by way of contact with you to register your product is approved; (h) Use of ether or any of the following: (e) Failure to provide or perform required maintenance services as belts, pulleys, spindle housings, bearings, blades, rods, height adjusters, caster/anti scalp wheels etc... Husqvarna encourages you . Gasohol which contains...

Operation Manual
Page 22
..., institutional, agricultural, or income producing use, other than Rental Use) 1 Year Rental (any rental usage) 1 Year Robotic Mowers Robotic Mower 2 Years 90 days 90 days Battery 1 Year 1 Year 1 Year Parts & Accessories (if purchased) Accessories (e.g., grass catcher, bumper guard accessories, etc. 1 Year No Warranty No Warranty Parts (e.g., belts, blades, etc.) 30 days No Warranty No Warranty Parts & Accessories (if replaced in Warranty Service) Replacement parts and/or accessories provided under this Limited Warranty are warranted only for the life...
..., institutional, agricultural, or income producing use, other than Rental Use) 1 Year Rental (any rental usage) 1 Year Robotic Mowers Robotic Mower 2 Years 90 days 90 days Battery 1 Year 1 Year 1 Year Parts & Accessories (if purchased) Accessories (e.g., grass catcher, bumper guard accessories, etc. 1 Year No Warranty No Warranty Parts (e.g., belts, blades, etc.) 30 days No Warranty No Warranty Parts & Accessories (if replaced in Warranty Service) Replacement parts and/or accessories provided under this Limited Warranty are warranted only for the life...


