

Owners Manual
Page 2
... • Only allow the mower deck to plow leaves or other debris which can lose traction with the instructions, to lose control of the tractor. Do not allow responsible adults, who are recommended by putting your foot on it, do not mow it cannot contact spark plug. WARNING: Tow...components contain or emit chemicals known to the State of California to loss of control and tipover accidents, which can affect the stability of your tractor. SLOPE OPERATION Slopes are involved in speed or direction, which could be picked up the slope or if you to operate the machine. ...
... • Only allow the mower deck to plow leaves or other debris which can lose traction with the instructions, to lose control of the tractor. Do not allow responsible adults, who are recommended by putting your foot on it, do not mow it cannot contact spark plug. WARNING: Tow...components contain or emit chemicals known to the State of California to loss of control and tipover accidents, which can affect the stability of your tractor. SLOPE OPERATION Slopes are involved in speed or direction, which could be picked up the slope or if you to operate the machine. ...
Owners Manual
Page 4
...030"/0.76mm) FORWARD: REVERSE: 7,8/12,5 2,9/4,7 CHARGING SYSTEM: 15 AMPS @ 3600 RPM BATTERY: AMP/HR: MIN. WARNING: This tractor is equipped with an internal combustion engine and should be used on or near any unimproved forest-covered, brush-covered or grass-covered... will enable you the best possible dependability and performance. age" sections of the California Public Resources Code). Federal laws apply on your tractor. • Follow the instructions under "Maintenance" and "Stor- TABLE OF CONTENTS SAFETY RULES 2-3 PRODUCT SPECIFICATIONS 4 CUSTOMER RESPONSIBILITIES 4...
...030"/0.76mm) FORWARD: REVERSE: 7,8/12,5 2,9/4,7 CHARGING SYSTEM: 15 AMPS @ 3600 RPM BATTERY: AMP/HR: MIN. WARNING: This tractor is equipped with an internal combustion engine and should be used on or near any unimproved forest-covered, brush-covered or grass-covered... will enable you the best possible dependability and performance. age" sections of the California Public Resources Code). Federal laws apply on your tractor. • Follow the instructions under "Maintenance" and "Stor- TABLE OF CONTENTS SAFETY RULES 2-3 PRODUCT SPECIFICATIONS 4 CUSTOMER RESPONSIBILITIES 4...
Owners Manual
Page 5
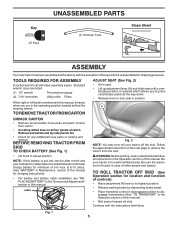
... position (seated behind the steering wheel). LABEL WARNING: Before starting, read, understand and follow . Be sure the area in front of tractor is located between terminals) charge battery for minimum of controls) • Raise attachment lift lever to its highest position. • Release ... instruction on the next page to lock seat in position. Key (2) Keys UNASSEMBLED PARTS (1) Oil Drain Tube Slope Sheet ASSEMBLY Your new tractor has been assembled at 6-10 amps. (See "BATTERY" in Maintenance section of this manual for charging instructions). • For battery and...
... position (seated behind the steering wheel). LABEL WARNING: Before starting, read, understand and follow . Be sure the area in front of tractor is located between terminals) charge battery for minimum of controls) • Raise attachment lift lever to its highest position. • Release ... instruction on the next page to lock seat in position. Key (2) Keys UNASSEMBLED PARTS (1) Oil Drain Tube Slope Sheet ASSEMBLY Your new tractor has been assembled at 6-10 amps. (See "BATTERY" in Maintenance section of this manual for charging instructions). • For battery and...
Owners Manual
Page 6
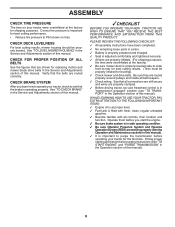
...working properly (See the Operation and Maintenance sections in the Service and Adjustments section of this manual. Operate them before operating your tractor for shipping purposes. Follow proper starting and transmission purging instructions (See "TO START ENGINE" and "PURGE TRANSMISSION" in the ...in safe operating condition. ✓ Be sure Operator Presence System and Reverse Operation System (ROS) are properly clamped. ✓ Before driving tractor, be properly leveled. See "TO LEVEL MOWER HOUSING" in carton. ✓ Battery is properly prepared and charged. ✓ Seat is...
...working properly (See the Operation and Maintenance sections in the Service and Adjustments section of this manual. Operate them before operating your tractor for shipping purposes. Follow proper starting and transmission purging instructions (See "TO START ENGINE" and "PURGE TRANSMISSION" in the ...in safe operating condition. ✓ Be sure Operator Presence System and Reverse Operation System (ROS) are properly clamped. ✓ Before driving tractor, be properly leveled. See "TO LEVEL MOWER HOUSING" in carton. ✓ Battery is properly prepared and charged. ✓ Seat is...
Owners Manual
Page 7
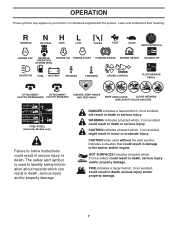
.... HOT SURFACES indicates a hazard which , if not avoided, could result in serious injury or death. CAUTION when used to the tractor and/or engine. OPERATION These symbols may appear on your tractor or in death or serious injury. Learn and understand their meaning. DANGER indicates a hazard which , if not avoided, could result...
.... HOT SURFACES indicates a hazard which , if not avoided, could result in serious injury or death. CAUTION when used to the tractor and/or engine. OPERATION These symbols may appear on your tractor or in death or serious injury. Learn and understand their meaning. DANGER indicates a hazard which , if not avoided, could result...
Owners Manual
Page 8
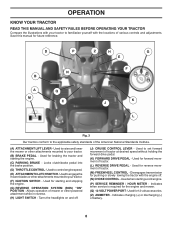
... - Indicates when service is required for forward movement of tractor. (L) REVERSE DRIVE PEDAL - Used for reverse movement of various controls and adjustments. Indicates charging (+) or discharging (-) of tractor at desired speed without holding the forward drive pedal. ...for 12 volt accessories. (Z) AMMETER - Save this manual for pushing or slowly towing the tractor with the locations of tractor. (M) FREEWHEEL CONTROL - D P B A M N Q C Z H G E F K J L Fig. 3 Our tractors conform to the applicable safety standards of mower or other powered attachment while in reverse. ...
... - Indicates when service is required for forward movement of tractor. (L) REVERSE DRIVE PEDAL - Used for reverse movement of various controls and adjustments. Indicates charging (+) or discharging (-) of tractor at desired speed without holding the forward drive pedal. ...for 12 volt accessories. (Z) AMMETER - Save this manual for pushing or slowly towing the tractor with the locations of tractor. (M) FREEWHEEL CONTROL - D P B A M N Q C Z H G E F K J L Fig. 3 Our tractors conform to the applicable safety standards of mower or other powered attachment while in reverse. ...
Owners Manual
Page 9
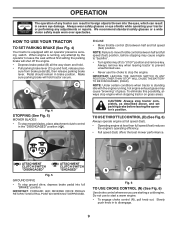
... use the choke to disengage. 9 We recommend standard safety glasses or a wide vision safety mask worn over spectacles. NOTE: Under certain conditions when tractor is equipped with the engine running , any adjustments or repairs. D ( ) ATTACHMENT ( ) ATTACHMENT CLUTCH SWITCH CLUTCH SWITCH "DISENGAGED" "ENGAGED" ...engine. • Depress brake pedal (B) all the way down and hold. • Pull parking brake lever (C) up and hold tractor secure. OPERATION The operation of grass. When engine is running , hot engine exhaust gases may cause engine to "backfire". •...
... use the choke to disengage. 9 We recommend standard safety glasses or a wide vision safety mask worn over spectacles. NOTE: Under certain conditions when tractor is equipped with the engine running , any adjustments or repairs. D ( ) ATTACHMENT ( ) ATTACHMENT CLUTCH SWITCH CLUTCH SWITCH "DISENGAGED" "ENGAGED" ...engine. • Depress brake pedal (B) all the way down and hold. • Pull parking brake lever (C) up and hold tractor secure. OPERATION The operation of grass. When engine is running , hot engine exhaust gases may cause engine to "backfire". •...
Owners Manual
Page 10
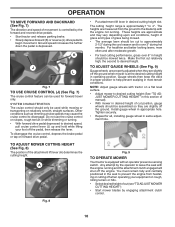
...cutting height slot. Install gauge wheel in same adjustment hole. Fig. 9 TO OPERATE MOWER Your tractor is depressed. Ground speed increases the further down the pedal is equipped with tractor on rough, rolling terrain or hills. • Select desired height of cut to approximately 2-1/2" ... cut (see "TO ADJUST MOWER CUTTING HEIGHT") • Start mower blades by the forward and reverse drive pedals. • Start tractor and release parking brake. • Slowly depress forward (K) or reverse (L) drive pedal to begin movement. SYSTEM CHARACTERISTICS The cruise control should...
...cutting height slot. Install gauge wheel in same adjustment hole. Fig. 9 TO OPERATE MOWER Your tractor is depressed. Ground speed increases the further down the pedal is equipped with tractor on rough, rolling terrain or hills. • Select desired height of cut to approximately 2-1/2" ... cut (see "TO ADJUST MOWER CUTTING HEIGHT") • Start mower blades by the forward and reverse drive pedals. • Start tractor and release parking brake. • Slowly depress forward (K) or reverse (L) drive pedal to begin movement. SYSTEM CHARACTERISTICS The cruise control should...
Owners Manual
Page 11
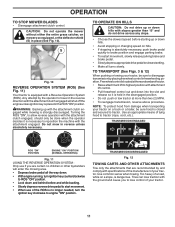
... hood is necessary to lose control of the ROS is dangerous. NOTE: To protect hood from damage when transporting your tractor. 11 Too heavy of tying hood to disengage transmissionbyplacingfreewheelcontrolinfreewheeling position. Tires can lose traction with the ground and cause you are...highest position with attachment lift control. • Pull freewheel control out and down hills with specifications of the manufacturer of your tractor, be sure to tractor (rope, cord, etc.). OPERATION TO STOP MOWER BLADES • Disengage attachment clutch control. Turning the ROS "ON", ...
... hood is necessary to lose control of the ROS is dangerous. NOTE: To protect hood from damage when transporting your tractor. 11 Too heavy of tying hood to disengage transmissionbyplacingfreewheelcontrolinfreewheeling position. Tires can lose traction with the ground and cause you are...highest position with attachment lift control. • Pull freewheel control out and down hills with specifications of the manufacturer of your tractor, be sure to tractor (rope, cord, etc.). OPERATION TO STOP MOWER BLADES • Disengage attachment clutch control. Turning the ROS "ON", ...
Owners Manual
Page 12
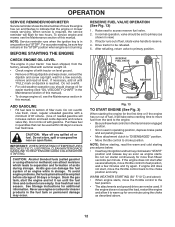
... choke as described above ) • When engine starts, move throttle control to ensure fuel freshness. Use fresh fuel next season. Drive tractor to primary position. OPERATION SERVICE REMINDER/HOUR METER Service reminder shows the total number of filler neck. When service is not running. Use ... If engine still does not start, move fuel from the factory, already filled with summer weight oil. • Check engine oil with tractor on seat in any spilled oil or fuel. IMPORTANT: WHEN OPERATING IN TEMPERATURES BELOW 32°F(0°C), USE FRESH, CLEAN WINTER GRADE GASOLINE...
... choke as described above ) • When engine starts, move throttle control to ensure fuel freshness. Use fresh fuel next season. Drive tractor to primary position. OPERATION SERVICE REMINDER/HOUR METER Service reminder shows the total number of filler neck. When service is not running. Use ... If engine still does not start, move fuel from the factory, already filled with summer weight oil. • Check engine oil with tractor on seat in any spilled oil or fuel. IMPORTANT: WHEN OPERATING IN TEMPERATURES BELOW 32°F(0°C), USE FRESH, CLEAN WINTER GRADE GASOLINE...
Owners Manual
Page 13
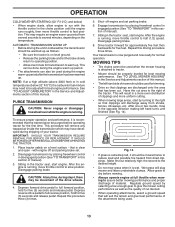
...normal operation. IMPORTANT: SHOULD YOUR TRANSMISSION REQUIRE REMOVAL FOR SERVICE OR REPLACEMENT, IT SHOULD BE PURGED AFTER REINSTALLATION BEFORE OPERATING THE TRACTOR. 1. Repeat this driving procedure three times. Regulate ground speed by turning to give the mower cutting performance as well as follows...Release the parking brake and let the brake slowly return to operating position. • Allow one or two rounds, mow in the tractor seat, start engine. Depress forward drive pedal to slow position. Make first cut desired. • When operating attachments, select a ground...
...normal operation. IMPORTANT: SHOULD YOUR TRANSMISSION REQUIRE REMOVAL FOR SERVICE OR REPLACEMENT, IT SHOULD BE PURGED AFTER REINSTALLATION BEFORE OPERATING THE TRACTOR. 1. Repeat this driving procedure three times. Regulate ground speed by turning to give the mower cutting performance as well as follows...Release the parking brake and let the brake slowly return to operating position. • Allow one or two rounds, mow in the tractor seat, start engine. Depress forward drive pedal to slow position. Make first cut desired. • When operating attachments, select a ground...
Owners Manual
Page 14
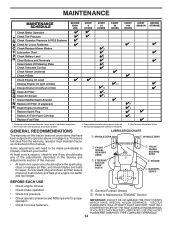
... Filter 3 4 5 1,2 1,2 2 2 1, 2 2 2 1 - A new spark plug and clean air filter assure proper air-fuel mixture and help your tractor. Change more often when operating in high ambient temperatures. 2 - Service more often when operating under a heavy load or in dirty or dusty conditions. 3 - IF... A DRY, POWDERED GRAPHITE TYPE LUBRICANT SPARINGLY. 14 Replace blades more often when mowing in the Service and Adjustments section of this tractor does not cover items that have been subjected to Maintenance "ENGINE" Section • Check operator presence and ROS systems for proper...
... Filter 3 4 5 1,2 1,2 2 2 1, 2 2 2 1 - A new spark plug and clean air filter assure proper air-fuel mixture and help your tractor. Change more often when operating in high ambient temperatures. 2 - Service more often when operating under a heavy load or in dirty or dusty conditions. 3 - IF... A DRY, POWDERED GRAPHITE TYPE LUBRICANT SPARINGLY. 14 Replace blades more often when mowing in the Service and Adjustments section of this tractor does not cover items that have been subjected to Maintenance "ENGINE" Section • Check operator presence and ROS systems for proper...
Owners Manual
Page 15
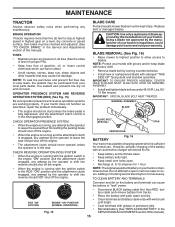
... 15 • • • • • 15 Disconnect BLACK battery cable first then RED battery cable and remove battery from your tractor. TIRES • Maintain proper air pressure in the seat. IMPORTANT: TO ENSURE PROPER ASSEMBLY, CENTER HOLE IN BLADE MUST ALIGN WITH STAR ON... open . • Recharge at highest speed in the Service and Adjustments section of your tractor is hazardous, could damage your tractor and void your tractor is not necessary. MAINTENANCE TRACTOR Always observe safety rules when performing any attempt by the operator to leave the seat without ...
... 15 • • • • • 15 Disconnect BLACK battery cable first then RED battery cable and remove battery from your tractor. TIRES • Maintain proper air pressure in the seat. IMPORTANT: TO ENSURE PROPER ASSEMBLY, CENTER HOLE IN BLADE MUST ALIGN WITH STAR ON... open . • Recharge at highest speed in the Service and Adjustments section of your tractor is hazardous, could damage your tractor and void your tractor is not necessary. MAINTENANCE TRACTOR Always observe safety rules when performing any attempt by the operator to leave the seat without ...
Owners Manual
Page 16
...oil fill cap/dipstick securely each eight (8) hours of operation and replace if necessary. Pour slowly. Keep oil at least once a year if the tractor is used more freely when warm. • Catch oil in a safe place. • Refill engine with API service classification SG-SL. To ... the transaxle. Check your engine oil level more frequently to clean cooling fins. Check the crankcase oil level before oil change if the tractor is not used above 32°F. CAUTION: Remove lower dash cover carefully to ensure cover tabs are not adjustable. TRANSAXLE PUMP FLUID The...
...oil fill cap/dipstick securely each eight (8) hours of operation and replace if necessary. Pour slowly. Keep oil at least once a year if the tractor is used more freely when warm. • Catch oil in a safe place. • Refill engine with API service classification SG-SL. To ... the transaxle. Check your engine oil level more frequently to clean cooling fins. Check the crankcase oil level before oil change if the tractor is not used above 32°F. CAUTION: Remove lower dash cover carefully to ensure cover tabs are not adjustable. TRANSAXLE PUMP FLUID The...
Owners Manual
Page 17
...more often under extremely dusty, dirty conditions), remove the blower housing and other external surfaces of all foreign matter. • Clean debris from tractor and mower. 17 Debris can restrict clutch/brake pedal shaft movement, causing belt slip and loss of operation, whichever occurs first. of this...line with a blocked grass screen, dirty or plugged cooling fins, and/or cooling shrouds removed will shorten the useful life of your tractor unless the engine and transmission are shown in engine or transmission will cause engine damage due to keep water out. CLAMP FUEL FILTER...
...more often under extremely dusty, dirty conditions), remove the blower housing and other external surfaces of all foreign matter. • Clean debris from tractor and mower. 17 Debris can restrict clutch/brake pedal shaft movement, causing belt slip and loss of operation, whichever occurs first. of this...line with a blocked grass screen, dirty or plugged cooling fins, and/or cooling shrouds removed will shorten the useful life of your tractor unless the engine and transmission are shown in engine or transmission will cause engine damage due to keep water out. CLAMP FUEL FILTER...
Owners Manual
Page 18
... excess water and to the "DISENGAGED" position. MAINTENANCE DECK WASHOUT PORT (See Fig. 22) Your tractor's deck is clear. 7. Move the tractor's attachment clutch control to help dry before putting the tractor away. Turn the ignition key to the STOP position to a water spigot for your garden hose. ... 3. WARNING: A broken or missing washout fitting could expose you or others to thrown objects from the nozzle washout port. 10.Move the tractor to reach. Make sure the attachment clutch control is directed AWAY from your house, garage, parked cars, etc. Thread the nozzle adapter (...
... excess water and to the "DISENGAGED" position. MAINTENANCE DECK WASHOUT PORT (See Fig. 22) Your tractor's deck is clear. 7. Move the tractor's attachment clutch control to help dry before putting the tractor away. Turn the ignition key to the STOP position to a water spigot for your garden hose. ... 3. WARNING: A broken or missing washout fitting could expose you or others to thrown objects from the nozzle washout port. 10.Move the tractor to reach. Make sure the attachment clutch control is directed AWAY from your house, garage, parked cars, etc. Thread the nozzle adapter (...
Owners Manual
Page 19
...90° END INTEGRATED WASHER END Fig. 24 A M F OP Q C E H D S B D Fig. 23 19 TO INSTALL MOWER (See Fig. 23-30) Ensure tractor is on level surface and engage parking brake. • Lower attachment lift lever to its lowest position. • Remove mower belt from electric clutch pulley...plug and place wire where it is spring loaded. CAUTION: After rear lift links are pointing forward before sliding mower under tractor. • Slide mower under tractor. NOTE: Be sure mower side suspension arms (A) are disconnected, the attachment lift lever will be spring loaded. CAUTION: ...
...90° END INTEGRATED WASHER END Fig. 24 A M F OP Q C E H D S B D Fig. 23 19 TO INSTALL MOWER (See Fig. 23-30) Ensure tractor is on level surface and engage parking brake. • Lower attachment lift lever to its lowest position. • Remove mower belt from electric clutch pulley...plug and place wire where it is spring loaded. CAUTION: After rear lift links are pointing forward before sliding mower under tractor. • Slide mower under tractor. NOTE: Be sure mower side suspension arms (A) are disconnected, the attachment lift lever will be spring loaded. CAUTION: ...

Owners Manual
Page 20
...To-Back Adjustment in "TO LEVEL MOWER" in rear mower bracket (D). TS D D. Insert threaded rod end of link assembly through front hole in tractor suspension bracket (F). • Install bushing (O) and loosely install nut (P) and jam nut (Q). • Insert flared ends of link (E) into ...left rear tire in same position/location. • Pivot the integrated washer end of anti-sway bar (S) towards mower deck bracket on opposite side of tractor. F O P E Q H Fig. 29 • Install belt onto electric clutch pulley (M). SERVICE AND ADJUSTMENTS • From right side of ...
...To-Back Adjustment in "TO LEVEL MOWER" in rear mower bracket (D). TS D D. Insert threaded rod end of link assembly through front hole in tractor suspension bracket (F). • Install bushing (O) and loosely install nut (P) and jam nut (Q). • Insert flared ends of link (E) into ...left rear tire in same position/location. • Pivot the integrated washer end of anti-sway bar (S) towards mower deck bracket on opposite side of tractor. F O P E Q H Fig. 29 • Install belt onto electric clutch pulley (M). SERVICE AND ADJUSTMENTS • From right side of ...

Owners Manual
Page 21
... • Recheck measurements, adjust if necessary until front tip of blade is 1/8" to the ground at side and measure the distance (A) from bottom edge of tractor. • With an 11/16" or adjustable wrench, loosen jam nut A several turns to clear adjustment nut B. • With a 3/4" or adjustable ...tighten) to raise the front of the blade. VISUAL SIDE-TO-SIDE ADJUSTMENT (See Fig. 31) • With all tires properly inflated, park tractor on tires. Protect your lawn appears unevenly cut, determine which side of your hands with gloves and/or wrap blade with heavy cloth. • ...
... • Recheck measurements, adjust if necessary until front tip of blade is 1/8" to the ground at side and measure the distance (A) from bottom edge of tractor. • With an 11/16" or adjustable wrench, loosen jam nut A several turns to clear adjustment nut B. • With a 3/4" or adjustable ...tighten) to raise the front of the blade. VISUAL SIDE-TO-SIDE ADJUSTMENT (See Fig. 31) • With all tires properly inflated, park tractor on tires. Protect your lawn appears unevenly cut, determine which side of your hands with gloves and/or wrap blade with heavy cloth. • ...

Owners Manual
Page 22
... lowest position. • Remove mandrel covers. • Remove any twist. Correct if needed. • Adjust belt tension by : • Park tractor on a level, dry concrete or paved surface, then brake must lock and skid when you try to 30 Ft. The rear wheels must be serviced... • With a 3/8" breaker bar and using the square opening in "transmission disengaged" position. BELT ROUTING ENGINE Fig. 37 TO CHECK BRAKE If tractor requires more than five (5) feet to relieve the tension on the engine shaft. Contact a qualified service center. SPRING EYEBOLT NUT IDLER ARM Fig. 35 ...
... lowest position. • Remove mandrel covers. • Remove any twist. Correct if needed. • Adjust belt tension by : • Park tractor on a level, dry concrete or paved surface, then brake must lock and skid when you try to 30 Ft. The rear wheels must be serviced... • With a 3/8" breaker bar and using the square opening in "transmission disengaged" position. BELT ROUTING ENGINE Fig. 37 TO CHECK BRAKE If tractor requires more than five (5) feet to relieve the tension on the engine shaft. Contact a qualified service center. SPRING EYEBOLT NUT IDLER ARM Fig. 35 ...


