
Owners Manual
Page 10
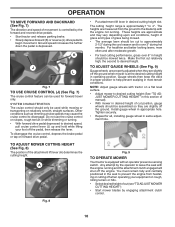
...upon soil conditions, height of grass and types of grass being mowed. • The average lawn should be used for all, installing gauge wheel in operating position. NOTE: Adjust gauge wheels with tractor on a flat level surface. • Adjust mower to leave the seat with an operator...MOVE FORWARD AND BACKWARD (See Fig. 7) The direction and speed of movement is controlled by the forward and reverse drive pedals. • Start tractor and release parking brake. • Slowly depress forward (K) or reverse (L) drive pedal to disengage. These heights are slightly off the pedal, then ...
...upon soil conditions, height of grass and types of grass being mowed. • The average lawn should be used for all, installing gauge wheel in operating position. NOTE: Adjust gauge wheels with tractor on a flat level surface. • Adjust mower to leave the seat with an operator...MOVE FORWARD AND BACKWARD (See Fig. 7) The direction and speed of movement is controlled by the forward and reverse drive pedals. • Start tractor and release parking brake. • Slowly depress forward (K) or reverse (L) drive pedal to disengage. These heights are slightly off the pedal, then ...
Owners Manual
Page 18
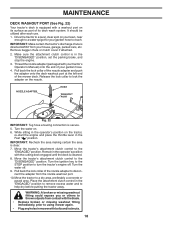
..." position to remove excess water and to the "DISENGAGED" position. Place the attachment clutch control in the operator's position on your lawn, near enough to a water spigot for your garden hose to disconnect the adapter from your garden hose. 4. Turn the water on... the nozzle. Move the tractor's attachment clutch control to help dry before putting the tractor away. Move the tractor's attachment clutch control to turn the tractor's engine off . 9. Make sure the attachment clutch control is secure. 5. Remain...
..." position to remove excess water and to the "DISENGAGED" position. Place the attachment clutch control in the operator's position on your lawn, near enough to a water spigot for your garden hose to disconnect the adapter from your garden hose. 4. Turn the water on... the nozzle. Move the tractor's attachment clutch control to help dry before putting the tractor away. Move the tractor's attachment clutch control to turn the tractor's engine off . 9. Make sure the attachment clutch control is secure. 5. Remain...

Owners Manual
Page 21
... the mower. CAUTION: Blades are sharp. VISUAL SIDE-TO-SIDE ADJUSTMENT (See Fig. 31) • With all tires properly inflated, park tractor on tires. PRECISION SIDE-TO-SIDE ADJUSTMENT (See Fig. 32) • With all tires properly inflated and if your adjustment by mowing some...adjustment nut B. • With a 3/4" or adjustable wrench, turn of the adjustment nut will change mower height about 3/16". • Test your lawn appears unevenly cut, determine which side of mower, or, counterclockwise (loosen) to highest position. • Position any blade so the tip is not ...
... the mower. CAUTION: Blades are sharp. VISUAL SIDE-TO-SIDE ADJUSTMENT (See Fig. 31) • With all tires properly inflated, park tractor on tires. PRECISION SIDE-TO-SIDE ADJUSTMENT (See Fig. 32) • With all tires properly inflated and if your adjustment by mowing some...adjustment nut B. • With a 3/4" or adjustable wrench, turn of the adjustment nut will change mower height about 3/16". • Test your lawn appears unevenly cut, determine which side of mower, or, counterclockwise (loosen) to highest position. • Position any blade so the tip is not ...


