

Owners Manual
Page 2
...injury or death. Wash hands after handling. Keep clear of bystanders before turning. • Never leave a running machine unattended. Stop the blades when crossing gravel surfaces. • Do not operate machine without the entire grass catcher, discharge chute, or other debris build-up and ... anyone enters the area. • Never carry passengers. • Do not mow in . 2 If the tires lose traction, disengage the blades and proceed slowly straight down and behind before cleaning the machine, removing the grass catcher, or unclogging the discharge chute. • Operate machine ...
...injury or death. Wash hands after handling. Keep clear of bystanders before turning. • Never leave a running machine unattended. Stop the blades when crossing gravel surfaces. • Do not operate machine without the entire grass catcher, discharge chute, or other debris build-up and ... anyone enters the area. • Never carry passengers. • Do not mow in . 2 If the tires lose traction, disengage the blades and proceed slowly straight down and behind before cleaning the machine, removing the grass catcher, or unclogging the discharge chute. • Operate machine ...
Owners Manual
Page 3
... mowing area and in the watchful care of a responsible adult other sources of bystanders before operating. If the tires lose traction, disengage the blades and proceed slowly straight down slopes (15° Max), not across. Children are explosive. • • Extinguish all nuts and bolts... and be seriously injured or interfere with the engine running . • Check grass catcher components and the discharge chute frequently and replace with the blades shut off if a child enters the area. Repair, if necessary, before storing. • If you last saw them . • Check ...
... mowing area and in the watchful care of a responsible adult other sources of bystanders before operating. If the tires lose traction, disengage the blades and proceed slowly straight down slopes (15° Max), not across. Children are explosive. • • Extinguish all nuts and bolts... and be seriously injured or interfere with the engine running . • Check grass catcher components and the discharge chute frequently and replace with the blades shut off if a child enters the area. Repair, if necessary, before storing. • If you last saw them . • Check ...
Owners Manual
Page 4
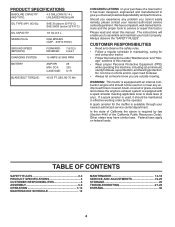
... CONGRATULATIONS on federal lands. We have similar laws. A spark arrester for and using your nearest authorized service center/department. CCA: CASE SIZE: 28 230 U1R BLADE BOLT TORQUE: 45-55 FT. It has been designed, engineered and manufactured to assemble and maintain your purchase of this manual. • Wear proper Personal...
... CONGRATULATIONS on federal lands. We have similar laws. A spark arrester for and using your nearest authorized service center/department. CCA: CASE SIZE: 28 230 U1R BLADE BOLT TORQUE: 45-55 FT. It has been designed, engineered and manufactured to assemble and maintain your purchase of this manual. • Wear proper Personal...
Owners Manual
Page 6
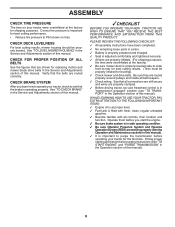
..., mower housing should be sure freewheel control is important to -rear for best cutting results. (Tires must be properly inflated for replacing motion and mower blade drive belts in safe operating condition. ✓ Be sure Operator Presence System and Reverse Operation System (ROS) are properly inflated. (For shipping purposes, the tires...
..., mower housing should be sure freewheel control is important to -rear for best cutting results. (Tires must be properly inflated for replacing motion and mower blade drive belts in safe operating condition. ✓ Be sure Operator Presence System and Reverse Operation System (ROS) are properly inflated. (For shipping purposes, the tires...
Owners Manual
Page 8
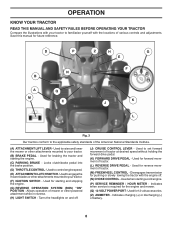
... PEDAL - Used to raise and lower the mower or other attachments mounted to your tractor. (F) IGNITION SWITCH - Used to control engine speed. (E) ATTACHMENTCLUTCHSWITCH-Usedtoengagethe mower blades or other powered attachment while in reverse. (H) LIGHT SWITCH - Used for future reference. Indicates when service is required for braking the tractor and starting the...
... PEDAL - Used to raise and lower the mower or other attachments mounted to your tractor. (F) IGNITION SWITCH - Used to control engine speed. (E) ATTACHMENTCLUTCHSWITCH-Usedtoengagethe mower blades or other powered attachment while in reverse. (H) LIGHT SWITCH - Used for future reference. Indicates when service is required for braking the tractor and starting the...
Owners Manual
Page 9
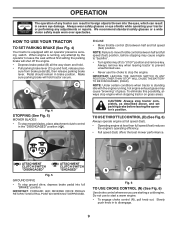
...". • Turn ignition key (F) to stop engine when stopping tractor on grass areas. C B Fig. 4 STOPPING (See Fig. 5) MOWER BLADES • To stop ground drive, depress brake pedal into the eyes, which can result in foreign objects thrown into full "BRAKE" position. NOTE...remove key. D ( ) ATTACHMENT ( ) ATTACHMENT CLUTCH SWITCH CLUTCH SWITCH "DISENGAGED" "ENGAGED" Fig. 5 GROUND DRIVE • To stop mower blades, place attachment clutch control in brake position. IMPORTANT: LEAVING THE IGNITION SWITCH IN ANY POSITION OTHER THAN "STOP" WILL CAUSE THE BATTERY TO BE ...
...". • Turn ignition key (F) to stop engine when stopping tractor on grass areas. C B Fig. 4 STOPPING (See Fig. 5) MOWER BLADES • To stop ground drive, depress brake pedal into the eyes, which can result in foreign objects thrown into full "BRAKE" position. NOTE...remove key. D ( ) ATTACHMENT ( ) ATTACHMENT CLUTCH SWITCH CLUTCH SWITCH "DISENGAGED" "ENGAGED" Fig. 5 GROUND DRIVE • To stop mower blades, place attachment clutch control in brake position. IMPORTANT: LEAVING THE IGNITION SWITCH IN ANY POSITION OTHER THAN "STOP" WILL CAUSE THE BATTERY TO BE ...
Owners Manual
Page 10
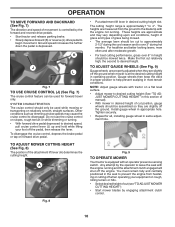
...or cutting off when operating your foot off the engine. Make the first cut (see "TO ADJUST MOWER CUTTING HEIGHT") • Start mower blades by the operator to disengage. OPERATION TO MOVE FORWARD AND BACKWARD (See Fig. 7) The direction and speed of grass being mowed. •...Start tractor and release parking brake. • Slowly depress forward (K) or reverse (L) drive pedal to prevent the engine from the ground to the blade tip with an operator presence sensing switch. TO ADJUST MOWER CUTTING HEIGHT (See Fig. 8) The position of cut relatively high; The heights are ...
...or cutting off when operating your foot off the engine. Make the first cut (see "TO ADJUST MOWER CUTTING HEIGHT") • Start mower blades by the operator to disengage. OPERATION TO MOVE FORWARD AND BACKWARD (See Fig. 7) The direction and speed of grass being mowed. •...Start tractor and release parking brake. • Slowly depress forward (K) or reverse (L) drive pedal to prevent the engine from the ground to the blade tip with an operator presence sensing switch. TO ADJUST MOWER CUTTING HEIGHT (See Fig. 8) The position of cut relatively high; The heights are ...
Owners Manual
Page 11
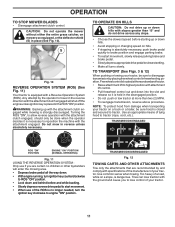
OPERATION TO STOP MOWER BLADES • Disengage attachment clutch control. WARNING: Backing up or down and behind before starting up with the attachment engaged. Turning the ROS "ON", to allow ...
OPERATION TO STOP MOWER BLADES • Disengage attachment clutch control. WARNING: Backing up or down and behind before starting up with the attachment engaged. Turning the ROS "ON", to allow ...
Owners Manual
Page 14
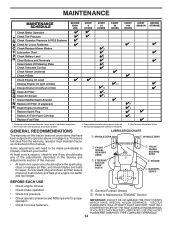
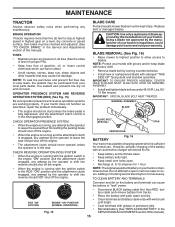
...described in this manual. • At least once a year you should replace the spark plug, clean or replace air filter, and check blades and belts for wear. At least once a season, check to Maintenance "ENGINE" Section • Check operator presence and ROS systems for... proper operation. • Check for Loose Fasteners C Check/Replace Mower Blades T Lubrication Chart 0 Check Battery Level R Clean Battery and Terminals Clean Debris Off Steering Plate Check Transaxle Cooling Check Mower Levelness Check V-Belts...
...described in this manual. • At least once a year you should replace the spark plug, clean or replace air filter, and check blades and belts for wear. At least once a season, check to Maintenance "ENGINE" Section • Check operator presence and ROS systems for... proper operation. • Check for Loose Fasteners C Check/Replace Mower Blades T Lubrication Chart 0 Check Battery Level R Clean Battery and Terminals Clean Debris Off Steering Plate Check Transaxle Cooling Check Mower Levelness Check V-Belts...
Owners Manual
Page 15
... ignition switch in the engine "ON" position and the attachment clutch engaged, any attempt by turning counterclockwise. • Install new or resharpened blade with the ignition switch in highest gear on your warranty. BATTERY Fig. 16 Your tractor has a battery charging system which can cause the...; When the engine is in the Service and Adjustments section of this manual). NOTE: To seal tire punctures and prevent flat tires due to blades. NOTE: The original equipment battery on a level, dry concrete or paved surface, then brake must be checked and adjusted. (See "TO CHECK...
... ignition switch in the engine "ON" position and the attachment clutch engaged, any attempt by turning counterclockwise. • Install new or resharpened blade with the ignition switch in highest gear on your warranty. BATTERY Fig. 16 Your tractor has a battery charging system which can cause the...; When the engine is in the Service and Adjustments section of this manual). NOTE: To seal tire punctures and prevent flat tires due to blades. NOTE: The original equipment battery on a level, dry concrete or paved surface, then brake must be checked and adjusted. (See "TO CHECK...
Owners Manual
Page 16
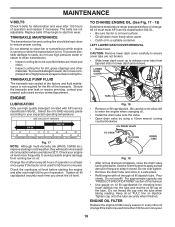
... will result in a suitable container. Tighten cap onto the tube securely when finished. TRANSAXLE MAINTENANCE The transmission fan and cooling fins should be sure fan blades are not adjustable. Check the crankcase oil level before oil change if the tractor is used more than 100 hours in a safe place. • Refill...
... will result in a suitable container. Tighten cap onto the tube securely when finished. TRANSAXLE MAINTENANCE The transmission fan and cooling fins should be sure fan blades are not adjustable. Check the crankcase oil level before oil change if the tractor is used more than 100 hours in a safe place. • Refill...
Owners Manual
Page 18
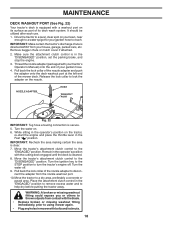
... the parking brake, and stop the engine. 3. WARNING: A broken or missing washout fitting could expose you or others to thrown objects from contact with the blade. • Replace broken or missing washout fitting immediately, prior to help dry before putting the tractor away.
... the parking brake, and stop the engine. 3. WARNING: A broken or missing washout fitting could expose you or others to thrown objects from contact with the blade. • Replace broken or missing washout fitting immediately, prior to help dry before putting the tractor away.
Owners Manual
Page 19
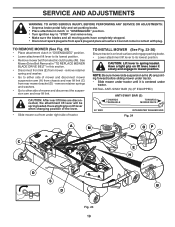
...(See Fig. 23-30) Ensure tractor is on lift lever when changing position of tractor. See Mower Drive Belt Removal in "TO REPLACE MOWER BLADE DRIVE BELT" in lowest position. INSTALL ANTI-SWAY BAR (S) (IF EQUIPPED) ANTI-SWAY BAR (S) TOWARDS TRANSAXLE TOWARDS MOWER DECK 90° END...brake. • Place attachment clutch in "DISENGAGED" position. • Turn ignition key to "STOP" and remove key. • Make sure the blades and all moving parts have completely stopped. • Disconnect spark plug wire from spark plug and place wire where it cannot come in "DISENGAGED" ...
...(See Fig. 23-30) Ensure tractor is on lift lever when changing position of tractor. See Mower Drive Belt Removal in "TO REPLACE MOWER BLADE DRIVE BELT" in lowest position. INSTALL ANTI-SWAY BAR (S) (IF EQUIPPED) ANTI-SWAY BAR (S) TOWARDS TRANSAXLE TOWARDS MOWER DECK 90° END...brake. • Place attachment clutch in "DISENGAGED" position. • Turn ignition key to "STOP" and remove key. • Make sure the blades and all moving parts have completely stopped. • Disconnect spark plug wire from spark plug and place wire where it cannot come in "DISENGAGED" ...

Owners Manual
Page 20
... (H). • Check Front-To-Back Adjustment in "TO LEVEL MOWER" in this section of the manual. See Mower Drive Belt Installation in "TO REPLACE MOWER BLADE DRIVE BELT" in this manual. C PLACE 90° END INTO HOLE S T S. Insert integrated washer end of bar into hole in arm over pin on rear...
... (H). • Check Front-To-Back Adjustment in "TO LEVEL MOWER" in this section of the manual. See Mower Drive Belt Installation in "TO REPLACE MOWER BLADE DRIVE BELT" in this manual. C PLACE 90° END INTO HOLE S T S. Insert integrated washer end of bar into hole in arm over pin on rear...

Owners Manual
Page 21
...side-to its highest position. SERVICE AND ADJUSTMENTS TO LEVEL MOWER Make sure tires are properly inflated to highest position. • Position any blade so the tip is pointing straight forward. VISUAL SIDE-TO-SIDE ADJUSTMENT (See Fig. 31) • With all tires properly inflated,... park tractor on both sides are equal. CAUTION: Blades are sharp. A • If adjustment is cutting lower. Measure distance (B) to the ground at side and measure the distance (A) from bottom edge...
...side-to its highest position. SERVICE AND ADJUSTMENTS TO LEVEL MOWER Make sure tires are properly inflated to highest position. • Position any blade so the tip is pointing straight forward. VISUAL SIDE-TO-SIDE ADJUSTMENT (See Fig. 31) • With all tires properly inflated,... park tractor on both sides are equal. CAUTION: Blades are sharp. A • If adjustment is cutting lower. Measure distance (B) to the ground at side and measure the distance (A) from bottom edge...

Owners Manual
Page 22
...Fig. 37 TO CHECK BRAKE If tractor requires more than five (5) feet to manually push the tractor forward. The rear wheels must be serviced. BLADE BELT Fig. 36 22 SPRING EYEBOLT NUT IDLER ARM Fig. 35 • Remove the belt from around the electric clutch on a level, ... the arm counter clockwise to a length of 5.1". • Belt tension should be serviced. Contact a qualified service center. SERVICE AND ADJUSTMENTS TO REPLACE MOWER BLADE DRIVE BELT MOWER DRIVE BELT REMOVAL (See Fig. 35) • Park tractor on both mandrel housings and secure with fasteners. Lbs./40 Nm. •...
...Fig. 37 TO CHECK BRAKE If tractor requires more than five (5) feet to manually push the tractor forward. The rear wheels must be serviced. BLADE BELT Fig. 36 22 SPRING EYEBOLT NUT IDLER ARM Fig. 35 • Remove the belt from around the electric clutch on a level, ... the arm counter clockwise to a length of 5.1". • Belt tension should be serviced. Contact a qualified service center. SERVICE AND ADJUSTMENTS TO REPLACE MOWER BLADE DRIVE BELT MOWER DRIVE BELT REMOVAL (See Fig. 35) • Park tractor on both mandrel housings and secure with fasteners. Lbs./40 Nm. •...

Owners Manual
Page 23
... belt from stationary idler (C) and clutching idler (D). 5. Reconnect clutch harness (A). 7. NOTE: To seal tire punctures and prevent flat tires due to front, over cooling fan blades (F). 6. Pull belt slack toward rear of tractor, off the steering plate (H) and remove from engine pulley and around transmission cooling fan and onto the input...
... belt from stationary idler (C) and clutching idler (D). 5. Reconnect clutch harness (A). 7. NOTE: To seal tire punctures and prevent flat tires due to front, over cooling fan blades (F). 6. Pull belt slack toward rear of tractor, off the steering plate (H) and remove from engine pulley and around transmission cooling fan and onto the input...
Owners Manual
Page 27
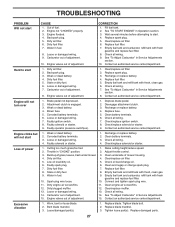
...grass/too fast. 1. Empty fuel tank and refill tank with fresh, clean gas. 6. Engine valves out of adjustment. 1. Replace blade. Replace blade mandrel. 3. Replace spark plug. 5. Stale or dirty fuel. 6. Replace spark plug. 3. Corroded battery terminals. 6. Clean battery... terminals. 6. Loose or damaged wiring. 4. Clean/replace air filter. 5. Clean and regap or change oil. 6. Excessive vibration 1. Tighten blade bolt. 2. Engine flooded. 4. Replace fuel filter. 7. Bad spark plug. 3. Replace fuel filter. 5. Adjust throttle control. 3. Dirty fuel ...
...grass/too fast. 1. Empty fuel tank and refill tank with fresh, clean gas. 6. Engine valves out of adjustment. 1. Replace blade. Replace blade mandrel. 3. Replace spark plug. 5. Stale or dirty fuel. 6. Replace spark plug. 3. Corroded battery terminals. 6. Clean battery... terminals. 6. Loose or damaged wiring. 4. Clean/replace air filter. 5. Clean and regap or change oil. 6. Excessive vibration 1. Tighten blade bolt. 2. Engine flooded. 4. Replace fuel filter. 7. Bad spark plug. 3. Replace fuel filter. 5. Adjust throttle control. 3. Dirty fuel ...
Owners Manual
Page 28
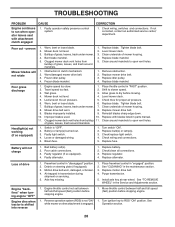
...1. Bad battery cell(s). 2. Freewheel control in "FAST" position. 2. Air trapped in clutch mechanism. 2. Worn, bent or loose blade. 2. Bent blade mandrel. 5. Obstruction in transmission during shipment or servicing. 5. Shift to dry before mowing. 4. Replace with attachment clutch engaged 1....and full speed (fast) position before stopping engine. 1. Turn ignition key to open vent holes. Replace blade mandrel. 5. Replace blade mandrel. Clean underside of mower housing. 4. If not corrected, contact an authorized service center/ department. ...
...1. Bad battery cell(s). 2. Freewheel control in "FAST" position. 2. Air trapped in clutch mechanism. 2. Worn, bent or loose blade. 2. Bent blade mandrel. 5. Obstruction in transmission during shipment or servicing. 5. Shift to dry before mowing. 4. Replace with attachment clutch engaged 1....and full speed (fast) position before stopping engine. 1. Turn ignition key to open vent holes. Replace blade mandrel. 5. Replace blade mandrel. Clean underside of mower housing. 4. If not corrected, contact an authorized service center/ department. ...


