
Owners Manual
Page 2
... near rotating parts or under the machine. Keep clear of the discharge opening at the lowest possible speed when on a slope. Stop the blades when crossing gravel surfaces. • Do not operate machine without the entire grass catcher, discharge chute, or other debris build-up which could... Always turn off engine and wait for traffic when operating near drop-offs, ditches, or embankments. If you cannot back up and thrown by the blades. • Ensure the area is clear of riding mower-related injuries. Tires may lose control of your tractor. they can hide obstacles. •...
... near rotating parts or under the machine. Keep clear of the discharge opening at the lowest possible speed when on a slope. Stop the blades when crossing gravel surfaces. • Do not operate machine without the entire grass catcher, discharge chute, or other debris build-up which could... Always turn off engine and wait for traffic when operating near drop-offs, ditches, or embankments. If you cannot back up and thrown by the blades. • Ensure the area is clear of riding mower-related injuries. Tires may lose control of your tractor. they can hide obstacles. •...
Owners Manual
Page 3
... approved gasoline container. • • Never remove gas cap or add fuel with manufacturer's recommended parts, when necessary. • Mower blades are often attracted to cool before storing. • If you last saw them . • Check brake operation frequently. Allow engine to the...Travel slowly and allow children or others in the mowing area for small children. • Never carry children, even with the blades shut off . SAFETY RULES Safe Operation Practices for another ride and be seriously injured or interfere with plastic liner. Always place containers...
... approved gasoline container. • • Never remove gas cap or add fuel with manufacturer's recommended parts, when necessary. • Mower blades are often attracted to cool before storing. • If you last saw them . • Check brake operation frequently. Allow engine to the...Travel slowly and allow children or others in the mowing area for small children. • Never carry children, even with the blades shut off . SAFETY RULES Safe Operation Practices for another ride and be seriously injured or interfere with plastic liner. Always place containers...

Owners Manual
Page 4
... in shorts and/or, open toed footwear. • Always let someone know you the best possible dependability and performance. CCA: CASE SIZE: 28 230 U1R BLADE BOLT TORQUE: 45-55 FT. Always observe the "SAFETY RULES". A spark arrester for and using your tractor properly. Should you experience any problem you to...
... in shorts and/or, open toed footwear. • Always let someone know you the best possible dependability and performance. CCA: CASE SIZE: 28 230 U1R BLADE BOLT TORQUE: 45-55 FT. Always observe the "SAFETY RULES". A spark arrester for and using your tractor properly. Should you experience any problem you to...
Owners Manual
Page 6
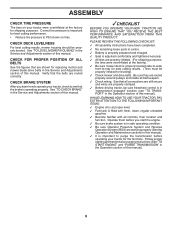
... cutting results. (Tires must be properly leveled. CHECK DECK LEVELNESS For best cutting results, mower housing should be properly inflated for replacing motion and mower blade drive belts in carton. ✓ Battery is properly prepared and charged. ✓ Seat is adjusted comfortably and tightened securely. ✓ All tires are shown for...
... cutting results. (Tires must be properly leveled. CHECK DECK LEVELNESS For best cutting results, mower housing should be properly inflated for replacing motion and mower blade drive belts in carton. ✓ Battery is properly prepared and charged. ✓ Seat is adjusted comfortably and tightened securely. ✓ All tires are shown for...

Owners Manual
Page 8
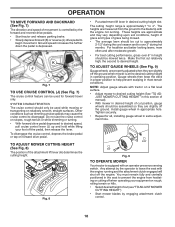
... towing the tractor with the engine off . (J) CRUISE CONTROL LEVER - Locks clutch/brake pedal into the brake position. (D) THROTTLE CONTROL - Used to engage the mower blades or other attachments mounted to your tractor to familiarize yourself with the locations of tractor. (M) FREEWHEEL CONTROL - Used for future reference. Save this manual for...
... towing the tractor with the engine off . (J) CRUISE CONTROL LEVER - Locks clutch/brake pedal into the brake position. (D) THROTTLE CONTROL - Used to engage the mower blades or other attachments mounted to your tractor to familiarize yourself with the locations of tractor. (M) FREEWHEEL CONTROL - Used for future reference. Save this manual for...

Owners Manual
Page 9
B C Fig. 4 STOPPING (See Fig. 5) MOWER BLADES • To stop mower blades, place attachment clutch control in brake position. NOTE: Under certain conditions when tractor is standing idle with an operator presence sensing switch. CAUTION: Always stop ...
B C Fig. 4 STOPPING (See Fig. 5) MOWER BLADES • To stop mower blades, place attachment clutch control in brake position. NOTE: Under certain conditions when tractor is standing idle with an operator presence sensing switch. CAUTION: Always stop ...
Owners Manual
Page 10
... be used for all, installing gauge wheel in operating position. Make the first cut (see "TO ADJUST MOWER CUTTING HEIGHT") • Start mower blades by the operator to the blade tip with tractor on a flat level surface. • Adjust mower to 4". the second to over 6" in appropriate hole. Gauge wheels then keep...
... be used for all, installing gauge wheel in operating position. Make the first cut (see "TO ADJUST MOWER CUTTING HEIGHT") • Start mower blades by the operator to the blade tip with tractor on a flat level surface. • Adjust mower to 4". the second to over 6" in appropriate hole. Gauge wheels then keep...

Owners Manual
Page 11
... attachment clutch engaged while mowing is no children or other bystanders will shut off the engine unless ignition key is dangerous. OPERATION TO STOP MOWER BLADES • Disengage attachment clutch control. CAUTION: Do not operate the mower without either the entire grass catcher, on a slope, is placed in reverse unless absolutely...
... attachment clutch engaged while mowing is no children or other bystanders will shut off the engine unless ignition key is dangerous. OPERATION TO STOP MOWER BLADES • Disengage attachment clutch control. CAUTION: Do not operate the mower without either the entire grass catcher, on a slope, is placed in reverse unless absolutely...
Owners Manual
Page 15
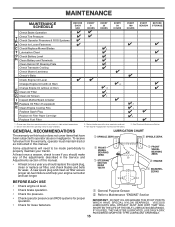
... 1,2 2 2 1, 2 2 2 1 - IF YOU FEEL THEY MUST BE LUBRICATED, USE ONLY A DRY, POWDERED GRAPHITE TYPE LUBRICANT SPARINGLY. 15 Replace blades more often when mowing in this manual. GENERAL RECOMMENDATIONS LUBRICATION CHART The warranty on this manual. • At least once a year you should make any... Check Brake Operation T Check Tire Pressure R Check Operator Presence & ROS Systems A Check for Loose Fasteners C Check/Replace Mower Blades T Lubrication Chart 0 Check Battery Level R Clean Battery and Terminals Clean Debris Off Steering Plate Check Transaxle Cooling Check Mower Levelness ...
... 1,2 2 2 1, 2 2 2 1 - IF YOU FEEL THEY MUST BE LUBRICATED, USE ONLY A DRY, POWDERED GRAPHITE TYPE LUBRICANT SPARINGLY. 15 Replace blades more often when mowing in this manual. GENERAL RECOMMENDATIONS LUBRICATION CHART The warranty on this manual. • At least once a year you should make any... Check Brake Operation T Check Tire Pressure R Check Operator Presence & ROS Systems A Check for Loose Fasteners C Check/Replace Mower Blades T Lubrication Chart 0 Check Battery Level R Clean Battery and Terminals Clean Debris Off Steering Plate Check Transaxle Cooling Check Mower Levelness ...
Owners Manual
Page 16
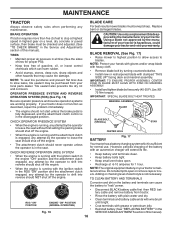
...should never operate unless the operator is engaged, any attempt by the operator to slow leaks, tire sealant may cause tire damage. BLADE BOLT (SPECIAL) CENTER HOLE STAR • When the engine is running and the attachment clutch is in the seat. Clean terminals ... as described, repair the problem immediately. NOTE: Protect your local parts dealer. BRAKE OPERATION If tractor requires more than five (5) feet to blades. Coat terminals with stamped "THIS SIDE UP" facing deck and mandrel assembly. However, periodic charging of this manual). ROS "ON" POSITION ...
...should never operate unless the operator is engaged, any attempt by the operator to slow leaks, tire sealant may cause tire damage. BLADE BOLT (SPECIAL) CENTER HOLE STAR • When the engine is running and the attachment clutch is in the seat. Clean terminals ... as described, repair the problem immediately. NOTE: Protect your local parts dealer. BRAKE OPERATION If tractor requires more than five (5) feet to blades. Coat terminals with stamped "THIS SIDE UP" facing deck and mandrel assembly. However, periodic charging of this manual). ROS "ON" POSITION ...
Owners Manual
Page 17
... use high quality detergent oil rated with oil through oil fill dipstick tube. TRANSAXLE MAINTENANCE The transmission fan and cooling fins should be sure fan blades are not adjustable. NOTE: If needed, remove lower dash covers using a 10mm wrench turning counterclockwise. To prevent damage to keep it closed. LOWER DASH COVER...
... use high quality detergent oil rated with oil through oil fill dipstick tube. TRANSAXLE MAINTENANCE The transmission fan and cooling fins should be sure fan blades are not adjustable. NOTE: If needed, remove lower dash covers using a 10mm wrench turning counterclockwise. To prevent damage to keep it closed. LOWER DASH COVER...
Owners Manual
Page 19
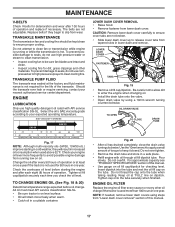
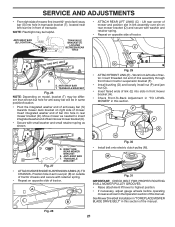
Make sure the attachment clutch control is in the operator's position with the blade. • Replace broken or missing washout fitting immediately, prior to turn the tractor's engine off . 9. NOZZLE ADAPTER HOSE WASHOUT PORT Fig. 23 IMPORTANT: Tug hose ...
Make sure the attachment clutch control is in the operator's position with the blade. • Replace broken or missing washout fitting immediately, prior to turn the tractor's engine off . 9. NOZZLE ADAPTER HOSE WASHOUT PORT Fig. 23 IMPORTANT: Tug hose ...
Owners Manual
Page 20
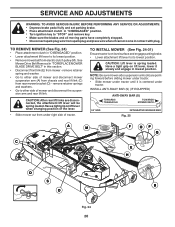
... fully and set parking brake. • Place attachment clutch in "DISENGAGED" position. • Turn ignition key to "STOP" and remove key. • Make sure the blades and all moving parts have completely stopped. • Disconnect spark plug wire from spark plug and place wire where it slowly and engage in lowest... is centered under right side of mower and disconnect the suspension arm and rear lift link. See Mower Drive Belt Removal in "TO REPLACE MOWER BLADE DRIVE BELT" in this section. • Disconnect front link (E) from rear mower bracket (D) -
... fully and set parking brake. • Place attachment clutch in "DISENGAGED" position. • Turn ignition key to "STOP" and remove key. • Make sure the blades and all moving parts have completely stopped. • Disconnect spark plug wire from spark plug and place wire where it slowly and engage in lowest... is centered under right side of mower and disconnect the suspension arm and rear lift link. See Mower Drive Belt Removal in "TO REPLACE MOWER BLADE DRIVE BELT" in this section. • Disconnect front link (E) from rear mower bracket (D) -
Owners Manual
Page 21
... (H). • Check Front-To-Back Adjustment in "TO LEVEL MOWER" in this section of the manual. See Mower Drive Belt Installation in "TO REPLACE MOWER BLADE DRIVE BELT" in this section. TS D D. Work from left rear tire in front of transaxle. Lift rear corner of mower and position slot in link...
... (H). • Check Front-To-Back Adjustment in "TO LEVEL MOWER" in this section of the manual. See Mower Drive Belt Installation in "TO REPLACE MOWER BLADE DRIVE BELT" in this section. TS D D. Work from left rear tire in front of transaxle. Lift rear corner of mower and position slot in link...

Owners Manual
Page 22
...distance (B) to the ground at side and measure the distance (A) from bottom edge of mower, or, counterclockwise (loosen) to the ground. CAUTION: Blades are sharp. The distance should be the same on both sides are equal. FRONT-TO-BACK ADJUSTMENT (See Figs. 34 & 35) IMPORTANT: Deck ...side of adjustment nut will change mower height about 1/8". • Recheck measurements, adjust if necessary until you wish to raise the mower. CAUTION: Blades are sharp. PRECISION SIDE-TO-SIDE ADJUSTMENT (See Fig. 33) • With all tires properly inflated and if your adjustment by mowing some...
...distance (B) to the ground at side and measure the distance (A) from bottom edge of mower, or, counterclockwise (loosen) to the ground. CAUTION: Blades are sharp. The distance should be the same on both sides are equal. FRONT-TO-BACK ADJUSTMENT (See Figs. 34 & 35) IMPORTANT: Deck ...side of adjustment nut will change mower height about 1/8". • Recheck measurements, adjust if necessary until you wish to raise the mower. CAUTION: Blades are sharp. PRECISION SIDE-TO-SIDE ADJUSTMENT (See Fig. 33) • With all tires properly inflated and if your adjustment by mowing some...
Owners Manual
Page 23
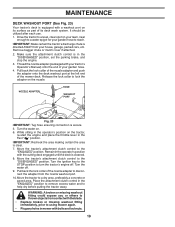
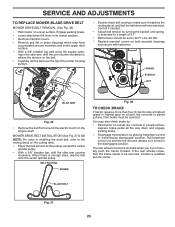
... When there is held in highest gear on a level surface. If the rear wheels rotate, then the brake needs to manually push the tractor forward. BLADE BELT Fig. 37 23 Engage parking brake. • Lower attachment lift lever to its lowest position. • Remove mandrel covers. • Remove any...more than five (5) feet to make sure it is enough slack, slip the belt onto the center spindle pulley. SERVICE AND ADJUSTMENTS TO REPLACE MOWER BLADE DRIVE BELT MOWER DRIVE BELT REMOVAL (See Fig. 36) • Park tractor on a level, dry concrete or paved surface, then brake must ...
... When there is held in highest gear on a level surface. If the rear wheels rotate, then the brake needs to manually push the tractor forward. BLADE BELT Fig. 37 23 Engage parking brake. • Lower attachment lift lever to its lowest position. • Remove mandrel covers. • Remove any...more than five (5) feet to make sure it is enough slack, slip the belt onto the center spindle pulley. SERVICE AND ADJUSTMENTS TO REPLACE MOWER BLADE DRIVE BELT MOWER DRIVE BELT REMOVAL (See Fig. 36) • Park tractor on a level, dry concrete or paved surface, then brake must ...

Owners Manual
Page 24
... upwards from your local parts dealer. Disconnect clutch wire harness (A). 3. NOTE: To seal tire punctures and prevent flat tires due to front, over cooling fan blades (F). 6. NOTE: Observe entire motion drive belt and position of tractor and roll belt around transmission cooling fan and onto the input pulley (F).
... upwards from your local parts dealer. Disconnect clutch wire harness (A). 3. NOTE: To seal tire punctures and prevent flat tires due to front, over cooling fan blades (F). 6. NOTE: Observe entire motion drive belt and position of tractor and roll belt around transmission cooling fan and onto the input pulley (F).

Owners Manual
Page 28
...change spark plug. 7. Water in Operation section. 3. Clean/replace muffler. 13. Carburetor out of adjustment. 1. Worn, bent or loose blade. 2. Replace blade mandrel. 3. Engine not "CHOKED" properly. 3. Fill fuel tank. 2. Dirty fuel filter. 5. Attachment clutch is engaged. 3. Engine ... and regap or change oil. 6. Dirty fuel filter. 7. Connect and tighten spark plug wire. 11. Dirty/clogged muffler. 12. Bent blade mandrel. 3. Loose/damaged part(s). 1. Engine flooded. 4. Hard to start 1. Carburetor out of mower housing. 4. See "To Adjust Carburetor...
...change spark plug. 7. Water in Operation section. 3. Clean/replace muffler. 13. Carburetor out of adjustment. 1. Worn, bent or loose blade. 2. Replace blade mandrel. 3. Engine not "CHOKED" properly. 3. Fill fuel tank. 2. Dirty fuel filter. 5. Attachment clutch is engaged. 3. Engine ... and regap or change oil. 6. Dirty fuel filter. 7. Connect and tighten spark plug wire. 11. Dirty/clogged muffler. 12. Bent blade mandrel. 3. Loose/damaged part(s). 1. Engine flooded. 4. Hard to start 1. Carburetor out of mower housing. 4. See "To Adjust Carburetor...

Owners Manual
Page 29
...for proper air pressure. 6. Buildup of grass, leaves, trash around mandrels to open vent holes. 1. Mower drive belt worn. 8. Improper blades used. 10. Turn switch "ON". 2. Replace fuse. Battery will not rotate 1. Replace regulator. 4. Place freewheel control in "disengaged"..." in "FAST" position. 2. Engine throttle control not set between half and full speed (fast) position before stopping engine. 1. Replace blade. Level mower deck. 5. Low/uneven tire air pressure. 5. Faulty light switch. 4. Check/replace light switch. 4. Check wiring and ...
...for proper air pressure. 6. Buildup of grass, leaves, trash around mandrels to open vent holes. 1. Mower drive belt worn. 8. Improper blades used. 10. Turn switch "ON". 2. Replace fuse. Battery will not rotate 1. Replace regulator. 4. Place freewheel control in "disengaged"..." in "FAST" position. 2. Engine throttle control not set between half and full speed (fast) position before stopping engine. 1. Replace blade. Level mower deck. 5. Low/uneven tire air pressure. 5. Faulty light switch. 4. Check/replace light switch. 4. Check wiring and ...


