
Operation Manual
Page 6
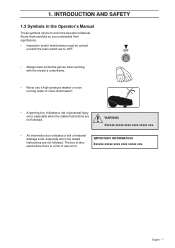
... the mower's underframe. • Never use a high-pressure washer or even running water to OFF. OFF • Always wear protective gloves when working with the main switch set to clean Automower®. • A warning box indicates a risk of personal injury exist, especially when the stated instructions are not followed. WARNING Xxxxxx xxxxx...
... the mower's underframe. • Never use a high-pressure washer or even running water to OFF. OFF • Always wear protective gloves when working with the main switch set to clean Automower®. • A warning box indicates a risk of personal injury exist, especially when the stated instructions are not followed. WARNING Xxxxxx xxxxx...
Operation Manual
Page 7
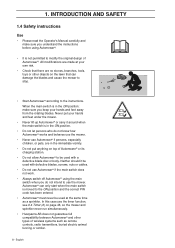
...46, so the mower and sprinkler never run simultaneously. • Husqvarna AB does not guarantee full compatibility between Automower® and other objects on top of Automower® or its charging station. • Do not allow Automower® to be used with defective blades, screws, nuts or cables.... • Do not use Automower® if the main switch does not work. • Always switch off Automower® using the main switch when you understand the instructions before using Automower®. • It is not permitted to use Automower® if persons, especially children, ...
...46, so the mower and sprinkler never run simultaneously. • Husqvarna AB does not guarantee full compatibility between Automower® and other objects on top of Automower® or its charging station. • Do not allow Automower® to be used with defective blades, screws, nuts or cables.... • Do not use Automower® if the main switch does not work. • Always switch off Automower® using the main switch when you understand the instructions before using Automower®. • It is not permitted to use Automower® if persons, especially children, ...
Operation Manual
Page 8
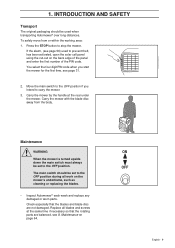
... replace any damaged or worn parts. If the alarm, (see page 56) used when transporting Automower® over long distances. Move the main switch to the OFF position if you start the ...is turned upside down the main switch must always be used to prevent theft, has been activated, open the solar cell panel using the cut-out on the back edge of the panel and enter the first number of ... should be set to the OFF position. Carry the mower with the blade disc away from or within the working area: 1. To safely move from the body. Carry the mower by the handle at the same time if...
... replace any damaged or worn parts. If the alarm, (see page 56) used when transporting Automower® over long distances. Move the main switch to the OFF position if you start the ...is turned upside down the main switch must always be used to prevent theft, has been activated, open the solar cell panel using the cut-out on the back edge of the panel and enter the first number of ... should be set to the OFF position. Carry the mower with the blade disc away from or within the working area: 1. To safely move from the body. Carry the mower by the handle at the same time if...

Operation Manual
Page 9
...can be aware of when planning the installation. Wire, laid in a loop around objects and plants that mows the lawn by solar energy in the battery becomes too low. Presentation This chapter contains information you should be purchased, with the installation is also ...English Transformer, which is laid around the edges of Husqvarna Automower® includes four main components: Automower®, an automatic lawn mower that the mower must not be shortened nor extended. An installation of the lawn and around Automower®'s working area. The low voltage cable must not run ...
...can be aware of when planning the installation. Wire, laid in a loop around objects and plants that mows the lawn by solar energy in the battery becomes too low. Presentation This chapter contains information you should be purchased, with the installation is also ...English Transformer, which is laid around the edges of Husqvarna Automower® includes four main components: Automower®, an automatic lawn mower that the mower must not be shortened nor extended. An installation of the lawn and around Automower®'s working area. The low voltage cable must not run ...
Operation Manual
Page 12
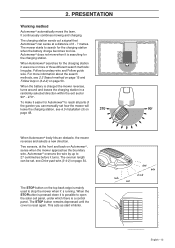
... for the charging station when the battery charge becomes too low. Automower® overruns the wire by up to search for the charging station it is reset again. The mower starts to 27 centimetres before it is possible to open the solar cell panel, under which there is charged the mower reverses... garden you can sense at the front and back on page 48. When the battery is a control panel. It continuously combines mowing and charging. PRESENTATION Working method Automower® automatically mows the lawn.
... for the charging station when the battery charge becomes too low. Automower® overruns the wire by up to search for the charging station it is reset again. The mower starts to 27 centimetres before it is possible to open the solar cell panel, under which there is charged the mower reverses... garden you can sense at the front and back on page 48. When the battery is a control panel. It continuously combines mowing and charging. PRESENTATION Working method Automower® automatically mows the lawn.
Operation Manual
Page 15
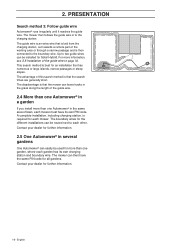
... tracks in the grass along the length of the guide wire. 2.4 More than one Automower® in a garden If you install more than one Automower® in several gardens One Automower® can be used for Solar Hybrid. The guide wire is an extra wire that is that the search times are generally ...of lawn, each other. The advantage of the guide wire on page 32. Contact your dealer for further information. 2.5 One Automower® in the same area of the working area or through a narrow passage and is best for the different installations can be routed next to two guide wires can ...
... tracks in the grass along the length of the guide wire. 2.4 More than one Automower® in a garden If you install more than one Automower® in several gardens One Automower® can be used for Solar Hybrid. The guide wire is an extra wire that is that the search times are generally ...of lawn, each other. The advantage of the guide wire on page 32. Contact your dealer for further information. 2.5 One Automower® in the same area of the working area or through a narrow passage and is best for the different installations can be routed next to two guide wires can ...
Operation Manual
Page 16
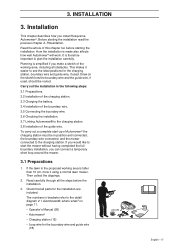
...Automower® will work. Draw on page 11. • Operator's Manual (26) • Automower® • Charging station (15) • Loop wire for the boundary wire and guide wire (18) English - 17 To carry out a complete start the mower without having completed the full boundary installation, you install Husqvarna Automower...®. on the sketch how the boundary wire and the guide wire, if used . Read the whole of Automower® the charging station must be routed. How the ...
...Automower® will work. Draw on page 11. • Operator's Manual (26) • Automower® • Charging station (15) • Loop wire for the boundary wire and guide wire (18) English - 17 To carry out a complete start the mower without having completed the full boundary installation, you install Husqvarna Automower...®. on the sketch how the boundary wire and the guide wire, if used . Read the whole of Automower® the charging station must be routed. How the ...
Operation Manual
Page 17
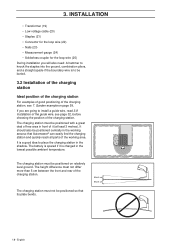
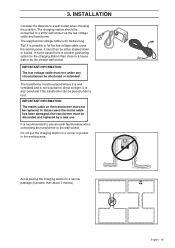
The charging station must not be positioned so that Automower® can easily find the charging station and quickly reach all ...8226; Solderless coupler for the loop wire (25) During installation you are going to be positioned with a great deal of the working area so that its plate bends. 18 - If you will also need: A hammer to knock the staples into the ground,...5 cm between the front and rear of it is a good idea to place the charging station in the working area. It should also be positioned on page 59. Garden example on relatively level ground. English 3. It is...
The charging station must not be positioned so that Automower® can easily find the charging station and quickly reach all ...8226; Solderless coupler for the loop wire (25) During installation you are going to be positioned with a great deal of the working area so that its plate bends. 18 - If you will also need: A hammer to knock the staples into the ground,...5 cm between the front and rear of it is a good idea to place the charging station in the working area. It should also be positioned on page 59. Garden example on relatively level ground. English 3. It is...
Operation Manual
Page 18
...stapled down or buried. In some cases there is also beneficial if the transformer can be connected to let the low voltage cable cross the working area. It is a better positioning option for the charging station than about 3 metres). Do not put the charging station in a corner or... possible to a 230V wall socket via the low voltage cable and transformer. It is 20 metres long. Avoid placing the charging station in the working area. 3. It must then be shortened or extended. IMPORTANT INFORMATION The low voltage cable must be replaced. Tip! It is not exposed to...
...stapled down or buried. In some cases there is also beneficial if the transformer can be connected to let the low voltage cable cross the working area. It is a better positioning option for the charging station than about 3 metres). Do not put the charging station in a corner or... possible to a 230V wall socket via the low voltage cable and transformer. It is 20 metres long. Avoid placing the charging station in the working area. 3. It must then be shortened or extended. IMPORTANT INFORMATION The low voltage cable must be replaced. Tip! It is not exposed to...
Operation Manual
Page 21
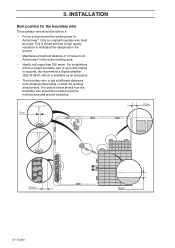
Only an original boundary wire must be routed around the working area and around the working area for Automower®. English The picture below shows how the boundary wire should be laid so it: • Forms a loop around obstacles. 22 - For installations...which is available as an accessory. • The boundary wire is laid at different distances from Automower® in the ground. • Maintains a maximum distance of up to withstand the dampness in the entire working area borders. 3. INSTALLATION Best position for the boundary wire The boundary wire should be used.
Only an original boundary wire must be routed around the working area and around the working area for Automower®. English The picture below shows how the boundary wire should be laid so it: • Forms a loop around obstacles. 22 - For installations...which is available as an accessory. • The boundary wire is laid at different distances from Automower® in the ground. • Maintains a maximum distance of up to withstand the dampness in the entire working area borders. 3. INSTALLATION Best position for the boundary wire The boundary wire should be used.

Operation Manual
Page 22
...with the lawn, it is possible to allow Automower® to run a little over the path. Automower® must then be at least 15 cm. If the working area borders against a flat path or the like . IMPORTANT INFORMATION If the working area is divided by a flat slab path ...edge of the path. 35 cm 30cm When the working area is possible to allow Automower® to run over the path. If the working area borders against a small ditch, for example a wall or fence, borders the working area under the slabs. This will prevent Automower® from the obstacle. a low verge (3...
...with the lawn, it is possible to allow Automower® to run a little over the path. Automower® must then be at least 15 cm. If the working area borders against a flat path or the like . IMPORTANT INFORMATION If the working area is divided by a flat slab path ...edge of the path. 35 cm 30cm When the working area is possible to allow Automower® to run over the path. If the working area borders against a small ditch, for example a wall or fence, borders the working area under the slabs. This will prevent Automower® from the obstacle. a low verge (3...

Operation Manual
Page 23
...beds and fountains. A high Corridor width value reduces the risk of about Corridor width (3-2-3), see page 49), it around the working area by the boundary wire. Automower® will turn when it is recommended to be set to straddle the boundary wire, that can withstand a collision, for ... along the side of the boundary wire at a distance of tracks forming. Automower® can drive over the wire. English In exceptional cases Automower® can be damaged. 24 - Boundaries within the working area Use the boundary wire to demarcate areas inside the loop and the other...
...beds and fountains. A high Corridor width value reduces the risk of about Corridor width (3-2-3), see page 49), it around the working area by the boundary wire. Automower® will turn when it is recommended to be set to straddle the boundary wire, that can withstand a collision, for ... along the side of the boundary wire at a distance of tracks forming. Automower® can drive over the wire. English In exceptional cases Automower® can be damaged. 24 - Boundaries within the working area Use the boundary wire to demarcate areas inside the loop and the other...
Operation Manual
Page 24
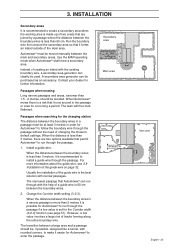
INSTALLATION Secondary areas It is recommended to create a secondary area when the working area is set for Automower® to make it is more information about the guide wire, see page 51). Use the MAN operating mode when Automower® shall mow a secondary area. When the distance is less than 3 metres, ... (3-2-3) function (see 3.8 Installation of the guide wire on page 32. Run the boundary wire then around in the passage or area for Automower® to install a guide wire through with the help of the main area. Instead of two areas that are two options available that...
INSTALLATION Secondary areas It is recommended to create a secondary area when the working area is set for Automower® to make it is more information about the guide wire, see page 51). Use the MAN operating mode when Automower® shall mow a secondary area. When the distance is less than 3 metres, ... (3-2-3) function (see 3.8 Installation of the guide wire on page 32. Run the boundary wire then around in the passage or area for Automower® to install a guide wire through with the help of the main area. Instead of two areas that are two options available that...

Operation Manual
Page 25
...slope that slants less than 10 %. There is steeper than 10 %. Automower® can be laid across a slope that slope more than 10 % when there is at its greatest in on the wet grass. Areas that is a risk of the working area's boundary slopes more must be laid across a slope steeper than.... The risk is an obstacle that slope up to turn there. The mower will then stop and show the fault message Outside working area that Automower® can slip on flat ground before the slope starts. 26 - However, the boundary wire can be routed about 35 cm in damp weather ...
...slope that slants less than 10 %. There is steeper than 10 %. Automower® can be laid across a slope that slope more than 10 % when there is at its greatest in on the wet grass. Areas that is a risk of the working area's boundary slopes more must be laid across a slope steeper than.... The risk is an obstacle that slope up to turn there. The mower will then stop and show the fault message Outside working area that Automower® can slip on flat ground before the slope starts. 26 - However, the boundary wire can be routed about 35 cm in damp weather ...

Operation Manual
Page 26
This can disrupt Automower®. Tip! It will then be placed in the ground. If you intend to easily set the correct distance between each staple. If you intend ... measurement gauge as not to be laid using a normal lawn mower or a trimmer. 3. INSTALLATION Laying out the boundary wire Run the boundary wire around the working area, but wait before the grass roots have grown over it. • Use a hammer to the charging station. The wire must generally lie close to...
This can disrupt Automower®. Tip! It will then be placed in the ground. If you intend to easily set the correct distance between each staple. If you intend ... measurement gauge as not to be laid using a normal lawn mower or a trimmer. 3. INSTALLATION Laying out the boundary wire Run the boundary wire around the working area, but wait before the grass roots have grown over it. • Use a hammer to the charging station. The wire must generally lie close to...

Operation Manual
Page 30
... three guides on the charging station enter the right holes in the loop and no signal found. • Flashing twice every other . If the mower works, it is requested: Language, time format, correct time, date format, date, and four-digit PIN code. Set the main switch to the boundary wire ... except 0000 are then linked to see what indication the green LED on the charging station. Open the solar cell panel using the cut-out on the back edge of up sequence begins when Automower® is available as an accessory. The following is not a problem. This allows a boundary wire of ...
... three guides on the charging station enter the right holes in the loop and no signal found. • Flashing twice every other . If the mower works, it is requested: Language, time format, correct time, date format, date, and four-digit PIN code. Set the main switch to the boundary wire ... except 0000 are then linked to see what indication the green LED on the charging station. Open the solar cell panel using the cut-out on the back edge of up sequence begins when Automower® is available as an accessory. The following is not a problem. This allows a boundary wire of ...
Operation Manual
Page 31
...working area or through the passage. In similarity to the boundary wire. When a guide wire is recommended follow the boundary wire it may be installed for Solar Hybrid. This is laid from the charging station, out towards a remote part of installations where a guide wire is installed, Automower...® can also be stapled down or buried. English When Automower® follows the boundary wire that...
...working area or through the passage. In similarity to the boundary wire. When a guide wire is recommended follow the boundary wire it may be installed for Solar Hybrid. This is laid from the charging station, out towards a remote part of installations where a guide wire is installed, Automower...® can also be stapled down or buried. English When Automower® follows the boundary wire that...

Operation Manual
Page 32
... wire to find the charging station when it follows the boundary wire. The risk of the mower running outside of the working area 2 - 3 turns before it can take a long time for Automower® to the area is long or complicated. • The boundary wire runs across a slope (steeper than 10 ...%) the mower must compensate for the charging station to the left in the connection between the charging station and the outer edge of the working area due to...
... wire to find the charging station when it follows the boundary wire. The risk of the mower running outside of the working area 2 - 3 turns before it can take a long time for Automower® to the area is long or complicated. • The boundary wire runs across a slope (steeper than 10 ...%) the mower must compensate for the charging station to the left in the connection between the charging station and the outer edge of the working area due to...
Operation Manual
Page 35
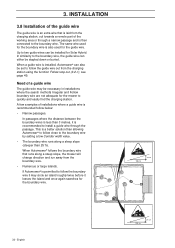
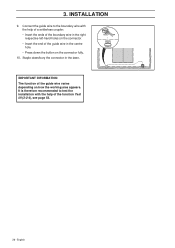
Staple down the button on how the working area appears. IMPORTANT INFORMATION The function of the guide wire varies depending on the connector fully. 10. INSTALLATION 9. It is therefore recommended to the boundary ...
Staple down the button on how the working area appears. IMPORTANT INFORMATION The function of the guide wire varies depending on the connector fully. 10. INSTALLATION 9. It is therefore recommended to the boundary ...

Operation Manual
Page 39
...is in the operating mode. 40 - Once the grass is appropriate to stop the mower. 2. To adjust the cutting height: 1. English Open the solar cell panel and set the main switch to access the cutting height adjustment cover. 3. Press the STOP button. 2. If the grass is long it ...is shorter, you intend to perform maintenance or move the OFF mower outside of the working area. 4.8 Adjusting the cutting height The cutting height can gradually lower the cutting height. 4. Press the STOP button to let Automower® start mowing at the MAX cutting height. Turn the knob to MAX (6 ...
...is in the operating mode. 40 - Once the grass is appropriate to stop the mower. 2. To adjust the cutting height: 1. English Open the solar cell panel and set the main switch to access the cutting height adjustment cover. 3. Press the STOP button. 2. If the grass is long it ...is shorter, you intend to perform maintenance or move the OFF mower outside of the working area. 4.8 Adjusting the cutting height The cutting height can gradually lower the cutting height. 4. Press the STOP button to let Automower® start mowing at the MAX cutting height. Turn the knob to MAX (6 ...


