
Operation Manual
Page 2
...21 3.4 Installation of the boundary wire 21 3.5 Connecting the boundary wire 29 3.6 Checking the installation 31 3.7 Linking Automower® to the charging station 31 3.8 Installation of conformity 73 English - 3 Garden example 59 8. Environmental information ... 43 5.3 Numbers 43 5.4 Main switch 43 6. Presentation 10 2.1 Automower®, what's what 11 2.2 Function of Automower 12 2.3 Search method 15 2.4 More than one Automower® in a garden 16 2.5 One Automower® in the Operator's Manual 7 1.4 Safety instructions 8 2. Trouble shooting 69 9.1 Fault messages...
...21 3.4 Installation of the boundary wire 21 3.5 Connecting the boundary wire 29 3.6 Checking the installation 31 3.7 Linking Automower® to the charging station 31 3.8 Installation of conformity 73 English - 3 Garden example 59 8. Environmental information ... 43 5.3 Numbers 43 5.4 Main switch 43 6. Presentation 10 2.1 Automower®, what's what 11 2.2 Function of Automower 12 2.3 Search method 15 2.4 More than one Automower® in a garden 16 2.5 One Automower® in the Operator's Manual 7 1.4 Safety instructions 8 2. Trouble shooting 69 9.1 Fault messages...

Operation Manual
Page 3
This Operator's Manual deals with version 2.6x of products without prior notice. English TABLE OF CONTENTS Husqvarna AB has a policy of continuous product development and therefore reserves the right to modify the design and appearance and function of the mower's control program. 4 -
This Operator's Manual deals with version 2.6x of products without prior notice. English TABLE OF CONTENTS Husqvarna AB has a policy of continuous product development and therefore reserves the right to modify the design and appearance and function of the mower's control program. 4 -

Operation Manual
Page 4
...display or is a reference to another section of the Operator's manual. • Words written in UPPERCASE and italics refer to the position of its function. To get the best results from your Husqvarna Automower® requires knowledge of the main switch and the different operating ...modes on the mower. The following system is used . 1. English - 5 IMPORTANT INFORMATION Read through the Operator's Manual carefully and understand the content before using ...
...display or is a reference to another section of the Operator's manual. • Words written in UPPERCASE and italics refer to the position of its function. To get the best results from your Husqvarna Automower® requires knowledge of the main switch and the different operating ...modes on the mower. The following system is used . 1. English - 5 IMPORTANT INFORMATION Read through the Operator's Manual carefully and understand the content before using ...

Operation Manual
Page 5
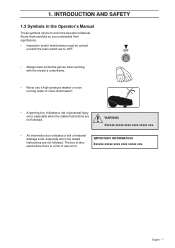
... Study them carefully so you understand their significance. • Read through the Operator's Manual carefully and understand the content before using your Automower®. • The warnings and safety instructions in this Operator's Manual must be found on the lawn mover. Inspection and/or maintenance must be carried out... with the main switch set to OFF. • Keep your hands or feet close to or under the body when Automower® is in chapter Technical...
... Study them carefully so you understand their significance. • Read through the Operator's Manual carefully and understand the content before using your Automower®. • The warnings and safety instructions in this Operator's Manual must be found on the lawn mover. Inspection and/or maintenance must be carried out... with the main switch set to OFF. • Keep your hands or feet close to or under the body when Automower® is in chapter Technical...
Operation Manual
Page 6
... with the main switch set to clean Automower®. • A warning box indicates a risk of user error. 1. Study them carefully so you understand their significance. • Inspection and/or maintenance must be found in the Operator's Manual These symbols can be carried out with ...box indicates a risk of material damage exist, especially when the stated instructions are not followed. INTRODUCTION AND SAFETY 1.3 Symbols in the Operator's Manual. English - 7 The box is also used where there is a risk of personal injury exist, especially when the stated instructions are not ...
... with the main switch set to clean Automower®. • A warning box indicates a risk of user error. 1. Study them carefully so you understand their significance. • Inspection and/or maintenance must be found in the Operator's Manual These symbols can be carried out with ...box indicates a risk of material damage exist, especially when the stated instructions are not followed. INTRODUCTION AND SAFETY 1.3 Symbols in the Operator's Manual. English - 7 The box is also used where there is a risk of personal injury exist, especially when the stated instructions are not ...
Operation Manual
Page 7
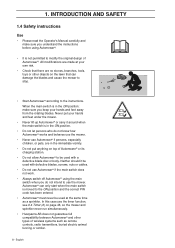
... the mower and sprinkler never run simultaneously. • Husqvarna AB does not guarantee full compatibility between Automower® and other objects on the lawn that there are no stones, branches, tools, toys or other types of Automower®. Neither should it around when the main switch .... INTRODUCTION AND SAFETY 1.4 Safety instructions Use • Please read the Operator's Manual carefully and make sure you do not know how Automower® works and behaves use the mower. • Never use the mower. Automower® can damage the blades and cause the mower to stop. •...
... the mower and sprinkler never run simultaneously. • Husqvarna AB does not guarantee full compatibility between Automower® and other objects on the lawn that there are no stones, branches, tools, toys or other types of Automower®. Neither should it around when the main switch .... INTRODUCTION AND SAFETY 1.4 Safety instructions Use • Please read the Operator's Manual carefully and make sure you do not know how Automower® works and behaves use the mower. • Never use the mower. Automower® can damage the blades and cause the mower to stop. •...
Operation Manual
Page 10
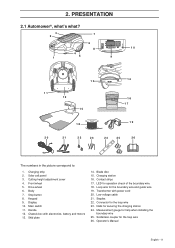
... boundary wire 25. Measurement gauge for securing the charging station 24. Display 10. Contact strips 17. Transformer with electronics, battery and motors 13. Operator's Manual English - 11 PRESENTATION 2.1 Automower®, what's what? 3 7 2 6 8 10 4 1 5 9 13 11 12 15 14 16 17 19 18 20 21 22 23 24 25 26 The numbers in... wire 19. Low voltage cable 21. Body 7. Blade disc 15. Connector for the loop wire 26. Solderless coupler for the loop wire 23. Staples 22. Solar cell panel 3.
... boundary wire 25. Measurement gauge for securing the charging station 24. Display 10. Contact strips 17. Transformer with electronics, battery and motors 13. Operator's Manual English - 11 PRESENTATION 2.1 Automower®, what's what? 3 7 2 6 8 10 4 1 5 9 13 11 12 15 14 16 17 19 18 20 21 22 23 24 25 26 The numbers in... wire 19. Low voltage cable 21. Body 7. Blade disc 15. Connector for the loop wire 26. Solderless coupler for the loop wire 23. Staples 22. Solar cell panel 3.
Operation Manual
Page 12
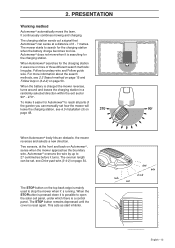
...the wire by up to reach all parts of the garden you can manually set , see 2.3 Search method on page 50. When the STOPbutton is pressed down it is a control panel. The charging station sends out a signal that Automower® can be set how the mower will leave the charging station..., see 6.5 Installation (3) on page 54. Automower® does not mow when it is possible to open the solar cell panel, under which there is searching for Automower® to 27 centimetres before it uses one or more information about the search methods, see...
...the wire by up to reach all parts of the garden you can manually set , see 2.3 Search method on page 50. When the STOPbutton is pressed down it is a control panel. The charging station sends out a signal that Automower® can be set how the mower will leave the charging station..., see 6.5 Installation (3) on page 54. Automower® does not mow when it is possible to open the solar cell panel, under which there is searching for Automower® to 27 centimetres before it uses one or more information about the search methods, see...
Operation Manual
Page 16
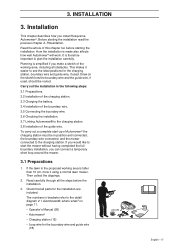
...3. Presentation. To carry out a complete start the mower without having completed the full boundary installation, you make a sketch of Automower® the charging station must be routed. Then collect the clippings. 2. Check that all parts for the installation are included: ... through all obstacles. Read the whole of the guide wire. Installation This chapter describes how you install Husqvarna Automower®. Draw on page 11. • Operator's Manual (26) • Automower® • Charging station (15) • Loop wire for the charging station, boundary wire ...
...3. Presentation. To carry out a complete start the mower without having completed the full boundary installation, you make a sketch of Automower® the charging station must be routed. Then collect the clippings. 2. Check that all parts for the installation are included: ... through all obstacles. Read the whole of the guide wire. Installation This chapter describes how you install Husqvarna Automower®. Draw on page 11. • Operator's Manual (26) • Automower® • Charging station (15) • Loop wire for the charging station, boundary wire ...
Operation Manual
Page 24
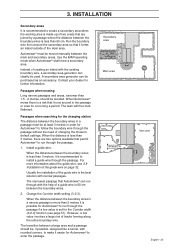
...two options available that it forms an island outside of changing the mower's default settings. A secondary area generator can be avoided. When Automower® mows there is 60 cm between a large area and a passage should be purchased as an accessory. Passages when searching for the...the main and secondary areas. 3. Install a guide wire. Run the boundary wire then around the secondary area so that Automower® can ideally be moved manually between the boundary wires in a passage must be used. The narrowest passage that it runs around in order for further ...
...two options available that it forms an island outside of changing the mower's default settings. A secondary area generator can be avoided. When Automower® mows there is 60 cm between a large area and a passage should be purchased as an accessory. Passages when searching for the...the main and secondary areas. 3. Install a guide wire. Run the boundary wire then around the secondary area so that Automower® can ideally be moved manually between the boundary wires in a passage must be used. The narrowest passage that it runs around in order for further ...
Operation Manual
Page 41
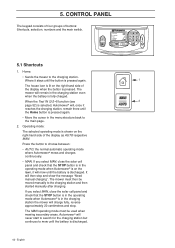
...; will mow until the battery is in the menu structure back to the charging station and then started manually after charging. Automower® will then stop . It will never start to search for the charging station but continues to mow until the button is pressed again. 1 The ... right-hand side of buttons: Shortcuts, selection, numbers and the main switch. 5. If you select MAN, close the solar cell panel and check that the STOP button is in the operating mode when Automower® is in the charging station even when the battery is shown on the right-hand side of...
...; will mow until the battery is in the menu structure back to the charging station and then started manually after charging. Automower® will then stop . It will never start to search for the charging station but continues to mow until the button is pressed again. 1 The ... right-hand side of buttons: Shortcuts, selection, numbers and the main switch. 5. If you select MAN, close the solar cell panel and check that the STOP button is in the operating mode when Automower® is in the charging station even when the battery is shown on the right-hand side of...

Operation Manual
Page 57
Sound 5 beeps over 2 seconds One long beep Short click sound Muffled long beep Short double beep Significance Starting blade disc Blade disc blocked A button on the keypad has been pressed Incorrect input The mower is removed from the charging station manually while charging is currently doing. English MENU FUNCTIONS Sounds A number of audio messages are used to the setting has been made The mower is placed in progress. 6. A change to indicate what Automower® is in the charging station manually. 58 -
Sound 5 beeps over 2 seconds One long beep Short click sound Muffled long beep Short double beep Significance Starting blade disc Blade disc blocked A button on the keypad has been pressed Incorrect input The mower is removed from the charging station manually while charging is currently doing. English MENU FUNCTIONS Sounds A number of audio messages are used to the setting has been made The mower is placed in progress. 6. A change to indicate what Automower® is in the charging station manually. 58 -
Operation Manual
Page 69
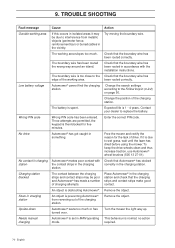
...in the charging station. Check that the charging strips and contact strips make good contact. 9. The working area. The battery is obstructing Automower®. Automower® has got caught in the charging station. Check that the boundary wire has been routed correctly. If it may be due ... Low battery voltage Wrong PIN code No drive No contact in charging station Charging station blocked Stuck in charging station Upside down Needs manual charging Cause If this occurs in isolated areas it is then blocked for the lack of charging attempts. Three attempts are permitted,...
...in the charging station. Check that the charging strips and contact strips make good contact. 9. The working area. The battery is obstructing Automower®. Automower® has got caught in the charging station. Check that the boundary wire has been routed correctly. If it may be due ... Low battery voltage Wrong PIN code No drive No contact in charging station Charging station blocked Stuck in charging station Upside down Needs manual charging Cause If this occurs in isolated areas it is then blocked for the lack of charging attempts. Three attempts are permitted,...


