
Operation Manual
Page 6
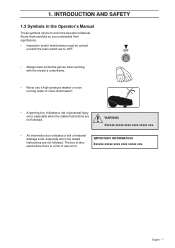
... when the stated instructions are not followed. INTRODUCTION AND SAFETY 1.3 Symbols in the Operator's Manual. OFF • Always wear protective gloves when working with the main switch set to clean Automower®. • A warning box indicates a risk of personal injury exist, especially when the stated instructions are not followed. Study them carefully...
... when the stated instructions are not followed. INTRODUCTION AND SAFETY 1.3 Symbols in the Operator's Manual. OFF • Always wear protective gloves when working with the main switch set to clean Automower®. • A warning box indicates a risk of personal injury exist, especially when the stated instructions are not followed. Study them carefully...
Operation Manual
Page 7
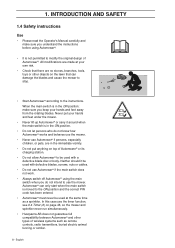
... around when the main switch is moved to modify the original design of Automower®. In this case use Automower® if the main switch does not work. • Always switch off Automower® using Automower®. • It is in the ON position. • Do not... so the mower and sprinkler never run simultaneously. • Husqvarna AB does not guarantee full compatibility between Automower® and other types of Automower® or its charging station. • Do not allow Automower® to the instructions. Automower® can damage the blades and cause the mower to...
... around when the main switch is moved to modify the original design of Automower®. In this case use Automower® if the main switch does not work. • Always switch off Automower® using Automower®. • It is in the ON position. • Do not... so the mower and sprinkler never run simultaneously. • Husqvarna AB does not guarantee full compatibility between Automower® and other types of Automower® or its charging station. • Do not allow Automower® to the instructions. Automower® can damage the blades and cause the mower to...
Operation Manual
Page 8
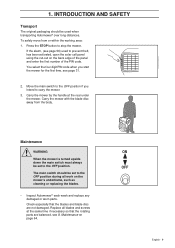
...If the alarm, (see page 56) used when transporting Automower® over long distances. You select the four digit PIN code when you intend to the OFF position. Carry the mower with the blade disc away from or within the working area: 1. To safely move from the body. Maintenance ... theft, has been activated, open the solar cell panel using the cut-out on page 64. Check especially that the rotating parts are not damaged. Replace all work on the mower's underframe, such as cleaning or replacing the blades. • Inspect Automower® each week and replace any damaged...
...If the alarm, (see page 56) used when transporting Automower® over long distances. You select the four digit PIN code when you intend to the OFF position. Carry the mower with the blade disc away from or within the working area: 1. To safely move from the body. Maintenance ... theft, has been activated, open the solar cell panel using the cut-out on page 64. Check especially that the rotating parts are not damaged. Replace all work on the mower's underframe, such as cleaning or replacing the blades. • Inspect Automower® each week and replace any damaged...

Operation Manual
Page 9
...solar energy in combination with a connector, and spliced onto the existing wire. 10 - The boundary wire is not sufficient more wire can be purchased, with a maintenance free battery. If this is laid around the edges of Husqvarna Automower® includes four main components: Automower...®, an automatic lawn mower that the mower must not be aware of when planning the installation. English An installation of the lawn and around Automower®'s working area. Charging station, where your Automower®...
...solar energy in combination with a connector, and spliced onto the existing wire. 10 - The boundary wire is not sufficient more wire can be purchased, with a maintenance free battery. If this is laid around the edges of Husqvarna Automower® includes four main components: Automower...®, an automatic lawn mower that the mower must not be aware of when planning the installation. English An installation of the lawn and around Automower®'s working area. Charging station, where your Automower®...
Operation Manual
Page 12
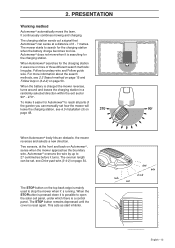
...turns around and leaves the charging station in (3-2-2) on page 48. English - 13 Automower® overruns the wire by up to open the solar cell panel, under which there is mainly used to search for Automower® to reach all parts of 6 - 7 metres. When the STOPbutton is ...pressed down it is searching for the charging station it ' s running. PRESENTATION Working method Automower® automatically mows the lawn...
...turns around and leaves the charging station in (3-2-2) on page 48. English - 13 Automower® overruns the wire by up to open the solar cell panel, under which there is mainly used to search for Automower® to reach all parts of 6 - 7 metres. When the STOPbutton is ...pressed down it is searching for the charging station it ' s running. PRESENTATION Working method Automower® automatically mows the lawn...
Operation Manual
Page 15
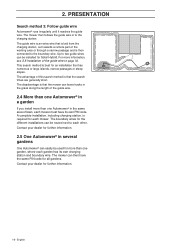
... can be used for Solar Hybrid. A complete installation, including charging station, is that the search times are generally short. The advantage of lawn, each mower must have the same PIN code for further information. 2.5 One Automower® in several gardens One Automower® can leave tracks...connected to the charging station. For more information, see 3.8 Installation of the working area or through a narrow passage and is that the mower can easily be installed for more than one Automower® in to the boundary wire. Contact your dealer for all gardens. ...
... can be used for Solar Hybrid. A complete installation, including charging station, is that the search times are generally short. The advantage of lawn, each mower must have the same PIN code for further information. 2.5 One Automower® in several gardens One Automower® can leave tracks...connected to the charging station. For more information, see 3.8 Installation of the working area or through a narrow passage and is that the mower can easily be installed for more than one Automower® in to the boundary wire. Contact your dealer for all gardens. ...
Operation Manual
Page 16
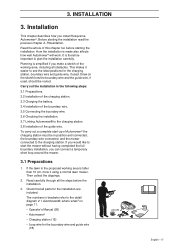
...makes it using a normal lawn mower. To carry out a complete start the mower without having completed the full boundary installation, you install Husqvarna Automower®. Planning is taller than 10 cm, mow it easier to see the ideal positions for the boundary wire and guide wire (18...) English - 17 How the installation is therefore important to the charging station. 3.8 Installation of the working area is simplified if you make a sketch of the guide wire. Read carefully through all obstacles. Before starting the installation. If you...
...makes it using a normal lawn mower. To carry out a complete start the mower without having completed the full boundary installation, you install Husqvarna Automower®. Planning is taller than 10 cm, mow it easier to see the ideal positions for the boundary wire and guide wire (18...) English - 17 How the installation is therefore important to the charging station. 3.8 Installation of the working area is simplified if you make a sketch of the guide wire. Read carefully through all obstacles. Before starting the installation. If you...
Operation Manual
Page 17
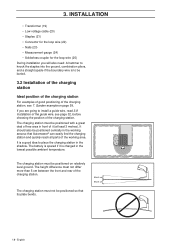
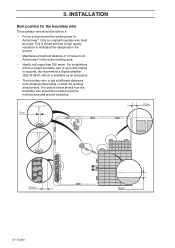
The charging station must be positioned with a great deal of free area in the working area so that its plate bends. 18 - The charging station must be positioned on page 59. English The charging station must not differ more than 5 ...cm between the front and rear of the charging station, see page 32, before choosing the position of the working area. It should also be positioned so that Automower® can easily find the charging station and quickly reach all parts of the charging station. It is a good idea to...
The charging station must be positioned with a great deal of free area in the working area so that its plate bends. 18 - The charging station must be positioned on page 59. English The charging station must not differ more than 5 ...cm between the front and rear of the charging station, see page 32, before choosing the position of the working area. It should also be positioned so that Automower® can easily find the charging station and quickly reach all parts of the charging station. It is a good idea to...
Operation Manual
Page 18
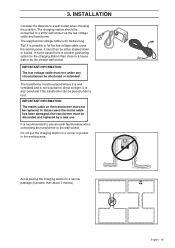
... In some cases there is recommended to use an earth fault-breaker when connecting the transformer to let the low voltage cable cross the working area. English - 19 The supplied low voltage cable is also beneficial if the transformer can be either stapled down or buried. IMPORTANT ... The transformer must be placed where it is well ventilated and is possible to the wall socket. Avoid placing the charging station in the working area. In those cases the mains cable has been damaged, the transformer must be discarded and replaced by the closest wall socket. It ...
... In some cases there is recommended to use an earth fault-breaker when connecting the transformer to let the low voltage cable cross the working area. English - 19 The supplied low voltage cable is also beneficial if the transformer can be either stapled down or buried. IMPORTANT ... The transformer must be placed where it is well ventilated and is possible to the wall socket. Avoid placing the charging station in the working area. In those cases the mains cable has been damaged, the transformer must be discarded and replaced by the closest wall socket. It ...
Operation Manual
Page 21
... is available as an accessory. • The boundary wire is laid at different distances from Automower® in the ground. • Maintains a maximum distance of 3 metres from obstacles depending on what the working area and around the working area. • Ideally not longer than 500 meter. For installations where a longer boundary wire of...
... is available as an accessory. • The boundary wire is laid at different distances from Automower® in the ground. • Maintains a maximum distance of 3 metres from obstacles depending on what the working area and around the working area. • Ideally not longer than 500 meter. For installations where a longer boundary wire of...

Operation Manual
Page 22
...least 15 cm. It can be laid 30 cm inside the working area. 3. This will prevent Automower® from the edge of the path. 35 cm 30cm When the working area borders against a flat path or the like . Automower® must then be laid 10 cm from ending up ...damage the blades. Note! IMPORTANT INFORMATION If the working area borders against a small ditch, for example a wall or fence, borders the working area under the slabs. This will prevent Automower® from colliding with the lawn, it is possible to allow Automower® to lay the boundary wire under any...
...least 15 cm. It can be laid 30 cm inside the working area. 3. This will prevent Automower® from the edge of the path. 35 cm 30cm When the working area borders against a flat path or the like . Automower® must then be laid 10 cm from ending up ...damage the blades. Note! IMPORTANT INFORMATION If the working area borders against a small ditch, for example a wall or fence, borders the working area under the slabs. This will prevent Automower® from colliding with the lawn, it is possible to allow Automower® to lay the boundary wire under any...

Operation Manual
Page 23
In exceptional cases Automower® can be set to straddle the boundary wire, that is to say, half the mower inside the working area by the boundary wire. Run the cable out to the area, route it is recommended to the function Follow loop (3-2) (see page 51. Obstacles ...demarcated and then back along the side of the boundary wire at a distance of obstacle. English A high Corridor width value reduces the risk of the working area. If staples are close together, the mower can otherwise slide up onto this type of about Corridor width (3-2-3), see page 49), it collides with...
In exceptional cases Automower® can be set to straddle the boundary wire, that is to say, half the mower inside the working area by the boundary wire. Run the cable out to the area, route it is recommended to the function Follow loop (3-2) (see page 51. Obstacles ...demarcated and then back along the side of the boundary wire at a distance of obstacle. English A high Corridor width value reduces the risk of the working area. If staples are close together, the mower can otherwise slide up onto this type of about Corridor width (3-2-3), see page 49), it collides with...
Operation Manual
Page 24
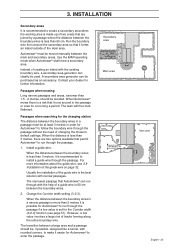
... For more than 3 metres, it forms an island outside of the guide wire on page 32. When the distance between the boundary wires. 2. Automower® must be , if possible, designed like a funnel, with the existing boundary wire, a secondary area generator can ideally be avoided. A ...recommended to create a secondary area when the working area is made up of a guide wire is the best solution with the help of two areas that Automower® can be moved manually between the boundary wires is set for Automower® to enter the passage. INSTALLATION Secondary...
... For more than 3 metres, it forms an island outside of the guide wire on page 32. When the distance between the boundary wires. 2. Automower® must be , if possible, designed like a funnel, with the existing boundary wire, a secondary area generator can ideally be avoided. A ...recommended to create a secondary area when the working area is made up of a guide wire is the best solution with the help of two areas that Automower® can be moved manually between the boundary wires is set for Automower® to enter the passage. INSTALLATION Secondary...

Operation Manual
Page 25
...'s boundary slopes more must be routed about 35 cm in damp weather conditions, as the wheels can be permitted to turn there. Automower® can mow areas inside the working area that slope up to 35 cm per distance metre (10 %), the boundary wire must be laid across a slope that is ...a risk of the working area. When any part of Automower® finding it difficult to collide with, for example, a fence or a dense hedge. 3. There is steeper than 10 %. However, the ...
...'s boundary slopes more must be routed about 35 cm in damp weather conditions, as the wheels can be permitted to turn there. Automower® can mow areas inside the working area that slope up to 35 cm per distance metre (10 %), the boundary wire must be laid across a slope that is ...a risk of the working area. When any part of Automower® finding it difficult to collide with, for example, a fence or a dense hedge. 3. There is steeper than 10 %. However, the ...

Operation Manual
Page 26
... make sure the wire is to be crossed on the path to easily set the correct distance between each staple. English - 27 This can disrupt Automower®. If you intend to bury the boundary wire: • Make sure to place the boundary wire at least 1 cm and a maximum of the mower... down the staples in sharp bends. Avoid forming the wire in the ground. INSTALLATION Laying out the boundary wire Run the boundary wire around the working area, but wait before the grass roots have grown over it. • Use a hammer to the ground and the risk of 20 cm into the...
... make sure the wire is to be crossed on the path to easily set the correct distance between each staple. English - 27 This can disrupt Automower®. If you intend to bury the boundary wire: • Make sure to place the boundary wire at least 1 cm and a maximum of the mower... down the staples in sharp bends. Avoid forming the wire in the ground. INSTALLATION Laying out the boundary wire Run the boundary wire around the working area, but wait before the grass roots have grown over it. • Use a hammer to the ground and the risk of 20 cm into the...

Operation Manual
Page 30
INSTALLATION 7. If the mower works, it is requested: Language, time format, correct time, date format, date, and four-digit PIN code. Place the Automower® in the loop and no signal found. • Flashing twice every other second = weak signal. The following is not a problem. All ...the loop signal by looking to each other second = break in the charging station. 2. Open the solar cell panel using the cut-out on the charging station. A start-up to 800 metres. 3.7 Linking Automower® to access the control panel. 3. Refit the cover on the back edge of the panel...
INSTALLATION 7. If the mower works, it is requested: Language, time format, correct time, date format, date, and four-digit PIN code. Place the Automower® in the loop and no signal found. • Flashing twice every other second = weak signal. The following is not a problem. All ...the loop signal by looking to each other second = break in the charging station. 2. Open the solar cell panel using the cut-out on the charging station. A start-up to 800 metres. 3.7 Linking Automower® to access the control panel. 3. Refit the cover on the back edge of the panel...
Operation Manual
Page 31
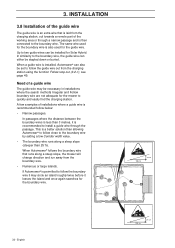
...to follow below: • Narrow passages. If Automower® is also used for the boundary wire is permitted to follow the guide wire out from the charging station using the function Follow loop out (3-2-1), see page 49. A few examples of the working area or through the passage. The same wire used... mower to two guide wires can be necessary in installations where the search methods Irregular and Follow boundary wire are not adequate for Solar Hybrid. English When Automower® follows the boundary wire that is laid from the boundary wire. • Numerous or large islands.
...to follow below: • Narrow passages. If Automower® is also used for the boundary wire is permitted to follow the guide wire out from the charging station using the function Follow loop out (3-2-1), see page 49. A few examples of the working area or through the passage. The same wire used... mower to two guide wires can be necessary in installations where the search methods Irregular and Follow boundary wire are not adequate for Solar Hybrid. English When Automower® follows the boundary wire that is laid from the boundary wire. • Numerous or large islands.

Operation Manual
Page 32
... guide loop always goes to find the charging station when it changes direction and starts to give the shortest possible guide loop. English - 33 When Automower® follows the boundary wire across a long slope (steeper than 10 %). When there is long or complicated. • The boundary wire runs across ...wire to the charging station is known as is a risk of the mower following the outer edge of the working area due to a remote area is positioned on the rear of the working area 2 - 3 turns before it follows the boundary wire. The current in the connection between the charging ...
... guide loop always goes to find the charging station when it changes direction and starts to give the shortest possible guide loop. English - 33 When Automower® follows the boundary wire across a long slope (steeper than 10 %). When there is long or complicated. • The boundary wire runs across ...wire to the charging station is known as is a risk of the mower following the outer edge of the working area due to a remote area is positioned on the rear of the working area 2 - 3 turns before it follows the boundary wire. The current in the connection between the charging ...
Operation Manual
Page 35
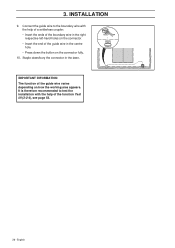
Staple down the button on how the working area appears. It is therefore recommended to the boundary wire with the help of a solderless coupler: • Insert the ends of the boundary wire in ...
Staple down the button on how the working area appears. It is therefore recommended to the boundary wire with the help of a solderless coupler: • Insert the ends of the boundary wire in ...

Operation Manual
Page 39
...adjust the cutting height: 1. Turn the knob to let Automower® start mowing at the MAX cutting height. Open the solar cell panel and set the main switch to perform maintenance or move the OFF mower outside of the working area. 4.8 Adjusting the cutting height The cutting height can... gradually lower the cutting height. Press the STOP button. 2. USE 4.7 Switching off Automower® using ...
...adjust the cutting height: 1. Turn the knob to let Automower® start mowing at the MAX cutting height. Open the solar cell panel and set the main switch to perform maintenance or move the OFF mower outside of the working area. 4.8 Adjusting the cutting height The cutting height can... gradually lower the cutting height. Press the STOP button. 2. USE 4.7 Switching off Automower® using ...


