Husqvarna AUTOMOWER 430XH with installation service Support and Manuals
Get Help and Manuals for this Husqvarna item

View All Support Options Below
Free Husqvarna AUTOMOWER 430XH with installation service manuals!
Problems with Husqvarna AUTOMOWER 430XH with installation service?
Ask a Question
Free Husqvarna AUTOMOWER 430XH with installation service manuals!
Problems with Husqvarna AUTOMOWER 430XH with installation service?
Ask a Question
Popular Husqvarna AUTOMOWER 430XH with installation service Manual Pages
Owner Manual - Page 1

Operator's manual
HUSQVARNA AUTOMOWER® 430XH/450XH
Read the operator's manual carefully and make sure that you understand the instructions before you use the product. EN, English
Owner Manual - Page 2

... the product 37 5.3 Replace the blades 38 5.4 Battery 38 5.5 Winter service 39
6 Troubleshooting 6.1 Introduction - Installation 16 3.2 Before the installation of the wires........... 16 3.3 Before the installation of the product........16 3.4 Installation of the product 20 3.5 To put the wire into position with stakes...22 3.6 To bury the boundary wire or the guide wire 22 3.7 To...
Owner Manual - Page 3
...Introduction - 3
The operator selects the operation settings with the keys on www.husqvarna.com.
1.1 Support
For support about the Husqvarna product, speak to register your product on the keypad. The display shows the selected and possible operation settings, and the operating mode of the product.
1.2 Product description
Note: Husqvarna regularly updates the appearance and function of the...
Owner Manual - Page 6

....
The installation function for manual settings for the problems.
The GPS-supported navigation is active. The bars show the signal strength of the battery. The SIM symbol indicates that there is used for settings made for the products are set in the charging station but do not expose the battery to the grass growth. Read the user instructions...
Owner Manual - Page 15
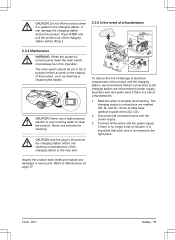
... chassis of the product, such as cleaning or replacing the blades.
Mark the wires to the right...supply if there is no longer a risk of thunder. Some models have additional guide wires (G2, G3).
2. Safety - 15 CAUTION: Do ...set in the 0 position before all connected wires and the power supply.
3.
Press STOP and pull the product out of the charging station before any damaged or worn parts...
Owner Manual - Page 20
.... Refer to
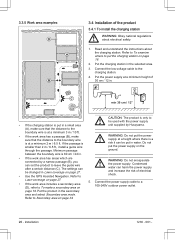
WARNING: Do not encapsulate the power supply. The settings can harm the power supply and increase the risk of electrical shock. Lawn coverage on page 34.
20 - If the passage is at a minimum 2 m / 6.5 ft. Installation
1230 - 001 - Read and understand the instructions about electrical safety.
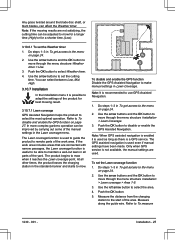
1. Connect the low-voltage cable to...
Owner Manual - Page 23
... part of the PIN code. Push the START button and close the hatch. Note: Use the MEMO page at the beginning of the manual to make a note of the dashboard there are shortcuts to the Timer settings ... app installed. A plug is shown over the battery symbol when the product is shown over the battery symbol when the product charges its battery. Note: Some models require a factory PIN code before ...
Owner Manual - Page 27
... the OK button to the menu on page 24. 2. At all parts of the product for a shorter time (Low).
3.10.6.1 To set the Weather timer
1.
Only when GPS service is a GPS service.
Do steps 1-3 in To get access to
move through the menu structure Installation > Lawn coverage > Area 1-5. 3. Note: When GPS assisted navigation is enabled...
Owner Manual - Page 29
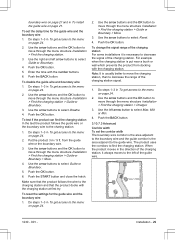
... the arrow buttons and the OK button to move through the menu structure Installation > Find the charging station > Charger.
3. Use the arrow buttons to the guide wire. To test if the product can find the charging station.
To set the corridor width The boundary wire corridor is the area adjacent to the boundary...
Owner Manual - Page 31
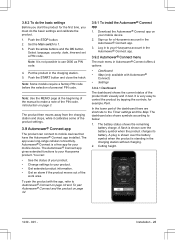
... through the menu structure Settings > General > Time & Date.
3. To enable or disable the Slope control 1. Installation - 31
To use ...settings that are made, the symbol * is charging.
Note: Use ECO mode to the profile are not stored to save energy and avoid interference with other equipment, for example hearing loops or garage doors. Do steps 1-3 in the boundary loop, the guide...
Owner Manual - Page 37
... when used under favorable conditions. Contact your Husqvarna central service. Also, check that may be done according to it may impede docking. Grass on the wheels can pivot freely.
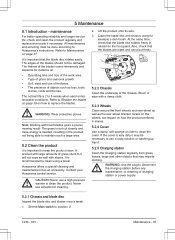
5.2.2 Chassis Clean the underside of grass stuck to Husqvarna's instructions. WARNING: Use the plug to the foot guard. Set the Main switch to clean the product...
Owner Manual - Page 39

....
The battery is updated.
1230 - 001 - Note: Battery life is dependent on the length of use a day means that the battery must be replaced more regularly. battery capacity enough to winter storage. Contact your local Husqvarna representative to replace the battery.
5.5 Winter service
Take your product to replace battery if necessary.
• If new firmware is available...
Owner Manual - Page 43

...Troubleshooting - 43 turned over.
The alarm was activated because the
ted
product was lifted. Remove the object.
Refer to To set...If the problem remains, the message requires action by an authorized service technician. Adjust the mower security settings in the... and no action is set the time & date on a flat, level sur-
Needs manual charging
The product is required...
Owner Manual - Page 46

... Main area setting. Connection problems
Problem with a new loop wire and splice using an original coupler.
Break in the guide wire.
Action
Check that the guide wire is tightly connected to Installation on page 21. Refer to To install the guide wire on page 21.
Replace the damaged section of -
Check that the guide wires are installed according to an error.
46...
Owner Manual - Page 51
...to disruptions several weeks after installation and then lower the height...suspected wire section. Some models have occurred until the desired...in the charging station. Then follow instruction in their original positions. If indicator...troubleshooting is long (thick black line) then do as in the boundary loop.
Troubleshooting...the break may have additional guide wires (G2, G3)....
Husqvarna AUTOMOWER 430XH with installation service Reviews
We have not received any reviews for Husqvarna yet.