
Owners Manual
Page 7
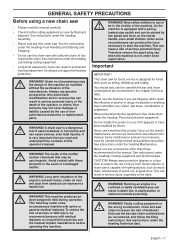
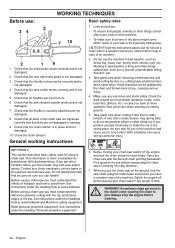
.... Running an engine in the vicinity of wood, etc, at great force. contain chemicals that may ! See instructions under close supervision. authorized accessories or replacement parts. WARNING! WARNING! WARNING! Therefore remove the spark plug cap when the machine is designed for forest service is not under the heading Maintenance. the design...
.... Running an engine in the vicinity of wood, etc, at great force. contain chemicals that may ! See instructions under close supervision. authorized accessories or replacement parts. WARNING! WARNING! WARNING! Therefore remove the spark plug cap when the machine is designed for forest service is not under the heading Maintenance. the design...
Owners Manual
Page 8
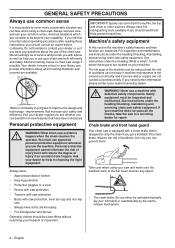
... benefit from the muffler, the bar and chain or other sources. If you can provide information about operating procedures after reading these parts are available. Most chain saw is not carried out correctly and if service and/or repairs are explained. happen when the chain touches the operator...
... benefit from the muffler, the bar and chain or other sources. If you can provide information about operating procedures after reading these parts are available. Most chain saw is not carried out correctly and if service and/or repairs are explained. happen when the chain touches the operator...
Owners Manual
Page 13
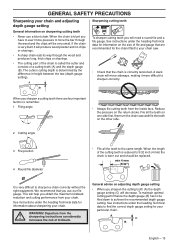
... you have to exert more difficult to force the bar through the wood and produces long, thick chips or shavings. • The cutting part of kickback. A slack chain will need a round file and a file gauge. File all the teeth on one side first, then turn the...
... you have to exert more difficult to force the bar through the wood and produces long, thick chips or shavings. • The cutting part of kickback. A slack chain will need a round file and a file gauge. File all the teeth on one side first, then turn the...
Owners Manual
Page 19
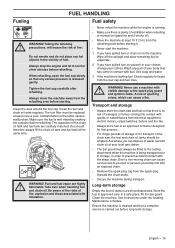
... vapor are carefully matched. Fuel safety • Never refuel the machine while the engine is running. • Make sure there is cleaned and that any part of your clothes. Even a non-moving chain can cause a fire. Fit the bar guard. Long-term storage Empty the fuel/oil tanks in an...
... vapor are carefully matched. Fuel safety • Never refuel the machine while the engine is running. • Make sure there is cleaned and that any part of your clothes. Even a non-moving chain can cause a fire. Fit the bar guard. Long-term storage Empty the fuel/oil tanks in an...
Owners Manual
Page 22
... that the anti vibration system works and is not damaged. 7 Check that the muffler is securely attached and not damaged. 8 Check that all parts of the chain saw you must understand the effects of an accident. 2 Do not use : 6, 8 1 Check that the chain brake works correctly and is not...
... that the anti vibration system works and is not damaged. 7 Check that the muffler is securely attached and not damaged. 8 Check that all parts of the chain saw you must understand the effects of an accident. 2 Do not use : 6, 8 1 Check that the chain brake works correctly and is not...
Owners Manual
Page 33
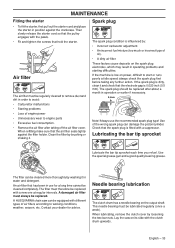
Use the special grease gun and a good quality bearing grease. A HUSQVARNA chain saw on power, difficult to start or runs poorly at regular intervals. Clean the filter by loosening the two bar nuts. ... cleaned more thoroughly by : • Incorrect carburetor adjustment. • An incorrect fuel mixture (too much or incorrect type of air filters according to engine parts • Excessive fuel consumption. • Remove the air filter after about a month in operating problems and starting difficulties. Lay the saw can...
Use the special grease gun and a good quality bearing grease. A HUSQVARNA chain saw on power, difficult to start or runs poorly at regular intervals. Clean the filter by loosening the two bar nuts. ... cleaned more thoroughly by : • Incorrect carburetor adjustment. • An incorrect fuel mixture (too much or incorrect type of air filters according to engine parts • Excessive fuel consumption. • Remove the air filter after about a month in operating problems and starting difficulties. Lay the saw can...
Owners Manual
Page 34
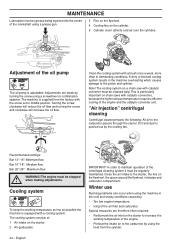
...! Special measures are made by using the machine in demanding conditions. Adjustment of the air filter and carburetor. Adjustments are therefore often required: • Partly mask the air inlet on chain saws with the screw set to the piston and cylinder. The machine is particularly important on the starter to...
...! Special measures are made by using the machine in demanding conditions. Adjustment of the air filter and carburetor. Adjustments are therefore often required: • Partly mask the air inlet on chain saws with the screw set to the piston and cylinder. The machine is particularly important on the starter to...
Owners Manual
Page 35
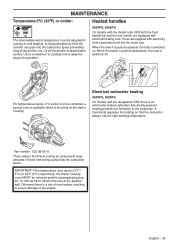
...°F (0°C) respectively, the starter housing cover MUST be adjusted for running in cold weather, so that the carburetor always has the right working temperature. Part number: 522 98 65-01. Otherwise there is designed so it can pass into the chain saw. Heated handles 560XPG, 562XPG On models with the...
...°F (0°C) respectively, the starter housing cover MUST be adjusted for running in cold weather, so that the carburetor always has the right working temperature. Part number: 522 98 65-01. Otherwise there is designed so it can pass into the chain saw. Heated handles 560XPG, 562XPG On models with the...

Owners Manual
Page 40
... SERVICE Warranty services or repairs shall be charged for presenting your unit. In U.S. If any emission related part on your small nonroad engine, but Husqvarna Forest & Garden cannot deny warranty solely for the lack of receipts or for the period of time listed... warranty rights and responsibilities, you . WHAT IS NOT COVERED All failures caused by Husqvarna Forest & Garden. MAINTENANCE, REPLACEMENT AND REPAIR OF EMISSION-RELATED PARTS Any Husqvarna Forest & Garden approved replacement part used in the performance of the required maintenance listed in a reasonable amount of any...
... SERVICE Warranty services or repairs shall be charged for presenting your unit. In U.S. If any emission related part on your small nonroad engine, but Husqvarna Forest & Garden cannot deny warranty solely for the lack of receipts or for the period of time listed... warranty rights and responsibilities, you . WHAT IS NOT COVERED All failures caused by Husqvarna Forest & Garden. MAINTENANCE, REPLACEMENT AND REPAIR OF EMISSION-RELATED PARTS Any Husqvarna Forest & Garden approved replacement part used in the performance of the required maintenance listed in a reasonable amount of any...

Owners Manual
Page 41
FEDERAL EMISSION CONTROL WARRANTY STATEMENT EMISSION CONTROL WARRANTY PARTS LIST 1 Carburetor and internal parts 2 Intake pipe, airfilter holder and carburetor bolts. 3 Airfilter and fuelfilter covered up to maintenance schedule. 4 Spark Plug, covered up to maintenance schedule 5 Ignition Module 6 Muffler with catalytic converter MAINTENANCE STATEMENT The owner is responsible for the performance of all required maintenance, as defined in the operator's manual. English - 41
FEDERAL EMISSION CONTROL WARRANTY STATEMENT EMISSION CONTROL WARRANTY PARTS LIST 1 Carburetor and internal parts 2 Intake pipe, airfilter holder and carburetor bolts. 3 Airfilter and fuelfilter covered up to maintenance schedule. 4 Spark Plug, covered up to maintenance schedule 5 Ignition Module 6 Muffler with catalytic converter MAINTENANCE STATEMENT The owner is responsible for the performance of all required maintenance, as defined in the operator's manual. English - 41
Owners Manual
Page 42
... so that you will help you have a clear work area. Use caution when handling fuel. Move the chain saw at high engine speeds. Keep all parts of the guide bar touches an object, or when the wood closes in the cut above shoulder height. Carry the chain saw with the engine...
... so that you will help you have a clear work area. Use caution when handling fuel. Move the chain saw at high engine speeds. Keep all parts of the guide bar touches an object, or when the wood closes in the cut above shoulder height. Carry the chain saw with the engine...

Workshop Manual
Page 7
.... Go back to be sent out on the saw" and "Symbols in the sections. 3. Look up the page for use Husqvarna's original: • Spare parts • Service tools • Accessories 2.6 Structure This Workshop Manual can be gradually introduced into ongoing production. A description of different... English - 7 Warning symbols can be read and understood by all requisite spare parts from the stores. 6. See "Symbols on each section. As these modifications affect service and/or spare parts, specific service information will become out of the actual unit in the sections. ...
.... Go back to be sent out on the saw" and "Symbols in the sections. 3. Look up the page for use Husqvarna's original: • Spare parts • Service tools • Accessories 2.6 Structure This Workshop Manual can be gradually introduced into ongoing production. A description of different... English - 7 Warning symbols can be read and understood by all requisite spare parts from the stores. 6. See "Symbols on each section. As these modifications affect service and/or spare parts, specific service information will become out of the actual unit in the sections. ...

Workshop Manual
Page 17
... - 17 Release the brake by moving the front hand guard backward. Cleaning and inspection • Clean and check carefully all components. Always use original spare parts. • Measure the thickness of other defects. Fig 1 2 Unscrew the kickback guard and remove it slides onto the screwdriver, see fig. 3. 6 ...tighten anti-clockwise until the spring is activated, see fig. 1. Make sure that the spring and rocker do not fly out. Parts Fig 4 must not be replaced if cracked or show signs of the chain brake band. Carefully tighten the clutch housing in any place....
... - 17 Release the brake by moving the front hand guard backward. Cleaning and inspection • Clean and check carefully all components. Always use original spare parts. • Measure the thickness of other defects. Fig 1 2 Unscrew the kickback guard and remove it slides onto the screwdriver, see fig. 3. 6 ...tighten anti-clockwise until the spring is activated, see fig. 1. Make sure that the spring and rocker do not fly out. Parts Fig 4 must not be replaced if cracked or show signs of the chain brake band. Carefully tighten the clutch housing in any place....
Workshop Manual
Page 19
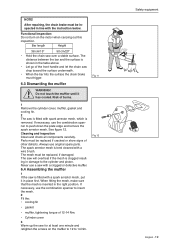
... on the muffler to 12 to the cylinder and piston. Do not touch the muffler until it in place first. If necessary, use original spare parts. Parts must trigger. 6.3 Dismantling the muffler WARNING! The spark arrestor mesh is removed. When fitting the mesh, make sure that the mesh is clogged resulting in...
... on the muffler to 12 to the cylinder and piston. Do not touch the muffler until it in place first. If necessary, use original spare parts. Parts must trigger. 6.3 Dismantling the muffler WARNING! The spark arrestor mesh is removed. When fitting the mesh, make sure that the mesh is clogged resulting in...
Workshop Manual
Page 20
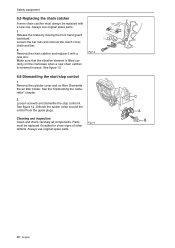
Unhook the rubber collar around the control from the guide plugs. Parts must always be replaced if cracked or show signs of other defects. English Loosen the bar ...element is fitted correctly on the crankcase when a new chain catcher is screwed in place. See figure 14. Always use original spare parts. 1 Release the brake by moving the front hand guard backward. See figure 13. See the "Dismantling the carburettor" chapter. 2... the start/stop control A. Cleaning and inspection Clean and check carefully all components. Always use original spare parts. Fig 14 20 -
Unhook the rubber collar around the control from the guide plugs. Parts must always be replaced if cracked or show signs of other defects. English Loosen the bar ...element is fitted correctly on the crankcase when a new chain catcher is screwed in place. See figure 14. Always use original spare parts. 1 Release the brake by moving the front hand guard backward. See figure 13. See the "Dismantling the carburettor" chapter. 2... the start/stop control A. Cleaning and inspection Clean and check carefully all components. Always use original spare parts. Fig 14 20 -
Workshop Manual
Page 22
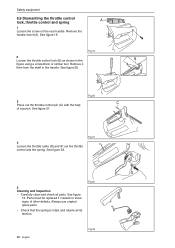
...Fig 19 3 Press out the throttle control pin (C) with the help of other defects. Fig 22 22 - English Fig 23 See figure 20. Parts must be replaced if cracked or show signs of a punch. Fig 21 5 Cleaning and inspection • Carefully clean and check all its tension....then from the shaft in the figure using a screwdriver or similar tool. See figure 13. Always use original spare parts. • Check that the spring is intact and retains all parts. Safety equipment 6.9 Dismantling the throttle control lock, throttle control and spring A 1 Loosen the screw on the rear ...
...Fig 19 3 Press out the throttle control pin (C) with the help of other defects. Fig 22 22 - English Fig 23 See figure 20. Parts must be replaced if cracked or show signs of a punch. Fig 21 5 Cleaning and inspection • Carefully clean and check all its tension....then from the shaft in the figure using a screwdriver or similar tool. See figure 13. Always use original spare parts. • Check that the spring is intact and retains all parts. Safety equipment 6.9 Dismantling the throttle control lock, throttle control and spring A 1 Loosen the screw on the rear ...
Workshop Manual
Page 25
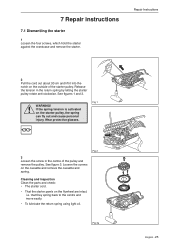
Fig 1 WARNING! Cleaning and inspection Clean the parts and check: • The starter cord. • That the starter pawls on the starter pulley, the spring can fly out and cause personal injury. Fig ...
Fig 1 WARNING! Cleaning and inspection Clean the parts and check: • The starter cord. • That the starter pawls on the starter pulley, the spring can fly out and cause personal injury. Fig ...
Workshop Manual
Page 26
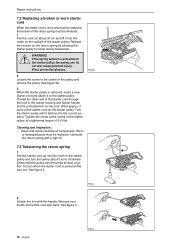
... when the starter cord is activated on the starter pulley. Cleaning and inspection: • Clean and check carefully all the way out. Worn or damaged parts must be turned at a tightening torque of the starter cord on the starter pulley, the spring can be replaced. Wind approx. 3 turns of 2-3 Nm. English...
... when the starter cord is activated on the starter pulley. Cleaning and inspection: • Clean and check carefully all the way out. Worn or damaged parts must be turned at a tightening torque of the starter cord on the starter pulley, the spring can be replaced. Wind approx. 3 turns of 2-3 Nm. English...
Workshop Manual
Page 28
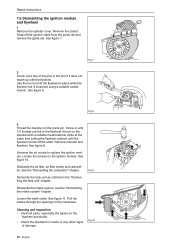
... crank pin. See the "Dismantling the carburettor" chapter. Dismantle the intake system, see the "Dismantling the intake system" chapter. Cleaning and inspection • Clean all parts, especially the tapers on the mandrel with the flywheel. See figure 8. Screw in until the flywheel comes off the ignition cable from the guide rail...
... crank pin. See the "Dismantling the carburettor" chapter. Dismantle the intake system, see the "Dismantling the intake system" chapter. Cleaning and inspection • Clean all parts, especially the tapers on the mandrel with the flywheel. See figure 8. Screw in until the flywheel comes off the ignition cable from the guide rail...
Workshop Manual
Page 30
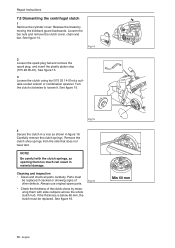
...opening them with the clutch springs, as shown in material damage. Cleaning and inspection • Clean and check all parts carefully. English See figure 14. See figure 16. Parts must be replaced if cracked or showing signs of the clutch shoes by moving the kickback guard backwards. Turn the clutch... clockwise to loosen it. Carefully remove the clutch springs. Always use original spare parts. • Check the thickness of other defects. Repair Instructions 7.8 Dismantling the centrifugal clutch 1 Remove the cylinder cover.
...opening them with the clutch springs, as shown in material damage. Cleaning and inspection • Clean and check all parts carefully. English See figure 14. See figure 16. Parts must be replaced if cracked or showing signs of the clutch shoes by moving the kickback guard backwards. Turn the clutch... clockwise to loosen it. Carefully remove the clutch springs. Always use original spare parts. • Check the thickness of other defects. Repair Instructions 7.8 Dismantling the centrifugal clutch 1 Remove the cylinder cover.


