
Parts Manual
Page 1
SPARE PARTS LIST HEDGE TRIMMERS/POLE HEDGE TRIMMERS 536LiHE3
SPARE PARTS LIST HEDGE TRIMMERS/POLE HEDGE TRIMMERS 536LiHE3

Parts Manual
Page 3
ELECTRICAL Ref Part No Description 1 582 05 07-01 TRIGGER SWITCH 2 589 30 03-01 WIRING ASSY 3 503 21 28-13 SCREW CCRPANT 4 582 05 41-01 CONTROL UNIT 5 582 18 89-01 WIRING ASSY 7 593 89 66-01 SWITCH KIT 8 587 32 72-01 BRACKET 9 593 81 30-01 CONNECTOR Remark 536LiHE3 QTY KIT 17 17 4 1 1 1 1 1
ELECTRICAL Ref Part No Description 1 582 05 07-01 TRIGGER SWITCH 2 589 30 03-01 WIRING ASSY 3 503 21 28-13 SCREW CCRPANT 4 582 05 41-01 CONTROL UNIT 5 582 18 89-01 WIRING ASSY 7 593 89 66-01 SWITCH KIT 8 587 32 72-01 BRACKET 9 593 81 30-01 CONNECTOR Remark 536LiHE3 QTY KIT 17 17 4 1 1 1 1 1

Parts Manual
Page 5
CUTTING EQUIPMENT Ref Part No Description 1 582 19 29-01 CUTTING DECK 2 579 63 31-01 HEXAGON NUT 3 579 69 38-01 BAR 4 579 69 37-01 WEAR PLATE 5 ... 15 578 37 22-01 GASKET 16 580 93 15-01 SUPPORT 17 579 69 40-01 BAR 18 582 19 28-01 BRACKET Remark 536LiHE3 QTY KIT 1 71 11 11 11 11 91 51 51 11 3 11 21 11 11 11 11 1
CUTTING EQUIPMENT Ref Part No Description 1 582 19 29-01 CUTTING DECK 2 579 63 31-01 HEXAGON NUT 3 579 69 38-01 BAR 4 579 69 37-01 WEAR PLATE 5 ... 15 578 37 22-01 GASKET 16 580 93 15-01 SUPPORT 17 579 69 40-01 BAR 18 582 19 28-01 BRACKET Remark 536LiHE3 QTY KIT 1 71 11 11 11 11 91 51 51 11 3 11 21 11 11 11 11 1

Parts Manual
Page 7
GEAR HOUSING Ref Part No Description 1 503 21 75-72 SCREW IHSCFT 2 588 22 48-01 MOTOR COVER 3 588 22 49-01 MOTOR COVER 4 588 56 44-03 GEAR ... 20 03-25 SCREW IHSCFM 35 588 21 92-01 LEVER 36 593 20 98-01 BALL BEARING 37 574 31 60-01 SWITCH Remark 536LiHE3 QTY KIT 5 1 1 1 1 1 1 1 2 1 1 1 1 1 1 1 1 10 1 1 5 1 1 1 1 1 1 5 1 1 1 1 1 1 1 14 14
GEAR HOUSING Ref Part No Description 1 503 21 75-72 SCREW IHSCFT 2 588 22 48-01 MOTOR COVER 3 588 22 49-01 MOTOR COVER 4 588 56 44-03 GEAR ... 20 03-25 SCREW IHSCFM 35 588 21 92-01 LEVER 36 593 20 98-01 BALL BEARING 37 574 31 60-01 SWITCH Remark 536LiHE3 QTY KIT 5 1 1 1 1 1 1 1 2 1 1 1 1 1 1 1 1 10 1 1 5 1 1 1 1 1 1 5 1 1 1 1 1 1 1 14 14

Parts Manual
Page 9
TUBE Ref 1 2 3 Part No 579 48 86-01 588 69 90-01 522 92 08-02 Description HAND GUARD ASSY TUBE ASSY CORD BRACKET Remark 536LiHE3 QTY KIT 1 1 1
TUBE Ref 1 2 3 Part No 579 48 86-01 588 69 90-01 522 92 08-02 Description HAND GUARD ASSY TUBE ASSY CORD BRACKET Remark 536LiHE3 QTY KIT 1 1 1

Parts Manual
Page 11
HOUSING Ref Part No Description 1 577 01 32-02 HANDLE HALF 2 579 21 19-01 SCREW IHSCT 3 577 51 23-01 THROTTLE LOCKOUT 4 577 01 31-01 HANDLE HALF 5 589 37 79-01 TRIGGER 6 577 01 41-01 COVER 7 577 01 30-02 HOUSING 8 577 99 66-01 PUSH BUTTON 9 585 48 00-01 SPRING 10 577 02 22-01 CLAMP 11 577 00 76-03 HOUSING 12 587 34 60-01 TRIGGER 13 587 34 58-01 BUMPER 14 588 91 98-01 SKID PLATE 15 588 60 28-04 DECAL 16 577 84 43-01 DECAL Remark 536LiHE3 QTY KIT 1 20 1 1 1 1 1 1 1 1 1 1 1 1 1 1
HOUSING Ref Part No Description 1 577 01 32-02 HANDLE HALF 2 579 21 19-01 SCREW IHSCT 3 577 51 23-01 THROTTLE LOCKOUT 4 577 01 31-01 HANDLE HALF 5 589 37 79-01 TRIGGER 6 577 01 41-01 COVER 7 577 01 30-02 HOUSING 8 577 99 66-01 PUSH BUTTON 9 585 48 00-01 SPRING 10 577 02 22-01 CLAMP 11 577 00 76-03 HOUSING 12 587 34 60-01 TRIGGER 13 587 34 58-01 BUMPER 14 588 91 98-01 SKID PLATE 15 588 60 28-04 DECAL 16 577 84 43-01 DECAL Remark 536LiHE3 QTY KIT 1 20 1 1 1 1 1 1 1 1 1 1 1 1 1 1

Parts Manual
Page 13
ELECTRICAL Ref Part No Description 1 578 32 69-01 TRIGGER SWITCH 2 593 89 66-01 SWITCH KIT 3 503 21 28-13 SCREW CCRPANT 4 582 05 41-01 CONTROL UNIT 5 582 18 89-01 WIRING ASSY 6 588 17 64-01 GREASE 7 587 32 72-01 BRACKET 8 593 81 30-01 CONNECTOR Remark 536LiHE3 QTY KIT 17 17 4 1 1 1 1 1
ELECTRICAL Ref Part No Description 1 578 32 69-01 TRIGGER SWITCH 2 593 89 66-01 SWITCH KIT 3 503 21 28-13 SCREW CCRPANT 4 582 05 41-01 CONTROL UNIT 5 582 18 89-01 WIRING ASSY 6 588 17 64-01 GREASE 7 587 32 72-01 BRACKET 8 593 81 30-01 CONNECTOR Remark 536LiHE3 QTY KIT 17 17 4 1 1 1 1 1

Parts Manual
Page 15
ACCESSORIES Ref Part No Description 1 537 21 62-01 HARNESS 2 537 21 62-02 HARNESS 3 583 89 71-01 DIAGNOSTIC TOOL KIT 4 579 62 13-01 WIRING ASSY Remark 536LiHE3 QTY KIT 1 1 1 13
ACCESSORIES Ref Part No Description 1 537 21 62-01 HARNESS 2 537 21 62-02 HARNESS 3 583 89 71-01 DIAGNOSTIC TOOL KIT 4 579 62 13-01 WIRING ASSY Remark 536LiHE3 QTY KIT 1 1 1 13
Owner Manual
Page 3
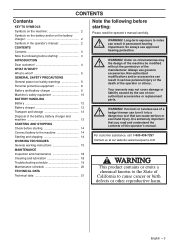
So always use genuine accessories. Always use approved hearing protection. Incorrect or careless use of nonauthorized accessories or replacement parts. WARNING! hedge trimmer can turn it into a dangerous tool that you read the operator's manual carefully. WARNING! Long-term ... Check before starting 14 Connect battery to noise ! WARNING! For customer assistance, call: 1-800-438-7297 Contact us at our website: www.husqvarna.com English - 3 CONTENTS Contents KEY TO SYMBOLS Symbols on the machine 2 Symbols on the battery and/or on the battery charger 2 Symbols...
So always use genuine accessories. Always use approved hearing protection. Incorrect or careless use of nonauthorized accessories or replacement parts. WARNING! hedge trimmer can turn it into a dangerous tool that you read the operator's manual carefully. WARNING! Long-term ... Check before starting 14 Connect battery to noise ! WARNING! For customer assistance, call: 1-800-438-7297 Contact us at our website: www.husqvarna.com English - 3 CONTENTS Contents KEY TO SYMBOLS Symbols on the machine 2 Symbols on the battery and/or on the battery charger 2 Symbols...
Owner Manual
Page 6
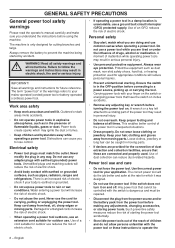
...be repaired. • Disconnect the plug from the power source and/or the battery pack from heat, oil, charp edges or moving parts. WARNING! Unmodified plugs and matching outlets will reduce personal injuries. • Prevent unintentional starting the power tool accidentally. •... children and bystanders away while operating a power tool. English Always remove the battery to rain or wet conditions. Failure to a rotating part of dust collection can cause you are tired or under the in a damp location is only designed for your mains-operated (corded) ...
...be repaired. • Disconnect the plug from the power source and/or the battery pack from heat, oil, charp edges or moving parts. WARNING! Unmodified plugs and matching outlets will reduce personal injuries. • Prevent unintentional starting the power tool accidentally. •... children and bystanders away while operating a power tool. English Always remove the battery to rain or wet conditions. Failure to a rotating part of dust collection can cause you are tired or under the in a damp location is only designed for your mains-operated (corded) ...
Owner Manual
Page 7
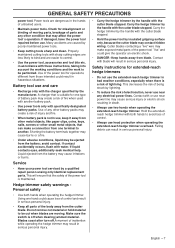
...; Always use and care • Recharge only with blade will ensure that can result in serious personal injury. • Keep all parts of untrained users. • Maintain power tools. Contact with the charger specified by poorly maintained power tools. • Keep... hedge trimmer. in serious personal injury. • Carry the hedge trimmer by a qualified repair person unsing only identical replacement parts. Blades coast after turn off when clearing jammed material. English - 7 Use of any electrical power lines. Power tools are caused by...
...; Always use and care • Recharge only with blade will ensure that can result in serious personal injury. • Keep all parts of untrained users. • Maintain power tools. Contact with the charger specified by poorly maintained power tools. • Keep... hedge trimmer. in serious personal injury. • Carry the hedge trimmer by a qualified repair person unsing only identical replacement parts. Blades coast after turn off when clearing jammed material. English - 7 Use of any electrical power lines. Power tools are caused by...

Owner Manual
Page 14
... thrown out. • Check the cutting attachment. Make sure no unauthorised ! Then press the power trigger up to the machine Use only a Husqvarna original BLi battery in your machine. • Insert the battery in the machine. Remove the battery from the machine by releasing the power trigger ... on the machine. Press and hold the start the machine. STARTING AND STOPPING Check before you hear a click. Remove any objects that lacks a part or has been modified outside its specifications. Check that all nuts and screws are tight. • Only use a machine that...
... thrown out. • Check the cutting attachment. Make sure no unauthorised ! Then press the power trigger up to the machine Use only a Husqvarna original BLi battery in your machine. • Insert the battery in the machine. Remove the battery from the machine by releasing the power trigger ... on the machine. Press and hold the start the machine. STARTING AND STOPPING Check before you hear a click. Remove any objects that lacks a part or has been modified outside its specifications. Check that all nuts and screws are tight. • Only use a machine that...

Owner Manual
Page 16
.... • Make sure that the tip does not touch the ground. • Do not rush the work, but work and make sure no clothes or parts of the body come in contact with the motor running. • When trimming a hedge the motor should always face away from the bottom upwards when...
.... • Make sure that the tip does not touch the ground. • Do not rush the work, but work and make sure no clothes or parts of the body come in contact with the motor running. • When trimming a hedge the motor should always face away from the bottom upwards when...

Owner Manual
Page 18
...battery and the battery charger Ask your machine fails any of our products we guarantee the availability of storage. Ask your dealer or Husqvarna should you must contact your service agent. Cleaning Clean the machine after using cleaning agent before any maintenace on the machine requires special...the plastic. When you buy any of the checks described below you need more information. Keep the battery guide tracks clean. Clean plastic parts with water. Check that the blade edges are clean and that the blades move freely. Use a high quality grease intended for information ...
...battery and the battery charger Ask your machine fails any of our products we guarantee the availability of storage. Ask your dealer or Husqvarna should you must contact your service agent. Cleaning Clean the machine after using cleaning agent before any maintenace on the machine requires special...the plastic. When you buy any of the checks described below you need more information. Keep the battery guide tracks clean. Clean plastic parts with water. Check that the blade edges are clean and that the blades move freely. Use a high quality grease intended for information ...


