

Parts Manual
Page 7
GEAR HOUSING Ref Part No Description 1 503 21 75-72 SCREW IHSCFT 2 588 22 48-01 MOTOR COVER 3 588 22 49-01 MOTOR COVER 4 588 56 44-03 GEAR HOUSING ASSY 5 582 34 14-01 AIR CONDUCTOR 6 588 22 58-01 MOTOR ASSY 7 588 22 38-01 GEAR ASSY 8 577 82 93-02 CONNECTING ROD ASSY 9 578 00 27-01 HEAVY DUTY DOWEL PIN...-01 RING 31 588 21 75-01 SLIDE RING 32 588 47 49-01 BRAKE BAND ASSY 33 588 21 78-01 BRAKE BAND 34 503 20 03-25 SCREW IHSCFM 35 588 21 92-01 LEVER 36 593 20 98-01 BALL BEARING 37 574 31 60-01 SWITCH Remark 536LiHE3 QTY KIT 5 1 1 1 1 1 1 1 2 1 1 1 1 1 1 1 1 10 1 ...
GEAR HOUSING Ref Part No Description 1 503 21 75-72 SCREW IHSCFT 2 588 22 48-01 MOTOR COVER 3 588 22 49-01 MOTOR COVER 4 588 56 44-03 GEAR HOUSING ASSY 5 582 34 14-01 AIR CONDUCTOR 6 588 22 58-01 MOTOR ASSY 7 588 22 38-01 GEAR ASSY 8 577 82 93-02 CONNECTING ROD ASSY 9 578 00 27-01 HEAVY DUTY DOWEL PIN...-01 RING 31 588 21 75-01 SLIDE RING 32 588 47 49-01 BRAKE BAND ASSY 33 588 21 78-01 BRAKE BAND 34 503 20 03-25 SCREW IHSCFM 35 588 21 92-01 LEVER 36 593 20 98-01 BALL BEARING 37 574 31 60-01 SWITCH Remark 536LiHE3 QTY KIT 5 1 1 1 1 1 1 1 2 1 1 1 1 1 1 1 1 10 1 ...

Owner Manual
Page 2
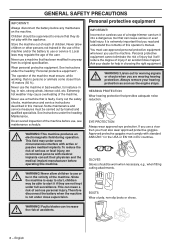
... • Approved eye protection Cutting unit operating cycle, run time/ idle time Symbols on the battery and/or on the machine: Translation of electrical and electronic equipment. (Applies to prevent Li-ion the machine being started by arcing. KEY TO SYMBOLS Symbols on the battery charger: Please read the operator's manual carefully and make sure you understand the instructions before using the machine. If have...
... • Approved eye protection Cutting unit operating cycle, run time/ idle time Symbols on the battery and/or on the machine: Translation of electrical and electronic equipment. (Applies to prevent Li-ion the machine being started by arcing. KEY TO SYMBOLS Symbols on the battery charger: Please read the operator's manual carefully and make sure you understand the instructions before using the machine. If have...
Owner Manual
Page 3
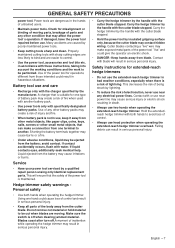
... use genuine accessories. Your warranty may ! hedge trimmer can result in permanent hearing impairment. WARNING! Non-authorized modifications and/or accessories can turn it into a dangerous tool that you read the operator's manual carefully. WARNING! It is what 5 GENERAL SAFETY PRECAUTIONS General power tool safety warnings 6 Personal protective equipment 8 Battery and battery charger 9 Machine′s safety equipment 10 BATTERY HANDLING Battery 12 Battery...
... use genuine accessories. Your warranty may ! hedge trimmer can result in permanent hearing impairment. WARNING! Non-authorized modifications and/or accessories can turn it into a dangerous tool that you read the operator's manual carefully. WARNING! It is what 5 GENERAL SAFETY PRECAUTIONS General power tool safety warnings 6 Personal protective equipment 8 Battery and battery charger 9 Machine′s safety equipment 10 BATTERY HANDLING Battery 12 Battery...

Owner Manual
Page 4
...the banks of the Huskvarna River, for using , service, maintenance etc) the life span and the second-hand value of your nearest servicing dealer. In 1956, the first motor driven lawn mowers appeared, followed by chain saws in the world of muskets. Your purchase ...customer! English By following its′ content (using a Husqvarna product. The location was logical, since water power was harnessed from wood stoves to buy a Husqvarna product! Husqvarna is one of our authorized dealers, ask for a long time. Today Husqvarna is based on a tradition that it will also...
...the banks of the Huskvarna River, for using , service, maintenance etc) the life span and the second-hand value of your nearest servicing dealer. In 1956, the first motor driven lawn mowers appeared, followed by chain saws in the world of muskets. Your purchase ...customer! English By following its′ content (using a Husqvarna product. The location was logical, since water power was harnessed from wood stoves to buy a Husqvarna product! Husqvarna is one of our authorized dealers, ask for a long time. Today Husqvarna is based on a tradition that it will also...
Owner Manual
Page 5
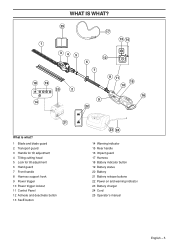
... guard 3 Handle for tilt adjustment 4 Tilting cutting head 5 Lock for tilt adjustment 6 Hand guard 7 Front handle 8 Harness support hook 9 Power trigger 10 Power trigger lockout 11 Control Panel 12 Activate and deactivate button 13 SavE button 23 24 14 Warning indicator 15 Rear handle 16 Impact guard 17 Harness 18 Battery indicator button 19 Battery status 20 Battery 21 Battery release buttons 22 Power on and warning indicator 23 Battery charger 24 Cord 25 Operator's manual...
... guard 3 Handle for tilt adjustment 4 Tilting cutting head 5 Lock for tilt adjustment 6 Hand guard 7 Front handle 8 Harness support hook 9 Power trigger 10 Power trigger lockout 11 Control Panel 12 Activate and deactivate button 13 SavE button 23 24 14 Warning indicator 15 Rear handle 16 Impact guard 17 Harness 18 Battery indicator button 19 Battery status 20 Battery 21 Battery release buttons 22 Power on and warning indicator 23 Battery charger 24 Cord 25 Operator's manual...
Owner Manual
Page 6
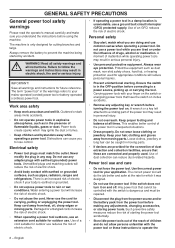
... OFF-position before making any adjusting key or wrench before using the machine. GENERAL SAFETY PRECAUTIONS General power tool safety warnings Please read the operator's manual carefully and make sure you understand the instructions before turning the power tool on. Always remove the battery to a rotating part of starting . Water entering a power tool will do not allow persons unfamiliar with earthed (grounded) power tools. Keep cord away from moving parts. Personal...
... OFF-position before making any adjusting key or wrench before using the machine. GENERAL SAFETY PRECAUTIONS General power tool safety warnings Please read the operator's manual carefully and make sure you understand the instructions before turning the power tool on. Always remove the battery to a rotating part of starting . Water entering a power tool will do not allow persons unfamiliar with earthed (grounded) power tools. Keep cord away from moving parts. Personal...
Owner Manual
Page 7
... of untrained users. • Maintain power tools. Battery tool use two hands when operating the extended-reach hedge trimmer. Service • Have your power tool serviced by the handle with these instructions, taking into account the working conditions and the work to control. • Use the power tool, accessories and tool bits etc. Carry the hedge trimmer by the manufacturer. Cutter blades contacting a "live " and could give the operator an electric shock. •...
... of untrained users. • Maintain power tools. Battery tool use two hands when operating the extended-reach hedge trimmer. Service • Have your power tool serviced by the handle with these instructions, taking into account the working conditions and the work to control. • Use the power tool, accessories and tool bits etc. Carry the hedge trimmer by the manufacturer. Cutter blades contacting a "live " and could give the operator an electric shock. •...
Owner Manual
Page 8
...operating this manual. Never use a machine that you are not kept under full surveillance. Do an overall inspection of children. WARNING! Never allow children or other persons not trained in rain, strong winds, intense cold, etc. Therefore disconnect the battery when the machine is not under the heading Maintenance...the use or ! This can cause serious or even fatal injury. You must use the machine. Faulty blades can turn it . Never allow children to start it will reduce the degree of the machine. Carry out the safety checks, maintenance and service instructions ...
...operating this manual. Never use a machine that you are not kept under full surveillance. Do an overall inspection of children. WARNING! Never allow children or other persons not trained in rain, strong winds, intense cold, etc. Therefore disconnect the battery when the machine is not under the heading Maintenance...the use or ! This can cause serious or even fatal injury. You must use the machine. Faulty blades can turn it . Never allow children to start it will reduce the degree of the machine. Carry out the safety checks, maintenance and service instructions ...

Owner Manual
Page 9
... instructions under the heading Maintenance. • Store the battery out of reach of children. • Protect the battery from Husqvarna. There is a risk the battery may explode if it is intact and that there are between -10 °C (14 °F) and 40 °C (104 °F). • Do not expose the battery to microwaves or high pressure. • Never clean the battery or...
... instructions under the heading Maintenance. • Store the battery out of reach of children. • Protect the battery from Husqvarna. There is a risk the battery may explode if it is intact and that there are between -10 °C (14 °F) and 40 °C (104 °F). • Do not expose the battery to microwaves or high pressure. • Never clean the battery or...

Owner Manual
Page 10
... these checks contact your service agent to locate where this section. section to get it is not possible to protect operators in case an electrical fault should be checked and maintained as described in the blades. • the machine is pressed and held (>1 sec.). Disconnect the battery. Make sure the cable is well ventilated, dry and free from water, oil and...
... these checks contact your service agent to locate where this section. section to get it is not possible to protect operators in case an electrical fault should be checked and maintained as described in the blades. • the machine is pressed and held (>1 sec.). Disconnect the battery. Make sure the cable is well ventilated, dry and free from water, oil and...

Owner Manual
Page 11
... cutting attachment stops and remain at no operation state. When you release the handle, the power trigger and the power trigger lockout both the power trigger lockout and the power trigger. Check that the power trigger and the power trigger lockout move back to prevent accidental operation. The cutting unit must stop within 3 seconds. Start the machine and apply full power. This movement is designed to their original positions. See instructions under the heading Start...
... cutting attachment stops and remain at no operation state. When you release the handle, the power trigger and the power trigger lockout both the power trigger lockout and the power trigger. Check that the power trigger and the power trigger lockout move back to prevent accidental operation. The cutting unit must stop within 3 seconds. Start the machine and apply full power. This movement is designed to their original positions. See instructions under the heading Start...
Owner Manual
Page 12
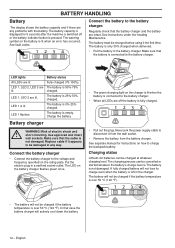
... of electric shock and ! Use approved and intact wall sockets. English BATTERY HANDLING Battery The display shows the battery capacity and if there are any way. The battery is pressed. See separate manual for 5 seconds after the machine is switched off the battery is over 50 °C (122 °F). 1 23 4 • The battery will not be cancelled or started whatever the battery's charge level is...
... of electric shock and ! Use approved and intact wall sockets. English BATTERY HANDLING Battery The display shows the battery capacity and if there are any way. The battery is pressed. See separate manual for 5 seconds after the machine is switched off the battery is over 50 °C (122 °F). 1 23 4 • The battery will not be cancelled or started whatever the battery's charge level is...

Owner Manual
Page 14
... be worn when necessary. • All covers must be thrown out. • Check the cutting attachment. Always remove the battery to the machine. Remove any objects that lacks a part or has been modified outside its specifications. Never use a machine that could be correctly fitted and undamaged before starting Starting and stopping Li-ion • Inspect the...
... be worn when necessary. • All covers must be thrown out. • Check the cutting attachment. Always remove the battery to the machine. Remove any objects that lacks a part or has been modified outside its specifications. Never use a machine that could be correctly fitted and undamaged before starting Starting and stopping Li-ion • Inspect the...
Owner Manual
Page 15
...ask an expert. Do not use the machine without first switching off first and always remove the battery. • CAUTION! Contact your dealer or your capability. that deactivates the machine if not used. A green LED will ...turning it off the engine. SavE mode The machine is equipped with a hedge trimmer. Keep proper footing and balance at all usage which you need to indicate that could be beyond your service workshop. The machine can cause ! serious personal injury. The green LED will light to . Cutting tool. Always disconnect the battery...
...ask an expert. Do not use the machine without first switching off first and always remove the battery. • CAUTION! Contact your dealer or your capability. that deactivates the machine if not used. A green LED will ...turning it off the engine. SavE mode The machine is equipped with a hedge trimmer. Keep proper footing and balance at all usage which you need to indicate that could be beyond your service workshop. The machine can cause ! serious personal injury. The green LED will light to . Cutting tool. Always disconnect the battery...

Owner Manual
Page 16
... the motor is within the safety zone. • Always use . • Make sure the cutting attachment has stopped before cleaning the blades. Basic working , switch off , keep your body. Always wear approved eye protection. Never lean over the cutting attachment guard. Children, animals, onlookers and helpers should be thrown up into the eyes causing blindness or serious injury. Disconnect the battery...
... the motor is within the safety zone. • Always use . • Make sure the cutting attachment has stopped before cleaning the blades. Basic working , switch off , keep your body. Always wear approved eye protection. Never lean over the cutting attachment guard. Children, animals, onlookers and helpers should be thrown up into the eyes causing blindness or serious injury. Disconnect the battery...

Owner Manual
Page 17
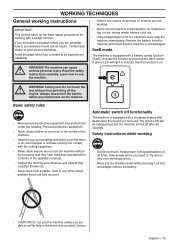
English - 17 WORKING TECHNIQUES Changing the hedge trimmer angle Disconnect the battery. The cutting unit has 8 adjustment positions to make work easier. • Pull down the position adjustment handle. • Tilt the cutting unit with its handle to use the transport protection during transport or long movements. • Disconnect the battery. • Tilt the cutting unit 180° towards yourself. When the machine is in transport...
English - 17 WORKING TECHNIQUES Changing the hedge trimmer angle Disconnect the battery. The cutting unit has 8 adjustment positions to make work easier. • Pull down the position adjustment handle. • Tilt the cutting unit with its handle to use the transport protection during transport or long movements. • Disconnect the battery. • Tilt the cutting unit 180° towards yourself. When the machine is in transport...

Owner Manual
Page 18
... battery charger. Turn the screw clockwise or counterclockwise in order to easily tilt the cutting unit. 18 - Never clean the battery or the battery charger with the screw. All servicing and repair work on the machine. Keep the battery guide tracks clean. Check that the blade edges are intact. Ask your service agent. Use a high quality grease intended for information on the battery and the battery charger Ask your nearest service agent. File...
... battery charger. Turn the screw clockwise or counterclockwise in order to easily tilt the cutting unit. 18 - Never clean the battery or the battery charger with the screw. All servicing and repair work on the machine. Keep the battery guide tracks clean. Check that the blade edges are intact. Ask your service agent. Use a high quality grease intended for information on the battery and the battery charger Ask your nearest service agent. File...

Owner Manual
Page 19
... the same time. Release the power trigger and the machine is lit with red light. MAINTENANCE Troubleshooting schedule Control Panel Troubleshooting takes place from the battery charger. Error LED flashes. The machine does not start Error LED is active. Allow the machine to cool down. Clean with that the mains voltage corresponds with compressed air or a soft brush. Possible action Charge the battery. Check that...
... the same time. Release the power trigger and the machine is lit with red light. MAINTENANCE Troubleshooting schedule Control Panel Troubleshooting takes place from the battery charger. Error LED flashes. The machine does not start Error LED is active. Allow the machine to cool down. Clean with that the mains voltage corresponds with compressed air or a soft brush. Possible action Charge the battery. Check that...

Owner Manual
Page 20
... position lock is not damaged. Replace the cutting unit if it is intact and functional. X Check that the hand guard is in working order. X Check that the start and stop switch works correctly and is a list of view. X Make sure that the power trigger and the power trigger lockout function correctly from a safety point of the maintenance that hold the blades together are cracked. X Check that the screws...
... position lock is not damaged. Replace the cutting unit if it is intact and functional. X Check that the hand guard is in working order. X Check that the start and stop switch works correctly and is a list of view. X Make sure that the power trigger and the power trigger lockout function correctly from a safety point of the maintenance that hold the blades together are cracked. X Check that the screws...

Owner Manual
Page 21
... 1,3/2,8 Approved chargers for 536LiHE3. Battery charger Input Voltage, V Frequency, Hz Power, W QC330 100-240 50-60 330 English - 21 TECHNICAL DATA Technical data Motor Motor type Weight Weight without battery, Lbs/kg Weight with battery, Lbs/kg Default battery BLi150 Battery runtime Battery runtime, min, (free run) with SavE activated Default battery BLi150 Cutter Type Blade length, inch/mm Blade speed cuts/min with SavE function activated Blade speed cuts/min with another...
... 1,3/2,8 Approved chargers for 536LiHE3. Battery charger Input Voltage, V Frequency, Hz Power, W QC330 100-240 50-60 330 English - 21 TECHNICAL DATA Technical data Motor Motor type Weight Weight without battery, Lbs/kg Weight with battery, Lbs/kg Default battery BLi150 Battery runtime Battery runtime, min, (free run) with SavE activated Default battery BLi150 Cutter Type Blade length, inch/mm Blade speed cuts/min with SavE function activated Blade speed cuts/min with another...


