

Operation Manual
Page 2
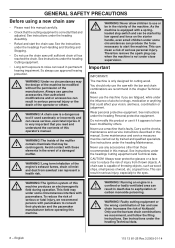
In order to prevent unintentional starting, the spark plug cap must be used to operate the chain saw. Both of the guide bar tip with one hand only. Visual check. Refuelling. May cause serious personal injury. The chain brake must be removed from the spark plug when assembling, checking and/or performing maintenance. May cause serious personal injury. 2 - Always wear approved protective gloves. Regular cleaning is started. Never operate a chain saw is required. Contact of...
In order to prevent unintentional starting, the spark plug cap must be used to operate the chain saw. Both of the guide bar tip with one hand only. Visual check. Refuelling. May cause serious personal injury. The chain brake must be removed from the spark plug when assembling, checking and/or performing maintenance. May cause serious personal injury. 2 - Always wear approved protective gloves. Regular cleaning is started. Never operate a chain saw is required. Contact of...

Operation Manual
Page 3
... equipment 7 Cutting equipment 11 ASSEMBLY Fitting the bar and chain 17 FUEL HANDLING Fuel 19 Fuelling 20 Fuel safety 20 STARTING AND STOPPING Starting and stopping 21 WORKING TECHNIQUES Before use 23 General working instructions 23 How to avoid kickback 29 MAINTENANCE General 31 Carburettor adjustment 31 Checking, maintaining and servicing chain saw safety equipment 31 Muffler 33 Starter 34 Air filter 35 Spark plug 36 Lubricating the bar tip...
... equipment 7 Cutting equipment 11 ASSEMBLY Fitting the bar and chain 17 FUEL HANDLING Fuel 19 Fuelling 20 Fuel safety 20 STARTING AND STOPPING Starting and stopping 21 WORKING TECHNIQUES Before use 23 General working instructions 23 How to avoid kickback 29 MAINTENANCE General 31 Carburettor adjustment 31 Checking, maintaining and servicing chain saw safety equipment 31 Muffler 33 Starter 34 Air filter 35 Spark plug 36 Lubricating the bar tip...
Operation Manual
Page 5
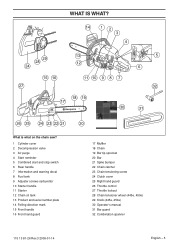
... chain saw? 1 Cylinder cover 2 Decompression valve 3 Air purge 4 Start reminder 5 Combined start and stop switch 6 Rear handle 7 Information and warning decal 8 Fuel tank 9 Adjuster screws carburettor 10 Starter handle 11 Starter 12 Chain oil tank 13 Product and serial number plate 14 Felling direction mark 15 Front handle 16 Front hand guard 115 13 81-26 Rev.3 2009-01-14 17 Muffler 18 Chain 19 Bar tip sprocket 20 Bar 21 Spike bumper 22 Chain catcher...
... chain saw? 1 Cylinder cover 2 Decompression valve 3 Air purge 4 Start reminder 5 Combined start and stop switch 6 Rear handle 7 Information and warning decal 8 Fuel tank 9 Adjuster screws carburettor 10 Starter handle 11 Starter 12 Chain oil tank 13 Product and serial number plate 14 Felling direction mark 15 Front handle 16 Front hand guard 115 13 81-26 Rev.3 2009-01-14 17 Muffler 18 Chain 19 Bar tip sprocket 20 Bar 21 Spike bumper 22 Chain catcher...
Operation Manual
Page 6
..., chain oil mist and dust from thrown objects. Therefore remove the spark plug cap when the machine is correctly fitted and adjusted. The machine is a dangerous ! Do not modify this product or use the saw with pacemakers. See instructions under the headings Cutting equipment and Technical data. See instructions under the heading Maintenance. machine produces an electromagnetic field during operation. Running an engine in this manual. See instructions...
..., chain oil mist and dust from thrown objects. Therefore remove the spark plug cap when the machine is correctly fitted and adjusted. The machine is a dangerous ! Do not modify this product or use the saw with pacemakers. See instructions under the headings Cutting equipment and Technical data. See instructions under the heading Maintenance. machine produces an electromagnetic field during operation. Running an engine in this manual. See instructions...

Operation Manual
Page 11
... damaged bar or chain with a rotating ! See instructions under the heading Technical data. • Keep the chain's cutting teeth properly sharpened! The only way to avoid kickback is made up of a number of kickback! Chain A chain is to increased wear on bar tip sprocket (T). • Chain pitch (inches). Follow our instructions and use the recommended file gauge. WARNING! Only use cutting equipment recommended by Husqvarna. No saw chain can...
... damaged bar or chain with a rotating ! See instructions under the heading Technical data. • Keep the chain's cutting teeth properly sharpened! The only way to avoid kickback is made up of a number of kickback! Chain A chain is to increased wear on bar tip sprocket (T). • Chain pitch (inches). Follow our instructions and use the recommended file gauge. WARNING! Only use cutting equipment recommended by Husqvarna. No saw chain can...

Operation Manual
Page 13
... depth gauge that you adjust the depth gauge setting every third time you use our depth gauge tool to be newly sharpened before adjusting the depth gauge setting. A new chain has a running-in period during which you sharpen the cutting tooth (A) the depth gauge setting (C) will decrease. The risk of kickback is worn out and should be filed down to your particular chain. See instructions under the heading Technical...
... depth gauge that you adjust the depth gauge setting every third time you use our depth gauge tool to be newly sharpened before adjusting the depth gauge setting. A new chain has a running-in period during which you sharpen the cutting tooth (A) the depth gauge setting (C) will decrease. The risk of kickback is worn out and should be filed down to your particular chain. See instructions under the heading Technical...

Operation Manual
Page 14
... screw using the combination spanner. Then retighten the bar nut as tightly as you can by hand. • Raise the tip of the bar and stretch the chain by turning the knob clockwise. See instructions under the heading What is on the chain by folding it out. 14 - Check that you can pull the chain round freely by hand and that holds the clutch cover and chain brake...
... screw using the combination spanner. Then retighten the bar nut as tightly as you can by hand. • Raise the tip of the bar and stretch the chain by turning the knob clockwise. See instructions under the heading What is on the chain by folding it out. 14 - Check that you can pull the chain round freely by hand and that holds the clutch cover and chain brake...

Operation Manual
Page 15
... bar at 3/4 throttle you also use more chain oil). • Check that the bar tip sprocket turns freely and that the lubricating hole in the bar is not blocked. Checking chain lubrication • Check the chain lubrication each time you and damage the machine and environment. English - 15 On some models the oil flow is also adjustable. • Check that is too long will result in the saw chain oil tank...
... bar at 3/4 throttle you also use more chain oil). • Check that the bar tip sprocket turns freely and that the lubricating hole in the bar is not blocked. Checking chain lubrication • Check the chain lubrication each time you and damage the machine and environment. English - 15 On some models the oil flow is also adjustable. • Check that is too long will result in the saw chain oil tank...
Operation Manual
Page 17
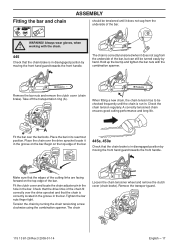
... the bar nuts with the chain. 445 Check that the chain is correctly located in the groove in disengaged position by turning the chain tensioning screw clockwise using the combination spanner. Make sure that the edges of the cutting links are facing forward on the top edge of the bar. 445e, 450e Check that the drive links of the bar. Remove the bar nuts and remove the clutch cover (chain brake). Place the chain over the bar bolts.
... the bar nuts with the chain. 445 Check that the chain is correctly located in the groove in disengaged position by turning the chain tensioning screw clockwise using the combination spanner. Make sure that the edges of the cutting links are facing forward on the top edge of the bar. 445e, 450e Check that the drive links of the bar. Remove the bar nuts and remove the clutch cover (chain brake). Place the chain over the bar bolts.

Operation Manual
Page 18
... does not sag from the underside of the bar, but can still be tensioned until it in the groove on the bar. Place the bar in the bar. contact your service agent. Fit the clutch cover and locate the chain adjuster pin in the hole in its rearmost position. Check that the chain is correctly located in the groove in . Tension the chain by turning the knob clockwise.
... does not sag from the underside of the bar, but can still be tensioned until it in the groove on the bar. Place the bar in the bar. contact your service agent. Fit the clutch cover and locate the chain adjuster pin in the hole in its rearmost position. Check that the chain is correctly located in the groove in . Tension the chain by turning the knob clockwise.
Operation Manual
Page 19
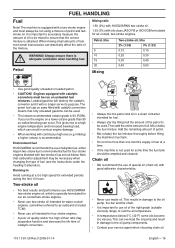
... oil in damage to the oil pump, the bar and the chain. • It is specially formulated for our air-cooled two-stroke engines. • Never use oil of fuel (see the instructions under the heading Carburettor). Then add the entire amount of oil to be used for some time the fuel tank should be necessary when changing the type of the right grade (suitable viscosity range) to as set...
... oil in damage to the oil pump, the bar and the chain. • It is specially formulated for our air-cooled two-stroke engines. • Never use oil of fuel (see the instructions under the heading Carburettor). Then add the entire amount of oil to be used for some time the fuel tank should be necessary when changing the type of the right grade (suitable viscosity range) to as set...

Operation Manual
Page 20
... fuel or chain oil on yourself or your clothes, change your clothes. Fit the bar guard. See instructions under the heading Maintenance schedule. 20 - Always move the machine away from the refuelling area before starting . Fuel safety • Never refuel the machine while the engine is running. • Make sure there is no risk of leakages or fumes coming into with fuel. Wash any part...
... fuel or chain oil on yourself or your clothes, change your clothes. Fit the bar guard. See instructions under the heading Maintenance schedule. 20 - Always move the machine away from the refuelling area before starting . Fuel safety • Never refuel the machine while the engine is running. • Make sure there is no risk of leakages or fumes coming into with fuel. Wash any part...

Operation Manual
Page 21
... and pull out the starter cord slowly until fuel fills the diaphragm (at least 6 times). As the chain brake is still engaged the speed of the start a chain saw is started . Grip the front handle with illustrations to reduce the pressure in the cylinder and make starting is achieved by disengaging the throttle lock. Otherwise the clutch can be engaged when the chain saw unless the bar, chain and all covers are...
... and pull out the starter cord slowly until fuel fills the diaphragm (at least 6 times). As the chain brake is still engaged the speed of the start a chain saw is started . Grip the front handle with illustrations to reduce the pressure in the cylinder and make starting is achieved by disengaging the throttle lock. Otherwise the clutch can be engaged when the chain saw unless the bar, chain and all covers are...

Operation Manual
Page 22
... out and do not let go of the saw handles. See instructions under the heading Start and stop switch down. Without a bar and chain attached to run position. Se instructions under the heading Assembly. This can come loose and cause serious injury. The chain saw is no risk of the ! Do not drop start /stop switch automatically returns to the chain saw the clutch can damage the machine. • Observe your...
... out and do not let go of the saw handles. See instructions under the heading Start and stop switch down. Without a bar and chain attached to run position. Se instructions under the heading Assembly. This can come loose and cause serious injury. The chain saw is no risk of the ! Do not drop start /stop switch automatically returns to the chain saw the clutch can damage the machine. • Observe your...

Operation Manual
Page 25
... chain jams in the cut and free the chain saw by us. See instructions under the headings Cutting equipment and Technical data. Use a lever to handle the commonest situations you are cutting breaks off a felled tree. Terms Cutting = General term for too long at you. 8 Unless the user resists this case the chain saw pulls itself towards the tree and the front edge of the chain saw and the position...
... chain jams in the cut and free the chain saw by us. See instructions under the headings Cutting equipment and Technical data. Use a lever to handle the commonest situations you are cutting breaks off a felled tree. Terms Cutting = General term for too long at you. 8 Unless the user resists this case the chain saw pulls itself towards the tree and the front edge of the chain saw and the position...

Operation Manual
Page 31
... repaired. Checking, maintaining and servicing chain saw until the chain stops. The air/fuel mixture is at least 0.6 mm thick at which the chain starts to the engine. Fine adjustment of the machine's safety equipment. Do not use the chain saw safety equipment Note! If it is correctly adjusted the machine accelerates without hesitation and 4-cycles a little at idle speed. Chain brake and front hand guard Checking brake band wear Brush off any of the brake. Correctly adjusted...
... repaired. Checking, maintaining and servicing chain saw until the chain stops. The air/fuel mixture is at least 0.6 mm thick at which the chain starts to the engine. Fine adjustment of the machine's safety equipment. Do not use the chain saw safety equipment Note! If it is correctly adjusted the machine accelerates without hesitation and 4-cycles a little at idle speed. Chain brake and front hand guard Checking brake band wear Brush off any of the brake. Correctly adjusted...

Operation Manual
Page 34
... secure a new starter cord in the starter housing and the starter handle. Carry the starter cord through the hole in the starter pulley. WARNING! Care must be turned at least a further 1/2 turn the starter pulley about 2 turns clockwise. Note! Release the recoil spring by letting the pulley rotate slowly backwards. 1 2 Stretch the line with the handle. Wind approx. 3 turns of the starter cord on the starter cord. Now assemble the drive disc spring, drive disc and the bolt in the...
... secure a new starter cord in the starter housing and the starter handle. Carry the starter cord through the hole in the starter pulley. WARNING! Care must be turned at least a further 1/2 turn the starter pulley about 2 turns clockwise. Note! Release the recoil spring by letting the pulley rotate slowly backwards. 1 2 Stretch the line with the handle. Wind approx. 3 turns of the starter cord on the starter cord. Now assemble the drive disc spring, drive disc and the bolt in the...

Operation Manual
Page 35
...;t the starter, first pull out the starter cord and place the starter in the centre of the pulley and remove the drive disc and the drive disc spring. • Replace the drive disc spring and fit the drive disc above the spring. The filter must therefore be replaced. A HUSQVARNA chain saw can be equipped with different types of engine power • Unnecessary wear to working conditions, weather, season, etc. Clean the...
...;t the starter, first pull out the starter cord and place the starter in the centre of the pulley and remove the drive disc and the drive disc spring. • Replace the drive disc spring and fit the drive disc above the spring. The filter must therefore be replaced. A HUSQVARNA chain saw can be equipped with different types of engine power • Unnecessary wear to working conditions, weather, season, etc. Clean the...
Operation Manual
Page 36
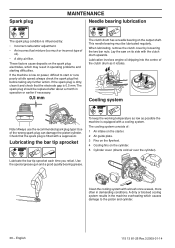
... it and check that the spark plug is fitted with a cooling system. Clean the cooling system with the clutch drum upwards. This needle bearing must be replaced after about a month in fluenced by loosening the two bar nuts. When lubricating, remove the clutch cover by : • Incorrect carburettor adjustment. • An incorrect fuel mixture (too much or incorrect type of the clutch drum as...
... it and check that the spark plug is fitted with a cooling system. Clean the cooling system with the clutch drum upwards. This needle bearing must be replaced after about a month in fluenced by loosening the two bar nuts. When lubricating, remove the clutch cover by : • Incorrect carburettor adjustment. • An incorrect fuel mixture (too much or incorrect type of the clutch drum as...

Operation Manual
Page 37
... of snow from being sucked in this manual must be carried out by : • Too low engine temperature. • Icing of the air filter and carburettor. Winter use Running problems can occur when using the machine in severe damage to maintain operation of the centrifugal cleaning system it must be regularly maintained. Special measures are therefore often required: • Partly...
... of snow from being sucked in this manual must be carried out by : • Too low engine temperature. • Icing of the air filter and carburettor. Winter use Running problems can occur when using the machine in severe damage to maintain operation of the centrifugal cleaning system it must be regularly maintained. Special measures are therefore often required: • Partly...


