Owner Manual
Page 3
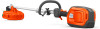
... you. Do not use in locations where objects can forcibly throw objects that no people or animals come closer than 15 metres. Manufacturer Husqvarna AB Drottninggatan 2, SE-561 82 Huskvarna, Sweden, tel: +46-36-146500 Product liability As referred to the operator or others. It...not approved by the manufacturer. • the product has an accessory that you understand the instructions before the product is not used . Battery indicator button 25. Power and Warning LED 20. Please read the operator's manual carefully and make sure you read and understand the ...
... you. Do not use in locations where objects can forcibly throw objects that no people or animals come closer than 15 metres. Manufacturer Husqvarna AB Drottninggatan 2, SE-561 82 Huskvarna, Sweden, tel: +46-36-146500 Product liability As referred to the operator or others. It...not approved by the manufacturer. • the product has an accessory that you understand the instructions before the product is not used . Battery indicator button 25. Power and Warning LED 20. Please read the operator's manual carefully and make sure you read and understand the ...

Owner Manual
Page 4
... you to a rotating part of flammable liquids, gases or dust. A wrench or a key left attached to lose control. Note: Used to power source and/or battery pack, picking up or carrying the tool. Work area safety • Keep work area clean and well lit. CAUTION: Used if there is in the...
... you to a rotating part of flammable liquids, gases or dust. A wrench or a key left attached to lose control. Note: Used to power source and/or battery pack, picking up or carrying the tool. Work area safety • Keep work area clean and well lit. CAUTION: Used if there is in the...
Owner Manual
Page 5
...attachment stops completely. Use of a second. Liquid ejected from those intended could result in unexpected situations. • Dress properly. Always remove the battery when passing the product to another person. • Never put the product down unless you move to , Safety devices on the product on... 8 and 1385 - 002 - 04.12.2019 5 in use the power tool if the switch does not turn it and removed the battery. Shorting the battery terminals together may cause burns or a fire. • Under abusive conditions, liquid may affect the power tool´s operation. This will ...
...attachment stops completely. Use of a second. Liquid ejected from those intended could result in unexpected situations. • Dress properly. Always remove the battery when passing the product to another person. • Never put the product down unless you move to , Safety devices on the product on... 8 and 1385 - 002 - 04.12.2019 5 in use the power tool if the switch does not turn it and removed the battery. Shorting the battery terminals together may cause burns or a fire. • Under abusive conditions, liquid may affect the power tool´s operation. This will ...
Owner Manual
Page 6
... been given supervision or instruction concerning use , appliances should be in this manual. • Faulty cutting attachment can face. Therefore disconnect the battery when the machine is not under close supervision. • Never allow children to call for dirt and cracks. Carry out the safety checks,...• Always ensure that ventilation openings are not kept under the Maintenance heading. • Working in use of the product and/or the battery to the trimmer. • All covers, guards and handles must be modified without first checking behind you to make sure that no one...
... been given supervision or instruction concerning use , appliances should be in this manual. • Faulty cutting attachment can face. Therefore disconnect the battery when the machine is not under close supervision. • Never allow children to call for dirt and cracks. Carry out the safety checks,...• Always ensure that ventilation openings are not kept under the Maintenance heading. • Working in use of the product and/or the battery to the trimmer. • All covers, guards and handles must be modified without first checking behind you to make sure that no one...
Owner Manual
Page 7
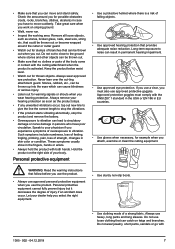
... line to give the line the correct length to stop the vibrations. • If the product starts vibrating abnormally, stop the product and remove the battery. • Overexposure to vibration can lead to move and stand safely. Never lean over the cut-ting attachment guard. Such symptoms include numbness, loss of...
... line to give the line the correct length to stop the vibrations. • If the product starts vibrating abnormally, stop the product and remove the battery. • Overexposure to vibration can lead to move and stand safely. Never lean over the cut-ting attachment guard. Such symptoms include numbness, loss of...

Owner Manual
Page 9
... when you have an approved guard attached. • Make sure that follow before you do maintenance on the product. • Remove the battery before you do not do maintenance, it can result in water for the safety devices on page 19. Refer to Accessories on page 13..... • If a harness is necessary for all checks in the centre hole of a larger extension. • Do not clean the battery or the battery charger with the attachment, the harness must engage correctly in this operator's manual. Safety instructions for the cutting attachment that are not necessary. ...
... when you have an approved guard attached. • Make sure that follow before you do maintenance on the product. • Remove the battery before you do not do maintenance, it can result in water for the safety devices on page 19. Refer to Accessories on page 13..... • If a harness is necessary for all checks in the centre hole of a larger extension. • Do not clean the battery or the battery charger with the attachment, the harness must engage correctly in this operator's manual. Safety instructions for the cutting attachment that are not necessary. ...

Owner Manual
Page 12
...result in the groove on the opposite side of trimmer heads WARNING: When you install the cutting attachment it is very important that the battery is recommended for a trimmer head 1. Turn the trimmer head (A) counterclockwise to lock the shaft. 4. To attach the trimmer guard for ... around the shaft and attach it can cause serious personal injury. WARNING: Always use Husqvarna original batteries with the product. 1. Put the drive disc (B) on page 19. The battery locks into the battery holder of the holes in the centre hole of the cutting attachment. See Accessories on...
...result in the groove on the opposite side of trimmer heads WARNING: When you install the cutting attachment it is very important that the battery is recommended for a trimmer head 1. Turn the trimmer head (A) counterclockwise to lock the shaft. 4. To attach the trimmer guard for ... around the shaft and attach it can cause serious personal injury. WARNING: Always use Husqvarna original batteries with the product. 1. Put the drive disc (B) on page 19. The battery locks into the battery holder of the holes in the centre hole of the cutting attachment. See Accessories on...
Owner Manual
Page 13
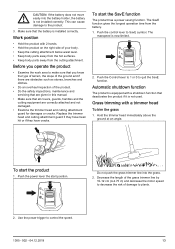
... have been hit or if they have cracks. The maxspeed is not installed correctly. Do not push the grass trimmer line into the battery holder, the battery is now limited. 2. Before you know the type of terrain, the slope of the ground and if there are obstacles such as stones...8226; Keep the cutting attachment below waist level. • Keep body parts away from the hot surfaces. • Keep body parts away from the battery. 1. Automatic shutdown function The product is installed correctly. Hold the trimmer head immediately above the ground at an angle. Use the power trigger to make...
... have been hit or if they have cracks. The maxspeed is not installed correctly. Do not push the grass trimmer line into the battery holder, the battery is now limited. 2. Before you know the type of terrain, the slope of the ground and if there are obstacles such as stones...8226; Keep the cutting attachment below waist level. • Keep body parts away from the hot surfaces. • Keep body parts away from the battery. 1. Automatic shutdown function The product is installed correctly. Hold the trimmer head immediately above the ground at an angle. Use the power trigger to make...

Owner Manual
Page 15
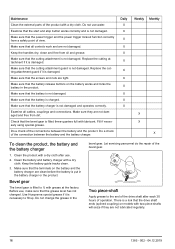
The following is a list of the maintenance steps that you must read and understand the safety chapter. WARNING: Remove the battery before you must do maintenance. Push the release buttons on the product. 1385 - 002 - 04.12.2019 15 Maintenance Introduction Maintenance schedule WARNING: Before you do any maintenance work you do on the battery and pull the battery out. 3.
The following is a list of the maintenance steps that you must read and understand the safety chapter. WARNING: Remove the battery before you must do maintenance. Push the release buttons on the product. 1385 - 002 - 04.12.2019 15 Maintenance Introduction Maintenance schedule WARNING: Before you do any maintenance work you do on the battery and pull the battery out. 3.
Owner Manual
Page 16
...use water. Fill if necessary using special grease. Clean the product with a dry cloth. Clean the battery and battery charger with a dry cloth after each 30 hours of operation. Use Husqvarna special grease if it is filled three-quarters full with grease at the factory. There is a risk ...the cutting attachment guard if it is not damaged and operates correctly. Do not change the grease in the product. Make sure that the battery charger is damaged. Make sure that all cables, couplings and connections. Make sure they are not lubricated regularly. 16 1385 - 002 - ...
...use water. Fill if necessary using special grease. Clean the product with a dry cloth. Clean the battery and battery charger with a dry cloth after each 30 hours of operation. Use Husqvarna special grease if it is filled three-quarters full with grease at the factory. There is a risk ...the cutting attachment guard if it is not damaged and operates correctly. Do not change the grease in the product. Make sure that the battery charger is damaged. Make sure that all cables, couplings and connections. Make sure they are not lubricated regularly. 16 1385 - 002 - ...
Owner Manual
Page 17
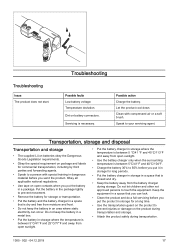
...the temperature is between 5°C/41°F and 40°C/104°F. • Charge the battery 30% to prevent movement. • Remove the battery for long periods. • Put the battery charger in storage in a package. Clean with special training in an area where static electricity can ... material before you send the product. Let the product cool down. Troubleshooting Issue The product does not start. Possible action Charge the battery. Obey all applicable national regulations. • Use tape on package and labels for a long time. • Use the transportation guard...
...the temperature is between 5°C/41°F and 40°C/104°F. • Charge the battery 30% to prevent movement. • Remove the battery for long periods. • Put the battery charger in storage in a package. Clean with special training in an area where static electricity can ... material before you send the product. Let the product cool down. Troubleshooting Issue The product does not start. Possible action Charge the battery. Obey all applicable national regulations. • Use tape on package and labels for a long time. • Use the transportation guard...
Owner Manual
Page 18
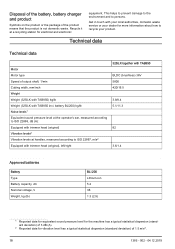
Disposal of the battery, battery charger and product Symbols on the product or the package of output shaft, 1/min Cutting width, mm/inch Weight Weight (325iLK with TAB850) kg/lb Weight (325iLK with TAB850 incl. Technical data Technical data Motor Motor type Speed of ... data for more information about how to ISO 22867, m/s2 Equipped with trimmer head (original), left/right 325iLK together with TAB850 BLDC (brushless) 36V 5800 420/16.5 3.8/8.4 5.1/11.3 82 3.6/1.4 Approved batteries Battery Type Battery capacity, Ah Nominal voltage, V Weight, kg (lb) BLi 200 Lithium-ion 5.2 36 1.3 (2.9) 1...
Disposal of the battery, battery charger and product Symbols on the product or the package of output shaft, 1/min Cutting width, mm/inch Weight Weight (325iLK with TAB850) kg/lb Weight (325iLK with TAB850 incl. Technical data Technical data Motor Motor type Speed of ... data for more information about how to ISO 22867, m/s2 Equipped with trimmer head (original), left/right 325iLK together with TAB850 BLDC (brushless) 36V 5800 420/16.5 3.8/8.4 5.1/11.3 82 3.6/1.4 Approved batteries Battery Type Battery capacity, Ah Nominal voltage, V Weight, kg (lb) BLi 200 Lithium-ion 5.2 36 1.3 (2.9) 1...
Owner Manual
Page 19
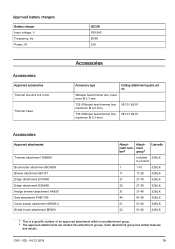
... Edger attachment ESA850 Hedge trimmer attachment HA850 Saw attachment PAB1100 Clean sweep attachment SR600-2 Bristle brush attachment BR600 Attach- Approved battery chargers Battery charger Input voltage, V Frequency, Hz Power, W QC330 100-240 50-60 330 Accessories Approved accessories Trimmer line Ø...2019 19 no. ment ber3 group4 Use with Included 325iLK in product 1 1-10 325iLK 11 11-20 325iLK 21 21-30 325iLK 22 21-30 325iLK 31 31-40 325iLK 44 41-50 325iLK 51 51-60 325iLK 52 51-60 325iLK 3 This is a specific number of an approved attachment...
... Edger attachment ESA850 Hedge trimmer attachment HA850 Saw attachment PAB1100 Clean sweep attachment SR600-2 Bristle brush attachment BR600 Attach- Approved battery chargers Battery charger Input voltage, V Frequency, Hz Power, W QC330 100-240 50-60 330 Accessories Approved accessories Trimmer line Ø...2019 19 no. ment ber3 group4 Use with Included 325iLK in product 1 1-10 325iLK 11 11-20 325iLK 21 21-30 325iLK 22 21-30 325iLK 31 31-40 325iLK 44 41-50 325iLK 51 51-60 325iLK 52 51-60 325iLK 3 This is a specific number of an approved attachment...


