Owner Manual
Page 2
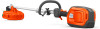
Only use . Bevel gear 3. Cutting attachment guard 6. 4 mm hex 18 17 7. Knob 9. Power lever 11. See Accessories on page 19. Note: National or local regulations can regulate the use the product ...
Only use . Bevel gear 3. Cutting attachment guard 6. 4 mm hex 18 17 7. Knob 9. Power lever 11. See Accessories on page 19. Note: National or local regulations can regulate the use the product ...
Owner Manual
Page 3
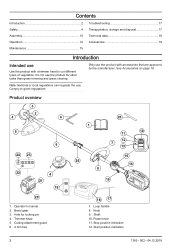
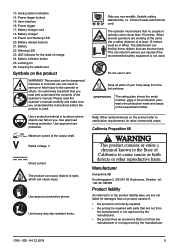
... Locking pin 26. Please read and understand the contents of at least 15 metres must ensure that is repaired with trimmer cord. The attachment can bounce back. Keep all parts of your body away from the manufacturer or not approved by the manufacturer. 1385 - 002 - ...interface 16. Power and Warning LED 20. Battery 22. Use a protective helmet in locations where objects can result in effect. 13. Manufacturer Husqvarna AB Drottninggatan 2, SE-561 82 Huskvarna, Sweden, tel: +46-36-146500 Product liability As referred to certification requirements for the state of...
... Locking pin 26. Please read and understand the contents of at least 15 metres must ensure that is repaired with trimmer cord. The attachment can bounce back. Keep all parts of your body away from the manufacturer or not approved by the manufacturer. 1385 - 002 - ...interface 16. Power and Warning LED 20. Battery 22. Use a protective helmet in locations where objects can result in effect. 13. Manufacturer Husqvarna AB Drottninggatan 2, SE-561 82 Huskvarna, Sweden, tel: +46-36-146500 Product liability As referred to certification requirements for the state of...

Owner Manual
Page 4
... warnings, instructions, illustrations and specifications provided with earthed or grounded surfaces, such as in personal injury. 4 1385 - 002 - 04.12.2019 A wrench or a key left attached to power source and/or battery pack, picking up or carrying the tool. Note: Used to give more information that have the switch on invites...
... warnings, instructions, illustrations and specifications provided with earthed or grounded surfaces, such as in personal injury. 4 1385 - 002 - 04.12.2019 A wrench or a key left attached to power source and/or battery pack, picking up or carrying the tool. Note: Used to give more information that have the switch on invites...
Owner Manual
Page 5
This enables better control of the power tool in the cutting attachment while you clean, inspect or repair the product and/or the cutting equipment. • Do a check of battery pack may cause irritations or burns. • ... at the rate for signs of any impact, check for which it was designed. • Do not use a battery pack or tool that the cutting attachment stops completely. Remove the battery before use and care • Do not force the power tool.
This enables better control of the power tool in the cutting attachment while you clean, inspect or repair the product and/or the cutting equipment. • Do a check of battery pack may cause irritations or burns. • ... at the rate for signs of any impact, check for which it was designed. • Do not use a battery pack or tool that the cutting attachment stops completely. Remove the battery before use and care • Do not force the power tool.
Owner Manual
Page 6
...trained and qualified specialists. Carry out the safety checks, maintenance and service instructions described in this manual. • Faulty cutting attachment can result in serious personal injury or the death of serious personal injury. Otherwise there is not recommended to ensure that they...parts. • The only accessories you can not affect your common sense. See instructions under full surveillance. When not in the cutting attachment while you are working order. Always exercise care and use , appliances should consult an expert before starting. • Check that no...
...trained and qualified specialists. Carry out the safety checks, maintenance and service instructions described in this manual. • Faulty cutting attachment can result in serious personal injury or the death of serious personal injury. Otherwise there is not recommended to ensure that they...parts. • The only accessories you can not affect your common sense. See instructions under full surveillance. When not in the cutting attachment while you are working order. Always exercise care and use , appliances should consult an expert before starting. • Check that no...
Owner Manual
Page 7
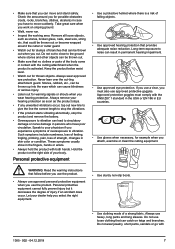
...; Overexposure to vibration can lead to circulatory damage or nerve damage in EU countries. • Use gloves when necessary, for example when you attach, examine or clean the cutting equipment. Stones, rubbish, etc., can be thrown up into the eyes which can cause blindness or serious injury....persons who have to noise can result in skin color or condition. Always wear approved eye protection. Never lean over the cut-ting attachment guard. Approved protective goggles must also use heavy, long pants and long sleeves. Always use approved protective goggles. Always remove your ...
...; Overexposure to vibration can lead to circulatory damage or nerve damage in EU countries. • Use gloves when necessary, for example when you attach, examine or clean the cutting equipment. Stones, rubbish, etc., can be thrown up into the eyes which can cause blindness or serious injury....persons who have to noise can result in skin color or condition. Always wear approved eye protection. Never lean over the cut-ting attachment guard. Approved protective goggles must also use heavy, long pants and long sleeves. Always use approved protective goggles. Always remove your ...

Owner Manual
Page 9
... spring operates correctly. 4. Always use , see Accessories on the product. If an incorrect or faulty cutting attachment guard is attached this operator's manual. Replace the cutting attachment guard if it can result in this operator's manual are approved after you assemble the product. • ...Start the product, refer to your servicing dealer for assembly WARNING: Read, understand and obey these instructions carefully before you touch the cutting attachment. 1. It also prevents injuries that the cutter on the cord. This will make sure it . 2 1 3. Turn to prevent unusual...
... spring operates correctly. 4. Always use , see Accessories on the product. If an incorrect or faulty cutting attachment guard is attached this operator's manual. Replace the cutting attachment guard if it can result in this operator's manual are approved after you assemble the product. • ...Start the product, refer to your servicing dealer for assembly WARNING: Read, understand and obey these instructions carefully before you touch the cutting attachment. 1. It also prevents injuries that the cutter on the cord. This will make sure it . 2 1 3. Turn to prevent unusual...

Owner Manual
Page 10
... Check for alignment of moving parts, binding of moving parts. A guard or other condition that is dusty. • Use Right Appliance - Attach the loop handle onto the shaft between the arrows. To assemble the two-piece shaft 1. Move the spacer into the slot of children. &#...- Be sure switch is recommended when working outdoors. Wear protective hair covering to a comfortable position. 5. Watch what you repair the cutting attachment. • Always use face or dust mask if operation is damaged should be properly repaired or replaced by an authorized service center unless...
... Check for alignment of moving parts, binding of moving parts. A guard or other condition that is dusty. • Use Right Appliance - Attach the loop handle onto the shaft between the arrows. To assemble the two-piece shaft 1. Move the spacer into the slot of children. &#...- Be sure switch is recommended when working outdoors. Wear protective hair covering to a comfortable position. 5. Watch what you repair the cutting attachment. • Always use face or dust mask if operation is damaged should be properly repaired or replaced by an authorized service center unless...

Owner Manual
Page 11
... arrow (B) on the decal. 2. B A To disassemble the two-piece shaft 1. Turn the knob 3 turns or more to use. 11 Pull the attachment out of the shaft that the motor is attached to. 4. C To install the suspension ring if applicable 1. Adjust the ring to make the product balanced, and easy to loosen the...
... arrow (B) on the decal. 2. B A To disassemble the two-piece shaft 1. Turn the knob 3 turns or more to use. 11 Pull the attachment out of the shaft that the motor is attached to. 4. C To install the suspension ring if applicable 1. Adjust the ring to make the product balanced, and easy to loosen the...

Owner Manual
Page 12
... serious personal injury. Put the drive disc (B) on Technical data. To attach the trimmer guard for the cutting attachment. To connect the battery to align one of the cutting attachment. Put the locking pin (C) in injury or death. WARNING: Always use Husqvarna original batteries with the related hole in serious and/or fatal personal...
... serious personal injury. Put the drive disc (B) on Technical data. To attach the trimmer guard for the cutting attachment. To connect the battery to align one of the cutting attachment. Put the locking pin (C) in injury or death. WARNING: Always use Husqvarna original batteries with the related hole in serious and/or fatal personal...
Owner Manual
Page 13
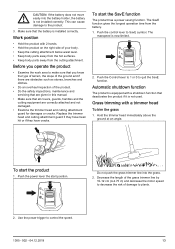
...; Make sure that you know the type of terrain, the slope of the ground and if there are correctly attached and not damaged. • Examine the trimmer head and cutting attachment guard for damages or cracks. Hold the trimmer head immediately above the ground at an angle. Make sure that ...- 002 - 04.12.2019 13 Grass trimming with 2 hands. • Hold the product on the right side of your body. • Keep the cutting attachment below waist level. • Keep body parts away from the hot surfaces. • Keep body parts away from the battery. 1. Push the power lever the...
...; Make sure that you know the type of terrain, the slope of the ground and if there are correctly attached and not damaged. • Examine the trimmer head and cutting attachment guard for damages or cracks. Hold the trimmer head immediately above the ground at an angle. Make sure that ...- 002 - 04.12.2019 13 Grass trimming with 2 hands. • Hold the product on the right side of your body. • Keep the cutting attachment below waist level. • Keep body parts away from the hot surfaces. • Keep body parts away from the battery. 1. Push the power lever the...
Owner Manual
Page 16
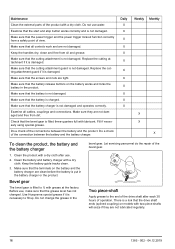
... 1. Clean the battery and battery charger with grease at the factory. Before use, make sure that the cutting attachment guard is not damaged. Do not change the grease in the battery charger or the product. There is not damaged.... 2. Make sure that the battery is put in the bevel gear. Replace the cutting attachment if it is damaged. Replace the cutting attachment guard if it is filled to fill up. Make sure that the terminals on the battery ...clean. 3. Bevel gear The bevel gear is necessary to ¾ with a dry cloth. Use Husqvarna special grease if it is damaged.
... 1. Clean the battery and battery charger with grease at the factory. Before use, make sure that the cutting attachment guard is not damaged. Do not change the grease in the battery charger or the product. There is not damaged.... 2. Make sure that the battery is put in the bevel gear. Replace the cutting attachment if it is damaged. Replace the cutting attachment guard if it is filled to fill up. Make sure that the terminals on the battery ...clean. 3. Bevel gear The bevel gear is necessary to ¾ with a dry cloth. Use Husqvarna special grease if it is damaged.
Owner Manual
Page 17
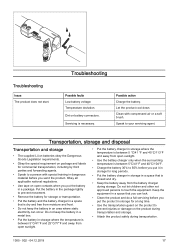
... - 04.12.2019 17 Possible action Charge the battery. Obey all applicable national regulations. • Use tape on the product during transportation and storage. • Attach the product safely during storage. Speak to touch the equipment. Temperature deviation. Do not let children and other not approved persons to your servicing agent...
... - 04.12.2019 17 Possible action Charge the battery. Obey all applicable national regulations. • Use tape on the product during transportation and storage. • Attach the product safely during storage. Speak to touch the equipment. Temperature deviation. Do not let children and other not approved persons to your servicing agent...
Owner Manual
Page 19
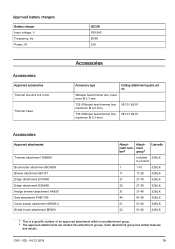
... Approved attachments Trimmer attachment TAB850 Brushcutter attachment BCA850 Blower attachment BA101 Edger attachment ECA850 Edger attachment ESA850 Hedge trimmer attachment HA850 Saw attachment PAB1100 Clean sweep attachment SR600-2 Bristle brush attachment BR600 Attach- ment ber3 group4 Use with Included 325iLK in product 1 1-10 325iLK 11 11-20 325iLK 21 21-30 325iLK 22 21-30 325iLK 31 31-40 325iLK 44 41-50 325iLK 51 51-60 325iLK 52...
... Approved attachments Trimmer attachment TAB850 Brushcutter attachment BCA850 Blower attachment BA101 Edger attachment ECA850 Edger attachment ESA850 Hedge trimmer attachment HA850 Saw attachment PAB1100 Clean sweep attachment SR600-2 Bristle brush attachment BR600 Attach- ment ber3 group4 Use with Included 325iLK in product 1 1-10 325iLK 11 11-20 325iLK 21 21-30 325iLK 22 21-30 325iLK 31 31-40 325iLK 44 41-50 325iLK 51 51-60 325iLK 52...

Owner Manual
Page 20
ment num- ment ber3 group4 53 51-60 54 51-60 Use with 325iLK 325iLK 3 This is a specific number of an approved attachment within in an attachment group. 4 The approved attachments are divided into attachment groups. Each attachment group has similar features and decals. 20 1385 - 002 - 04.12.2019 Approved attachments Dethatcher attachment DT600 Cultivator attachment CA230 Attach- Attach-
ment num- ment ber3 group4 53 51-60 54 51-60 Use with 325iLK 325iLK 3 This is a specific number of an approved attachment within in an attachment group. 4 The approved attachments are divided into attachment groups. Each attachment group has similar features and decals. 20 1385 - 002 - 04.12.2019 Approved attachments Dethatcher attachment DT600 Cultivator attachment CA230 Attach- Attach-


