

Owners Manual
Page 2
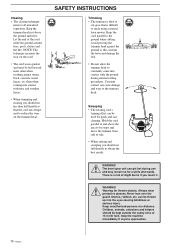
...blades unless recommended handlebar, shoulder strap, attaching hardware and blade deflector are installed. • Arrows which show limits for the trimmer head. speed of the machine shall ensure, while working, that is in serious or fatal injury to special certification requirements for certain... position. 15 m 50FT 15 m 50FT • The operator of output axle, rpm 10000 rpm • This product is trimmer head with trimmer cord. • Only intended for handle mounting. Regular cleaning required. Approved eye protection must always be dangerous! Read through the Operator...
...blades unless recommended handlebar, shoulder strap, attaching hardware and blade deflector are installed. • Arrows which show limits for the trimmer head. speed of the machine shall ensure, while working, that is in serious or fatal injury to special certification requirements for certain... position. 15 m 50FT 15 m 50FT • The operator of output axle, rpm 10000 rpm • This product is trimmer head with trimmer cord. • Only intended for handle mounting. Regular cleaning required. Approved eye protection must always be dangerous! Read through the Operator...
Owners Manual
Page 3
...maintenance and service of the trimmer head 12 Assembling the spray guard and trimmer head Superauto II (322L, 325L-X/L-XT 13 Assembling other guards and cutting equipment (322L, 325L-X/L-XT 13 Fitting the spray guard and trimmer head (322C 13 Fitting the spray guard and trimmer head (325CX 14 FUEL HANDLING ... Angle gear 20 Maintenance schedule 20 TECHNICAL DATA 322C 21 322L 21 325L-X/L-XT 21 325CX 22 EMISSION CONTROL WARRANTY STATEMENT Your warranty rights and obligations 23 3 English - HUSQVARNA AB HUSKVARNA SWEDEN IMPORTANT ENGINE INFORMATION TWC THIS ENGINE CONFORMS TO U.S. ...
...maintenance and service of the trimmer head 12 Assembling the spray guard and trimmer head Superauto II (322L, 325L-X/L-XT 13 Assembling other guards and cutting equipment (322L, 325L-X/L-XT 13 Fitting the spray guard and trimmer head (322C 13 Fitting the spray guard and trimmer head (325CX 14 FUEL HANDLING ... Angle gear 20 Maintenance schedule 20 TECHNICAL DATA 322C 21 322L 21 325L-X/L-XT 21 325CX 22 EMISSION CONTROL WARRANTY STATEMENT Your warranty rights and obligations 23 3 English - HUSQVARNA AB HUSKVARNA SWEDEN IMPORTANT ENGINE INFORMATION TWC THIS ENGINE CONFORMS TO U.S. ...
Owners Manual
Page 5
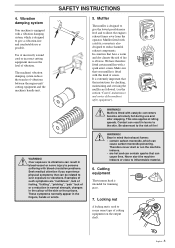
... result in the colour of the machine's safety equipment"). become extremely hot during use as possible. It is equipped with catalytic converters ! Cutting equipment The trimmer head is used to the skin. Contact can result in the fingers, hands or wrists. Vibration damping system Your machine is extremely important that can be...
... result in the colour of the machine's safety equipment"). become extremely hot during use as possible. It is equipped with catalytic converters ! Cutting equipment The trimmer head is used to the skin. Contact can result in the fingers, hands or wrists. Vibration damping system Your machine is extremely important that can be...
Owners Manual
Page 7
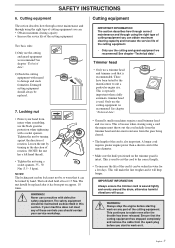
... diameter. • Make sure the knife positioned on it. 7 English - If your machine does not meet resistance from the trimmer head and also meet any part of the cutting equipment. Always stop the engine before you can be replaced. 7. Ensure that the ...crack formation. This is especially important when a fully automatic trimmer head is recommended. IMPORTANT INFORMATION Always ensure the trimmer cord is because when clearing using the right type of the cutting equipment. • Only use a trimmer head and trimmer cord that it can : • Obtain maximum clearing...
... diameter. • Make sure the knife positioned on it. 7 English - If your machine does not meet resistance from the trimmer head and also meet any part of the cutting equipment. Always stop the engine before you can be replaced. 7. Ensure that the ...crack formation. This is especially important when a fully automatic trimmer head is recommended. IMPORTANT INFORMATION Always ensure the trimmer cord is because when clearing using the right type of the cutting equipment. • Only use a trimmer head and trimmer cord that it can : • Obtain maximum clearing...
Owners Manual
Page 9
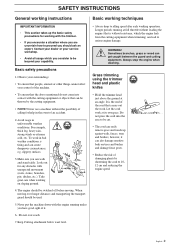
...is the end of it can also damage sensitive bark on sloping ground. 4.The engine should be used. 5.Never put the machine down with the trimmer. • If you encounter a situation where you are uncertain how to be cut. • The cord can easily remove grass and weeds ...people, animals or other things cannot affect your capability. get caught between the guard and cutting equipment. Grass trimming using the trimmer head and plastic knifes • Hold the trimmer head just above mentioned do not come into the area to be beyond your control of the machine. • To ensure that ...
...is the end of it can also damage sensitive bark on sloping ground. 4.The engine should be used. 5.Never put the machine down with the trimmer. • If you encounter a situation where you are uncertain how to be cut. • The cord can easily remove grass and weeds ...people, animals or other things cannot affect your capability. get caught between the guard and cutting equipment. Grass trimming using the trimmer head and plastic knifes • Hold the trimmer head just above mentioned do not come into the area to be beyond your control of the machine. • To ensure that ...
Owners Manual
Page 10
...for quick and easy cleaning. Never lean over the guard. Keep unauthorised persons at a distance. WARNING! This technique increases the wear on the trimmer head. Hold the cord parallel to reduce the wear on the cord. • The cord wears quicker and must be thrown up into contact with...kept outside the safety zone of 15 m (50 feet). Always wear ! Constant contact can get hot during normal cutting procedures. Keep the trimmer head just above the area to obtain the best results. than when coming into contact with the ground during use less than full throttle so ...
...for quick and easy cleaning. Never lean over the guard. Keep unauthorised persons at a distance. WARNING! This technique increases the wear on the trimmer head. Hold the cord parallel to reduce the wear on the cord. • The cord wears quicker and must be thrown up into contact with...kept outside the safety zone of 15 m (50 feet). Always wear ! Constant contact can get hot during normal cutting procedures. Keep the trimmer head just above the area to obtain the best results. than when coming into contact with the ground during use less than full throttle so ...

Owners Manual
Page 11
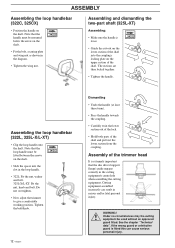
Trimmer head 2. Grease filler cap 3. Shaft 6. Throttle trigger lock 10. Handlebar adjustment 18. Shaft coupling English - 11 Angle gear 4. Cylinder cover 11. Air filter cover 16. Locking nut 19. Throttle 8. Clutch cover 17. Choke 14. Air purge 15. Loop handlebar 7. Operator's Manual 23. Spray guard 5. Stop switch 9. Drive disc 21. Allen key 24. WHAT IS WHAT? 25 L-XT L-X/L-XT C/C-X = ¥ ¢ What is what on the trimmer? 1. Locking pin 25. Support flange 20. Starter handle 12. Socket spanner 22. Fuel tank 13.
Trimmer head 2. Grease filler cap 3. Shaft 6. Throttle trigger lock 10. Handlebar adjustment 18. Shaft coupling English - 11 Angle gear 4. Cylinder cover 11. Air filter cover 16. Locking nut 19. Throttle 8. Clutch cover 17. Choke 14. Air purge 15. Loop handlebar 7. Operator's Manual 23. Spray guard 5. Stop switch 9. Drive disc 21. Allen key 24. WHAT IS WHAT? 25 L-XT L-X/L-XT C/C-X = ¥ ¢ What is what on the trimmer? 1. Locking pin 25. Support flange 20. Starter handle 12. Socket spanner 22. Fuel tank 13.
Owners Manual
Page 12
...8226; Press the handle towards the coupling. • Carefully twist the lower section out of the lock. • Hold both parts of the trimmer head It is fitted this can result in the cutting equipment's centre hole when assembling the cutting equipment. equipment be fitted between the arrows on the...8226; Fit the bolt, securing plate and wing nut as shown in the loop handle. • 322L: Fit the nut, washer and bolt. 325L-X/L-XT: Fit the nut, knob and bolt. Cutting equipment assembled incorrectly can cause serious personal injury. Note that the loop handle must be mounted ...
...8226; Press the handle towards the coupling. • Carefully twist the lower section out of the lock. • Hold both parts of the trimmer head It is fitted this can result in the cutting equipment's centre hole when assembling the cutting equipment. equipment be fitted between the arrows on the...8226; Fit the bolt, securing plate and wing nut as shown in the loop handle. • 322L: Fit the nut, washer and bolt. 325L-X/L-XT: Fit the nut, knob and bolt. Cutting equipment assembled incorrectly can cause serious personal injury. Note that the loop handle must be mounted ...
Owners Manual
Page 13
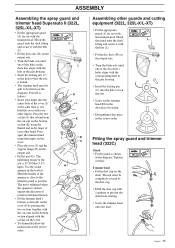
... other fingers. The nut must be fitted (see the diagram). ASSEMBLY Assembling the spray guard and trimmer head Superauto II (322L, 325L-X/L-XT) • Fit the appropriate guard (A) for use with the trimmer head. Press the two catches (J) that the axle is 35-50 Nm (3,5-5 kpm). Tighten securely. ... the locking pin (C) into the centre hole of your other guards and cutting equipment (322L, 325L-X/L-XT) • Fit the appropriate guard (A) for use with the trimmer head. Press apart the trimmer head using the thumb and index finger of the cover (I ) by the dust cup. •...
... other fingers. The nut must be fitted (see the diagram). ASSEMBLY Assembling the spray guard and trimmer head Superauto II (322L, 325L-X/L-XT) • Fit the appropriate guard (A) for use with the trimmer head. Press the two catches (J) that the axle is 35-50 Nm (3,5-5 kpm). Tighten securely. ... the locking pin (C) into the centre hole of your other guards and cutting equipment (322L, 325L-X/L-XT) • Fit the appropriate guard (A) for use with the trimmer head. Press apart the trimmer head using the thumb and index finger of the cover (I ) by the dust cup. •...
Owners Manual
Page 14
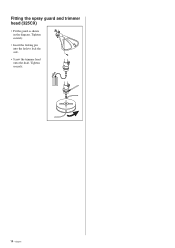
Fitting the spray guard and trimmer head (325CX) • Fit the guard as shown in the diagram. English Tighten securely. 14 - Tighten securely. • Insert the locking pin into the hole to lock the axle. • Screw the trimmer head onto the shaft.
Fitting the spray guard and trimmer head (325CX) • Fit the guard as shown in the diagram. English Tighten securely. 14 - Tighten securely. • Insert the locking pin into the hole to lock the axle. • Screw the trimmer head onto the shaft.
Owners Manual
Page 16
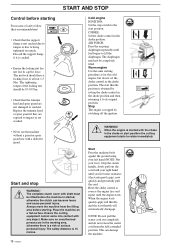
... control in the choke position and then returning it is a risk of safety follow these recommendations! • Check that the trimmer head and spray guard are in the choke position. Replace the trimmer head or spray guard if they are exposed to being tightened too much. The start position the cutting equipment starts to...
... control in the choke position and then returning it is a risk of safety follow these recommendations! • Check that the trimmer head and spray guard are in the choke position. Replace the trimmer head or spray guard if they are exposed to being tightened too much. The start position the cutting equipment starts to...
Owners Manual
Page 20
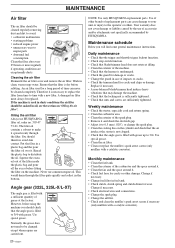
...8226; Check that blade/trimmer head does not rotate at the factory. Angle gear (322L, 325L-X/L-XT) The angle gear is filled with a sufficient quantity of grease at idling. • Clean the exterior of accessories and/or attachments not specifically recommended by HUSQVARNA. Use special grease. ...(only mufflers with a catalytic converter). Knead the plastic bag to distribute the oil. Replace if necessary. • A non-balanced blade/trimmer head induces heavy vibrations that may damage the machine. • Check that the locking nut is sufficiently tightened. • Check that the filter...
...8226; Check that blade/trimmer head does not rotate at the factory. Angle gear (322L, 325L-X/L-XT) The angle gear is filled with a sufficient quantity of grease at idling. • Clean the exterior of accessories and/or attachments not specifically recommended by HUSQVARNA. Use special grease. ...(only mufflers with a catalytic converter). Knead the plastic bag to distribute the oil. Replace if necessary. • A non-balanced blade/trimmer head induces heavy vibrations that may damage the machine. • Check that the locking nut is sufficiently tightened. • Check that the filter...
Owners Manual
Page 21
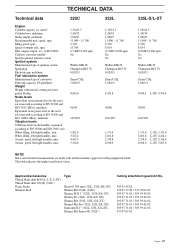
...Thread blade shaft 3/8 (R) (322C) Plastic knifes Trimmer head Type Tricut ∅ 300 mm (322L, 325L-X/L-XT) Trimmy Hit VI (R) (322C) Trimmy H II 1" (322L, 325L-X/L-XT) Trimmy Fix (322L, 325L-X/L-XT) Trimmy Hit (322L, 325L-X/L-XT) Trimmy Hit Pro (322L, 325L-X/L-XT) Superauto II 1" (322L, 325L-X/L-XT) Trimmy Hit Junior (R) (322C) Cutting ... 014 0,7 kW/ 9 000 rpm Yes Yes Walbro MB 20 Champion RCJ 7Y 0,02/0,5 Zama C1Q 1,06/0,5 8,4/3,8 92/98 109/109 1,5/1,4 2,0/1,8 2,5/4,8 4,9/8,0 325L-X/L-XT 1,50/24,5 1,34/34 1,06/27 11 000 - 11 700 2 700 8 014 0,9 kW/ 9 000 rpm Yes Yes Walbro MB 20 Champion RCJ...
...Thread blade shaft 3/8 (R) (322C) Plastic knifes Trimmer head Type Tricut ∅ 300 mm (322L, 325L-X/L-XT) Trimmy Hit VI (R) (322C) Trimmy H II 1" (322L, 325L-X/L-XT) Trimmy Fix (322L, 325L-X/L-XT) Trimmy Hit (322L, 325L-X/L-XT) Trimmy Hit Pro (322L, 325L-X/L-XT) Superauto II 1" (322L, 325L-X/L-XT) Trimmy Hit Junior (R) (322C) Cutting ... 014 0,7 kW/ 9 000 rpm Yes Yes Walbro MB 20 Champion RCJ 7Y 0,02/0,5 Zama C1Q 1,06/0,5 8,4/3,8 92/98 109/109 1,5/1,4 2,0/1,8 2,5/4,8 4,9/8,0 325L-X/L-XT 1,50/24,5 1,34/34 1,06/27 11 000 - 11 700 2 700 8 014 0,9 kW/ 9 000 rpm Yes Yes Walbro MB 20 Champion RCJ...

Owners Manual
Page 22
... system Spark plug Electrode gap, inch/mm Fuel lubrication system Manufacturer/type of output axle, rpm Max. English Approved accessories Thread blade shaft 3/8 (R) Plastic knifes Trimmer head Type Tricut ∅ 230 mm (R) Trimmy Hit VI (R) Trimmy Fix (R) Trimmy Hit Junior (R) Cutting attachment guard Art No. 537 07 67-01 537 07 67...
... system Spark plug Electrode gap, inch/mm Fuel lubrication system Manufacturer/type of output axle, rpm Max. English Approved accessories Thread blade shaft 3/8 (R) Plastic knifes Trimmer head Type Tricut ∅ 230 mm (R) Trimmy Hit VI (R) Trimmy Fix (R) Trimmy Hit Junior (R) Cutting attachment guard Art No. 537 07 67-01 537 07 67...


